
If you have a metal roof around a chimney and you’re seeing stains on the ceiling, damp insulation, or a musty smell, the problem is usually not the metal panels but the chimney flashing system (or its installation).
Chimneys are a “hard stop” through a roof, so water naturally tries to collect there, especially on the uphill side.
Metal roofing expands and contracts with temperature swings, which can loosen sealants and fasteners over time if the details weren’t designed to move.
The good news: most chimney leaks give warning signs before they become major damage, and you can often diagnose what’s wrong in under an hour.
Why chimneys leak on metal roofs (even “new” ones)
A chimney is one of the most leak-prone roof penetrations because it combines three tough conditions:
- A vertical wall meets a sloped roof.
- Water flow concentrates on the uphill side.
- Movement happens constantly (metal expands/contracts; the chimney moves differently).
In my experience as a home improvement professional (12+ years in residential remodeling), most “mystery leaks” around chimneys trace back to one of these:
The 3 Warning Signs Homeowners Miss
| Warning Sign | What It Looks Like | What It Usually Means |
|---|---|---|
| Stains that don’t match rainfall timing | Ceiling or wall stains appearing after wind-driven rain or even days after a storm | Water may be getting behind flashing and traveling along framing before it finally drips inside |
| Rust or white powder near the chimney area | Rust spots on metal components or white, chalky residue on masonry | Rust suggests water is sitting where it shouldn’t; white residue often indicates mineral deposits from repeated wetting and drying cycles |
| Cracked, peeling, or “bubbled” sealant beads | Thick, messy, or deteriorating caulk lines around flashing | Heavy sealant use is often a red flag because sealant should support proper flashing, not replace it |
What’s Actually Around Your Chimney?
Most homeowners are told, “You need new flashing,” but it helps to know what that means because there are different parts doing different jobs.
The chimney waterproofing system has layers
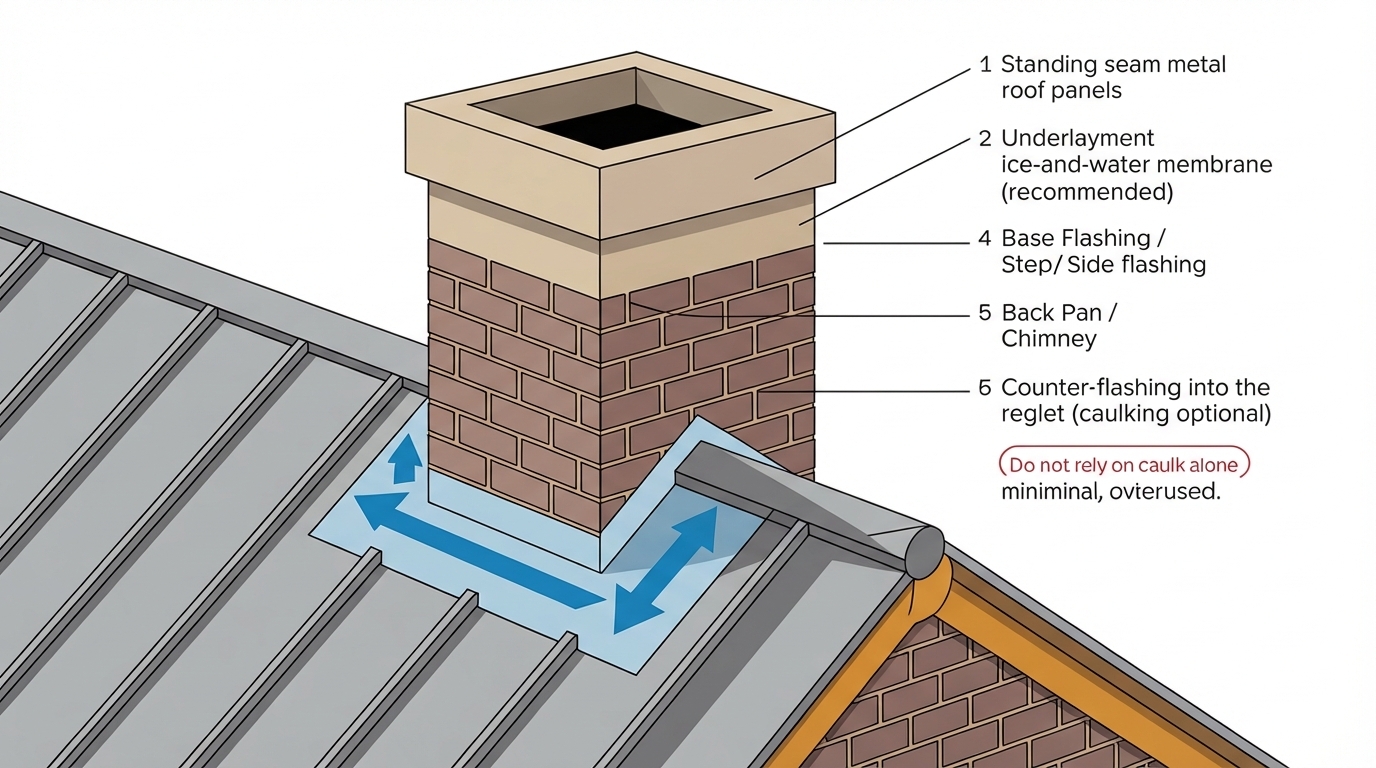
Think of it as a sequence that should shed water like shingles, even on a metal roof:
- Underlayment/ice-and-water membrane: the backup layer under the panels.
- Base flashing (apron + step/side components): directs water away from the chimney.
- Back pan/cricket (uphill side): prevents water from piling up behind the chimney.
- Counter-flashing: covers and protects the top edges of the base flashing.
- Sealant (limited use): seals specific joints where designed not as the main defense.
If any of these are missing or installed in a way that traps water, leaks will definitely follow.
Why do metal roofs make the chimney detail harder?
Metal roofs move. A lot.
On a sunny day, panels heat up and expand. At night, they cool and contract. If the flashing detail is rigid, that movement can:
- pull fasteners loose,
- fatigue sealant joints,
- open tiny gaps that become big leaks during wind-driven rain.
A durable chimney detail on a metal roof usually allows for controlled movement rather than fighting it.
Quick diagnosis: Where is the water likely entering?
Before you buy anything, do a simple inspection (safely, from the ground with binoculars if you can).
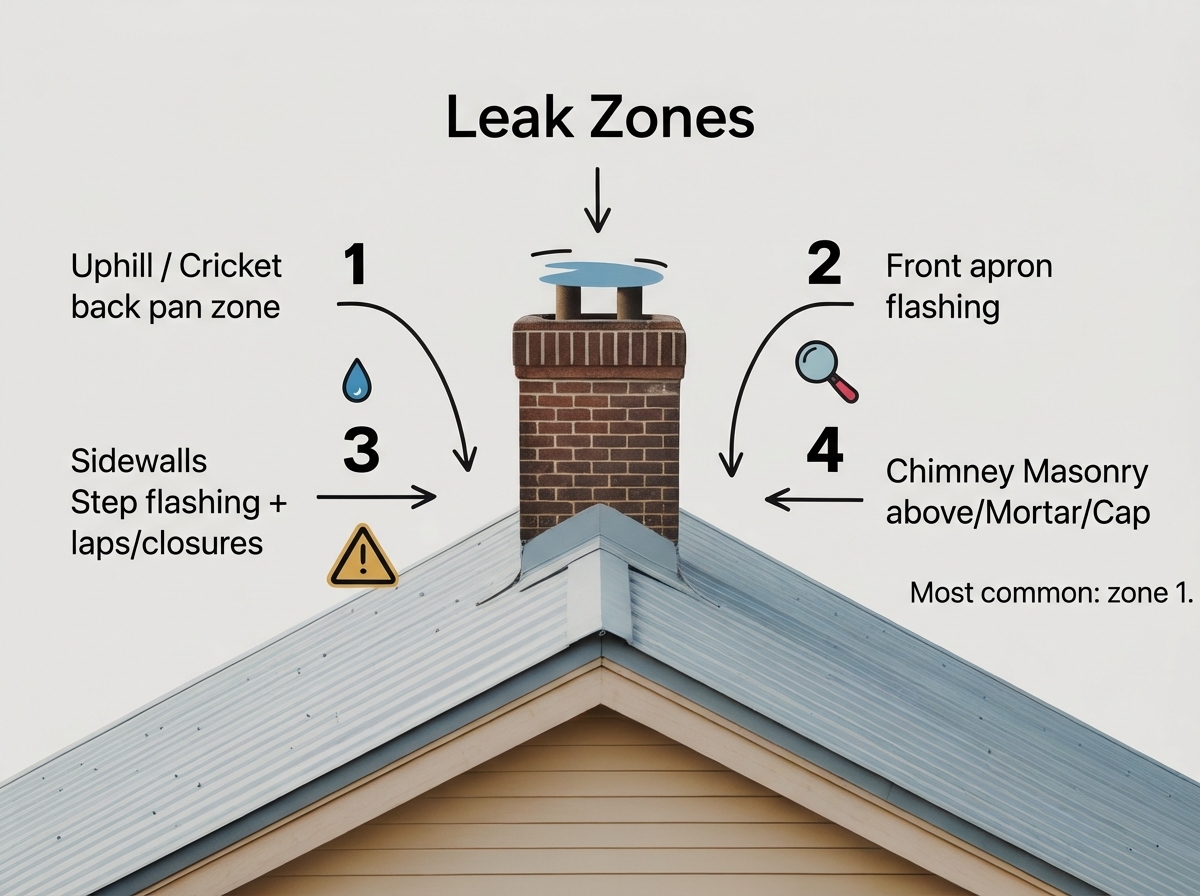
Start with these high-probability leak points
Uphill side of chimney (most common)
- No cricket/back diverter where one is needed
- A “flat” back pan that lets water pool
- Debris buildup (leaves/needles) forming a dam
Sidewalls
- Improper lapping (pieces overlap in a way that funnels water inward)
- Fasteners through critical flashing zones
- Missing closure strips on corrugated panels, creating capillary paths
Front/downhill side
- Apron flashing is too short
- Sealant-only “repair” of the cracked
Chimney masonry itself (sneaky)
- Cracked mortar/crown letting water into the chimney structure, then down into the attic
- Old counter-flashing reglet (groove) that opened up
If you see moisture but flashing looks intact, don’t ignore the chimney crown and mortar joints. Water can enter above the roofline and show up inside like a roof leak.
Can you DIY a fix around a metal roof chimney?
You can do a DIY inspection and minor maintenance safely. You should be cautious about full flashing replacement unless you have the right tools, comfort on roofs, and a clear plan for waterproof layering.
DIY-friendly tasks (often worth doing first)
1. Clear debris and improve drainage
Remove leaves and branches around the uphill side of the chimney (carefully). Debris dams water and accelerates corrosion.
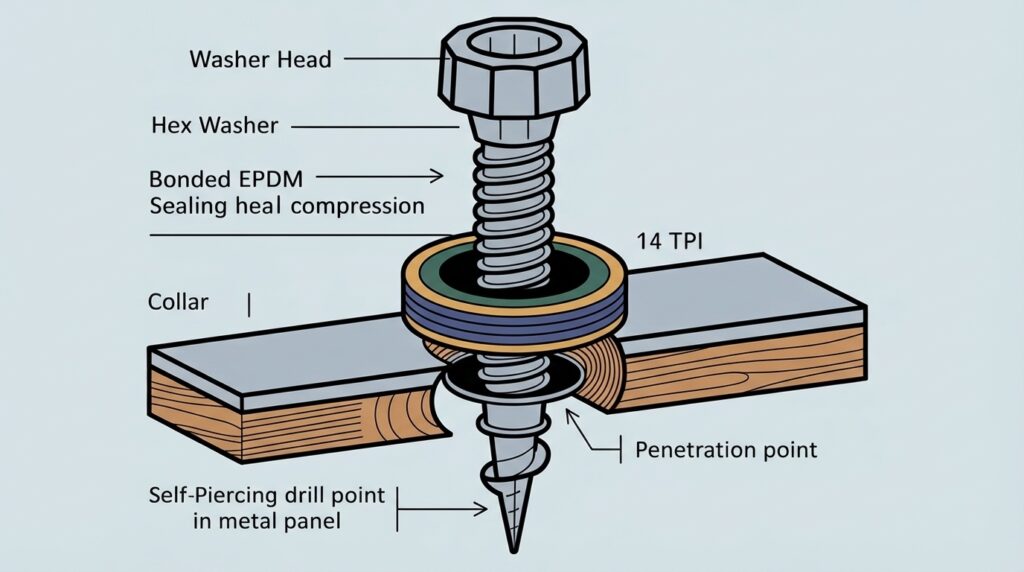
2. Check for obvious fastener back-out
If you can safely access the area, look for lifted screws with damaged washers near (not through) flashing edges. Check whether the correct metal roof screw pattern is right for the type of panel used.
3. Replace failing sealant only where appropriate
If a manufacturer-approved sealant is used at a designed joint (not smeared everywhere), removing and reapplying a small section can help. Use the right sealant type for metal roofing. Generic caulk often fails early.
When DIY Turns Expensive Fast
Call a qualified metal-roof installer or roofer if you suspect:
- missing or incorrect cricket/back pan,
- improper counter-flashing (especially into masonry),
- water intrusion that has reached the sheathing/insulation,
- Repeated leak after “re-caulking.”
A common homeowner trap is chasing a flashing design issue with more sealant. It may look fixed until the next freeze/thaw or hot summer day.
The components that matter most (and what “good” looks like)
Cricket (diverter) vs. no cricket: why it’s a big deal
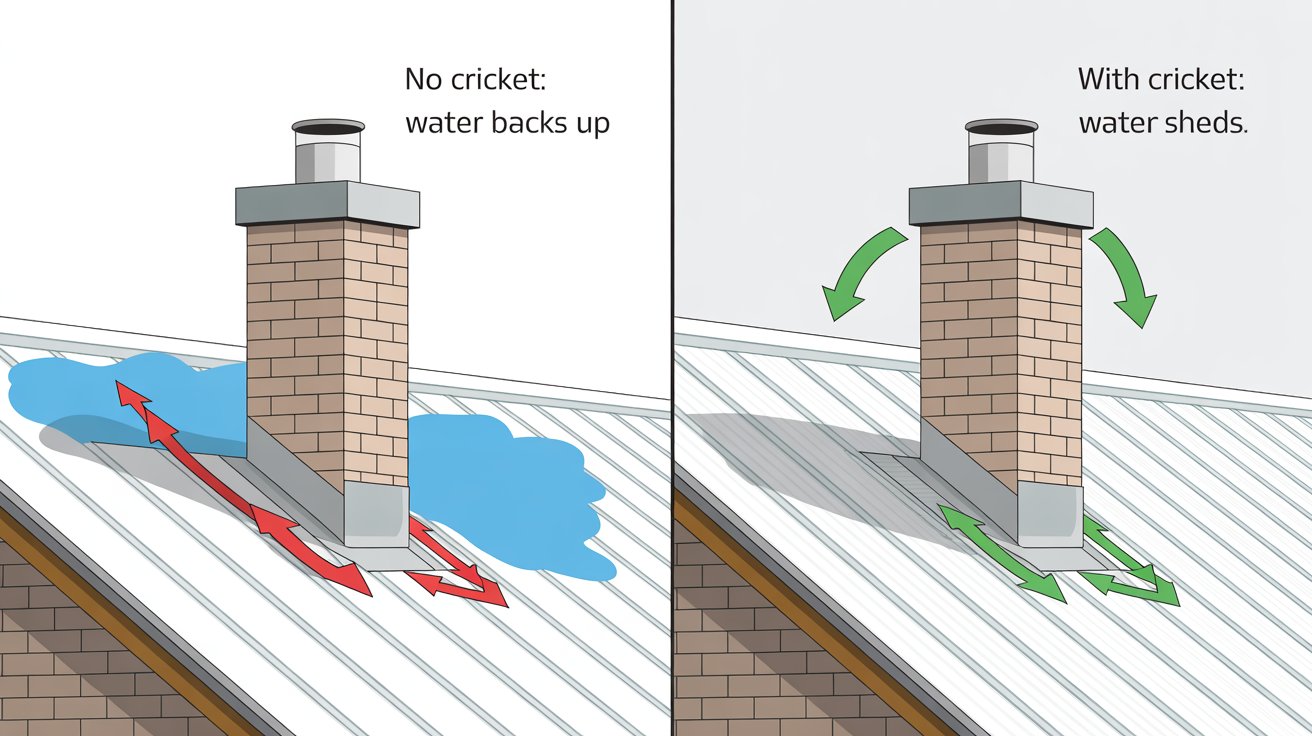
A cricket is a small roof structure on the uphill side of the chimney that splits water around it.
- If your chimney is wide enough, a cricket can be the difference between “dry for decades” and “repeat leaks.”
- Even on smaller chimneys, a properly formed back pan/diverter can prevent ponding.
If you see water lines, debris buildup, or staining on the uphill side, this is a prime suspect.
Counter-flashing: the piece homeowners rarely notice
Counter-flashing protects the top edge of base flashing from water getting behind it.
On masonry chimneys, quality counter-flashing is typically integrated into the masonry (in a groove) or otherwise secured so it can’t peel away. If counter-flashing is just face-sealed with caulk, expect maintenance.
Fasteners and movement: “floating” beats “locked down”
Metal moves. Flashing details that allow movement without opening water paths outperform rigid screws that are installed everywhere.
If you see many fasteners through exposed flashing in water-flow zones, that’s not automatically wrong, but it raises risk.
Each penetration is a long-term maintenance point.
Material choices: what lasts, what matches, what fails early
Not all flashing metals play nicely together. Mixing certain metals can accelerate corrosion, especially with moisture present.
Here’s a practical comparison for homeowners weighing repair vs. replacement.
Flashing material comparison (cost vs. longevity)
| Flashing material | Typical durability | Relative cost | Best use cases | Common pitfalls |
|---|---|---|---|---|
| Galvanized steel | 15–30+ years | Low | Budget-friendly, common residential repairs | Can rust if coatings are scratched; may not match premium systems |
| Aluminum | 20–40+ years | Low–mid | Lightweight, easy to form for some details | Can corrode in certain environments; needs proper separation from incompatible materials |
| Stainless steel | 40–60+ years | Mid–high | Coastal/harsh climates, long-life repairs | Higher material cost; harder to form without proper tools |
| Copper | 50–100 years | High | Premium longevity and classic look | Expensive; must avoid incompatible contact that causes galvanic corrosion |
Compatibility note: Your roof panel material and coating matter. When in doubt, match manufacturer recommendations and avoid direct contact between incompatible metals.
A homeowner-first plan: fix the leak and prevent the next one
Step 1: Confirm the leak path (don’t guess)
Inside the attic (if accessible), use a flashlight and look for:
- darkened wood,
- rusty nails,
- wet insulation,
- a trail leading uphill toward the chimney.
Water often enters higher than where you see the drip.
Step 2: Decide if this is maintenance, repair, or redesign
- Maintenance: clearing debris, renewing limited sealant joints, and tightening/replacing a few fasteners, and ensuring proper spacing in metal roof screws.
- Repair: replacing damaged flashing segments, correcting laps, and adding closures.
- Redesign: adding a cricket/back pan system, redoing counter-flashing, and reworking the chimney transition to handle movement.
If you’ve “fixed” it more than once, you likely need repair or redesign, not more maintenance.
Step 3: Prioritize the uphill side
If you only have a budget for one improvement, focus on water management behind the chimney:
- cricket/diverter/back pan,
- clean water path,
- proper overlap direction,
- robust counter-flashing.
That’s where water pressure and debris load are worst.
Common mistakes (that look fine… until they don’t)
Mistake 1: Relying on caulk as the system
A thick bead can crack, shrink, or separate as metal moves. Sealant is best used sparingly, at planned joints, with the right product.
Mistake 2: Incorrect overlap direction (“reverse lapping”)
Flashing should be layered so water flows over seams, not into them. One reversed piece can channel water behind everything.
Mistake 3: Skipping closures on corrugated metal
Corrugated profiles can leave small openings where wind-driven rain can push under panels near the chimney. Proper closures (matched to the panel profile) help block those paths without trapping moisture.
Mistake 4: Treating chimney masonry as “not the issue”
Cracked mortar joints, a failing crown, or a missing cap can saturate the chimney structure. That moisture can show up inside and mimic a roof leak.
Maintenance that actually works (short, realistic checklist)
You don’t need to babysit your roof monthly. You do need a routine that catches problems early.
Twice per year (spring and fall)
- Clear debris uphill of the chimney.
- Check for lifted screws or deteriorated washers near the chimney area.
- Look for sealant cracking at designed joints.
- Inspect counter-flashing edges for gaps or separation.
After major wind-driven rain or snow/ice events
- Look for new ceiling stains or damp smells.
- If safe, visually check the uphill side for debris dams and ice buildup patterns.
Every few years (or at the first sign of repeat issues)
- Have a pro evaluate the chimney transition detail, especially the uphill side design (cricket/back pan) and counter-flashing integrity.
When to hire a pro (and what to ask so you get the right fix)
If you’re hiring this out, your goal is to avoid “patch culture” and pay for a solution that respects metal movement.
Ask:
- “How will the flashing detail allow for expansion and contraction?”
- “Are you adding or rebuilding a cricket/back pan where needed?”
- “How is the counter-flashing integrated into the chimney?”
- “What materials are you using, and are they compatible with my roof system?”
- “What’s the expected maintenance schedule after the repair?”
- “What size metal roof screw will they use?”
A solid pro will answer clearly without defaulting to “we’ll just seal it up.”
FAQ: Metal roof around chimney
1. Why does my metal roof leak around the chimney only during heavy rain?
Heavy rain plus wind increases water pressure and can push water into small gaps at laps, closures, or counter-flashing edges. It’s also when water backs up behind the chimney if drainage is restricted.
2. Should there be a cricket behind every chimney on a metal roof?
Not always, but many chimneys benefit from one—especially wider chimneys or areas with heavy rain/snow. Even when a framed cricket isn’t used, a properly formed back pan/diverter is often essential.
3. Can I just re-caulk around the chimney flashing?
Sometimes re-sealing a designed sealant joint buys time. But if the flashing is incorrectly layered, missing a cricket/back pan, or the counter-flashing isn’t secure, caulk usually becomes a short-lived bandage.
4. How long should chimney flashing last on a metal roof?
With correct design, compatible materials, and occasional maintenance, flashing can last decades. Premature failures usually come from movement not being accommodated, poor lapping, incompatible metals, or reliance on sealant as the primary waterproofing.
Closing perspective (so you don’t get stuck in repeat repairs)
Chimney leaks on metal roofs are rarely about the metal roof “being bad.” They’re about details like layering, movement, and water routing at the most complex spot on the roof.
If you take only one action today, inspect the uphill side of the chimney for debris buildup, missing/weak diverter design, and counter-flashing integrity. Fixing water management there solves the majority of recurring problems and protects your insulation, framing, and interior finishes for the long haul.