
Most metal roof leaks don’t start at the ridge, the flashing, or the panels; they start at the screws.
The wrong fastener (or the right fastener installed incorrectly) can crack washers, invite corrosion, and slowly turn “a few drips” into rotten decking and interior damage.
This guide gives you a simple 3-step way to choose the right metal roofing screw for both exposed-fastener panels (corrugated/R-panel) and standing seam, plus the three installation mistakes that cause most DIY failures.
I’m Jordan Blake, a certified home improvement professional with 12+ years in residential remodeling and a Construction Management diploma, and I’ll keep this plain-English and practical so you can buy the right box once and install it with confidence.
The Real Cost of Getting Screws Wrong (Why This Matters NOW)
- Leaks at penetrations. Every exposed screw is a hole in your roof system. If the washer doesn’t seal or the screw backs out, water follows the threads into the deck.
- Panel movement turns into fastener failure. Metal expands and contracts. If the screw choice or spacing is wrong, panels “work” and screws loosen over time.
- Washer damage becomes a delayed leak. Over-tightening can crush or split the washer. It may look fine today and leak later.
- Corrosion can spread. Using a fastener that’s incompatible with the panel metal or using the wrong coating can accelerate corrosion around the fastener site (where you least want it).
- Warranty and spec issues. Manufacturers often require specific fastener types and patterns. Deviating can complicate warranty claims if a leak or blow-off occurs.
If you only remember one idea: the panel sheds water; the fastener is what keeps water out of the holes.
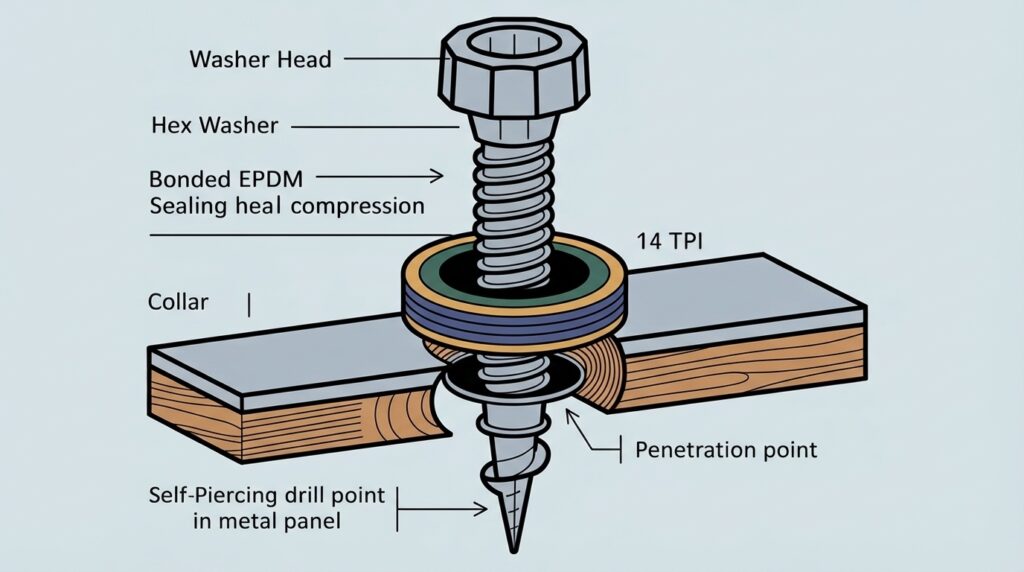
Screw Anatomy 101: Components That Matter
1) Head (what you drive). Most exposed-fastener roofing uses a hex washer head because it drives quickly and clamps a sealing washer. Many standing seam clip systems use a pancake head (low-profile) so the head fits correctly in clips or tight spaces.
2) Shank/diameter (the screw’s “thickness”). The diameter affects strength and how large a hole you’re making. Too small can strip or loosen; too large can create unnecessary panel deformation.
3) Threads (how it grips). Threads are designed for what you’re fastening into:
- Metal-to-wood screws bite aggressively into wood.
- Metal-to-metal screws are meant to tap into steel after drilling.
4) Point/drill tip (how it starts)
- Self-piercing points are common when fastening thin metal panels into wood.
- Self-drilling points (often called Tek-style) are common for fastening into metal framing/purlins.
Reading a Screw Label (#12-14 Explained)
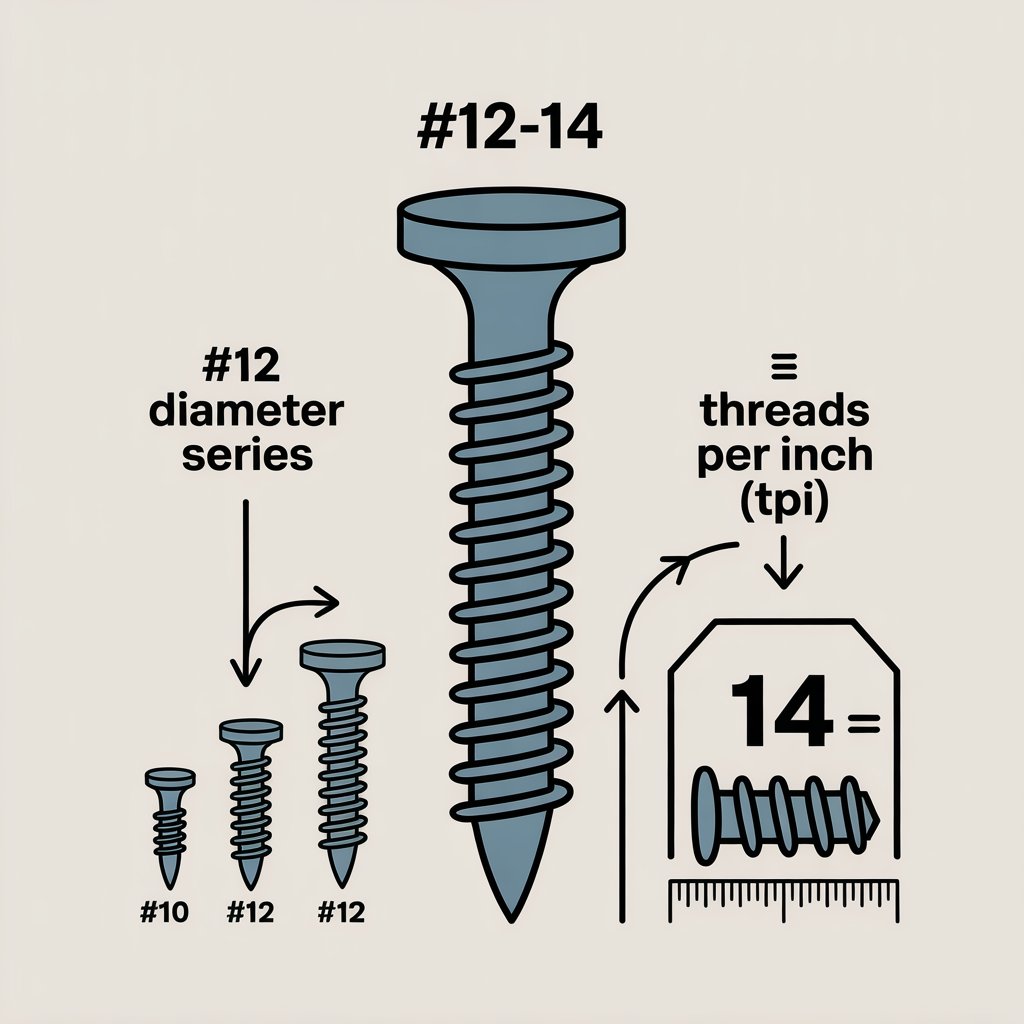
You’ll see markings like #10, #12, and sometimes combinations like #12-14.
- #12 typically refers to the diameter series (a thicker screw than #10, generally).
- The second number (like 14) commonly refers to threads per inch (thread pitch), which matters most for metal-to-metal grip and performance.
Practical takeaway: don’t get stuck on memorizing the label. Use the 3-step framework below and then match it to the manufacturer’s fastener schedule for your panel system.
The Decision Framework: Pick YOUR Screw in 3 Steps
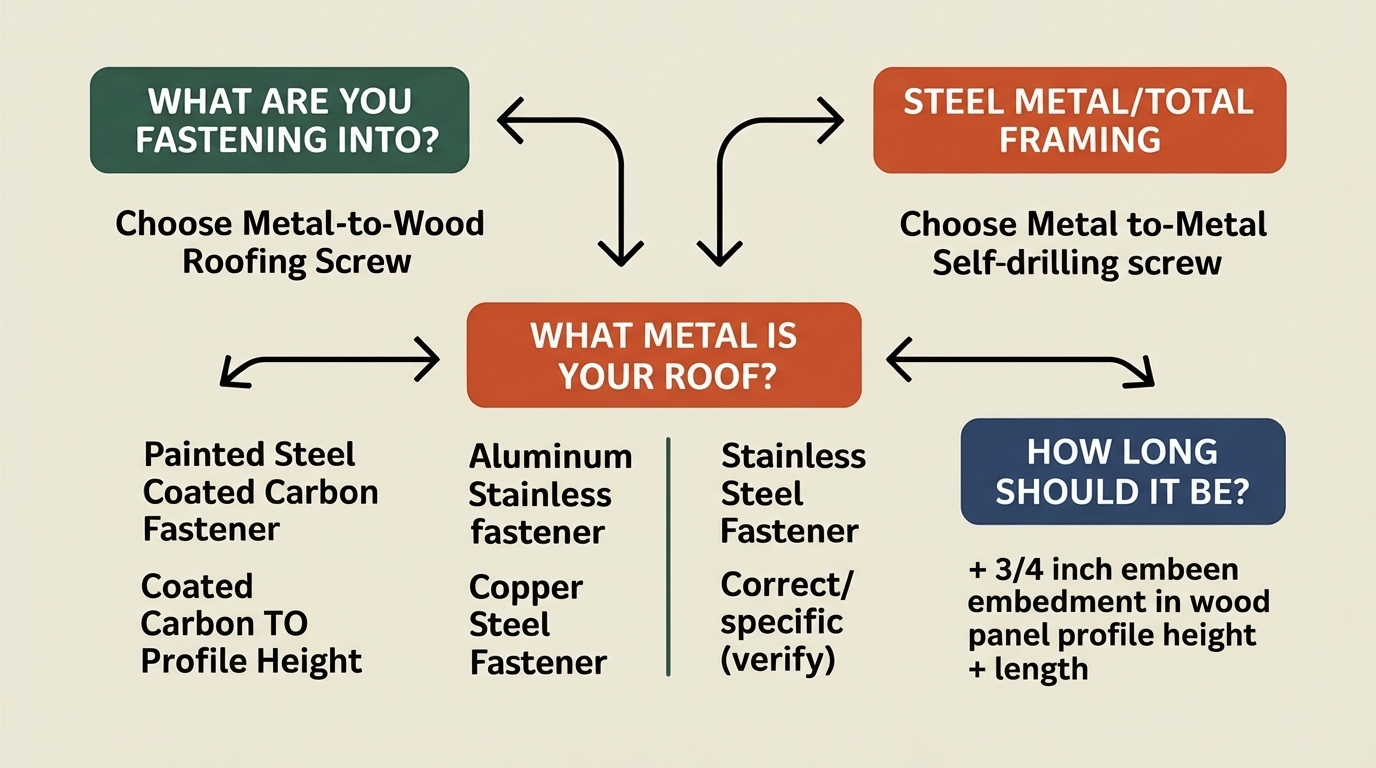
Step 1: What Are You Fastening INTO? (The Foundation)
This is the biggest fork in the road.
1. Wood deck (plywood/OSB) or wood purlins
Choose: metal-to-wood roofing screws (typically hex head + bonded sealing washer for exposed-fastener panels).
Why: wood needs a thread that bites and holds without stripping.
2. Metal purlins or steel framing
Choose: metal-to-metal self-drilling screws (Tek/self-drilling type, typically hex head + washer for exposed-fastener panels).
Why: you need a drill tip designed to penetrate steel and then thread correctly.
3. Standing seam clip attachment (usually into wood deck, sometimes into metal)
Choose: the clip manufacturer’s specified screw, often a pancake head fastener (frequently no exposed washer because it’s not a weather-exposed penetration like face-fastened panels). Why: clip systems are engineered; the fastener head shape and pull-out rating matter.
If you’re unsure, look underneath: if you see decking (plywood/OSB), you’re in the wood category. If you see steel purlins, you’re in metal-to-metal territory.
Step 2: What Metal Is Your Roof? (Compatibility + Corrosion)
Match the fastener material/coating to your panel material and environment.
- Painted steel / Galvalume-type steel (very common): quality coated carbon steel roofing screws are typical.
- Aluminum: stainless fasteners are often preferred to reduce corrosion risk.
- Copper or specialty metals: require specialty fasteners chosen specifically for compatibility (don’t guess here).
Two rules that prevent most corrosion mistakes:
- Use fasteners recommended by the panel manufacturer whenever available.
- If you’re mixing metals (panels, trim, fasteners), assume compatibility matters and verify before buying.
Step 3: How Long Should It Be? (Penetration Rule)
Length selection is where homeowners most often “almost” get it right.
- For wood substrates (common residential): Aim for about 3/4 inch of solid embedment into wood after passing through the metal panel and any underlayment layers.
- For metal framing: Length depends on the thickness of the steel you’re drilling into and the screw’s drilling capacity—follow the fastener spec and framing thickness requirements.
Now, apply that logic by panel type:
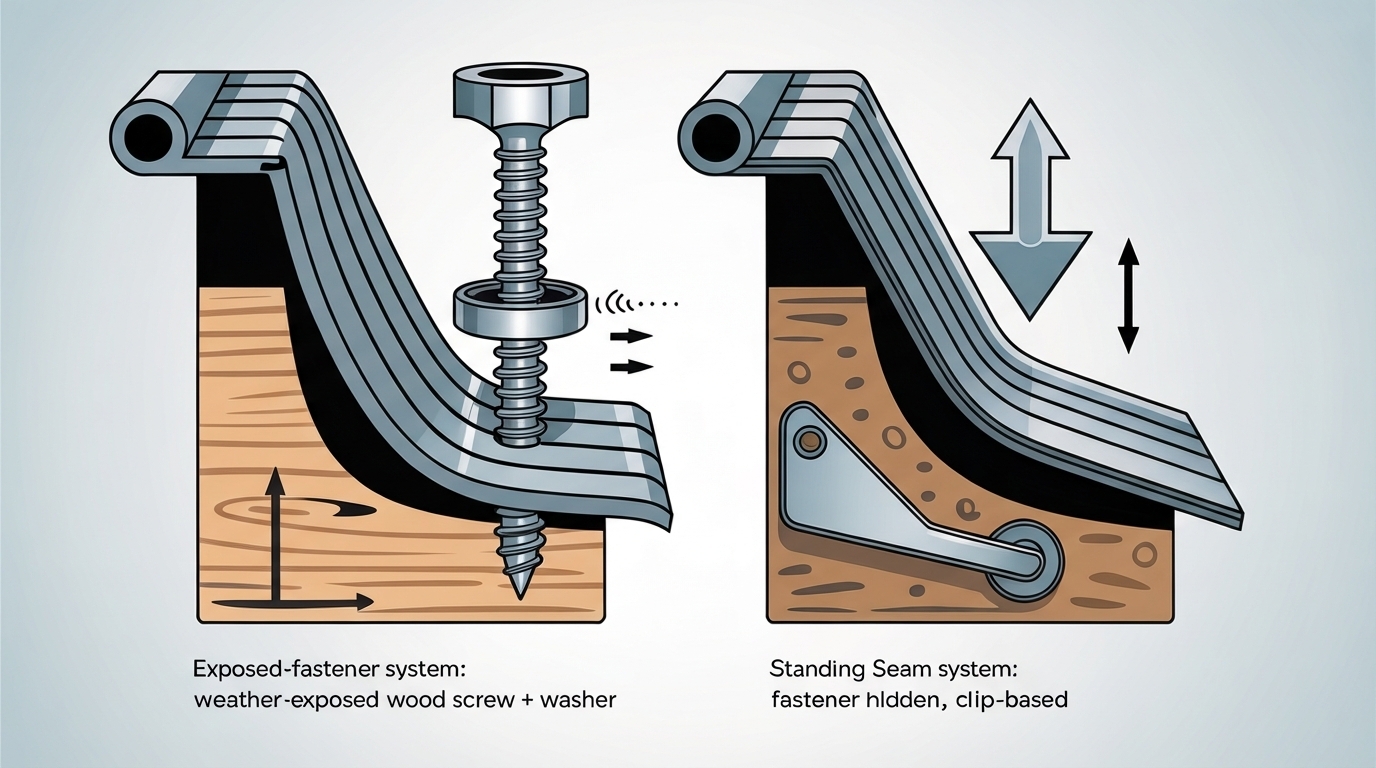
Exposed-fastener panels (corrugated/R-panel)
- Your screw must account for panel profile height, depending on whether fasteners are placed on flats/valleys or high ribs (varies by profile and manufacturer instructions).
- If you fasten on a high rib, you’ll typically need a longer screw than when fastening on a flat.
Standing seam
- You generally do not screw through the panel face.
- You fasten clips to the substrate, and the panel locks onto the clips. Length is chosen to meet clip specs and substrate embedment—again, follow the system instructions.
Common Screw Types Explained (What You’ll Actually Buy)
Metal-to-Wood Roofing Screws (Exposed Fastener)
Best for: corrugated/R-panel fastened into plywood/OSB or wood purlins.
Typical features: hex washer head + bonded sealing washer, sharp point designed for piercing thin sheet metal and biting into wood.
Why they work: strong pull-out resistance in wood and a washer that seals the penetration.
Common mistake: using a metal-to-wood screw in steel purlins. It may start, but it won’t properly drill and thread into steel.
Metal-to-Metal Self-Drilling Screws (Exposed Fastener)
Best for: corrugated/R-panel installed over steel purlins or metal framing.
Typical features: drill-bit-like tip + hex washer head + sealing washer.
Why they work: they drill and thread into metal without pre-drilling (within their rated capacity).
Common mistake: choosing a self-driller that’s not rated for the thickness of your framing. If it can’t drill cleanly, installers push harder, wobble, and end up with oversized holes and poor sealing.
Self-Drilling / Tek Ratings (Matching to Thickness)
“Tek” is often used to indicate the drill-point capability (how thick of metal it can drill). The exact rating system and recommended thickness vary by manufacturer.
Practical rule: if you’re fastening into metal purlins, don’t rely on guesswork; rather, match the screw’s drill capacity to the purlin thickness and your panel manufacturer’s recommendation.
Trim & Lap (Stitch) Screws
Best for: fastening trim to panels and panel sidelaps (panel-to-panel).
Typical features: smaller diameter than field fasteners; sometimes shorter; may still use a sealing washer depending on exposure and application.
Why they exist: they secure overlaps without over-fastening or deforming panels.
Common mistake: using stitch screws as the primary roof-to-deck fastener. They’re not designed for that job.
Comparison Table: Which Screw Should You Use?
| Application | Panel type | Substrate | Best screw category | Typical head | Washer? | Avoid this common error |
|---|---|---|---|---|---|---|
| Main field fastening (roof panels to deck) | Corrugated / R-panel (exposed fastener) | Wood (plywood/OSB) | Metal-to-wood roofing screw | Hex washer head | Yes (bonded sealing washer) | Over-tightening until the washer bulges/splits |
| Main field fastening (roof panels to framing) | Corrugated / R-panel (exposed fastener) | Steel purlins/metal framing | Metal-to-metal self-drilling screw | Hex washer head | Yes | Using wood screws in steel (poor thread engagement) |
| Panel sidelaps (panel-to-panel) | Corrugated / R-panel | Panel-to-panel connection | Stitch/lap screw | Small hex or specialty | Sometimes (depends on exposure) | Using lap screws as deck fasteners |
| Trim/flashings to panels | Both (trim varies) | Usually into the panel edge or framing | Trim screw/stitch screw (per trim detail) | Hex or pancake (detail-specific) | Often (exposed) | Reusing field screws everywhere and deforming trim |
| Clip fastening | Standing seam | Wood deck or metal (system-dependent) | Clip-specified fastener | Pancake head (common) | Usually not exposed | Screwing through the panel face instead of using clips |
Installation: The 3 Mistakes That Cause Leaks
Mistake 1: Over-Tightening (What “Right Tight” Looks Like)
What goes wrong: the sealing washer gets crushed, extrudes out, or splits. Sometimes the metal panel dimples, which can trap water around the fastener.
What “right tight” looks like: the washer is evenly compressed and seated flat. It should look snug—not squeezed out.
What it feels like: drive until the screw stops firmly and the washer seats, then stop. If you’re continuing to force the driver after it’s seated, you’re likely overdoing it.
Practical tip: Use a driver with an adjustable clutch or torque control and test on a scrap piece first.
Mistake 2: Driving at an Angle
What goes wrong: the washer seals on one side and gaps on the other. Water will find the gap.
How to prevent it: start slow, keep the driver perpendicular, and let the screw do the work. If it starts crooked, back it out immediately and restart.
If you’ve already angled a screw and the hole is now wallowed out, don’t “just tighten more.” Replace the fastener appropriately and ensure the sealing surface is correct.
Mistake 3: Wrong Spacing/Wrong Location (Rib vs Valley, Per System)
Exposed-fastener panels require fasteners placed exactly where the manufacturer specifies—both for holding power and for proper sealing behavior.
- Some profiles fasten on flats/valleys to reduce deformation.
- Others may specify fasteners on high ribs in certain details.
Spacing matters especially at edges and corners where wind uplift is higher. Following the fastening schedule is not optional if you want predictable performance.
Standing seam is different: you’re usually fastening clips, not the panel face. Clip spacing and fastener type are part of the engineered system.
Quick Reference Cheat Sheet for Metal Roof Screw Size Guide
Use this before you buy anything:
- Panel type: Exposed-fastener (corrugated/R-panel) or standing seam (clips).
- Substrate: wood deck vs steel purlins (this decides wood-screw vs self-driller).
- Compatibility: match fastener material/coating to panel metal and manufacturer guidance.
- Length: ensure strong bite—about 3/4 inch embedment into wood after layers for wood decks; match drill capacity for metal framing.
- Install “snug, not crushed”: washer evenly compressed, screw driven straight, correct spacing/location per system.
Frequently Asked Questions
Can I reuse old metal roof screws?
Usually, no. Even if the screw looks fine, the washer may be UV-damaged, hardened, or micro-cracked. Reusing fasteners is a common way to create a slow leak that shows up later. New screws are inexpensive compared to interior repairs.
Do I need sealing washers on every screw?
For exposed-fastener panels, yes—washers are what seal the penetration. For a standing seam, many fasteners are not directly exposed to weather (clip screws under the panel), and the system may not use sealing washers in the same way. Follow the standing seam system requirements.
How many screws do I need?
It depends on panel profile, roof geometry, and wind zone requirements. Exposed-fastener panels often use a consistent fastening screw pattern across the field with increased fastening at edges/corners. Standing seam uses clip spacing and clip fastener counts. The most accurate answer is always: follow your manufacturer’s installation guide.
What if I already installed the wrong screws?
Stop and evaluate before continuing. If the screws are wrong for the substrate (wood vs metal), you may not have adequate holding power. If washers are crushed or screws are angled, you’ve likely created future leak points.
In many cases, the fix is removing and replacing with the correct fastener and correcting technique rather than trying to “seal your way out” of a fastener problem.
Final Thought
In 12+ years of residential remodeling, I’ve seen metal roofs that looked perfect fail early because the fasteners were wrong, rushed, or over-driven. Panels are engineered to shed water, so your job is to make every penetration watertight and mechanically secure.
If you choose the right screw for your substrate and panel system, then drive it straight with the washer snug (not crushed), you eliminate the most common causes of metal roof leaks before they ever start.
If you tell me –
(1) your substrate (wood deck or metal purlins),
(2) your panel profile (corrugated vs R-panel), and
(3) whether you’re also doing a standing seam on another section
I can add a project-specific mini fastener list (exact categories + what to buy for field, laps, and trim) that fits cleanly into this article. Let me know!