Many clients initially tell me they simply lack enough space for a proper gaming setup.
I often hear about cramped bedroom corners, converted closets, or narrow studies.
Yet, every single time, we transform these small areas into incredible gaming havens. The truth I want you to understand immediately is this: a small gaming room does not limit your experience; it simply refines your approach.
My personal design projects, even in spaces under 100 square feet, consistently result in setups that feel more intentional, immersive, and uniquely yours than larger, less focused rooms.
Constraint, when embraced, becomes a powerful design tool.
If your space feels tight, wires are unmanageable, or you struggle with layout, I will guide you through my exact process for designing small gaming rooms, just as I would in a one-on-one consultation.
The Frustration of a Small Gaming Room is Real
Before diving into practical steps, I want to acknowledge the genuine stress a small gaming room can create.
Most guides gloss over this, offering only cheerful “just declutter!” advice.
However, a chaotic, cramped, or visually noisy environment significantly impacts your mood. Environmental psychology research shows cluttered spaces elevate stress and reduce focus.
For gamers, concentration and comfort are directly linked to performance and enjoyment, making room design a functional necessity, not just an aesthetic one.
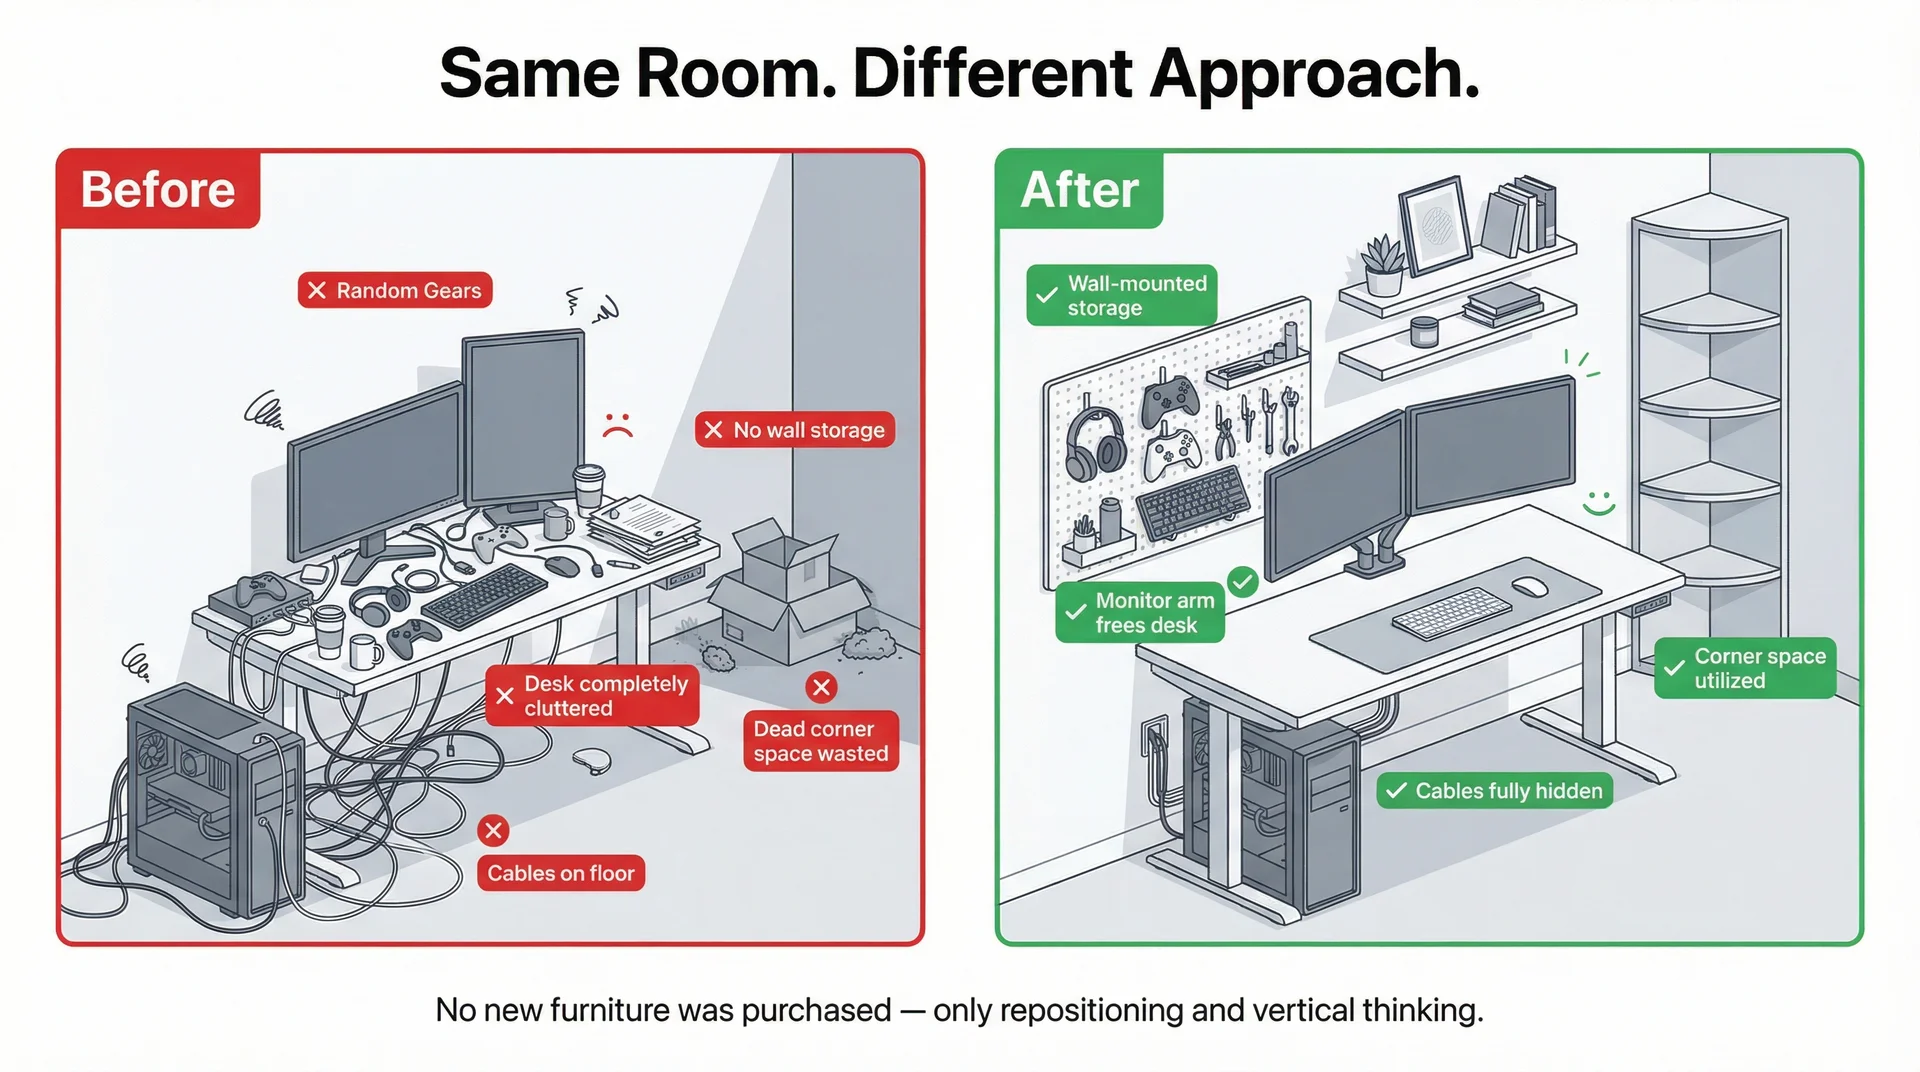
I once helped a college client, Marcus, whose 9×10-foot room overflowed with a PC, monitors, and gear.
He felt anxious every time he played. We reorganised and repositioned everything without buying new furniture.
His room felt completely different within a weekend. This experience taught me that solutions often exist within the room itself; you just need the right framework to uncover them.
Before Moving Anything in Your Gaming Room
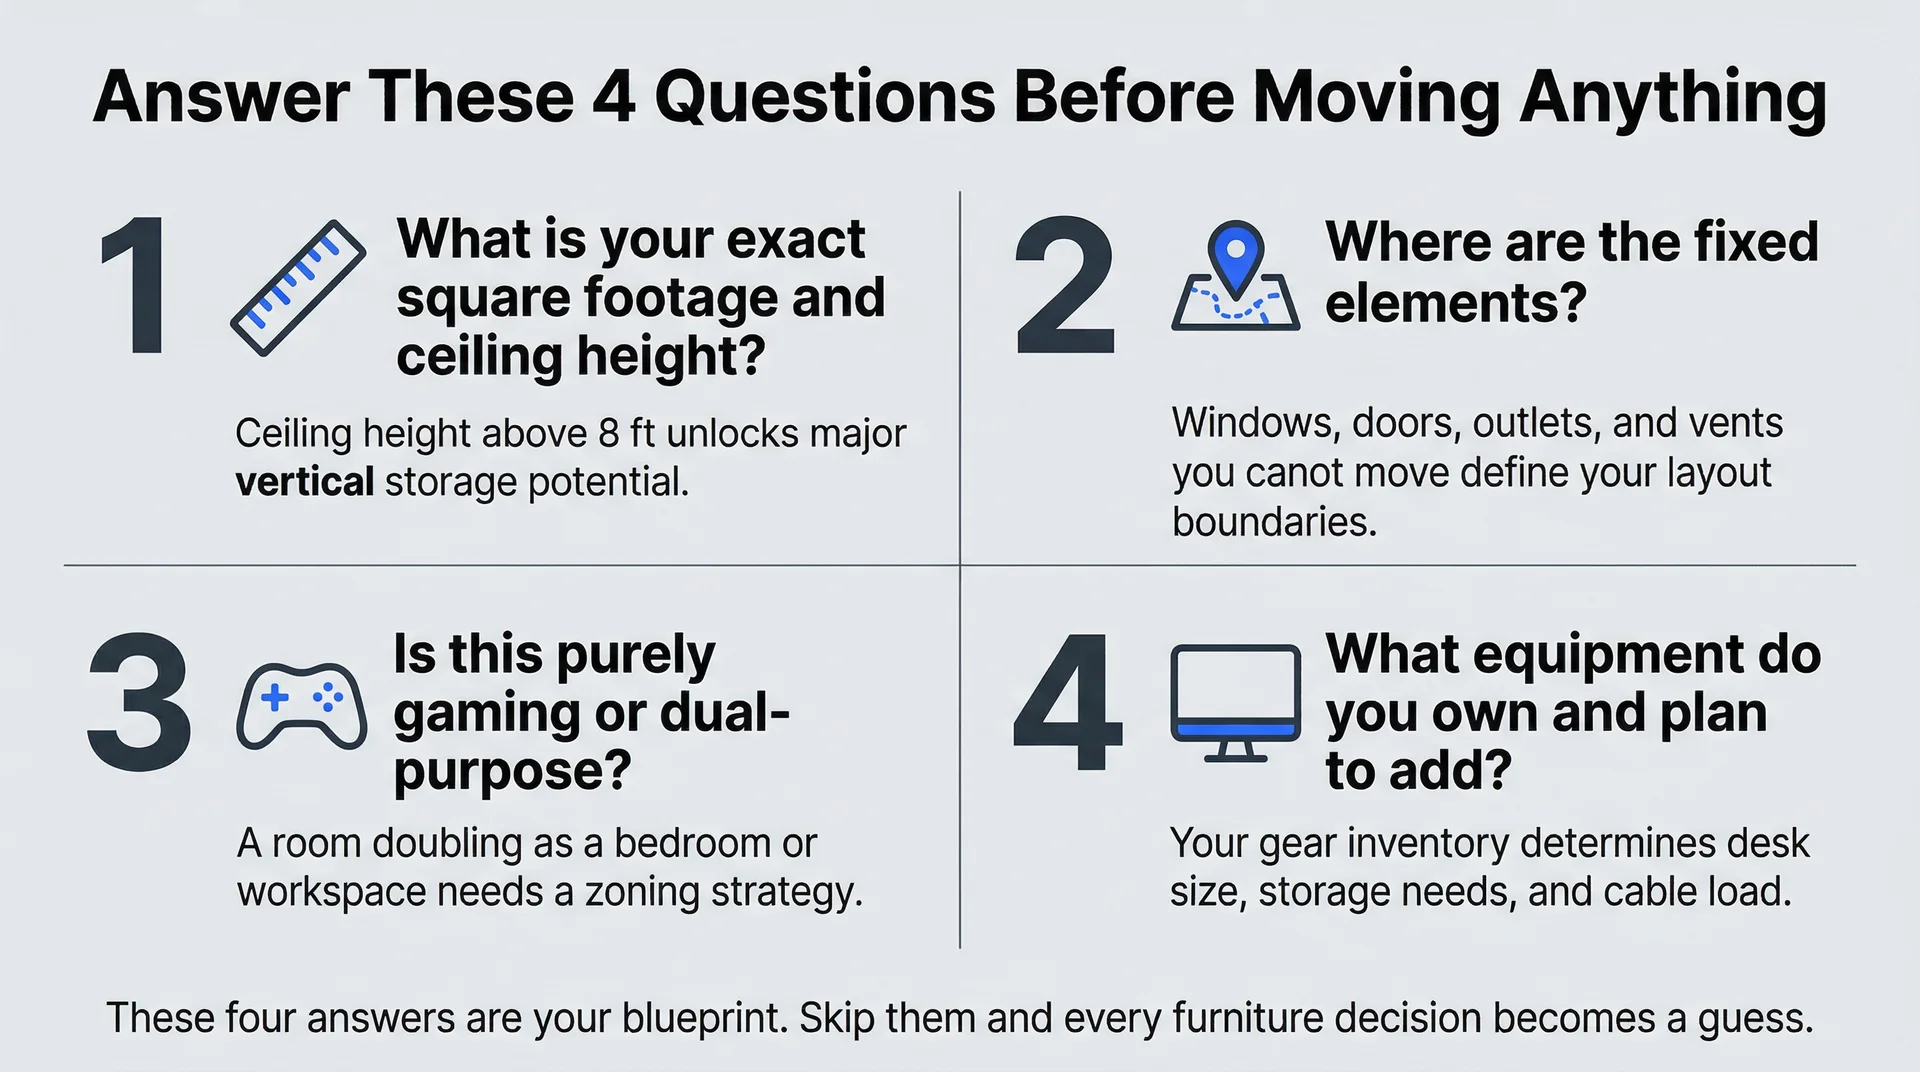
Jumping into furniture shopping without a clear spatial map is a common mistake. I always begin with precise measurements and zone planning. I recommend you do the same.
Answer these four key questions:
- What is the exact square footage, including ceiling height?
- Where are the fixed elements (windows, doors, outlets, vents) you cannot move?
- What is the primary use: purely gaming, or does it double as a bedroom or workspace?
- What equipment do you own, and what do you realistically plan to add?
These answers create your working blueprint. Ceiling height, often overlooked, offers enormous vertical potential in rooms above 8 feet, which we will explore further.
As I always say, “Space planning is the foundation of everything. Even with beautiful furniture and inspired lighting, if the layout does not support how you live and play, it will not feel right.”
Mastering Your Micro-Gaming Zone: Smart Space-Saving Strategies
The Art of Vertical Living
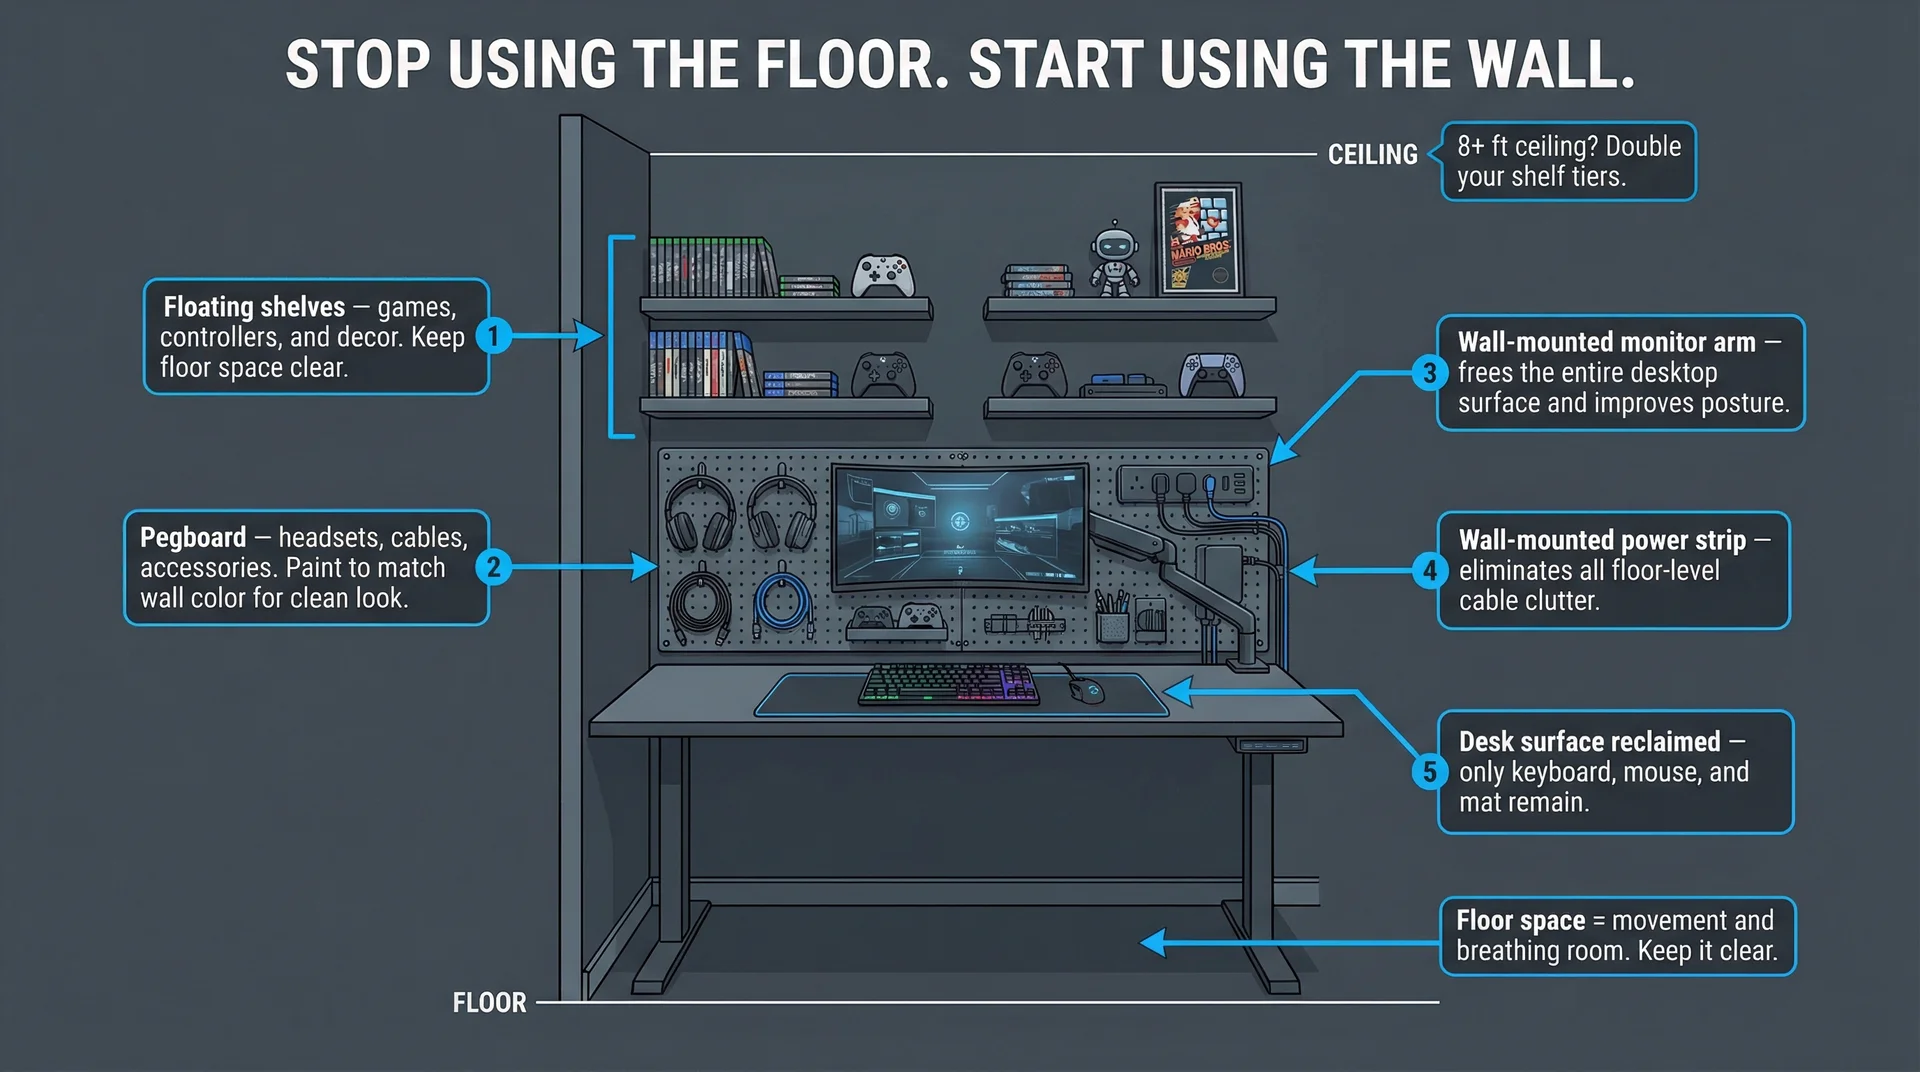
Your floor is prime real estate in a small room. Every inch used at floor level reduces movement and visual openness.
My first instinct, and what I teach clients, is to look up. Walls are your greatest asset.
Wall-mounted monitors offer the most impactful change, freeing your desktop and improving posture.
I recommend mounting the top third of the screen at eye level for comfortable, long sessions. Beyond monitors, consider these vertical solutions:
- Floating shelves above the desk for games, controllers, and decor.
- Pegboards at desk height or above for headsets, cables, and accessories. IKEA’s SKÅDIS system, for example, is a popular, customizable, and inexpensive choice.
- Wall-mounted power strips to eliminate floor-level cable clutter.
- Vertical media towers for game collections.
I once transformed a 10×10 bedroom setup by adding two shelves, a pegboard, and an adjustable monitor arm.
The desk became a clean workspace, and the floor opened up.
My client said, “It feels like a completely different room.”
Tip for pegboards: Paint them to match your wall color. A blending pegboard provides intentional organization without visual fragmentation.
Multi-Functional Marvels
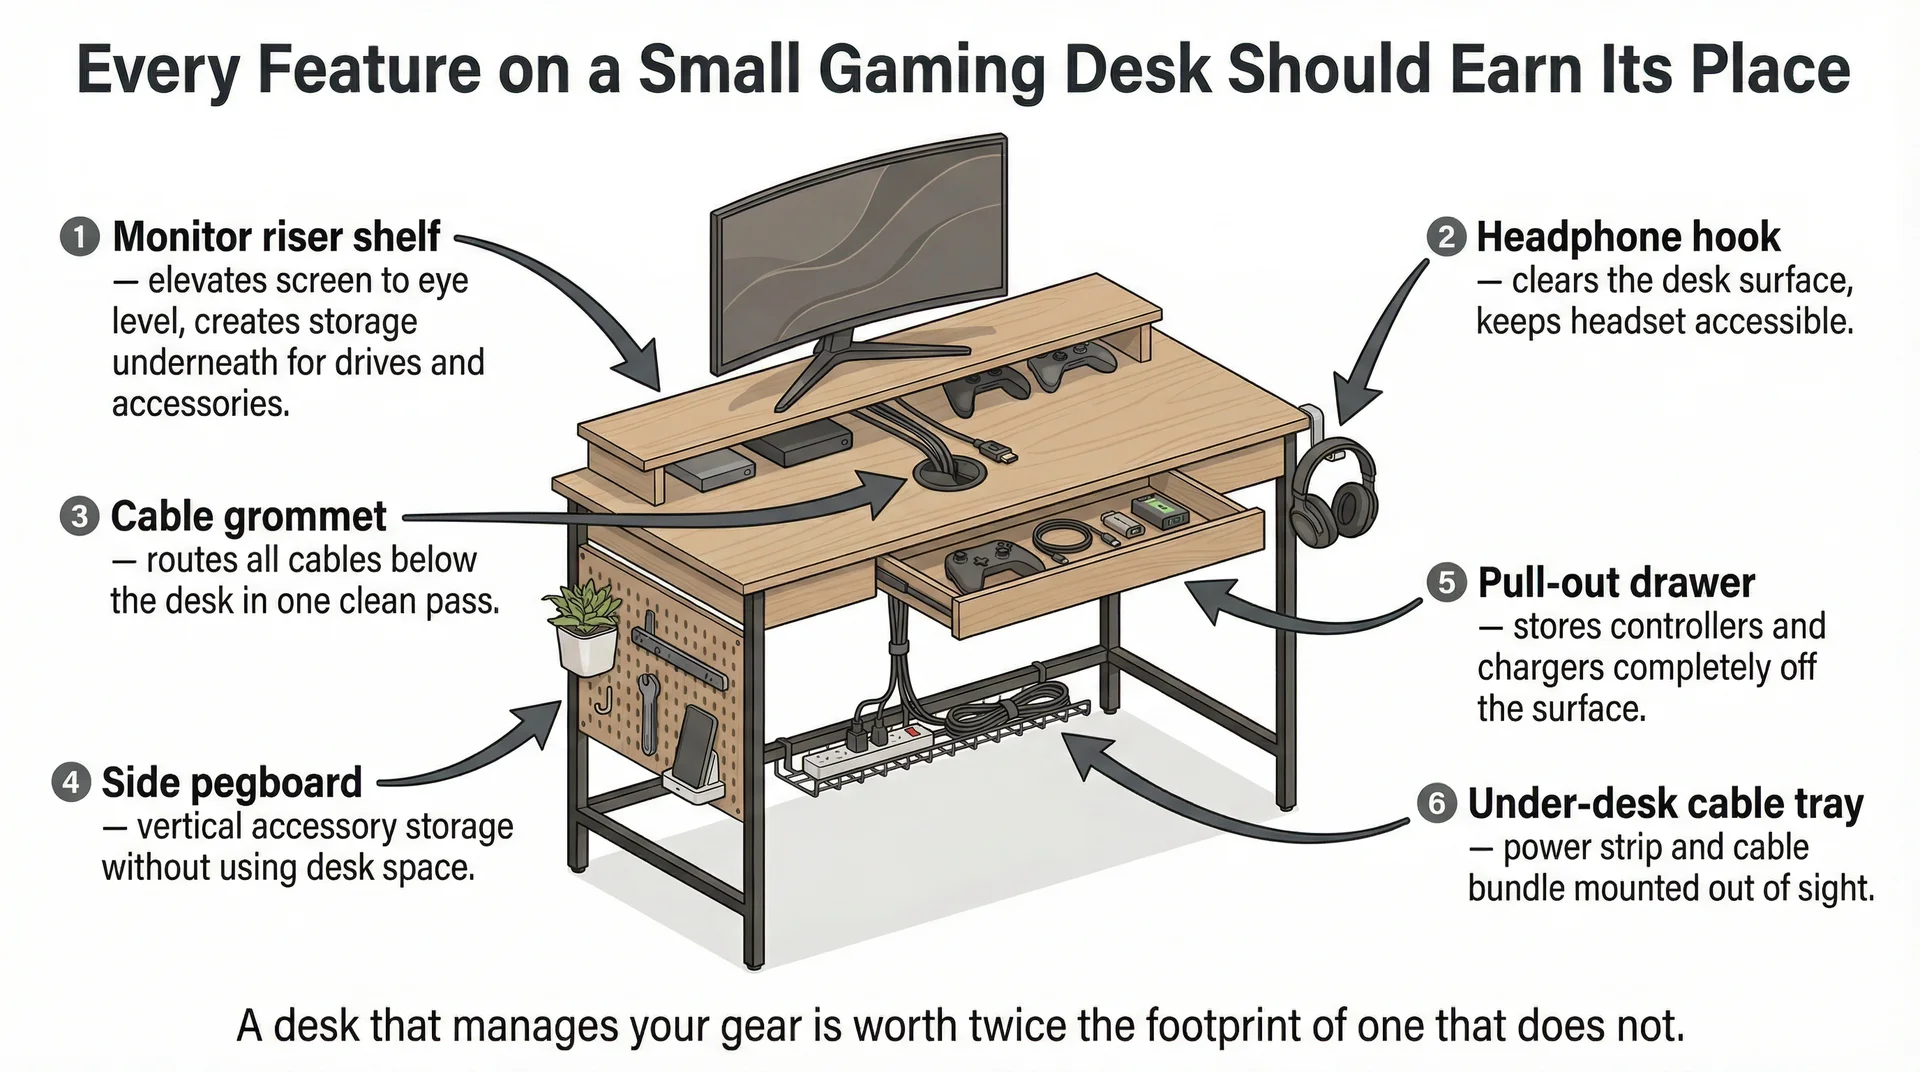
My consistent rule for small spaces is: every piece of furniture must earn its place. If an item performs only one function, it must justify its footprint.
Compact gaming desks with built-in storage are an excellent starting point. Seek desks with:
| Feature | Benefit |
|---|---|
| Monitor riser shelf | Elevates the screen, creates under-storage |
| Headphone hook | Clears desk surface |
| Cable management grommets | Hides wires |
| Side pegboard or hutch | Adds vertical storage |
| Drawer unit or pull-out | Stores controllers and chargers off the surface |
Brands like Secretlab, Flexispot, and Eureka Ergonomic offer such desks, often at accessible prices.
Sofa beds and fold-down furniture are vital if your gaming room serves dual purposes, like a guest room.
A good sleeper sofa anchors a gaming lounge while maintaining guest functionality.
I frequently recommend IKEA’s Friheten sofa bed for its generous gaming seating, convertible bed, and under-seat storage.
For extremely tiny rooms (under 80 sq ft), wall-mounted fold-down desks are ideal.
They mount flush, fold into a desk, and disappear when not in use, often designed with gaming in mind.
Gaming Room Ergonomics in a Nook: Comfort Without Compromise
Comfort in a small gaming room is essential, and ergonomics does not demand vast space; it demands intentionality.
For your chair, seek gaming or ergonomic office chairs under 21 inches wide with adjustable or removable armrests. Models like the Herman Miller Sayl or Secretlab Titan Lite provide excellent support without a large footprint.
For monitor placement, my practice follows these guidelines:
- Screen distance: approximately arm’s length (20-28 inches).
- Screen height: top of the screen at or just below eye level.
- Screen orientation: perpendicular to windows to prevent glare while allowing natural light.
For keyboard and mouse, your elbows should form a 90-degree angle at the desk.
If not, an inexpensive under-desk keyboard tray is an effective solution that also clears your desk. Overlooked often: a quality desk mat or extended mouse pad.
This not only protects your surface but also anchors your setup, making the workspace feel cohesive and intentional.
Maximizing Your Layout: Common Small Room Configurations
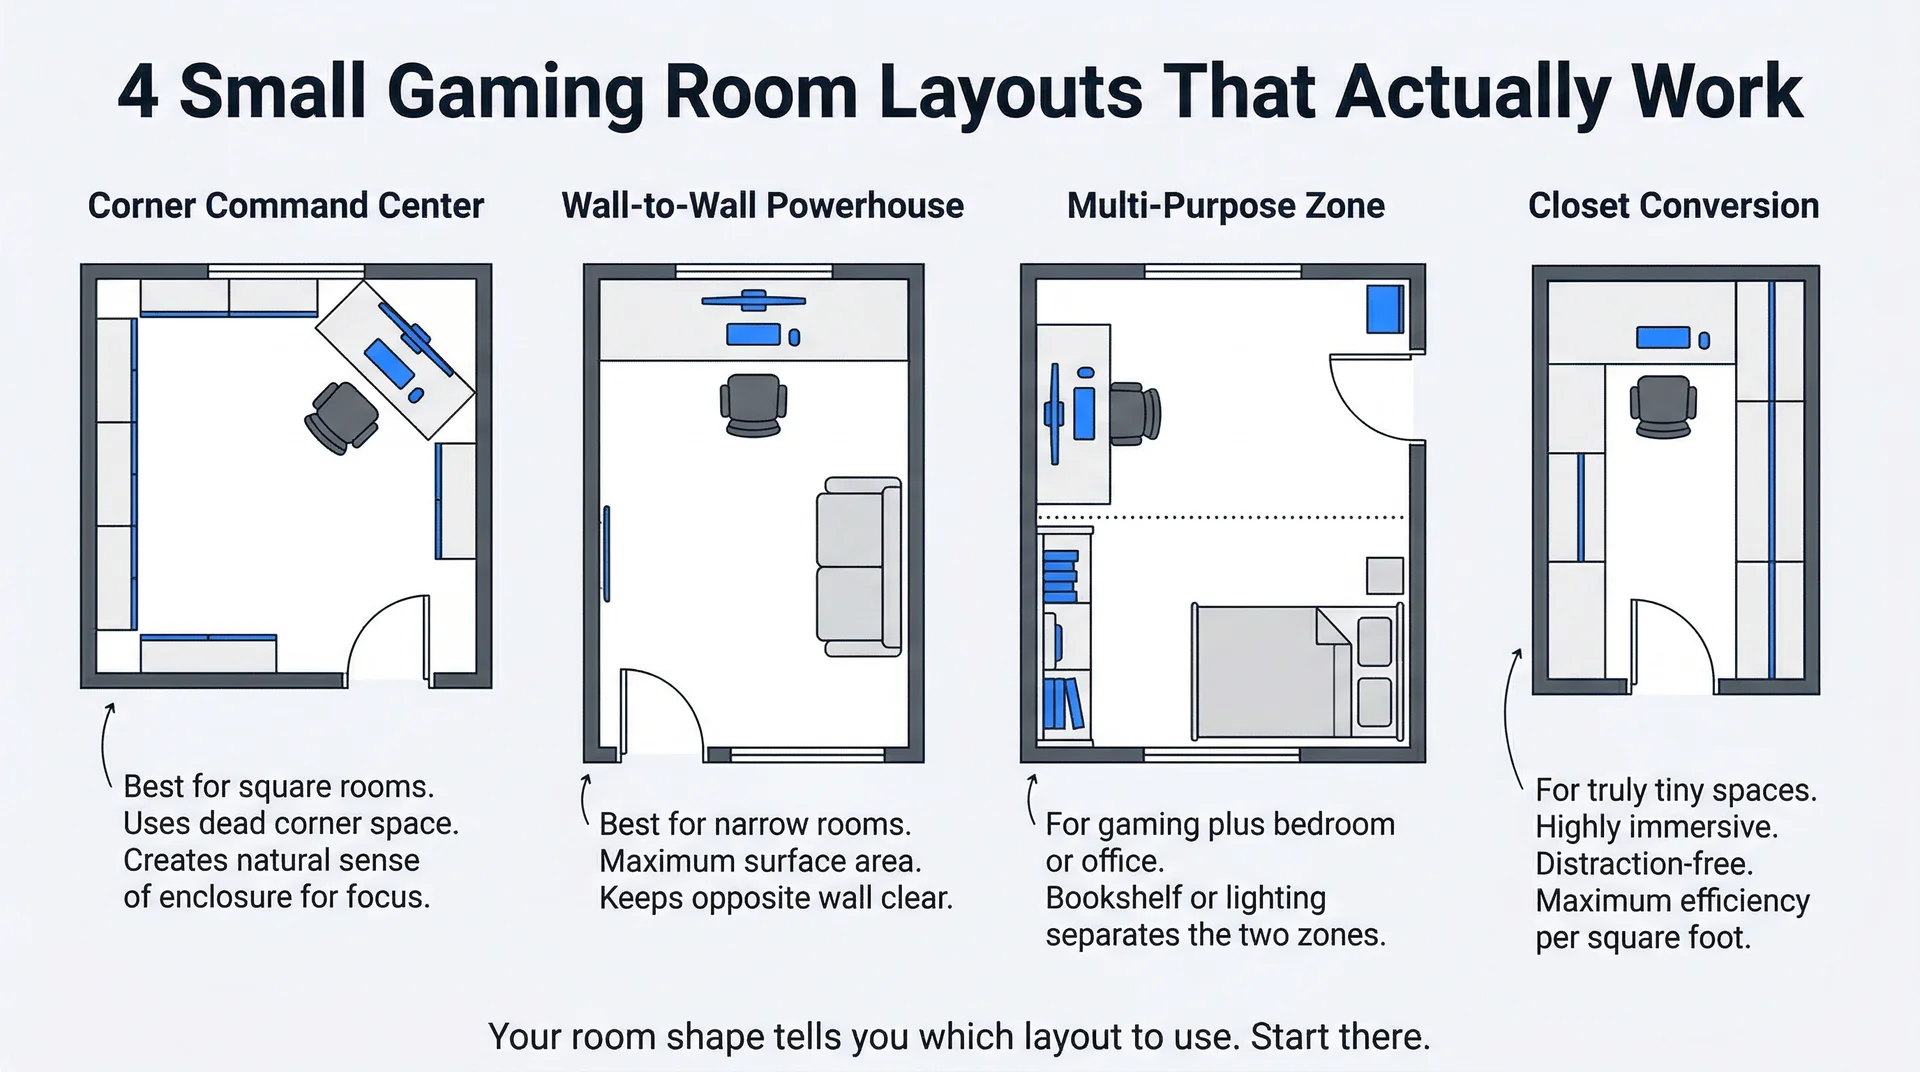
Understanding your room’s shape helps you choose the most effective layout. I often see these configurations work best in small gaming rooms:
- The Corner Command Center: Ideal for square or L-shaped rooms. Placing your desk in a corner utilizes otherwise dead space and provides a natural sense of enclosure, perfect for focus. Corner desks, or two desks joined at an angle, work well here.
- The Wall-to-Wall Powerhouse: For narrow rectangular rooms. Running your desk along one entire wall maximizes surface area while keeping the opposite wall clear for other furniture or storage. This layout promotes a sleek, minimalist aesthetic.
- The Multi-Purpose Zone: When gaming shares a bedroom or office. Strategically place your gaming setup on one wall, clearly separating it from the other function with a room divider, bookshelf, or clever lighting. This maintains distinct “zones” within the single room.
- The Closet Conversion: For truly tiny spaces. Removing closet doors and building a custom desk and shelving system inside transforms unused storage into a dedicated, highly efficient gaming nook. This creates a deeply immersive, distraction-free environment.
Design and Ambiance for Small Gaming Room
Strategic Lighting
Lighting creates dramatic transformations with minimal investment.
In small gaming rooms, lighting not only provides visibility but also shapes the perceived size and intimacy of the space.
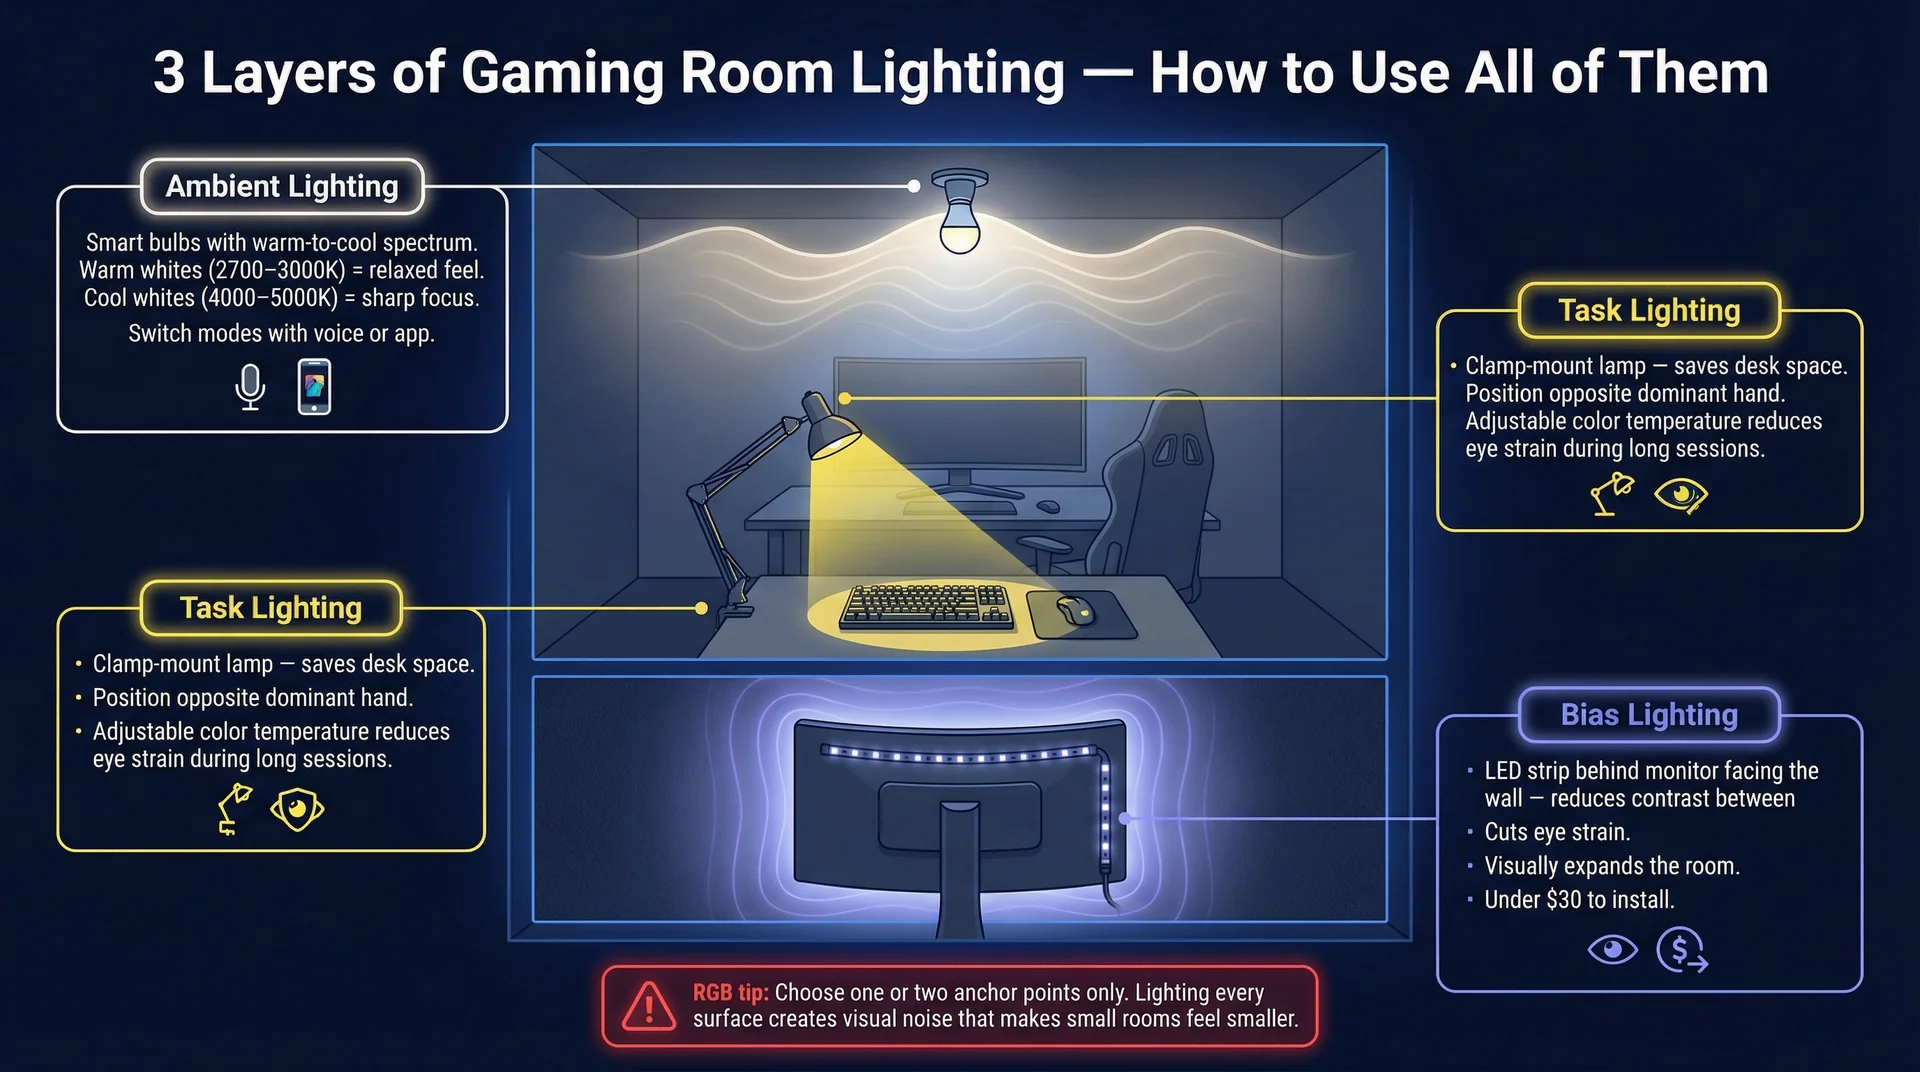
I always work with these three layers of gaming room lighting:
- Ambient Lighting: Smart bulbs with a warm-to-cool spectrum offer full control over the room’s base mood. Warm whites (2700-3000K) create a cozy, relaxed feel, while cool whites (4000-5000K) sharpen focus. Philips Hue or Govee setups allow instant switching.
- Task Lighting: A good desk lamp with adjustable color temperature, positioned opposite your dominant hand, significantly reduces eye strain. I prefer clamp-mount lamps in small rooms to eliminate desk clutter.
- Bias Lighting: I recommend this lighting upgrade to everyone, regardless of space or budget. An LED strip mounted behind your monitor (facing the wall) softens the contrast between the screen and the room, reducing eye strain. Affordable kits from Govee or Philips (under $30) greatly enhance comfort and ambiance. This glow also casts outward, visually expanding the room.
Regarding RGB lighting: My honest advice to clients is to use RGB intentionally, not excessively.
Lighting every surface and component in competing colors creates visual noise, making a small room feel smaller and more chaotic.
Choose one or two anchor points, like a strip behind the monitor and a floor lamp with color control, for ample atmosphere.
Painting Your Way to a Bigger Feel
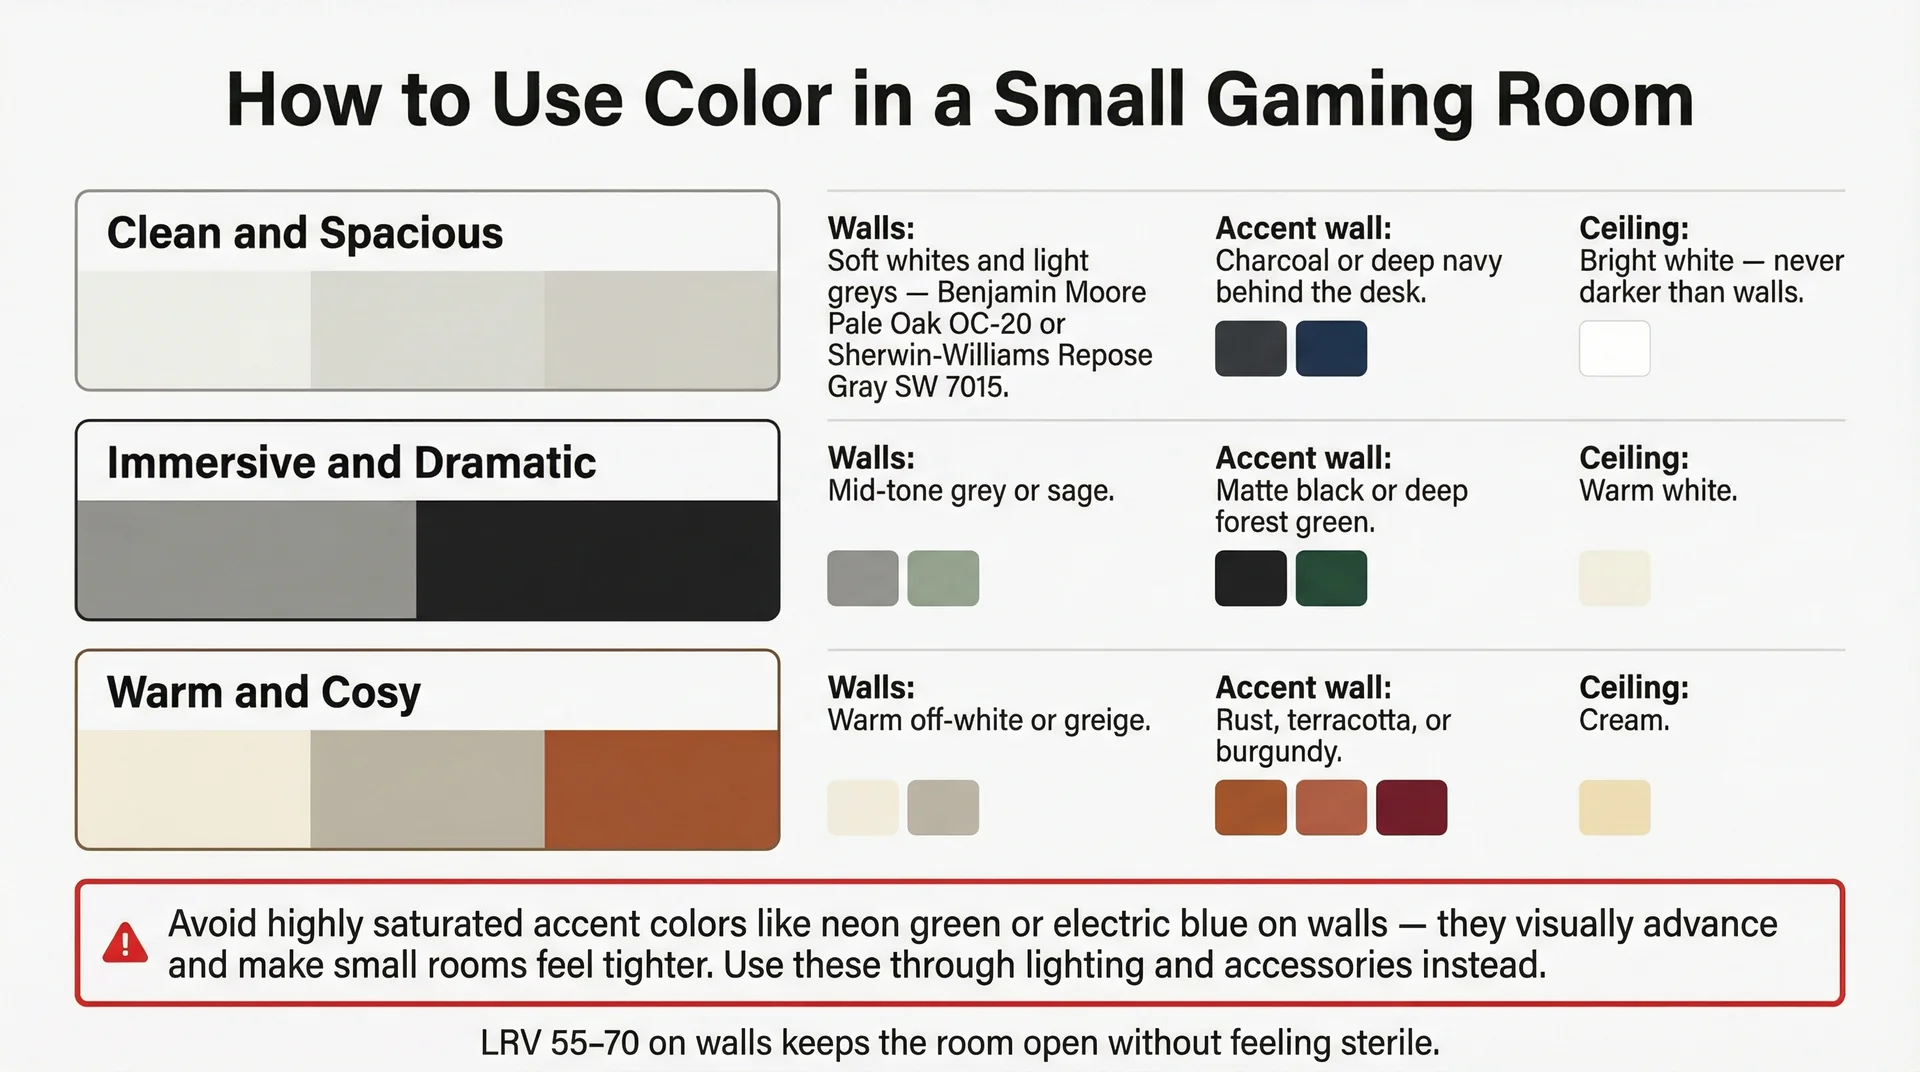
Color is a powerful design tool. In gaming rooms, rules differ from those in typical living spaces.
The core principle: lighter values on walls and ceilings expand perceived space, while darker values create intimacy.
Neither is wrong; it depends on your desired experience. For small gaming rooms, I recommend a layered approach:
- Walls: Use mid-to-light neutrals (soft greys, warm off-whites, desaturated sage greens) to maintain openness. Colors with an LRV of 55-70 work well. Benjamin Moore’s Pale Oak (OC-20) and Sherwin-Williams’ Repose Gray (SW 7015) are my frequent recommendations for their clean, contemporary feel.
- Accent Wall: This adds personality and depth. A deep charcoal, navy, forest green, or matte black wall behind your desk creates a focal point, making your setup visually pop and looking great in photos.
- Ceiling: Keep it light. Painting the ceiling the same color as the walls (or one shade lighter) eliminates the oppressive “lid” effect common in small rooms.
Here is my quick color reference for clients:
| Room Mood Goal | Wall Color Direction | Accent Wall | Ceiling |
|---|---|---|---|
| Clean and spacious | Soft whites, light greys | Charcoal or deep navy | Bright white |
| Immersive and dramatic | Mid-tone grey or sage | Matte black or deep forest | Warm white |
| Warm and cosy | Warm off-white or greige | Rust, terracotta, or burgundy | Cream |
| Futuristic and sharp | Cool light grey or white | Dark slate or midnight blue | Pure white |
A frequent mistake: using highly saturated, bright accent colors (like neon green or electric blue) because they feel “gaming.”
In small spaces, these colors visually advance, making the wall feel closer and the room tighter. If you love vibrant accents, incorporate them through lighting, accessories, and decor, not paint.
Mastering Cable Management and Organisation
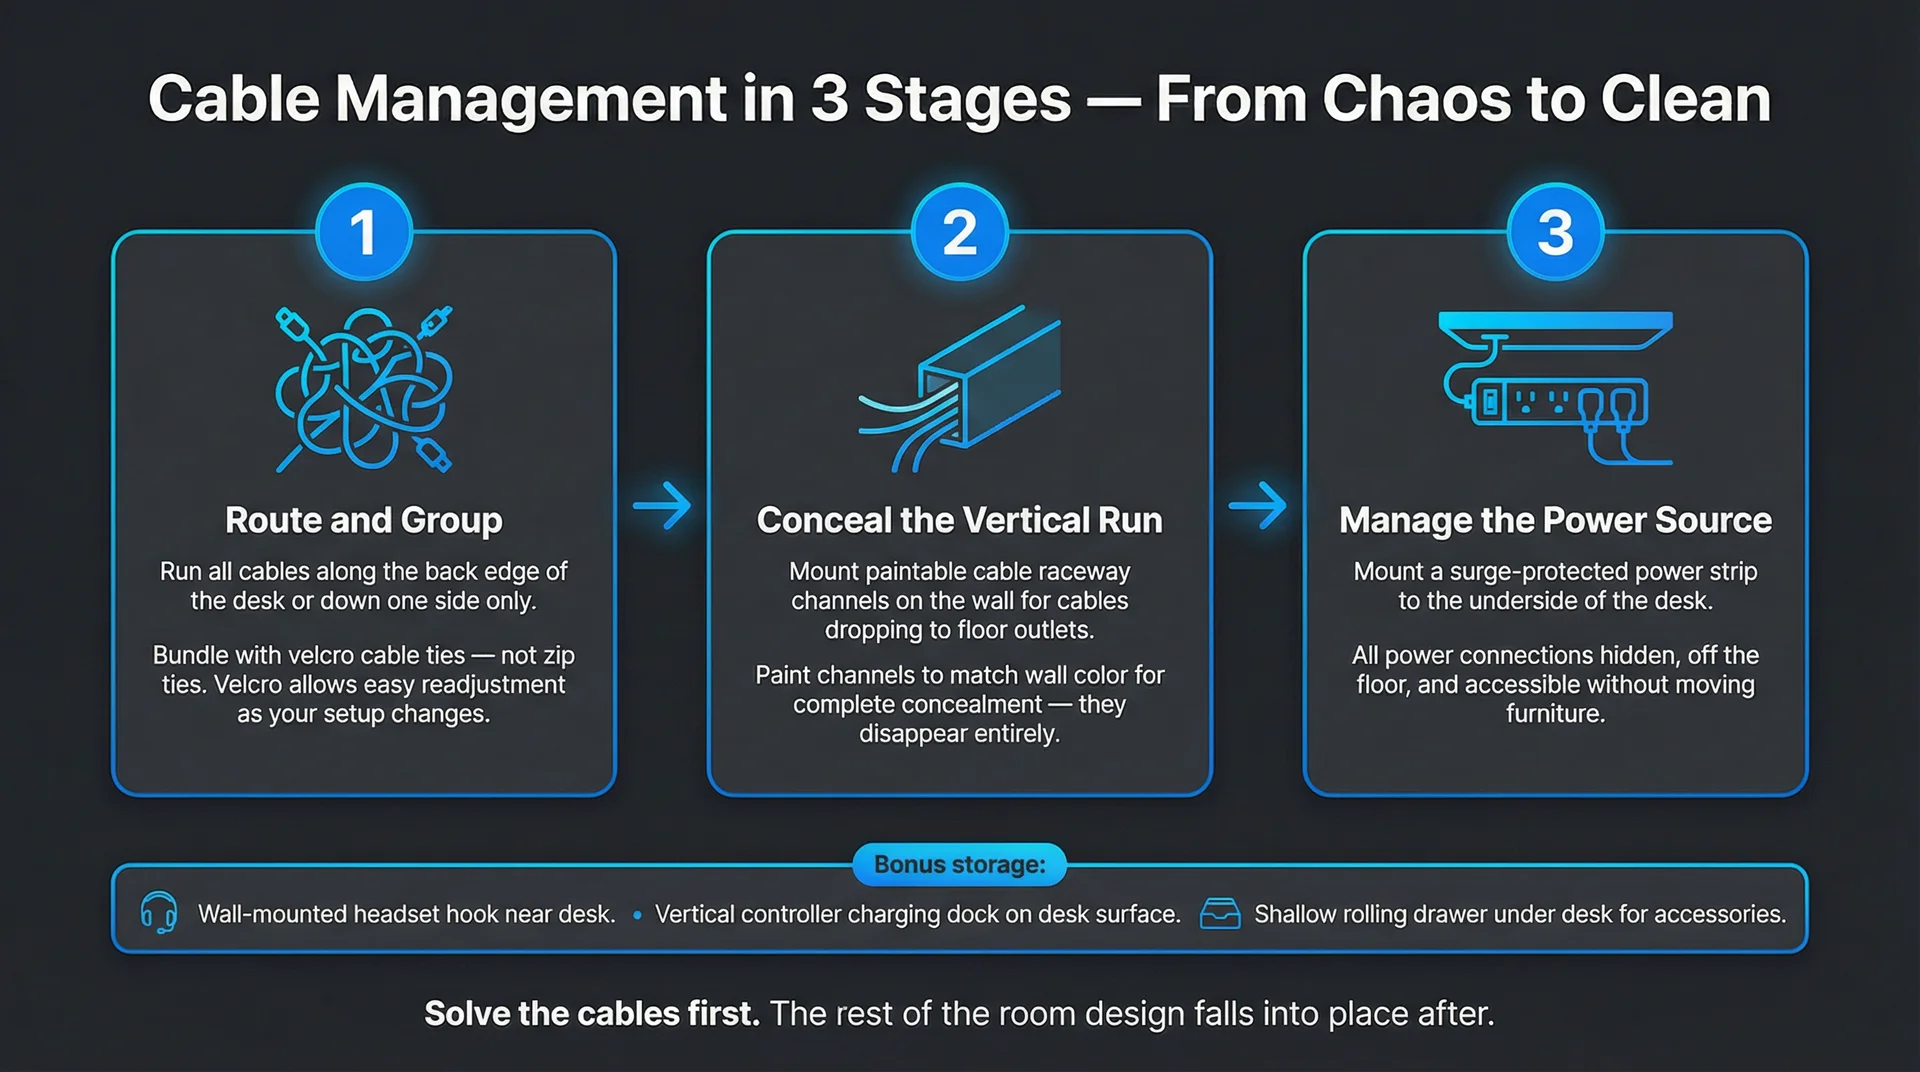
Frankly, cable management distinguishes a good gaming setup from a great one.
I have seen rooms with excellent equipment and lighting ruined by tangled cables behind the desk.
This visual clutter is particularly impactful in small rooms, where your eye has fewer places to rest. I recommend building your cable management system in three stages:
- Route and Group: Route all cables along a single path (desk back edge or down one side). Use velcro cable ties, not zip ties, to group cables. Velcro allows easy readjustment.
- Conceal the Vertical Run: For cables dropping from the desk or running to wall outlets, use paintable cable raceway channels. These mount flush to the wall, giving cables a clean, architectural look. I paint them to match the wall for complete concealment.
- Manage the Power Source: Mount a surge-protected power strip to the underside of your desk. This keeps all power connections out of sight and off the floor.
For peripheral storage:
- A small wall-mounted rack or hook system near the desk stores headsets cleanly.
- A vertical controller charging dock on the desk takes up minimal space.
- A shallow drawer unit or rolling storage cube under the desk holds less frequently used accessories.
As I always tell clients,
Once you solve the cable problem, the rest of the room design tends to fall into place. Cables are the single biggest source of visual noise in a gaming setup, and eliminating them changes everything about how the space reads.
Personalising Your Portal: Decor That Tells Your Story
The common instinct in small rooms is to strip decor back to achieve minimalism.
While I understand this, extreme minimalism can make a room feel impersonal and sterile, regardless of organization or ergonomics.
My goal is a curated personality, distinct from clutter. I apply these principles when helping clients personalize small gaming rooms:
- Group, do not scatter. Displaying three or four collectibles together as a curated collection looks intentional; scattering them creates clutter. Grouping provides visual rest points and a focused expression of your personality.
- Think about scale. Oversized art can overwhelm a small wall. A single 24×36 framed print often works better than multiple smaller pieces. A large single poster makes a stronger statement than a collage.
- Use shelving as a display system. Floating shelves offer both storage and display. I often style the front with meaningful items (figurine, small plant, photo) and store practical items behind them.
- Plants add life. Even a single small plant on the desk or a trailing pothos on a shelf softens the room, making it feel lived-in. Snake plants are ideal for gaming rooms due to their low light tolerance, minimal footprint, and easy care.
Elevating Your Small Gaming Experience
Enhancing Audio in Confined Spaces
Sound in small rooms differs greatly from larger spaces. Hard surfaces (walls, floors, windows) often cause echo and flutter reverb, leading to harsh, fatiguing audio.
If you primarily use headphones (my baseline recommendation for small rooms), invest in a quality headset stand and a DAC/amp for PC setups. A dedicated audio interface or amplifier significantly improves even mid-range headphone quality.
If you prefer speakers, placement and room treatment are crucial.
Position desktop nearfield monitors (e.g., Yamaha HS5 or PreSonus Eris E3.5) in a near-equilateral triangle with your listening position, angled slightly inward.
Avoid corner placement, which causes muddy, boomy bass.
For budget-friendly acoustic treatment:
- A large, full bookshelf behind you acts as a natural diffuser.
- A thick area rug absorbs floor reflections.
- Heavy curtains reduce echo and external noise.
- Acoustic foam panels (2×2 ft) at first reflection points (walls to your left and right at ear level) provide a noticeable improvement for $30-50.
Ventilation for Peak Performance
Heat management is a frequent concern for small gaming setups, yet often overlooked in design guides.
High-performance PCs, monitors, and lighting generate substantial heat in confined spaces, causing temperatures to rise quickly during long sessions.
I recommend these practical solutions:
- A small tower fan, like a 36-inch Honeywell or Dyson, positioned for cross-ventilation. This draws cool air in and pushes warm air out, proving more effective than simply blowing air at you, and occupies minimal floor space.
- Desk positioning relative to windows is crucial. Avoid placing your desk directly in front of windows receiving afternoon sun, which adds solar heat. Instead, position it perpendicular to the window for natural light and cross-ventilation without direct heat gain.
- For PC setups, ensure your rig has at least 6 inches of clearance on all sides. Avoid enclosed desk cabinets without active airflow, as this leads to thermal throttling and impacts in-game performance.
Integrating Smart Tech: Your Room, Your Command Center
A well-designed small gaming room can achieve a level of automation often neglected in larger spaces, thanks to increasingly affordable and accessible technology.
I find these smart tech additions most impactful in small gaming rooms:
- Smart lighting with scene presets. Create two or three lighting scenes for different activities (casual gaming, intense sessions, winding down). This allows you to change the room’s atmosphere with a voice command or phone tap. Govee, Philips Hue, and Nanoleaf offer easy-to-install systems with robust app and voice assistant integration.
- Smart plugs for equipment management. Plug monitors, speakers, and peripheral hubs into smart power strips or individual smart plugs. This enables powering everything down with a single command or scheduling automatic shut-offs, offering both energy savings and a convenient routine.
- A room sensor for temperature and air quality. I personally added this to my home office and found it surprisingly useful. Small sensors like the Govee room thermometer or Airthings Wave Mini provide real-time temperature and humidity data, helping you proactively adjust ventilation when the room becomes uncomfortable.
Putting It All Together: A Room-By-Room Transformation Checklist
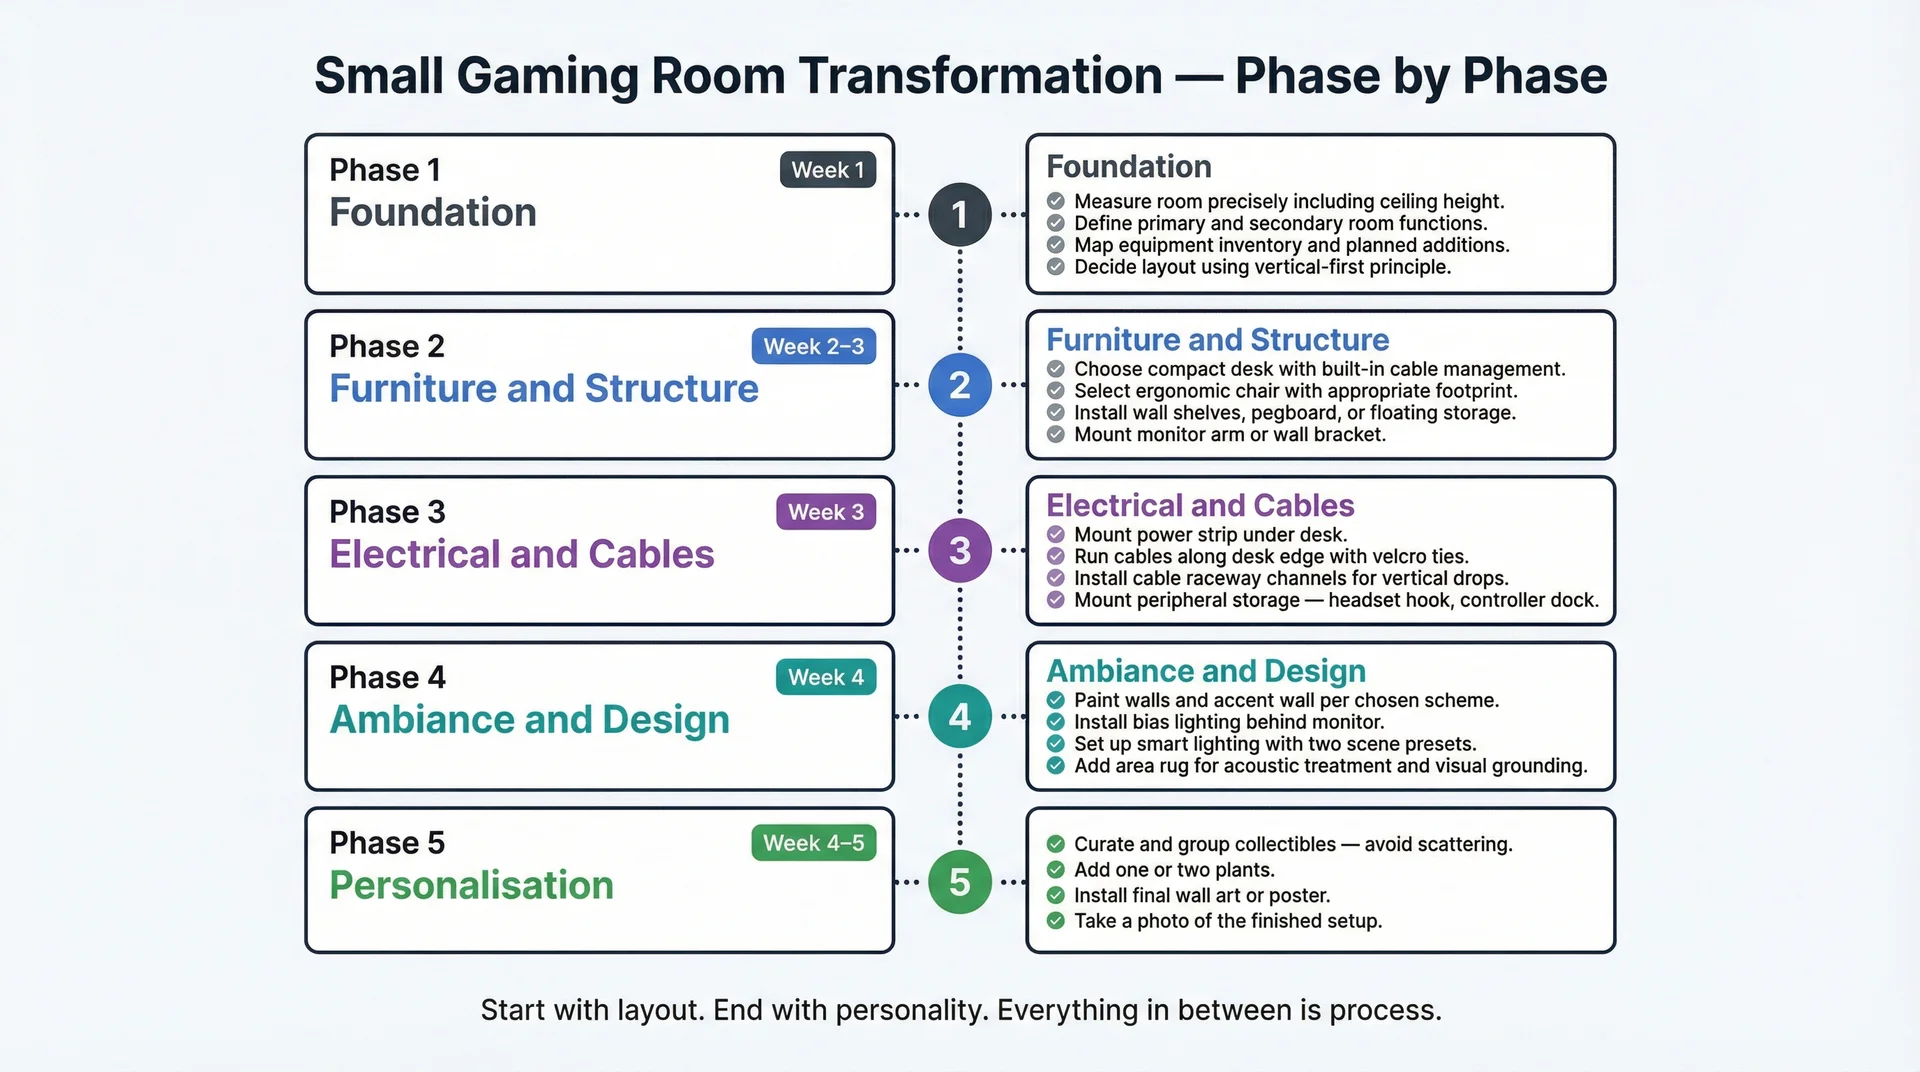
If you want to take everything covered here and make it actionable, here is the checklist I would hand you at the end of a real consultation:
Phase 1: Foundation (Week 1)
- Measure the room precisely, including ceiling height and all fixed elements
- Define the room’s primary and secondary functions
- Map out your equipment inventory and what you plan to add
- Decide on your layout using the vertical-first principle
Phase 2: Furniture and Structure (Week 2-3)
- Choose a compact desk with built-in cable management and storage
- Select an ergonomic chair with an appropriate footprint for your room
- Install wall shelves, pegboard, or floating storage above the desk
- Mount monitor arm or wall bracket for display equipment
Phase 3: Electrical and Cable Management (Week 3)
- Mount the power strip under the desk
- Run cables along the desk edge using velcro ties
- Install cable raceway channels for vertical drops
- Mount peripheral storage (headset hook, controller dock)
Phase 4: Ambiance and Design (Week 4)
- Paint walls and accent wall per your chosen scheme
- Install bias lighting behind the monitor
- Set up smart lighting with at least two scene presets
- Add an area rug for acoustic treatment and visual grounding
Phase 5: Personalisation and Finishing (Week 4-5)
- Curate and group collectibles or display items
- Add one or two plants
- Install the final wall art or poster
- Take a photo of the finished setup (you will want it)
Final Thoughts
The gaming rooms that inspire the most pride are rarely the largest.
They are the ones where occupants intentionally designed for how they wanted to feel in that space.
Small rooms impose constraints, but these constraints, when respected, foster creativity. You make deliberate choices about every element because you cannot afford to be careless with space.
The result is a room that feels more personal and intentional than a larger one where decisions happened by default.
Start with your layout. Embrace verticality. Choose multi-functional furniture. Light the room strategically. Master cable management. Then, personalize it with meaningful items.
The room you create will be small in square footage, but immense in experience.