
Whitewashing is one of the more rewarding weekend-scale updates you can make to a home, and also one of the more misunderstood.
Most tutorials tell you to mix white latex paint with water and start brushing. What they don’t cover is that the technique itself is the easy part. What trips most people up is every decision they make before they pick up a brush. Get the product choice, the prep, and the coverage goal right, and the application becomes straightforward. Skip them, and you’ll spend a Sunday painting over the whole thing.
I’ve spent over a decade helping homeowners work through practical interior updates, first as a design consultant for a regional furniture retailer, then independently as an interior styling advisor.
Whitewashed brick comes up constantly, particularly in homes from the 1970s and 1980s, where dated brick is doing heavy lifting in rooms that have otherwise moved on. This guide covers everything you need to get it right the first time.
Your Brick’s Starting Condition Changes Everything
Most people go straight to choosing a finish, which makes sense because the finish is the exciting part. But the result you get from any technique depends almost entirely on what you’re starting with.
Two identical applications on two different brick surfaces can produce completely different outcomes, and understanding why is the most useful thing to know first.
New Brick vs. Aged Brick
Older brick, the kind in homes built before the 1990s, tends to be more porous than newer brick. That porosity works in your favor because it absorbs whitewash more evenly and holds it better over time.
Newer, denser brick may absorb unevenly and look blotchy without additional coats. If your brick is on the newer side, plan for at least two coats and always test a small section first.
Can You Whitewash Red Brick?
Yes, and red brick is actually one of the best candidates for whitewashing. The warm undertone reads through even a medium-coverage wash and gives the result that soft, layered quality you see in farmhouse and transitional interiors.
Deep red or very dark brick may need two coats to shift the color enough to feel intentional. Orange brick, which is common in 1970s and 1980s construction, responds well to a slightly heavier 50/50 ratio on the first coat.
The orange tone softens rather than disappears, which most people find preferable to solid coverage.
Interior Brick vs. Exterior Brick: Different Rules Apply
This distinction matters more than most guides acknowledge. Interior brick, fireplaces, and exposed accent walls in particular are sheltered and forgiving.
You have more flexibility with product choices, and diluted latex paint gives a good result. Exterior brick is a different situation. It faces moisture, UV exposure, temperature swings, and in colder climates, freeze-thaw cycles that can be hard on a sealed surface.
Regular latex paint, even when diluted, can trap moisture inside the brick and cause cracking or spalling over time. For any exterior surface, a product specifically formulated for masonry is the right call, and limewash is almost always the better choice.
If you’re leaning toward limewash for your exterior or fireplace, this complete guide to limewashing brick covers dilution ratios, application technique, and how to distress the finish everything you need before you start.
Has Your Brick Been Painted Before?
Whitewash relies on the brick’s natural porosity to absorb the diluted paint and create a semi-transparent, layered look. On a sealed or previously painted surface, the wash sits on top rather than soaking in, and you can end up with a streaky, uneven finish.
If your brick has an existing coat of paint, use a limewash product rated for painted surfaces, or accept that the result will look more like a tinted wash than a classic whitewash texture. The prep process is otherwise the same.
Whitewash vs. Limewash vs. German Smear: How to Choose Without the Confusion
These three terms get used interchangeably online. They shouldn’t. They produce different results, require different products, and are not equally reversible. Here’s what each one actually is, and who each one is right for.
Whitewash (Diluted Latex Paint)
Whitewash in the DIY sense is white latex paint diluted with water and applied in thin, translucent coats. It’s ideal for interior brick, particularly fireplace surrounds, and for anyone who wants to try the technique without committing to something harder to undo.
It’s less durable than limewash on exterior surfaces and will eventually need touching up, but for indoor use, a well-applied coat lasts a long time.
Use an eggshell or satin finish latex for better washability once it’s dry; flat paint absorbs grime and is harder to clean off porous brick.
Limewash
Limewash is a mineral-based coating made from crushed limestone mixed with water. It bonds with the surface at a mineral level rather than sitting on top, it’s breathable (meaning moisture can pass through the brick rather than getting trapped), and it develops a natural patina over time that many people actually prefer to the freshly applied look. For exterior brick, limewash is the appropriate choice.
Products like Romabio Classico Limewash come pre-mixed and are designed for DIY application, which makes them far more accessible than traditional slaked lime preparation.
If you want that soft, aged German Schmar effect without the complexity of mortar, one coat of Romabio Classico Limewash in Bianco White, applied and partially washed back, replicates it closely.
One important note on reversibility: fresh limewash can be partially removed within the first five to seven days by wetting the surface and scrubbing. After full curing, removal becomes significantly more difficult. That window is worth keeping in mind if you’re still deciding between the two finishes for your fireplace.
German Smear (Mortar Wash)
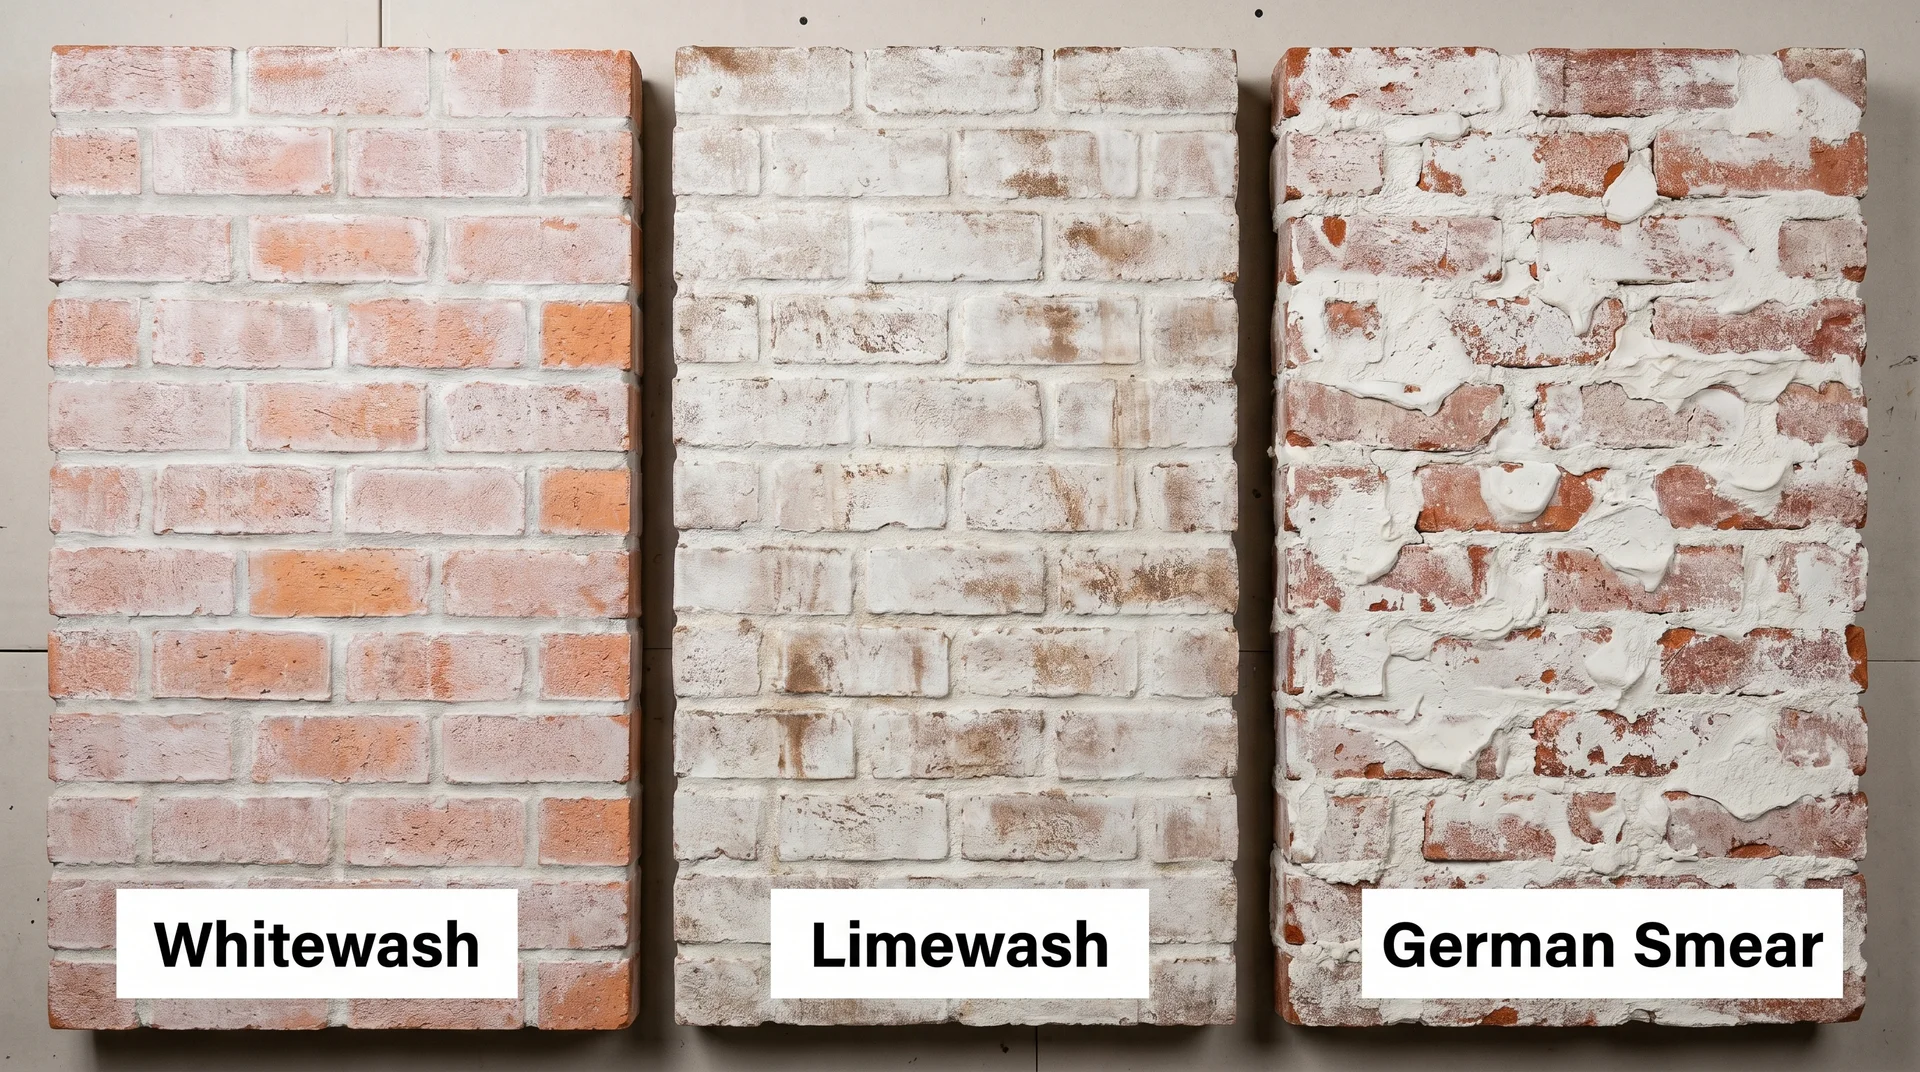
German smear involves applying a thin layer of white or off-white mortar to the brick and partially wiping it away while wet. It adds texture and creates a more dimensional, European-cottage appearance than either whitewash or limewash.
The mortar fills surface texture and mortar joints rather than just tinting, and the result is more dramatic. It’s also essentially permanent. Mortar bonds to brick at a structural level, and removing it without damaging the brick face is very difficult.
If you’re not completely certain, this is not the right starting point.
How to Choose in 30 Seconds
| Your Situation | Best Option |
|---|---|
| Interior fireplace, first-time DIY | Whitewash (diluted latex) |
| Interior fireplace, want durability | Limewash |
| Exterior brick, any climate | Limewash |
| Dramatic change, fully committed, love old-world texture | German smear |
| Previously painted brick | Limewash rated for painted surfaces |
| Nervous about permanence | Whitewash (most forgiving to adjust) |
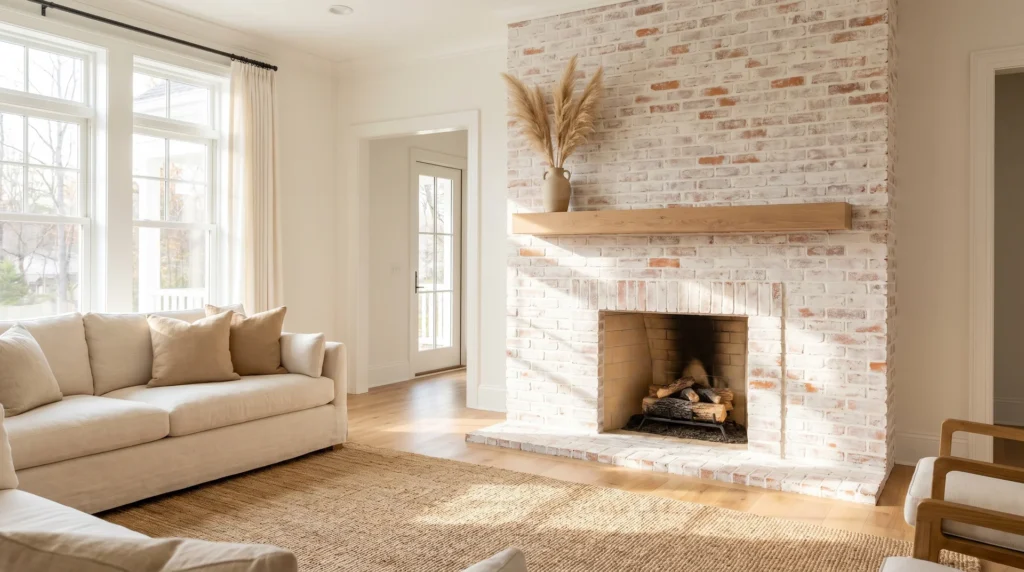
What Whitewashed Brick Actually Looks Like in a Real Room
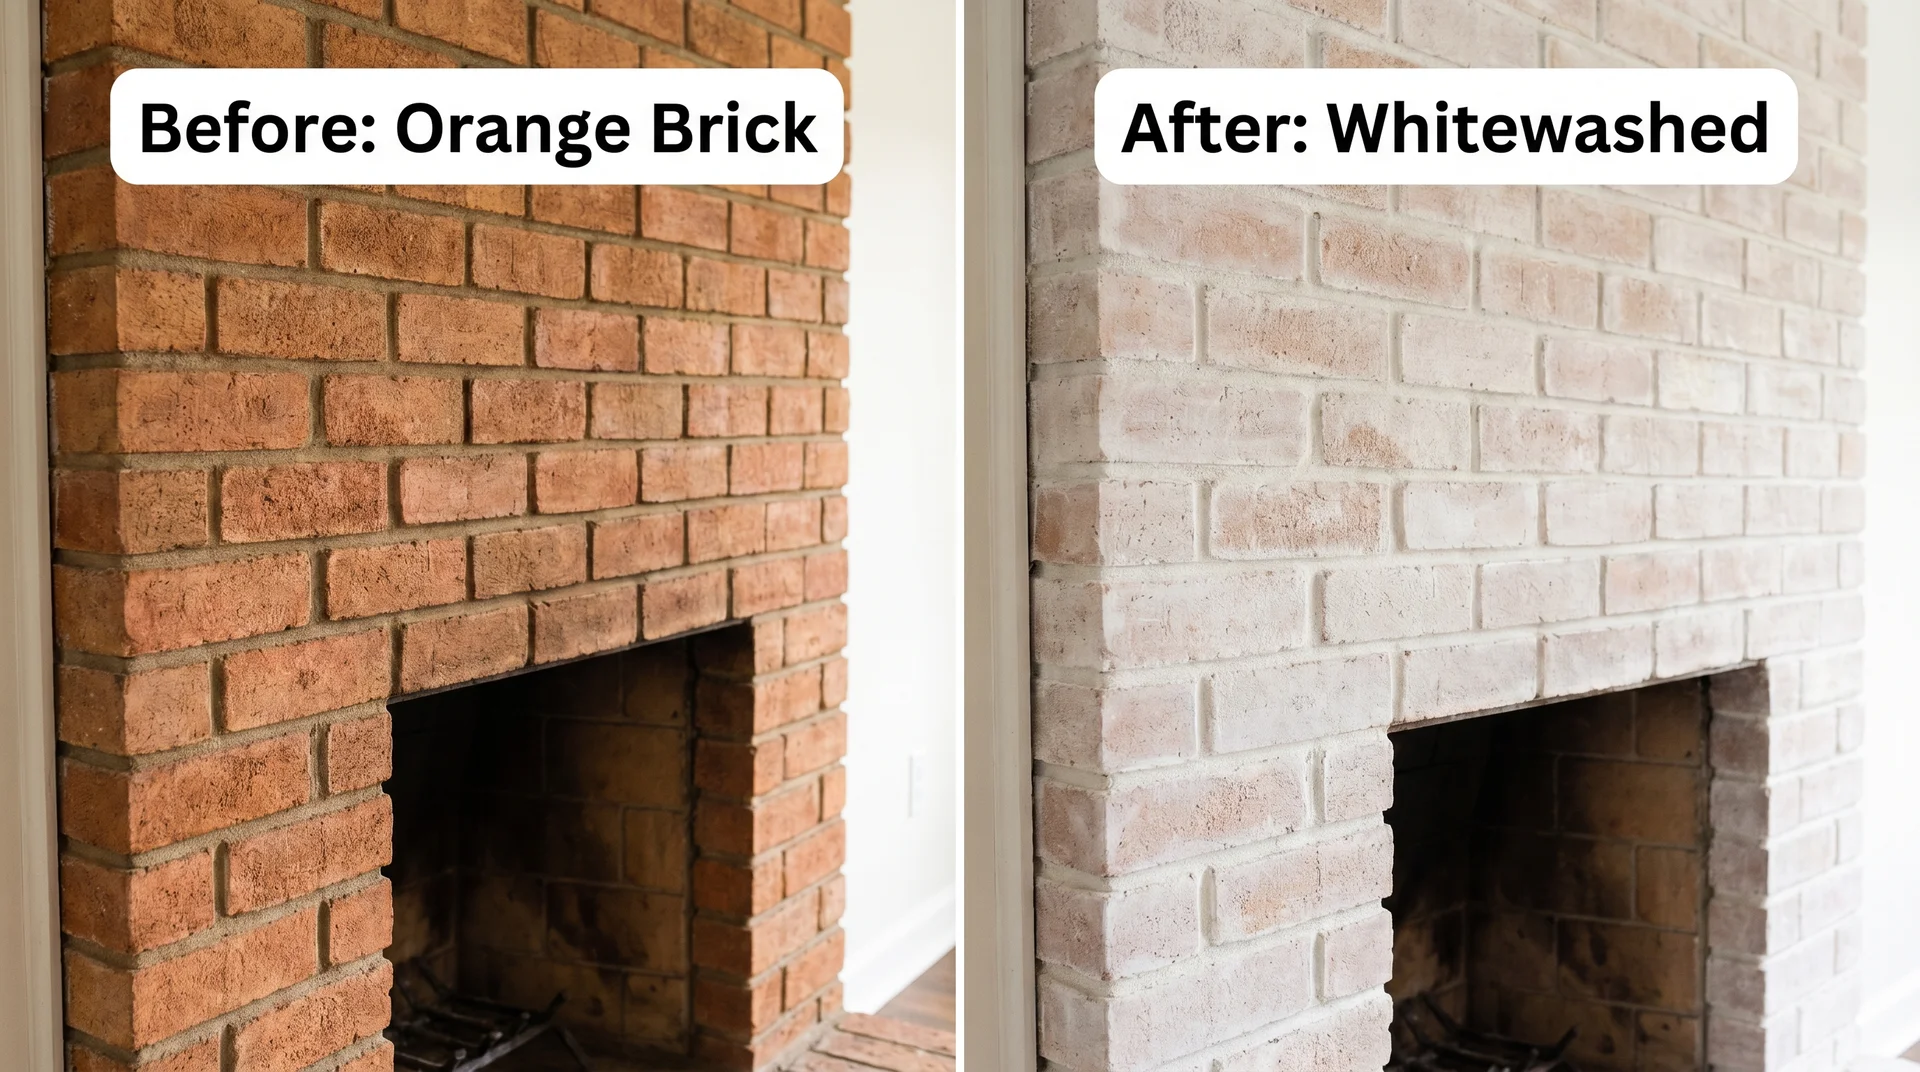
Pinterest and Instagram have built some unrealistic expectations around this technique. The photos that circulate most are always the dramatic before-and-afters: dark orange brick becoming bright, clean white.
What those photos don’t show is the finished room in different lighting, with real furniture and daily life in it. Here’s a more honest picture.
The Light and Airy Look (Modern Farmhouse, Coastal)

When whitewashed brick works in this direction, it’s usually because the rest of the room supports it: light-colored or white-painted trim, neutral or light flooring (white oak, pale concrete, painted wood), and walls that aren’t competing for attention.
In those rooms, the whitewashed brick recedes slightly, reads as texture rather than color, and stops dominating the design.
Where this looks to struggle is in rooms that don’t have those other conditions.
Where this looks to struggle is in rooms that don’t have those other conditions. If the trim is natural oak, the floors are dark, and the walls are warm cream, whitewashing the fireplace alone can create visual tension rather than cohesion.
Think about the trim and floor situation at the same time rather than treating the brick as an isolated project. The furniture arrangement is part of that same picture. If the living room layout around the fireplace has never fully settled, the surround refresh gives you the natural moment to address both.
This guide on arranging the living room around your refreshed fireplace walks through the placement decisions that most people skip until the room still feels off after the update.
Warm and Layered (Organic Modern, Transitional)
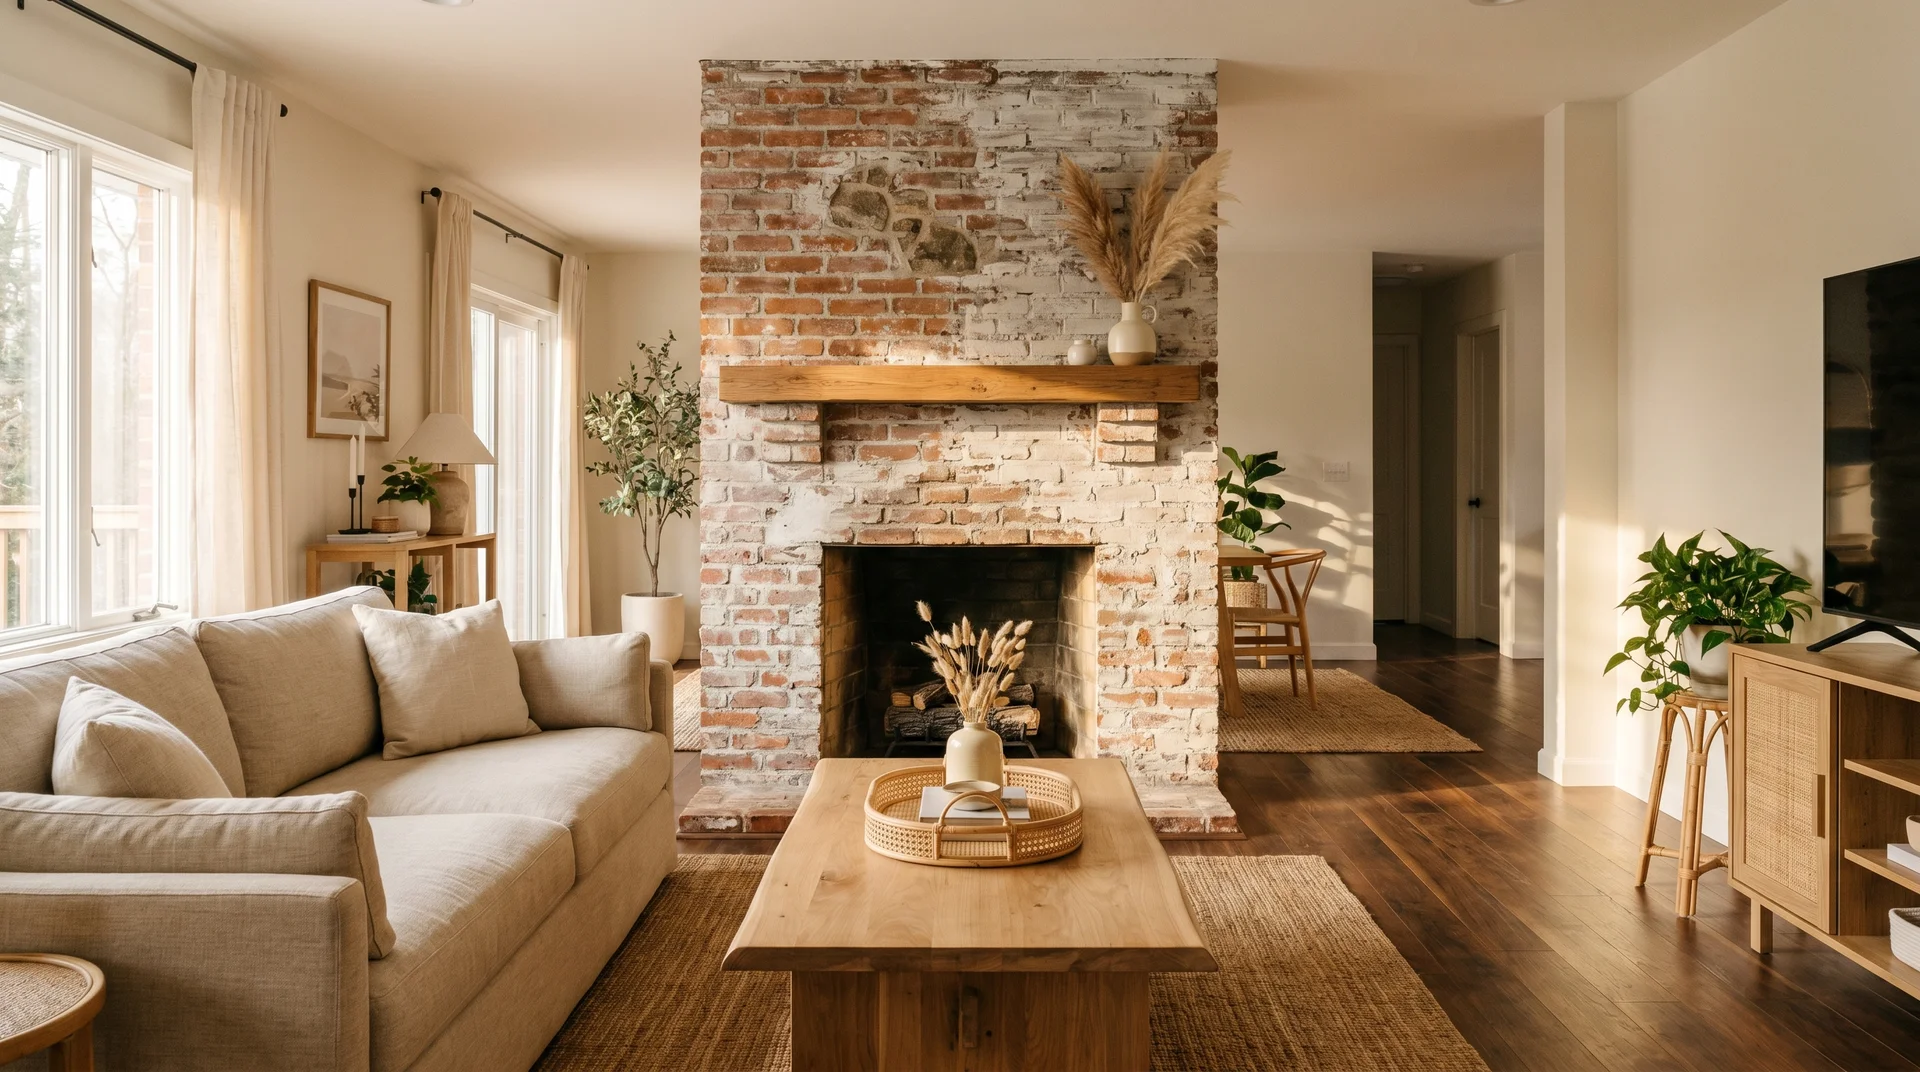
The second direction, which I personally find more interesting, is the warm-toned, textured outcome you get when you don’t aim for full-white coverage.
A thinner wash that lets the original brick show through, maybe 60 to 70 percent coverage, reads as layered and intentional in a way that works well with natural wood tones, linen upholstery, and organic textures.
It doesn’t look like you painted the brick. It looks like the brick has aged well and has been there a long time. This look suits transitional and organic modern interiors and is worth considering seriously if your space leans warm.
How to Coordinate Your White Wash Brick Color with the Room
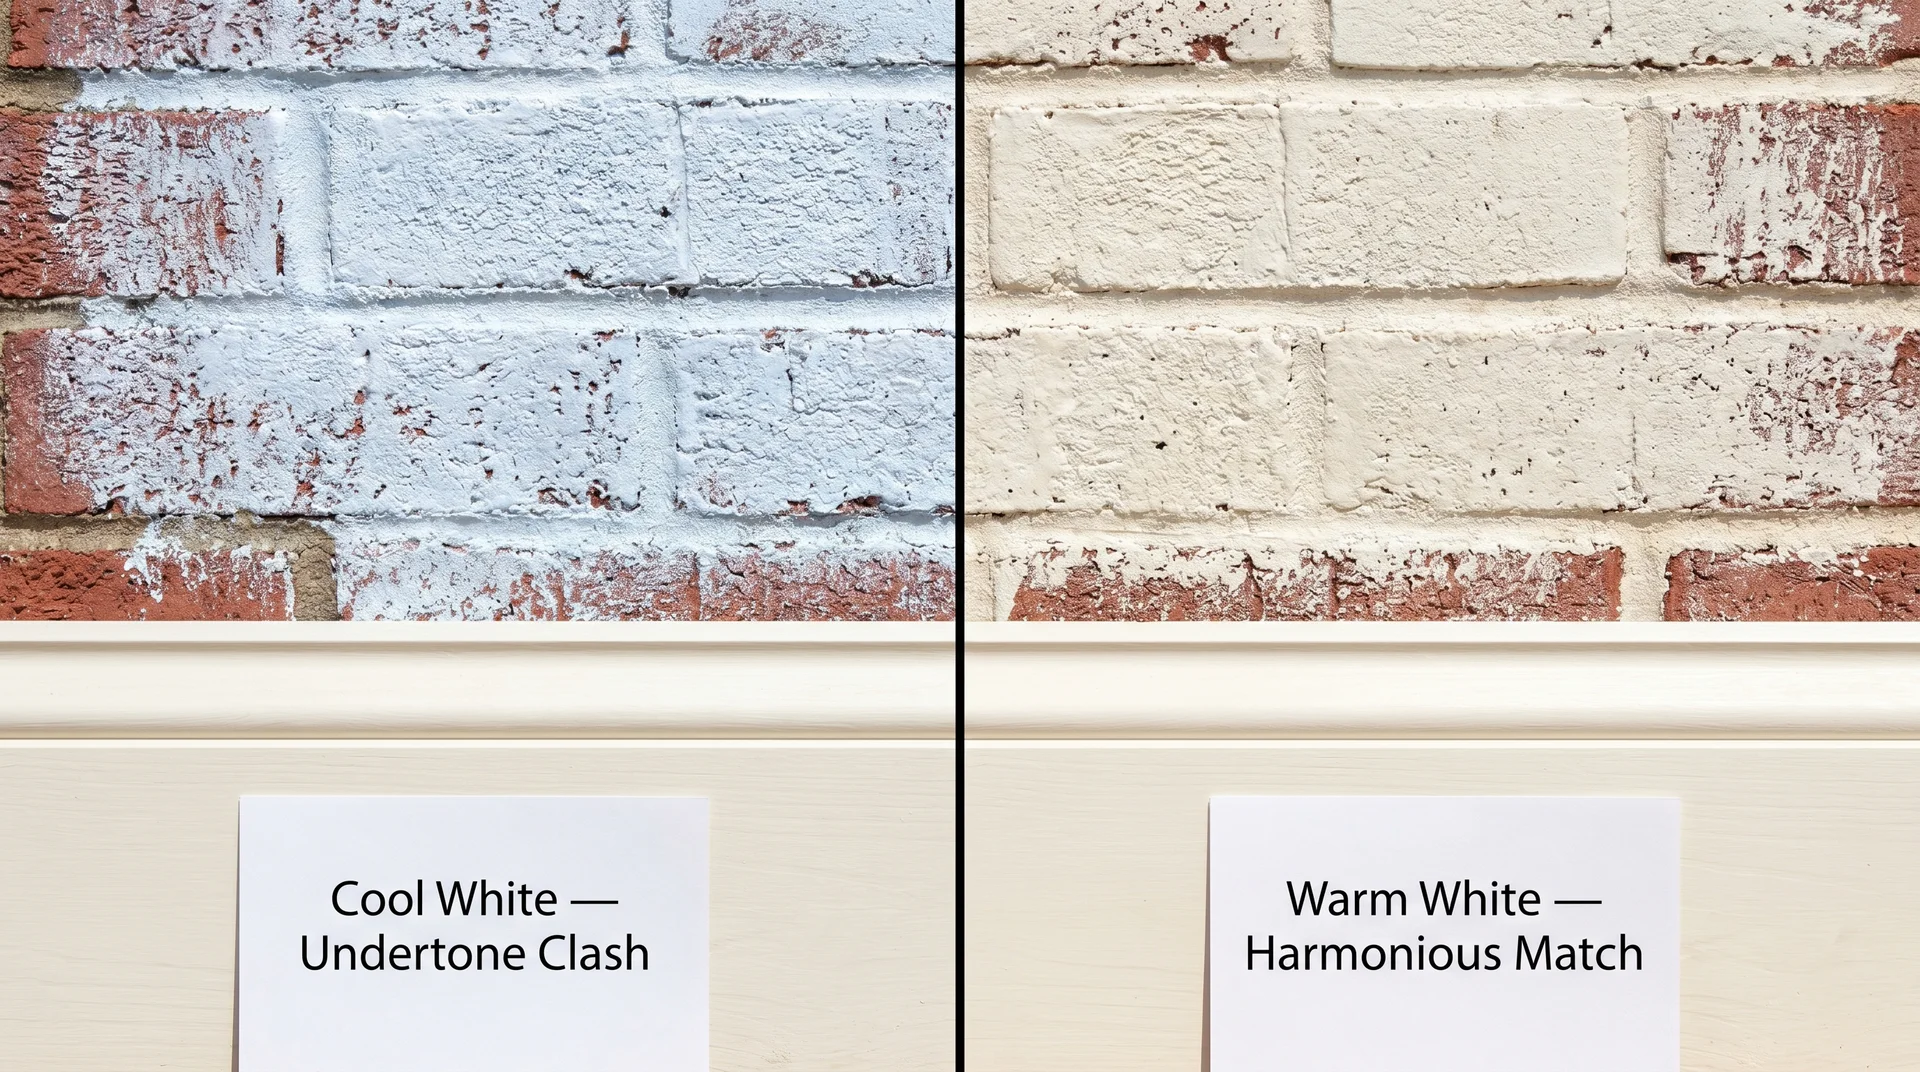
The white you choose for the wash needs to coordinate with your trim color. Cool-white brick next to warm-white trim reads as mismatched, and the problem is more obvious in natural light than it looks on a paint chip.
Two whites that pair well with most trim colors: Benjamin Moore Simply White (warm-neutral, reads clean without being stark) and Sherwin-Williams Extra White (slightly cooler, works well with gray and white trim).
If your trim is already in Sherwin-Williams Alabaster, be aware that Alabaster carries a warm, slightly creamy undertone. Your whitewash should be in a similarly warm white to avoid an undertone clash. Always hold your paint sample next to your trim in natural daylight before you commit.
This is worth thinking through before you start, not after. The brick treatment, trim color, roof tone, and front door all read as one decision from the street, even if they’re made separately.
If you want to see how those combinations actually come together across different brick types and home styles, these exterior whitewash transformations by brick type show the full picture, including which pairings worked and what made the difference in each case.
How to Whitewash Brick Step by Step
What You’ll Need

- White latex paint (eggshell or satin finish, for interior) or a limewash product such as Romabio Classico for exterior
- Water and a large mixing bucket
- A stiff-bristled masonry brush, 2 to 3 inches wide
- Clean cotton rags or a natural sponge
- Painter’s tape and drop cloths
- TSP (trisodium phosphate) or a mild masonry cleaner for prep
- Rubber gloves and eye protection for the cleaning step
- A spray bottle filled with clean water
Note on TSP: Trisodium phosphate is a caustic cleaner. Wear rubber gloves and eye protection when using it, keep children and pets out of the area, and rinse the surface thoroughly before any paint goes on.
Preparing the Surface: The Step That Decides the Outcome
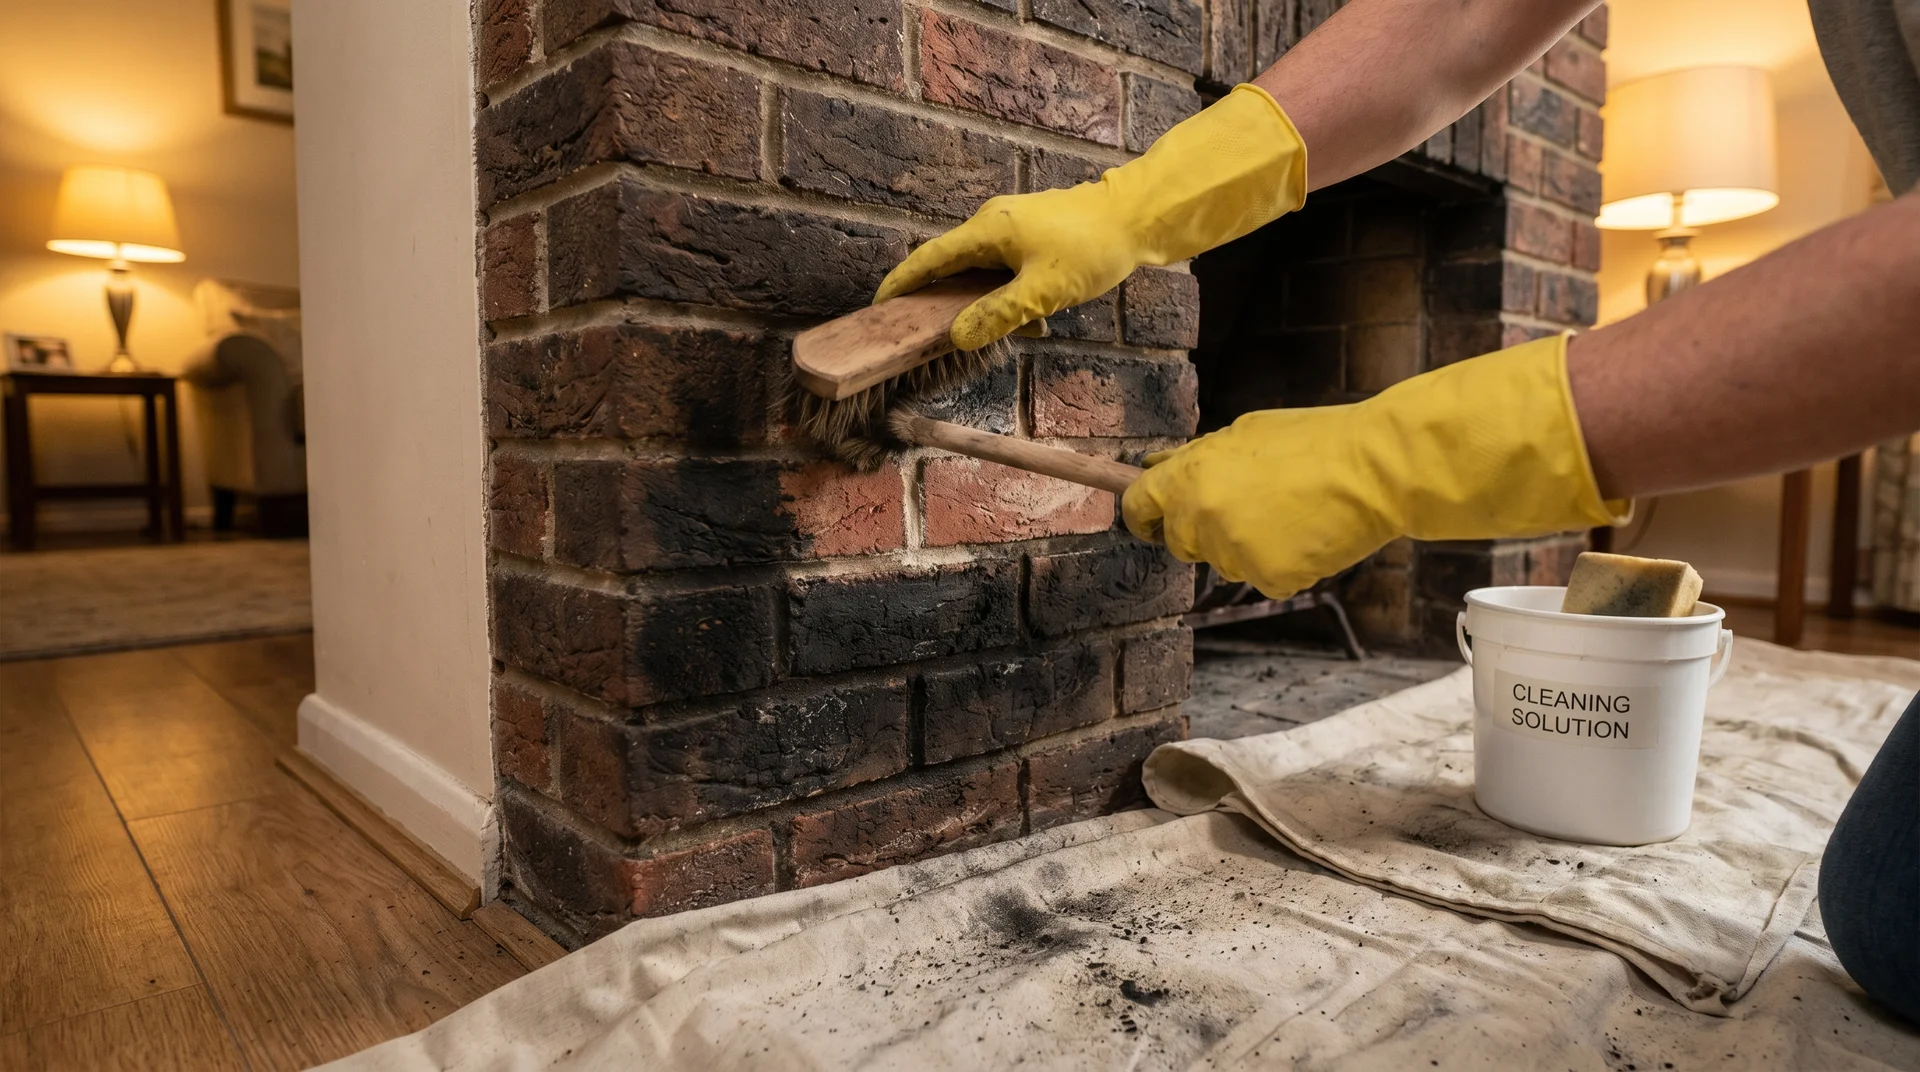
Preparation takes as long as the painting and matters more. Whitewash applied to a dirty or sooty surface doesn’t bond properly. You’ll get uneven coverage, dull patches, and a finish that looks tired before it should.
For a fireplace that has been used, the biggest challenge is soot. Mix one tablespoon of TSP with a gallon of warm water, put on gloves and eye protection, scrub the brick with a stiff brush, and rinse thoroughly.
For a brick that’s just dusty, mild soap and warm water scrubbed in with a brush is enough. Either way, the brick needs to be fully dry before paint goes on, which means at least 24 hours in a ventilated room. Wet brick rejects whitewash unevenly, and no number of extra coats fixes a surface that wasn’t ready.
Once the brick is dry, tape off the mantel, hearth, and any adjacent drywall. Lay drop cloths on the floor. Whitewash is watery and drips in ways regular paint doesn’t.
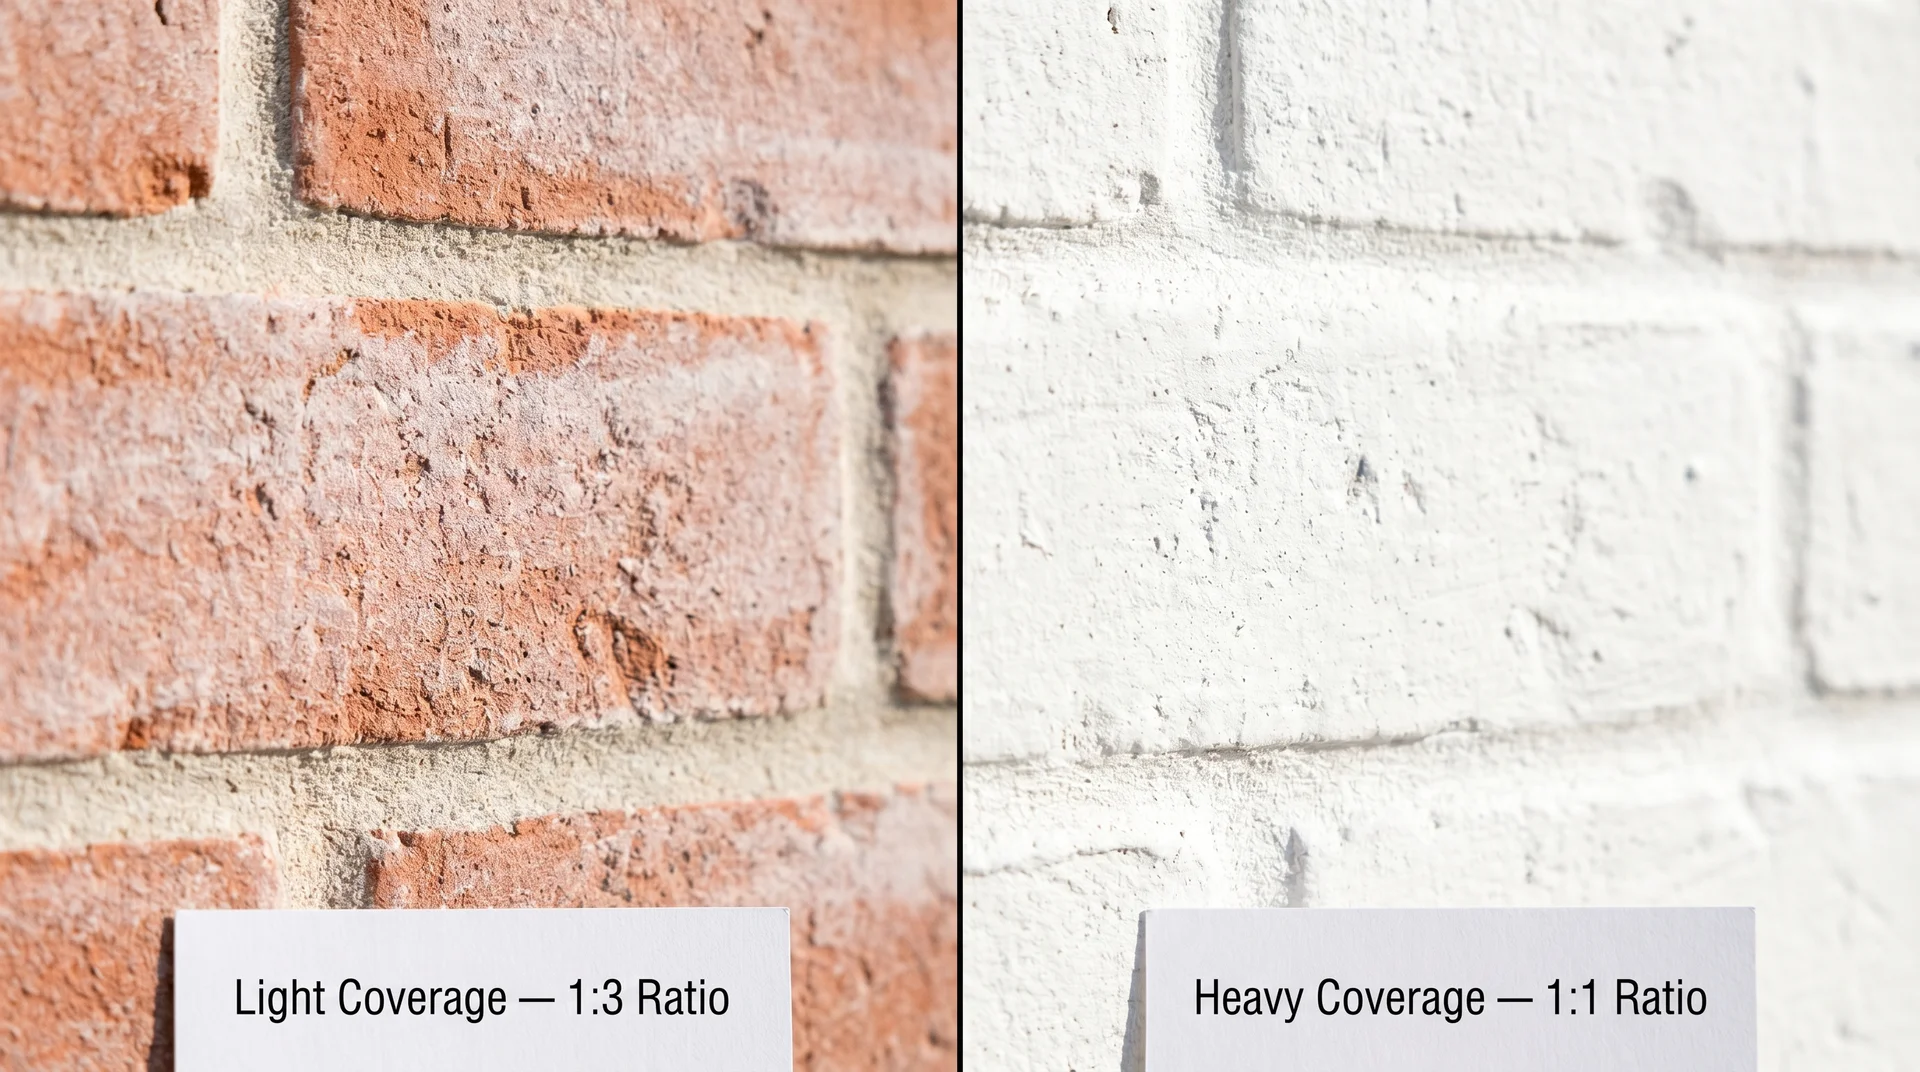
Mixing Your White Wash: Ratios That Actually Make Sense
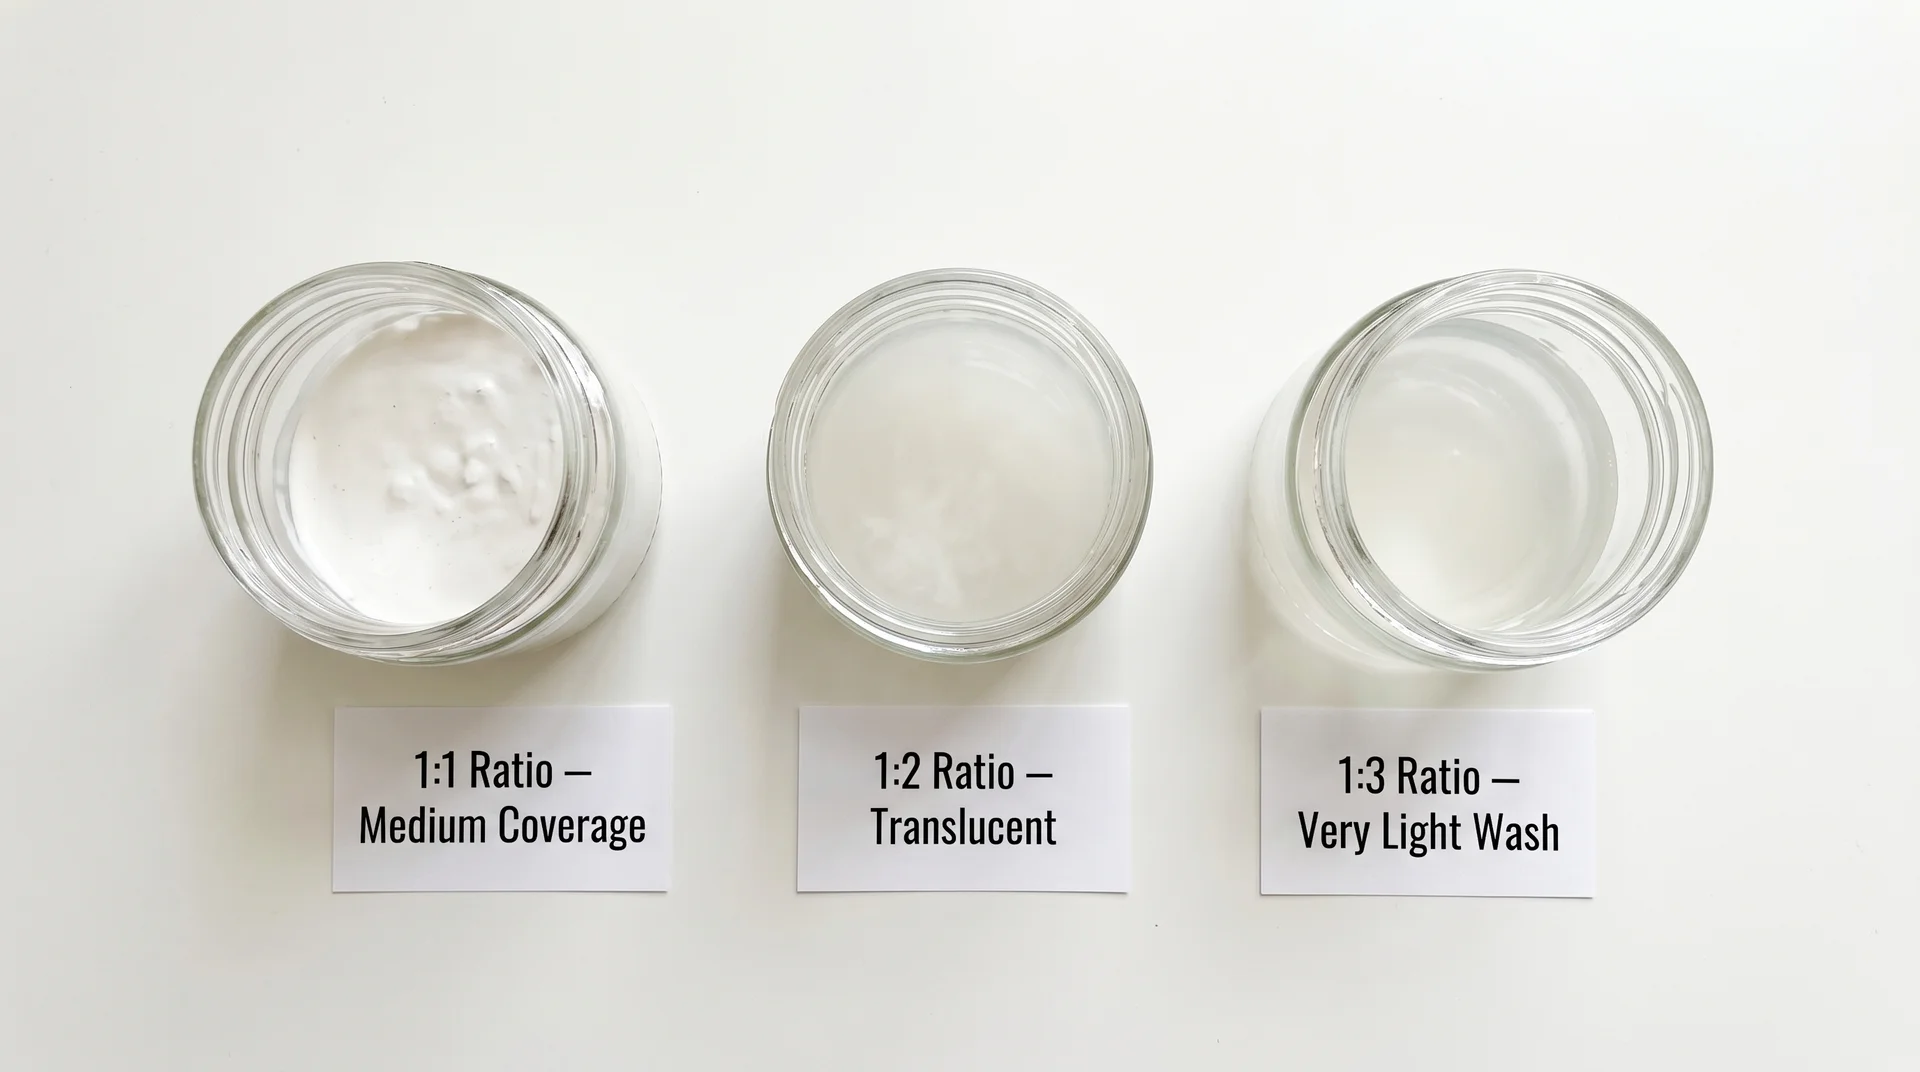
Start with a 1:1 ratio of white latex paint to water. This gives medium-opacity coverage and is the right starting point for most brick. Adjust from there based on your preference:
- More translucent: 1 part paint to 2 or 3 parts water
- Heavier coverage (closer to painted): Stay at 1:1 and plan for two coats
- Replicating the German Schmar look with limewash: Use Romabio Classico at a 50/50 dilution, apply with a masonry brush, and wash back while still wet
Stir the mixture thoroughly. The consistency should feel like slightly thinned milk.
Before touching the fireplace, test on an inconspicuous section and let it dry for 10 minutes. The wet result looks darker and more opaque than the dry result, so don’t judge coverage until it’s had time to set.
How to Apply White Wash Brick for the Best Results
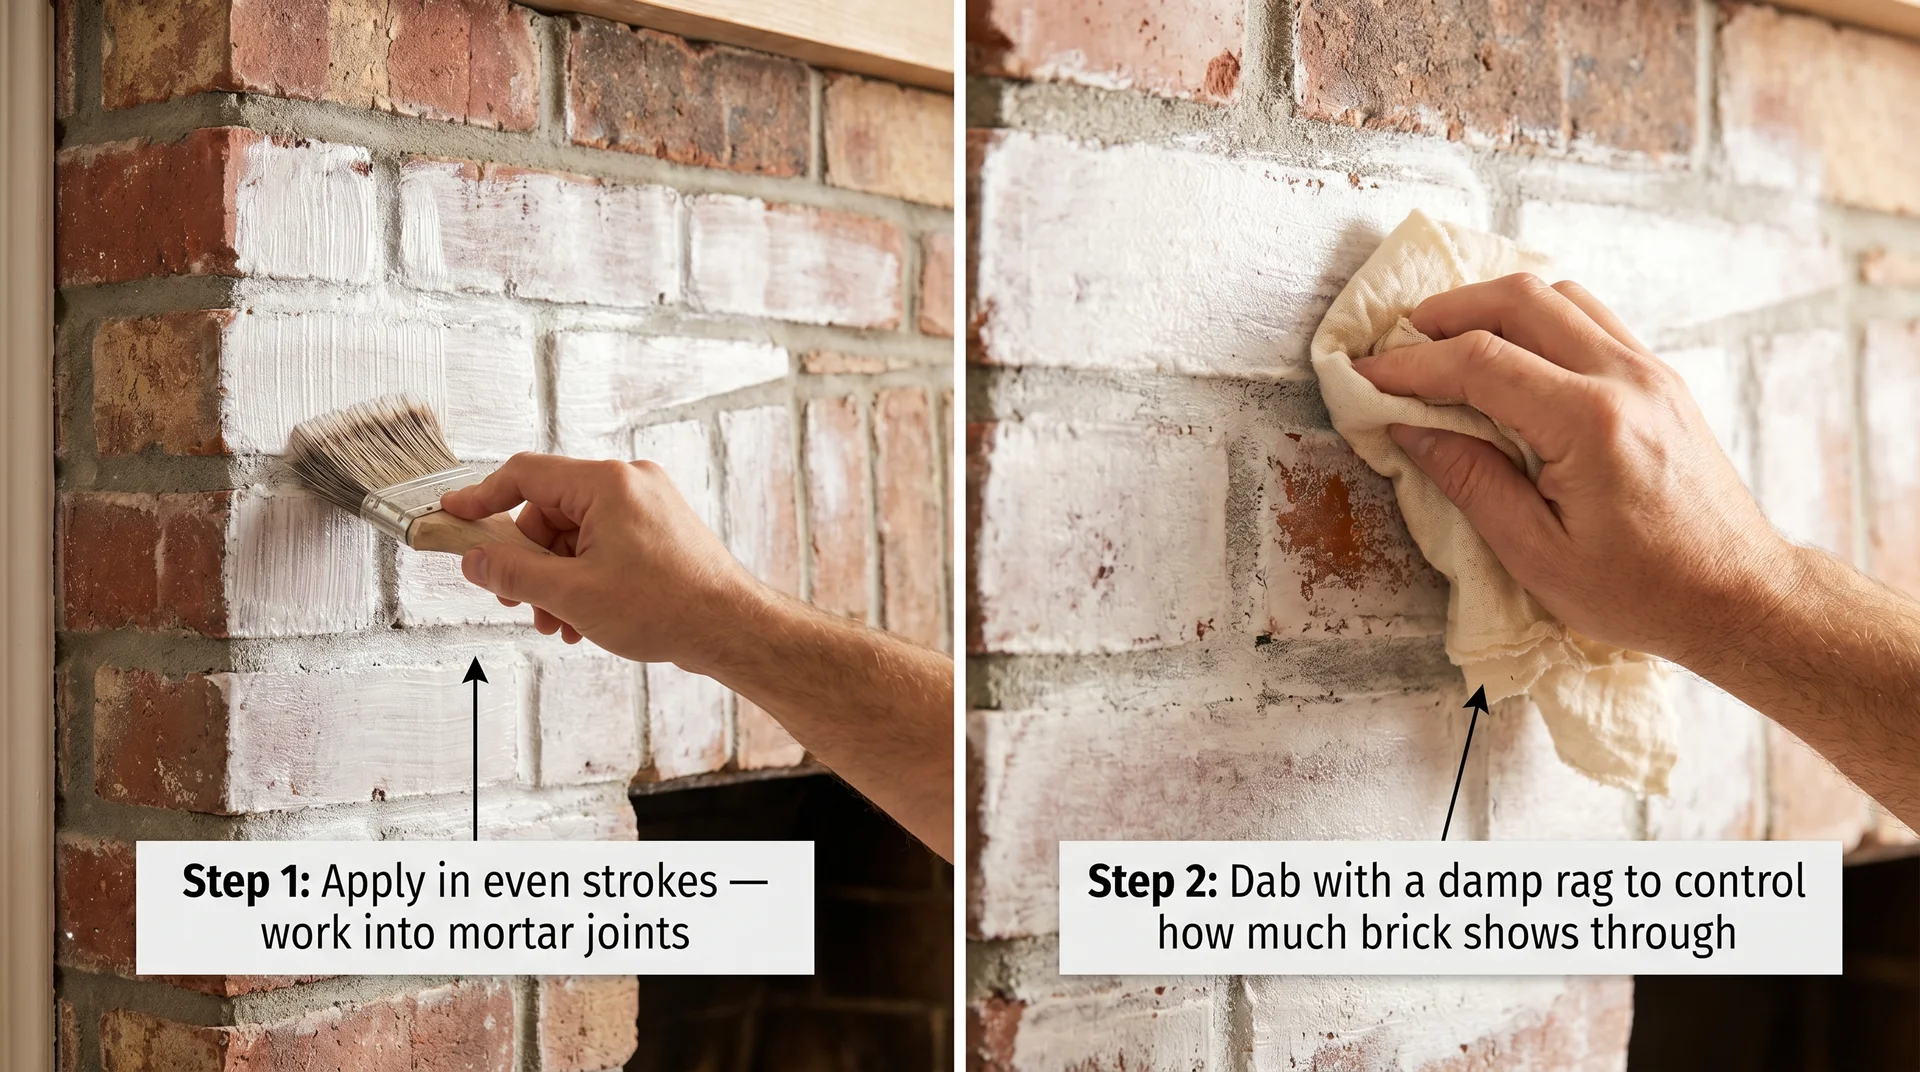
Work in small sections, roughly two square feet at a time. Apply the wash in even strokes with your brush and work it into the mortar joints as well as the brick faces.
Immediately after applying the wash to a section, take a damp cotton rag and dab or wipe the wet surface to lift some of the whitewash back off. This step controls how much brick shows through. Light dabbing gives heavier coverage. Heavier wiping leaves more of the original brick visible.
Work from top to bottom so you don’t drip onto finished sections below. Aim for consistent coverage within each section so there are no visible patches where opacity changes. Keep a spray bottle of water nearby. A light mist helps blend any area that starts drying before you’ve finished working it.
Second Coats and Knowing When to Stop
Wait for the first coat to dry fully before assessing it, which takes 30 to 60 minutes depending on humidity. The dried result will be lighter than the wet result, which surprises most people the first time. If the coverage looks right, you’re done.
It’s much easier to add a second coat than to walk back an over-applied first, so start lighter than you think you need to.
When applying a second coat, the same timing principles apply. If you’re unsure how long to wait between coats of paint before it’s safe to reapply without pulling the first coat off, let the surface dry to the touch fully before going back in, and always reassess dry rather than wet.
How to Whitewash Previously Painted Brick
The process differs from raw brick in one key way: the surface won’t absorb the wash the same way. Prep and clean as usual. Use a limewash product rather than diluted latex, since limewash adheres better to sealed surfaces.
Apply in thin coats and resist the urge to wipe back as aggressively, since on a painted surface, the wash sits on top rather than soaking in, and heavy wiping can remove more than you want. One light coat, fully dried, then a second if needed, gives a more consistent result on previously painted brick than trying to force coverage in a single application.
Mistakes That Are Easy to Avoid
These come up in projects I’ve seen go sideways, and every one is preventable if someone mentions it first.
- Skipping the test patch. Your brick’s porosity, color, and texture all affect the result. The test patch is not optional.
- Starting with the most visible section. Begin on a back or side section and work toward the focal area once you’re comfortable with the coverage.
- Applying the first coat too heavily. A single thick coat doesn’t give you more coverage than two medium ones. It gives you a chalky surface that looks painted rather than washed.
- Stopping mid-wall and returning later. Whitewash dries quickly. If you stop mid-section and come back in an hour, the dried edge leaves a visible seam. Finish a full wall or section in one session.
- Using interior latex paint on exterior brick. Regular latex seals the brick and traps moisture inside. In climates with temperature variation, that moisture causes deterioration from the inside out. Use a masonry-rated limewash for any exterior surface.
- Pressure washing to clean whitewashed brick later. For regular maintenance, a soft brush with mild soap and warm water is the right tool. Pressure washing strips the finish unevenly and forces water into the brick under pressure.
How Long White Wash Brick Lasts, and Whether You Can Remove It
Realistic Longevity by Product Type
| Product & Location | Expected Lifespan | What Aging Looks Like |
|---|---|---|
| Latex whitewash, interior fireplace (decorative) | 10 to 15 years | Gradual fading, easy to touch up |
| Latex whitewash, interior fireplace (actively used) | 5 to 8 years | Faster fade near the firebox opening |
| Latex whitewash, exterior brick | 5 to 8 years | Peeling or flaking in wet climates |
| Limewash, exterior brick | 5 to 7 years | Soft, gradual weathering (often attractive) |
| German smear | Permanent | Minimal change; highly durable |
The Reversibility Question: An Honest Answer
Limewash, within the first five to seven days after application, can be partially or fully removed by wetting the surface and scrubbing with a stiff brush. After it cures, removal becomes significantly more difficult.
Latex whitewash is not truly reversible once dry, but it can be painted over with solid paint or layered with additional whitewash coats. Think of it as probably permanent but paintable, rather than freely reversible.
German smear is permanent. If there’s any uncertainty, it’s not the right starting point.
Maintaining White Wash Brick Without Stripping the Finish
For day-to-day cleaning, a soft cloth and warm water handle most dust and light grime. For stubborn marks, mild dish soap diluted in warm water applied with a soft brush works well. Rinse with clean water and avoid anything abrasive or acidic, which lifts the finish unevenly.
Do not use pressure washing. When the finish starts to look dull or uneven, a fresh coat applied over the existing surface restores it without requiring full removal.
What It Costs to White Wash Brick
DIY Cost Breakdown
For a standard fireplace surround using diluted latex paint, materials run between $30 and $80, depending on whether you have white paint on hand.
If you’re using a pre-mixed limewash product such as Romabio Classico, expect to spend $60 to $120 for a fireplace, depending on coverage area and the number of coats.
For an exterior wall, the materials scale significantly. A 1,000-square-foot exterior done in limewash typically runs $200 to $500 for a competent DIY project.
Professional Cost Range
Hiring a professional for a fireplace whitewash typically runs $300 to $800, depending on the size and condition of the surround.
For an exterior, professional limewash application ranges from $2,000 to $5,000 for an average-sized home, with the main variables being brick condition, accessibility, and the contractor’s familiarity with masonry finishes.
Who Should DIY This, and Who Shouldn’t
For an interior fireplace, most capable homeowners can handle this project in an afternoon. It’s a forgiving technique, and the scale is manageable. For an exterior application, getting at least one professional quote before deciding is worth the time.
Application consistency is harder to maintain across large areas, and an uneven exterior finish is far more noticeable than a slightly imperfect fireplace surround. If you’re leaning toward German smear anywhere, hiring a professional is worth the additional cost.
The permanence of that technique raises the stakes considerably.
Frequently Asked Questions
Can You Whitewash Brick That’s Already Been Painted?
Yes, though the results differ from raw brick. On a painted surface, the wash sits on top of the paint rather than absorbing into the brick, which means coverage is more uniform and the finish looks slightly flatter than the classic whitewash texture.
A limewash product rated for painted surfaces gives better results than diluted latex paint in this situation.
What Is the Best White Paint Color for Whitewashing Brick?
The undertone matters more than the brand. For rooms with cool gray or white trim, choose a white with neutral or cool undertones, such as Sherwin-Williams Extra White.
For rooms with warmer trim and wood tones, choose a white with a slight warm undertone, such as Benjamin Moore Simply White. Always check your chosen shade against your trim color in natural daylight before you mix and apply.
Does Whitewashed Brick Need to Be Sealed?
For interior decorative fireplaces, sealing is optional. A water-based masonry sealer protects the finish and makes cleaning easier, but it reduces the breathability of the surface.
For exterior brick, sealing over a limewash finish is generally not recommended because it defeats the breathability that makes limewash appropriate for exterior masonry in the first place.
Can You Whitewash Brick in Cold Weather?
Latex whitewash should be applied in temperatures above 50 degrees Fahrenheit, with the surface staying above that temperature while the paint cures. For exterior applications in cooler climates, late spring through early fall gives the most reliable conditions. Interior projects can be done year-round with normal climate control.
Is Whitewashing Bad for Brick Long-Term?
For interior brick, properly applied whitewash or limewash doesn’t damage the brick. For exterior brick, the answer depends on the product.
A breathable mineral-based limewash is actually protective. Latex or oil-based paints that seal the surface and trap moisture can cause long-term damage in freeze-thaw climates. Use the right product for the location, and you won’t have a problem.
What’s the Difference Between Whitewash and Limewash on a Fireplace?
On an interior fireplace, the difference is mostly in texture and durability. Limewash produces a slightly more textured, chalky finish that develops a natural patina over time. Latex whitewash is smoother and more uniform.
Both look good. For a fireplace you actively use for fires, limewash holds up better near the heat and requires less maintenance over time.
How Do You Get a More Opaque Finish Without Fully Painting the Brick?
Apply two coats at a 1:1 ratio rather than one heavy coat. Two thinner coats give you more even, buildable coverage while preserving the texture and layered quality that makes whitewash worth doing. Let the first coat dry fully before the second, and reassess dry coverage before deciding if you need another round.