
Every summer the same five-ingredient DIY tanning oil recipe makes the rounds: coconut oil, carrot seed oil, vitamin E, a few drops of something scented, shake before use.
I’ve had clients bring these recipes to consultations and ask why they broke out after a beach day, or got burned, or just looked oily without tanning noticeably more. The recipe was fine. It was also completely wrong for their skin.
This guide covers how to make tanning oil that matches your skin type, with an honest explanation of what each ingredient actually does. It also covers the SPF question that most DIY articles skip, why carrot seed oil isn’t a sunscreen, no matter what you’ve read, and what to reach for when you don’t have a specific ingredient on hand.
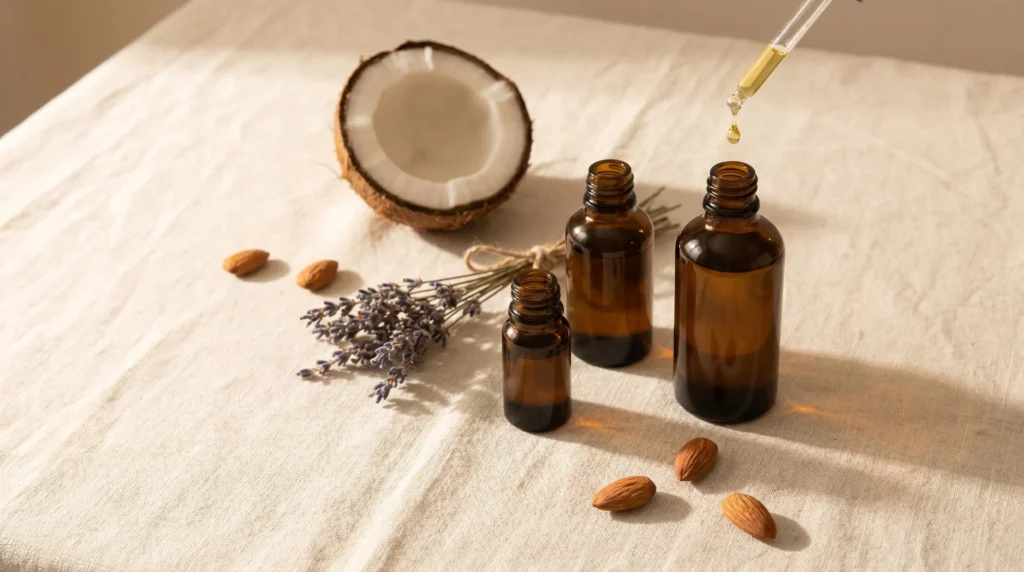
Quick Formula: Basic DIY Tanning Oil
For normal skin, here is the standard starting formula:
- 60ml sweet almond oil
- 30ml coconut oil
- 1 tsp (approximately 5ml) vitamin E oil
- 10 drops lavender essential oil
Combine in a dark glass bottle and shake well before each use. Apply to clean, dry skin 15 to 20 minutes before sun exposure. The full breakdown of why this combination works, and how to adjust it for your skin, follows below.
How Tanning Oil Actually Works
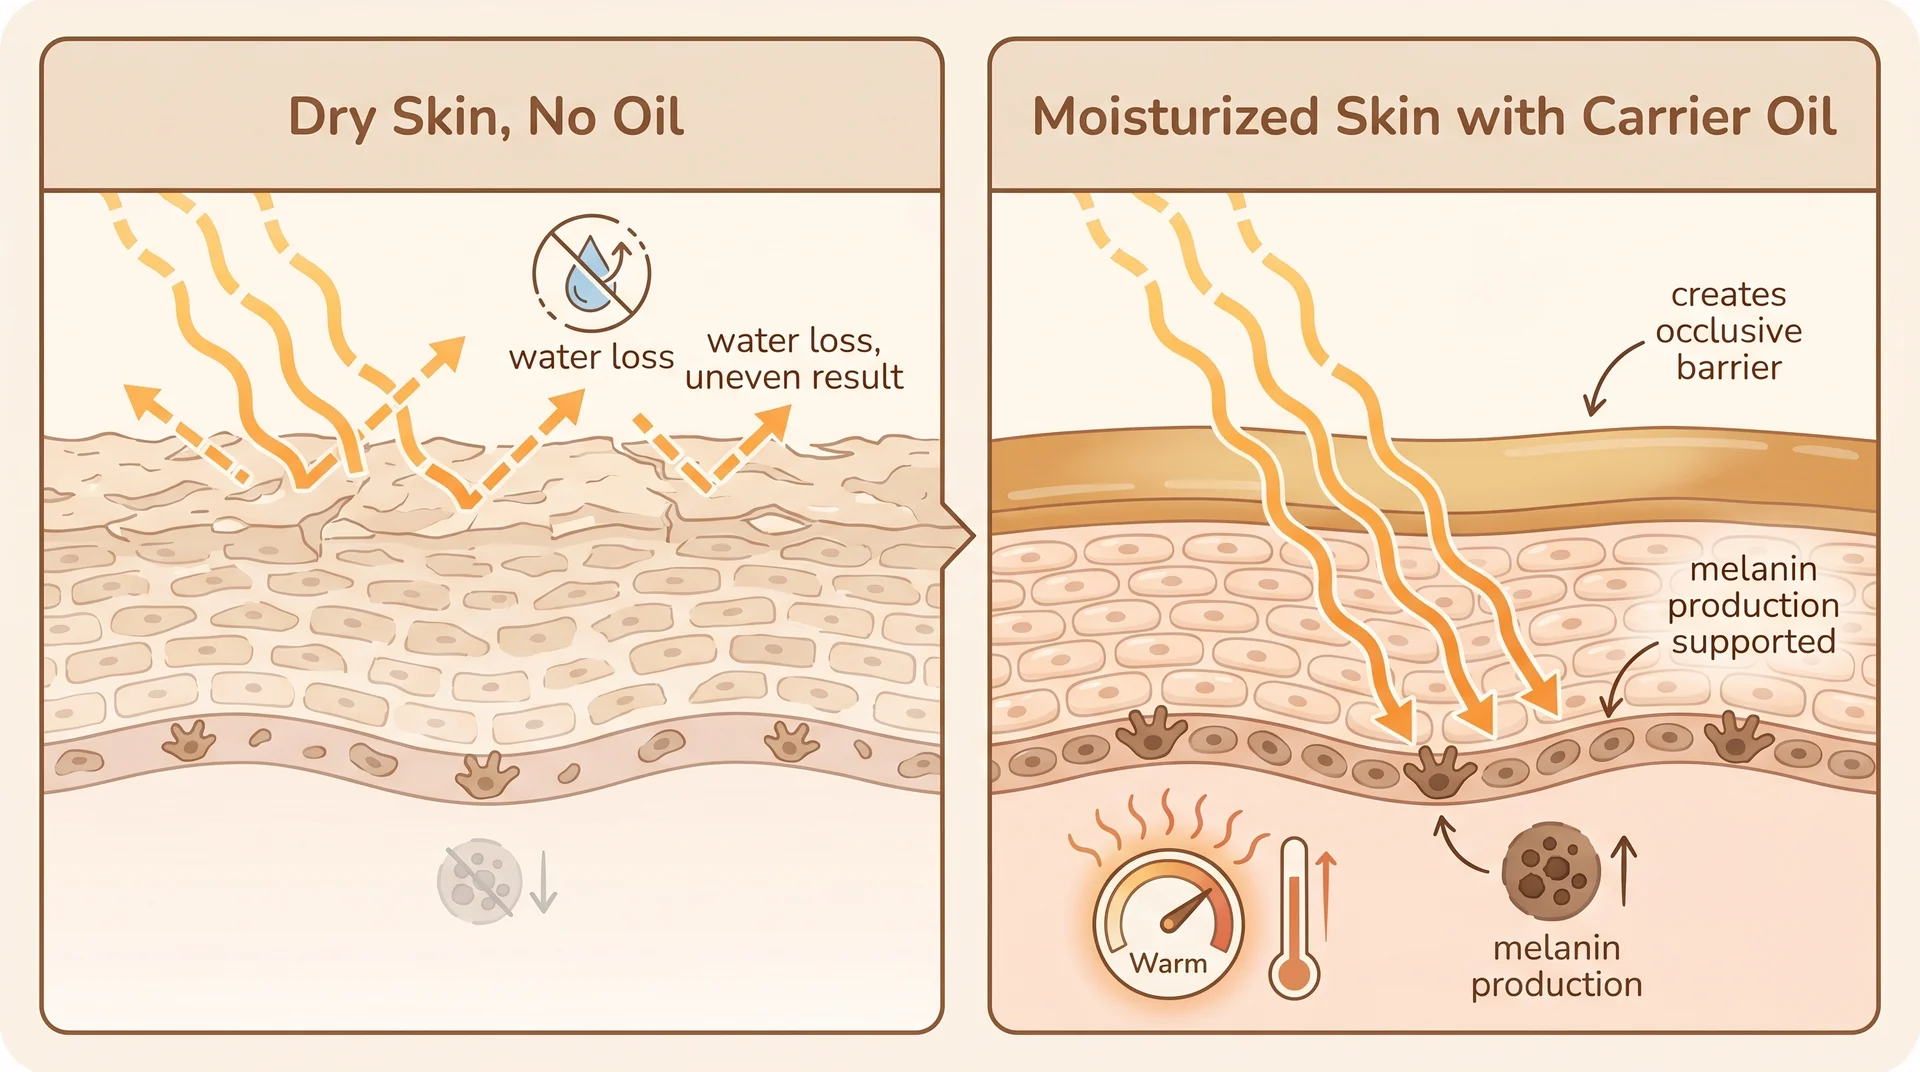
Tanning oil doesn’t create a tan. It creates surface conditions that support faster, more even melanin production, and understanding that distinction changes how you think about every ingredient you put in the bottle.
What the Oil Does During Sun Exposure
When you apply oil before UV exposure, a few things happen at once. The oil forms an occlusive layer that traps heat at the skin surface and reduces transepidermal water loss, which keeps skin hydrated and better able to develop an even, consistent color.
Some carrier oils, particularly coconut and olive, don’t contain the film-forming agents that deflect UV, so they transmit it relatively efficiently. That’s the point. You’re letting UV reach the skin while keeping the skin in good condition while it does.
The practical consequence of this: the same properties that make an oil effective for tanning can cause real problems if the oil is wrong for your skin type. An occlusive base that works perfectly for dry skin will sit on congested pores, trap heat, and cause breakouts on skin that runs oily or acne-prone.
I’ve seen this in consultations more times than I can count, and the connection is rarely made until someone asks. The formula has to match the skin, not just the goal.
Does DIY Tanning Oil Have SPF?
No. Most DIY tanning oils have no meaningful SPF, and carrot seed oil is not a sunscreen.
This is probably the most practically important thing in this article, and most homemade tanning oil content skips it entirely. Carrot seed oil is frequently cited in DIY circles as having a natural SPF in the 30s or 40s.
This claim is not supported by cosmetic chemistry consensus, is not accepted as reliable by dermatologists or formulators, and should not be used as a basis for UV protection decisions. Raspberry seed oil carries similar overstated claims. Both oils are genuinely useful ingredients for other reasons. UV protection is not one of them.
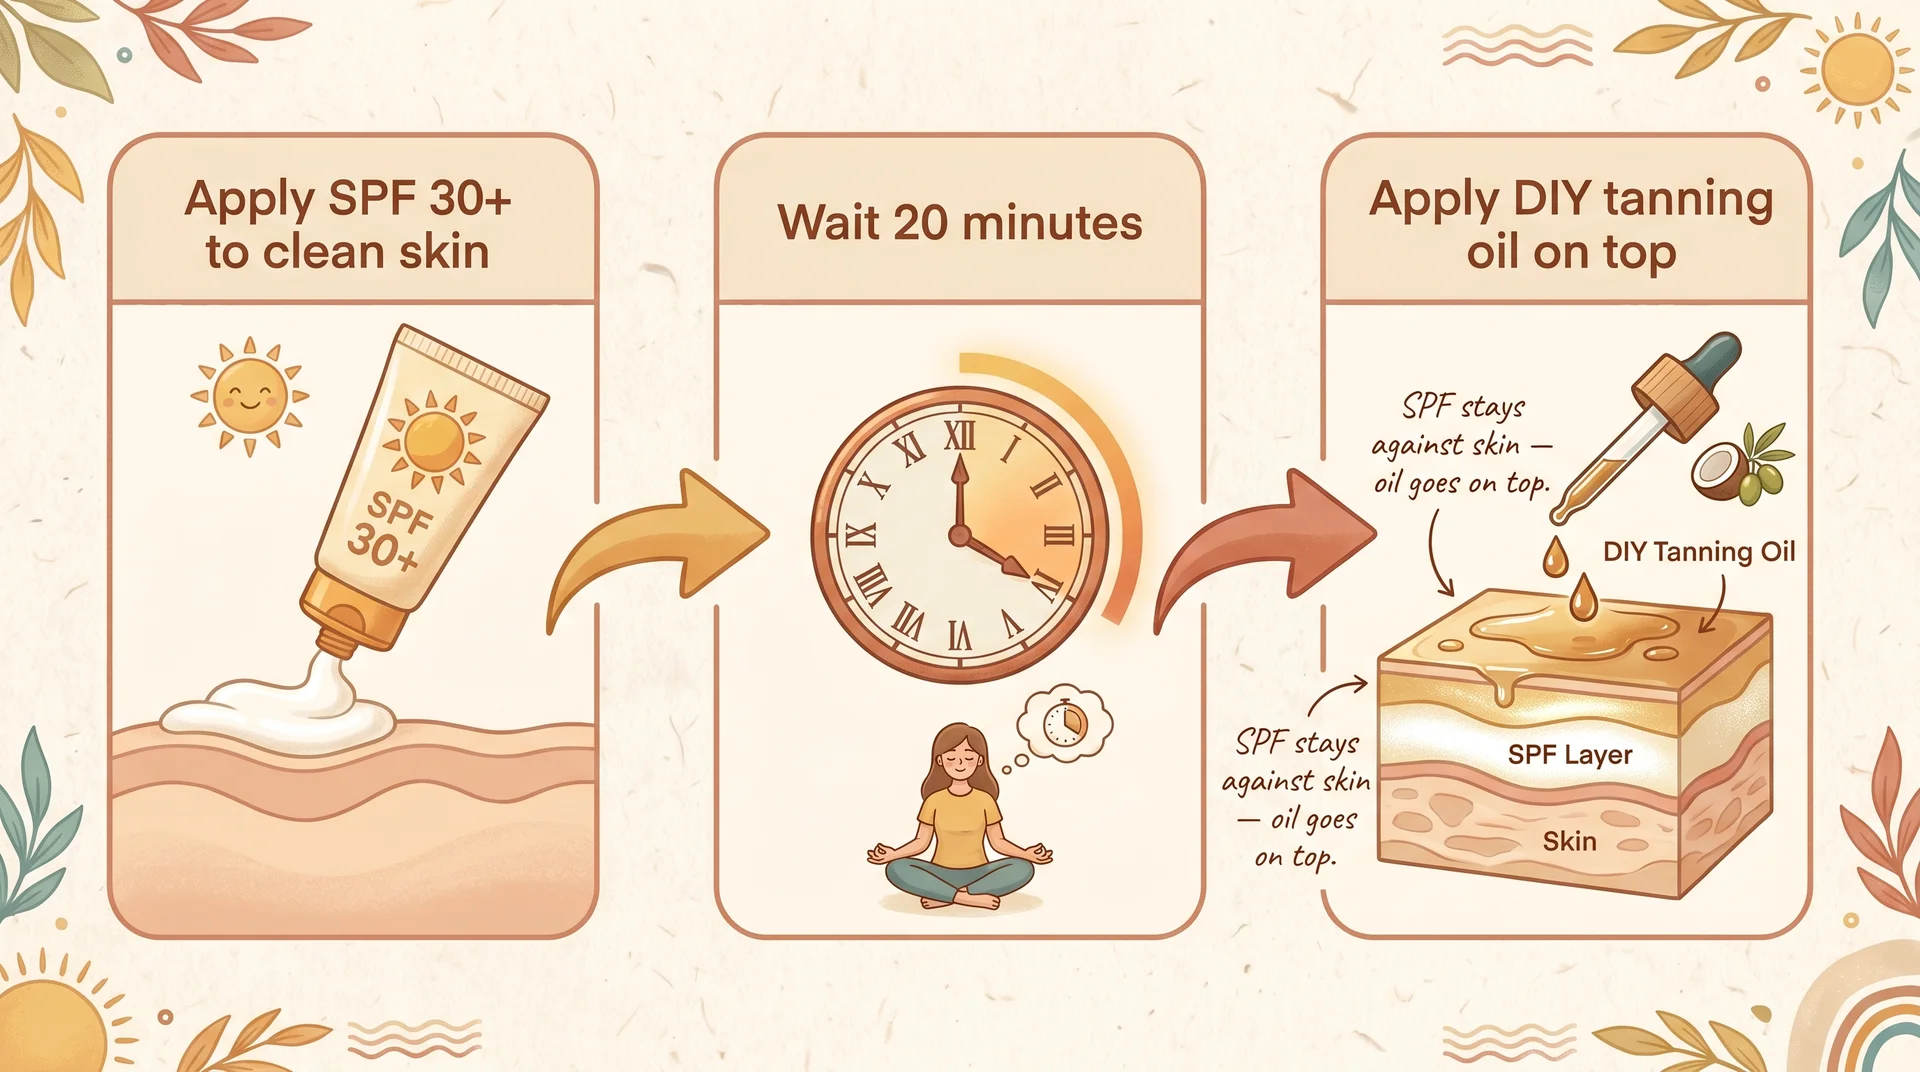
A DIY tanning oil is designed to work with UV exposure, not reduce it. If sun protection matters to you, the approach that actually works is layering. Apply a broad-spectrum SPF 30 or higher to clean skin first.
Wait at least 20 minutes for full absorption. Then apply your tanning oil on top. The SPF sits against the skin; the oil goes on top. This approach lets you support an even tan while maintaining actual UV protection. For a fuller explanation of how sunscreen behaves with UV exposure, this piece on sunscreen and UV exposure covers the mechanism in detail.
A note on UV risk: DIY tanning oils accelerate UV exposure and are not a substitute for sun protection. If you have a history of skin cancer, a photosensitivity condition, or active skin concerns, speak with a dermatologist before using any tanning product.
What Carrot Seed Oil and Beta-Carotene Actually Contribute
Carrot seed oil’s value in a tanning formula is antioxidant coverage, not tan acceleration. This matters for how you think about including it.
Beta-carotene consumed through food can give skin a warmer, more golden tone over time. That’s real. Applied topically, though, carrot seed oil doesn’t produce the same effect.
The beta-carotene content doesn’t meaningfully darken skin through surface application, the way internal beta-carotene does through the body’s metabolic processes. What carrot seed oil genuinely does is help neutralize some of the free radicals generated by UV exposure at the skin surface. That’s a worthwhile reason to include it. It’s just not the reason most recipes give you.
If you include it knowing it’s contributing antioxidant protection, you’re using it correctly. Once you understand what it’s actually doing, it becomes easier to choose the right base oil for your skin, which is where this formula either works for you or against you.
Choosing Your Base Oil
The base oil is the majority of your formula, and it’s the decision that most DIY recipes treat as interchangeable when it genuinely isn’t. Skin type determines which oil you should be using.
Best Base Oils for Normal to Dry Skin
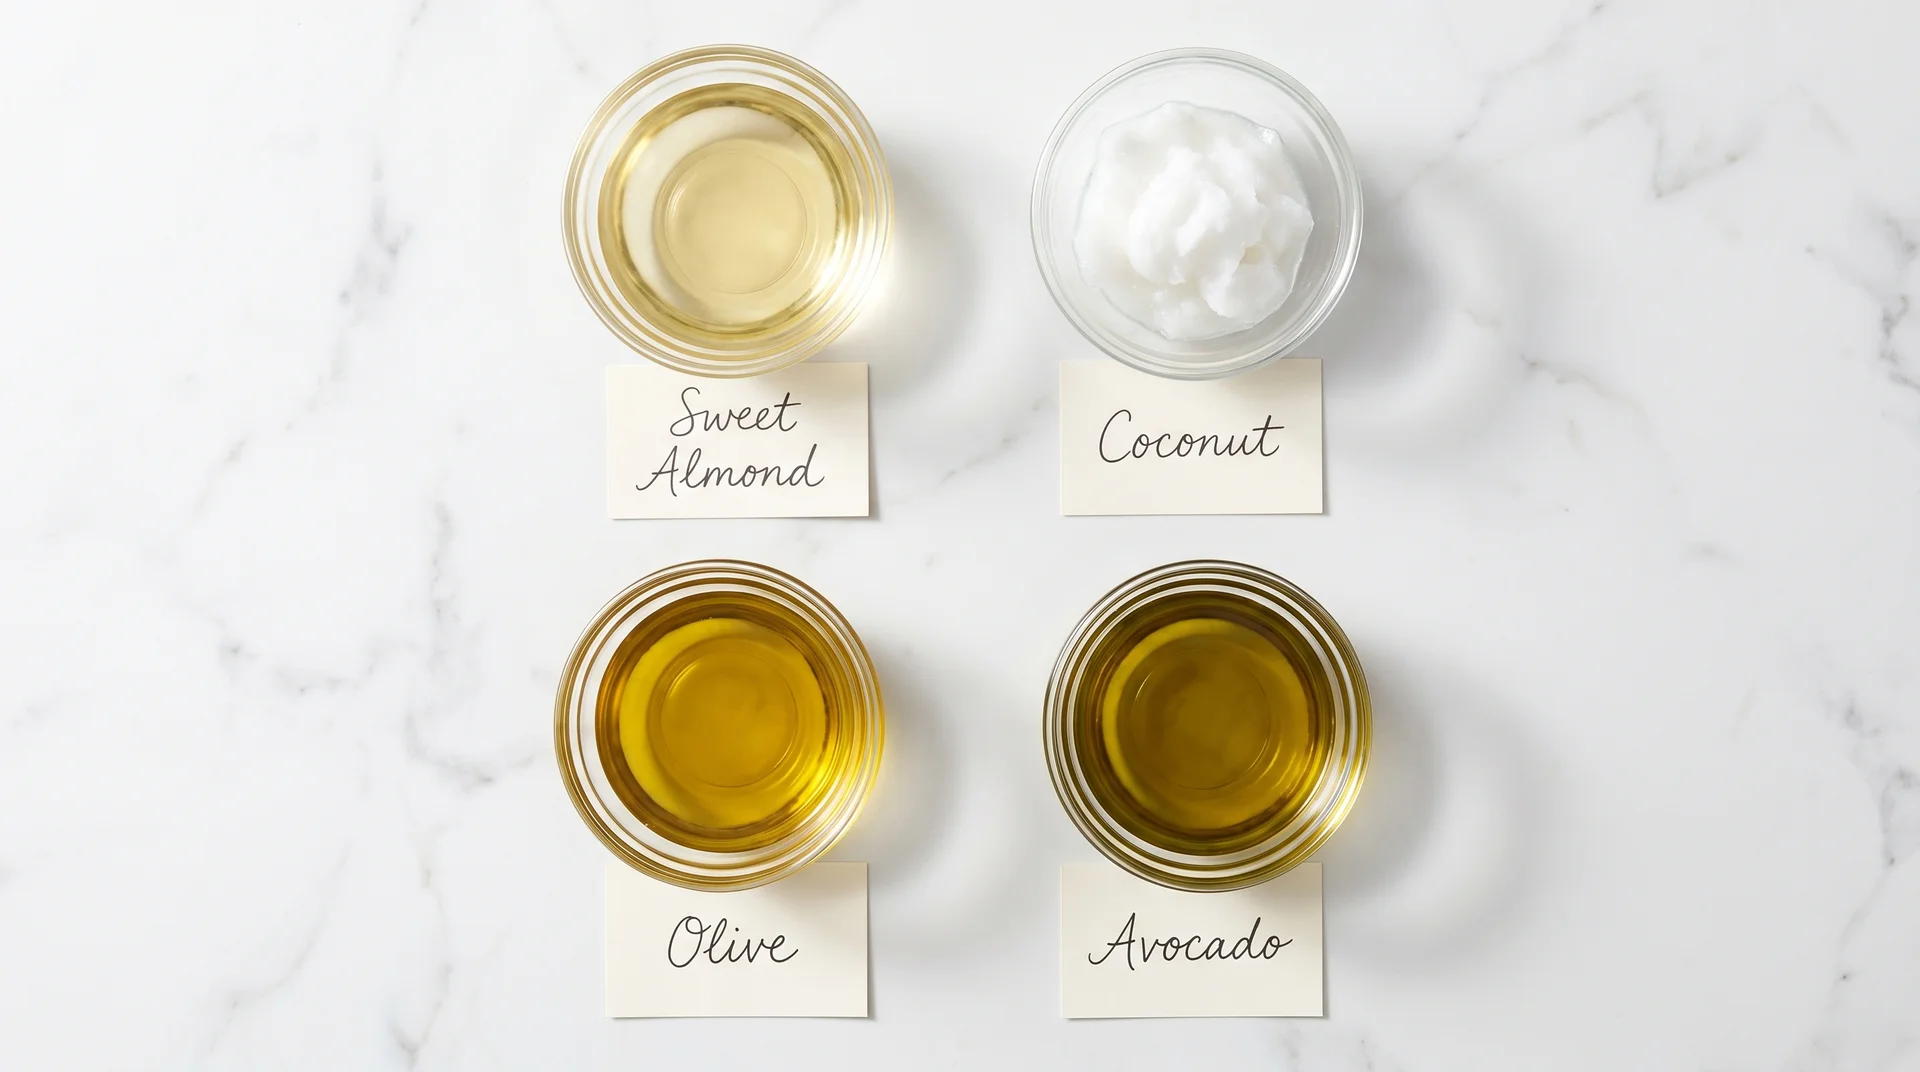
If your skin runs normal to dry without a history of congestion or breakouts, you have real flexibility here. The table below lists the most common options from lightest to richest.
| Oil | Comedogenic Rating | Texture | Best For |
|---|---|---|---|
| Sweet almond oil | 2 | Lightweight, absorbs cleanly | Normal to dry; the most versatile base |
| Coconut oil | 4 | Melts on contact, leaves a sheen | Normal skin, body application only |
| Olive oil | 2 to 3 | Heavier, slower to absorb | Dry skin; best blended with a lighter oil |
| Avocado oil | 3 | Richest of the group | Dry or mature skin |
Coconut oil is the most popular DIY tanning oil base for good reason: it’s inexpensive, widely available, and its UV transmission properties make it genuinely useful in this context.
The real-world caveat is its comedogenic rating of 4. On warm body skin that’s been sweating for several hours, even people who wouldn’t normally call themselves breakout-prone can experience congestion. Use it on your body, not your face, and pay attention to how your skin actually responds over a full day outdoors rather than assuming it’ll be fine because you’ve used it before.
Olive oil has one additional friction point worth mentioning: it oxidizes faster than most carrier oils in heat, and the smell of rancid olive oil on warm skin becomes noticeable. If you use it, blend it with a more stable carrier oil like sweet almond, and make smaller batches that you’ll finish within a few weeks.
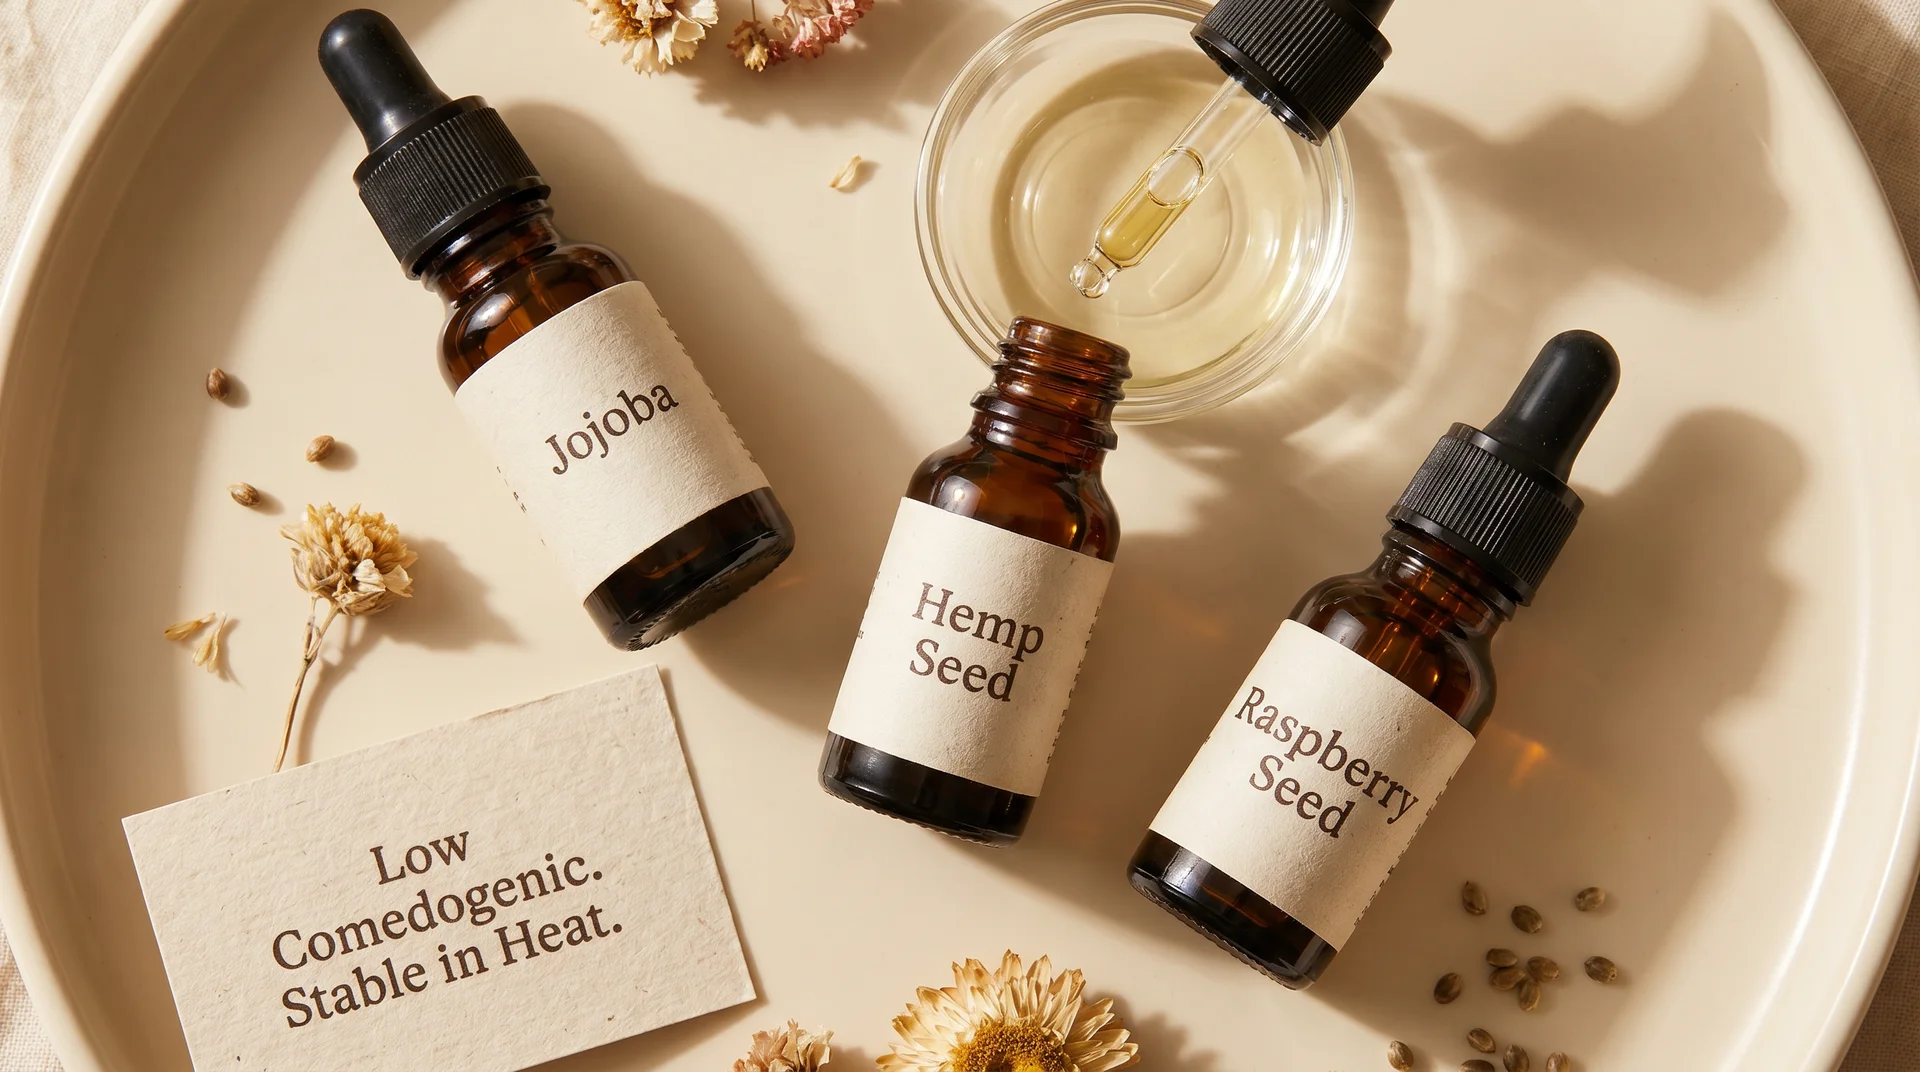
Best Base Oils for Acne-Prone or Sensitive Skin
This section is the one most DIY tanning oil articles don’t include, and it’s the most important one if your skin is prone to breakouts.
Warm skin, an occlusive oil, and several hours of sweating in direct heat create exactly the conditions that congest pores and trigger inflammation. The answer isn’t to skip tanning oil. It’s to choose a base that doesn’t work against your skin while you’re using it.
| Oil | Comedogenic Rating | Why It Works for Reactive Skin |
|---|---|---|
| Jojoba oil | 2 | A wax ester that mimics skin’s natural sebum; it stays stable as skin temperature rises |
| Hemp seed oil | 0 to 1 | High linoleic acid content; anti-inflammatory profile; absorbs without feeling heavy |
| Raspberry seed oil | 1 | Lightweight; antioxidant-rich; one of the more defensible skin-protective choices in this category |
Jojoba is my first recommendation for acne-prone skin in almost any context, and it’s particularly well-suited here because it stays stable as body temperature rises during sun exposure.
Hemp seed oil’s high linoleic acid content is relevant for a specific reason: skin that tends toward breakouts typically has lower linoleic acid in its sebum, and applying linoleic-rich oils topically can support barrier function without adding pore-clogging weight. It absorbs quickly, so you don’t spend the afternoon feeling coated.
One thing worth knowing if you go the hemp seed or raspberry seed route: both are high in polyunsaturated fatty acids, which means they oxidize faster than more saturated oils under heat and UV exposure.
This is exactly why the vitamin E in your formula matters, and why making smaller batches you’ll finish within six to eight weeks is smarter than making a large bottle you’ll use all summer. Store them in a cool, dark place, and refrigerate between uses if you can.
The beach breakout isn’t mysterious once you know the comedogenic rating of what you put on before you went out.
Oils to Avoid or Approach with Caution
- Baby oil (mineral oil): It intensifies UV exposure effectively, and that’s an honest statement. It also carries a real increase in burn risk, offers nothing to skin health, and traps heat in a way that can become uncomfortable quickly. For a full breakdown of the trade-off, this piece on baby oil for tanning covers it specifically. If someone chooses to use it, they should do so knowingly.
- Olive oil as a solo formula: Functional in theory, but it oxidizes quickly in heat, the smell on warm skin becomes noticeable within an hour, and using a moderately comedogenic oil alone on the body for extended periods can accumulate over time for congestion-prone skin.
- Fragrance oils: Not the same as essential oils. They offer no skin benefit, can cause sensitization on skin that’s already reactive from UV exposure, and have no place in a formula worn in direct sunlight. Only use essential oils, diluted correctly.
Enhancers and What Each One Actually Does
Every ingredient in a tanning formula should have a job. Here’s what the most common additions contribute, without the inflated claims most recipes attach to them.
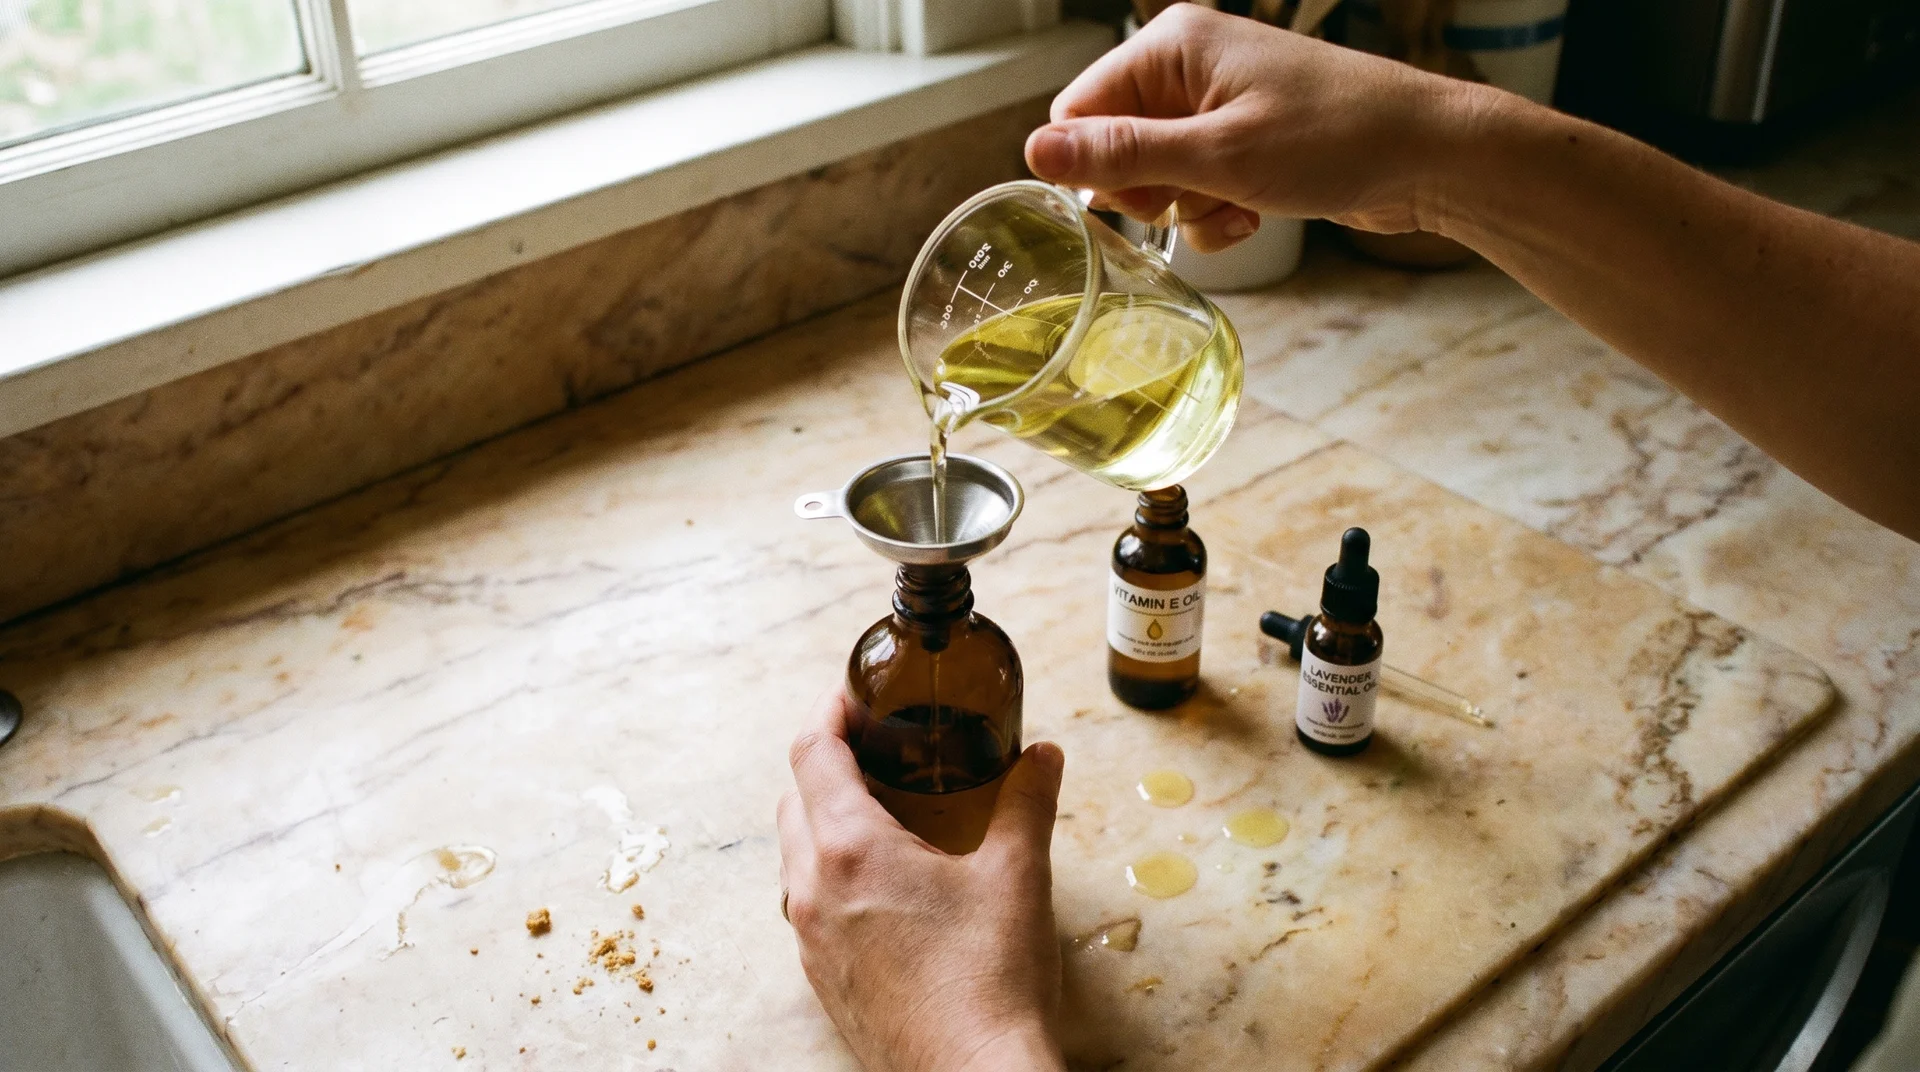
Vitamin E Oil
Vitamin E is the most straightforward addition in any tanning oil, and the most defensible one. As an antioxidant, it helps neutralize free radicals generated by UV exposure at the skin surface, which is a real and useful function, particularly for the high-PUFA oils covered above.
It also slows the oxidation of your carrier oil blend, which extends shelf life. One teaspoon per 100ml of carrier oil is sufficient. Adding more doesn’t improve either function, and vitamin E is viscous enough that overdoing it changes the formula’s texture in a way most people find unpleasant.
Safe Essential Oils for Scent and Skin Benefit
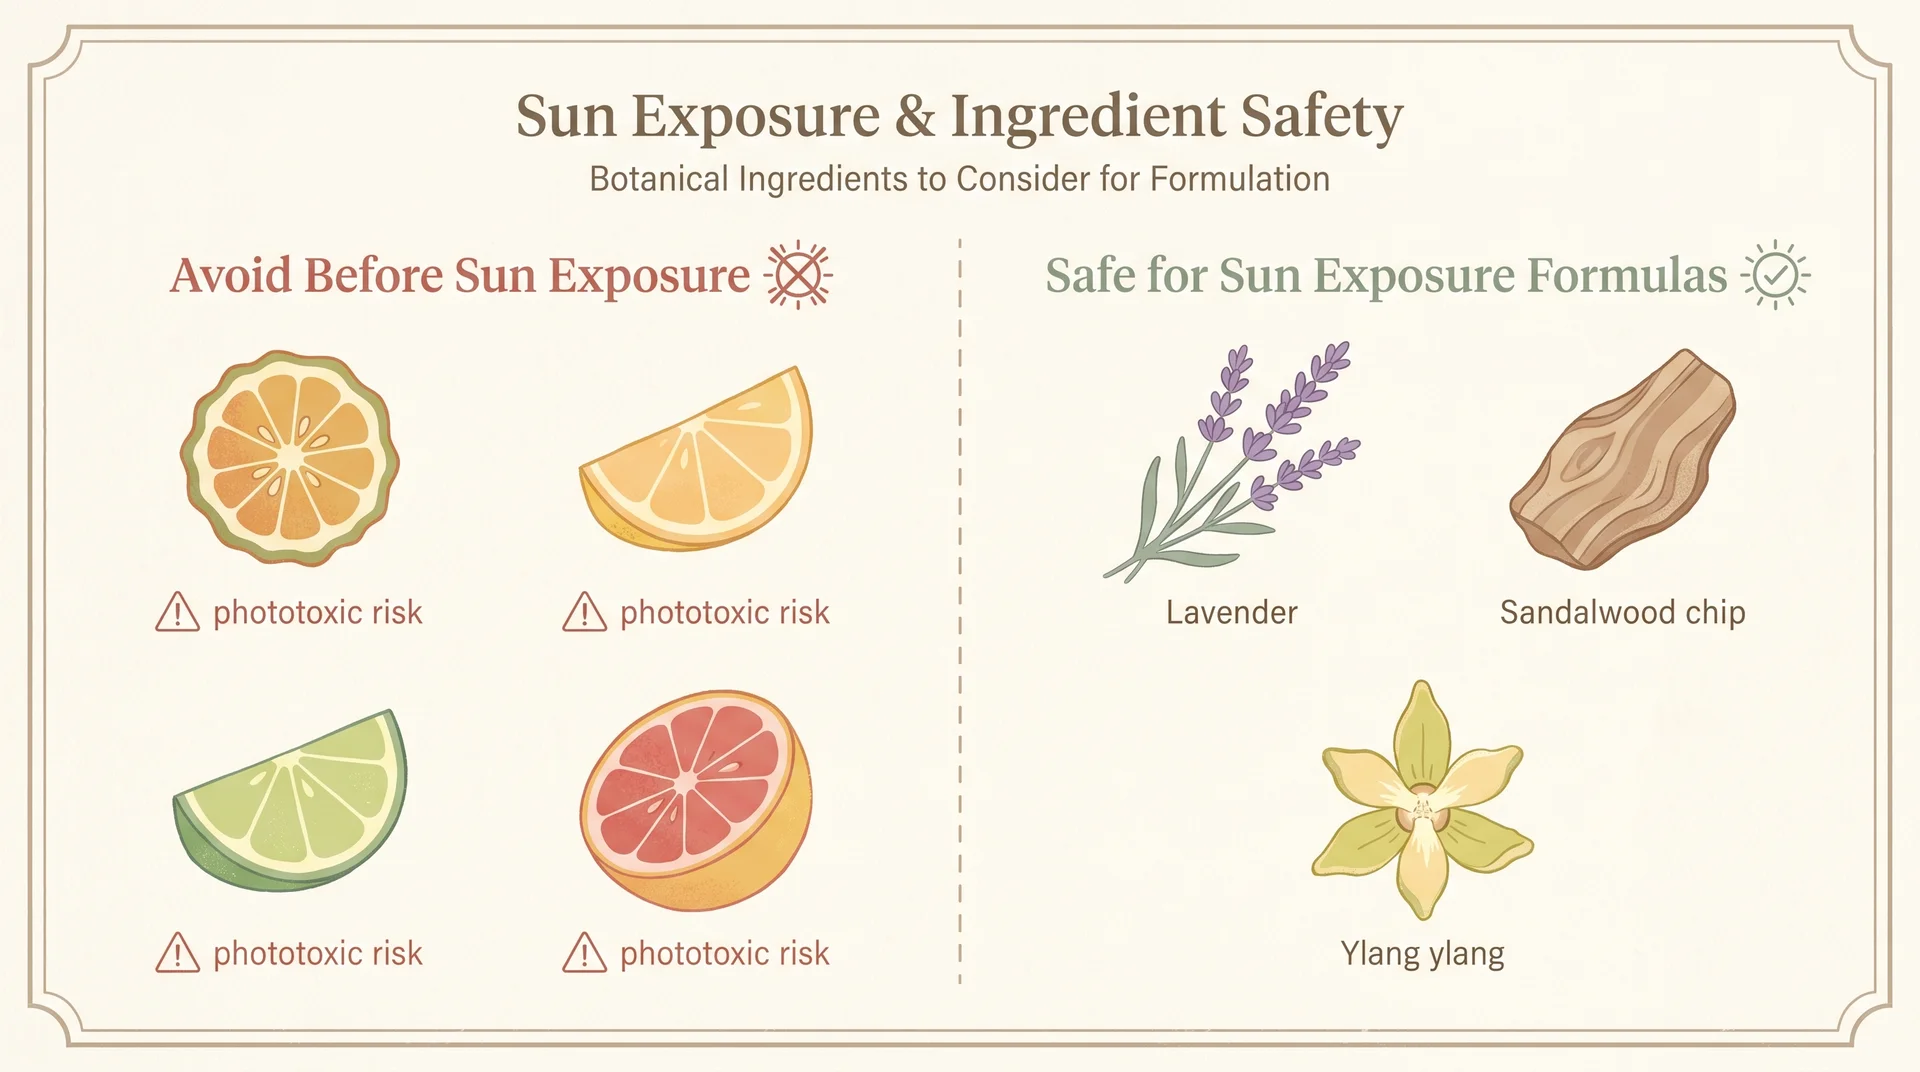
Essential oils add scent and some topical benefit, but not all of them belong near sun-exposed skin. Most DIY recipes don’t address this, and it’s one of the more consequential omissions in the category.
Do not use photosensitizing essential oils in any formula applied before sun exposure. Bergamot, lemon, lime, grapefruit, and sweet orange are the most common ones. They contain compounds called furanocoumarins that react with UV light and can cause hyperpigmentation, burns, or blistering at concentrations well within what most people consider a reasonable amount.
Essential oils that are genuinely safe for sun-exposure formulas:
- Lavender: The most practical choice. Mild anti-inflammatory properties, very low photosensitivity risk, and a scent that works in almost any formula.
- Sandalwood: Warm and skin-soothing; no photosensitivity concerns at standard dilutions.
- Ylang ylang: A richer floral option, well-suited to dry skin formulas. Use it at the lower end of the dilution range if you’re fragrance-sensitive.
Dosage for all of the above: 1 to 2 percent of your total formula, which works out to 10 to 15 drops per 100ml of carrier oil. More is not better in a leave-on product, and more is especially not better in something sitting on skin in direct sunlight.
Coffee in Tanning Oil
Caffeine has some evidence for improving microcirculation and mild cosmetic skin-tone effects when applied topically. Its impact on actual tan speed in a tanning oil formula is minimal. The genuine contribution of coffee to a tanning oil is a warming sensation on the skin, a pleasant scent, and a modest antioxidant presence from the coffee compounds themselves.
If you want to try it: use one tablespoon of very strong cold brew concentrate per 100ml of carrier oil, strained well through a fine-mesh cloth before combining. Oil and water don’t blend without an emulsifier, so the formula will separate and needs shaking before each use.
Make smaller batches you’ll finish within a week to ten days, because the water content shortens shelf life considerably. It’s a reasonable addition when you know what it contributes. It’s a disappointment if you expected something more dramatic.
Once you’ve chosen your base oil and enhancers, the recipes below put them together by skin type.
Three DIY Tanning Oil Recipes by Skin Type
Each formula is built around a specific skin profile. If you land somewhere between categories, use the base oil table above to guide your choice and adjust from there.
Recipe 1: Normal Skin
| Ingredient | Amount |
|---|---|
| Sweet almond oil | 60ml |
| Coconut oil | 30ml |
| Vitamin E oil | 1 tsp (approx. 5ml) |
| Lavender essential oil | 10 drops |
Method: Gently warm the coconut oil if it’s solid. Combine all ingredients in a dark glass bottle, cap it, and shake. Shake again before each use, as vitamin E can settle over time.
Shelf life: 3 to 4 months in a cool, dark place.
Sweet almond oil lightens the weight of coconut oil without losing moisture. Lavender is the safest essential oil choice for anything applied in the sun. The coconut component delivers the UV-transmitting quality that makes this feel like a tanning oil rather than a general body oil, and gives it the light, warm sheen most people associate with a tanning product.
Recipe 2: Acne-Prone or Sensitive Skin
| Ingredient | Amount |
|---|---|
| Jojoba oil | 50ml |
| Hemp seed oil | 30ml |
| Raspberry seed oil | 15ml |
| Vitamin E oil | 1 tsp (approx. 5ml) |
| Ylang ylang essential oil (optional) | 8 drops |
Method: Combine all ingredients in a dark glass bottle and shake. No melting needed — all three base oils are liquid at room temperature.
Shelf life: 6 to 8 weeks. Hemp seed oil has a shorter window than most carrier oils. Refrigerate between uses and bring to room temperature before applying. If the oil smells sharp or off, discard it.
This is the formula I’d recommend to any client who’s dealt with a breakout after a beach day. Jojoba stays stable in heat, hemp seed supports the skin barrier without adding pore-clogging weight, and raspberry seed brings antioxidant coverage that’s especially relevant here given the high-PUFA oil content. Leave out the ylang ylang if you’re fragrance-sensitive; the formula works without it.
Recipe 3: Dry or Mature Skin
| Ingredient | Amount |
|---|---|
| Avocado oil | 50ml |
| Sweet almond oil | 40ml |
| Vitamin E oil | 1 tsp (approx. 5ml) |
| Sandalwood essential oil | 10 drops |
Method: Combine in a dark glass bottle and shake. No melting required.
Shelf life: 3 to 4 months in a cool, dark place.
Avocado is the richest and slowest-absorbing option in this lineup, which is why this formula works best applied 20 to 30 minutes before sun exposure rather than right as you’re heading outside. The payoff is that dry and mature skin stays genuinely hydrated through a full day outdoors, without the tight, stripped feeling that lighter formulas sometimes leave behind. Applying it earlier gives it time to sink in before UV exposure begins.
What to Use If You Don’t Have Tanning Oil
The substitution question has a wide range of honest answers, and some of them come with real trade-offs that most articles gloss over.
Single Oils That Work Well on Their Own
- Jojoba oil: The best single-ingredient option for most skin types. It’s stable in heat, lightweight, and won’t contribute to congestion during extended sun exposure. The practical downside is cost — it runs higher per milliliter than coconut or almond oil, which matters if you’re making large batches.
- Sweet almond oil: A close second and probably the most practical single-ingredient tanning oil for most people. Lightweight, inexpensive, and genuinely kind to skin.
- Coconut oil: Works well for body skin on most normal skin types, and already lives in most kitchens. The comedogenic caveat from above still applies — pay attention to how your skin responds over a full day, not just in the first hour.
If indoor tanning is your context rather than sun exposure, the same oil selection logic applies. A formula that keeps skin hydrated and doesn’t clog pores matters even more in a tanning bed, where the session is shorter but UV concentration is higher. For more on what to look for in that context, this guide to tanning bed lotion covers the indoor-specific considerations.
What Doesn’t Really Work
- Baby oil: It intensifies UV exposure, and that part is true. The burn risk increase is also real, it does nothing for skin health, and the heat-trapping effect can become uncomfortable. That trade-off is worth understanding before reaching for it.
- Vegetable or canola oil: Oxidizes fast in heat, and the smell after an hour in the sun is enough reason to look for something else.
- Nothing at all: Worth acknowledging as a legitimate choice. Dry skin doesn’t tan as evenly, but skipping an oil isn’t made worse by the absence of a tanning formula.
How to Apply DIY Tanning Oil
The formula matters, but application timing and method affect the outcome more than most people expect.
Timing, Method, and What to Skip
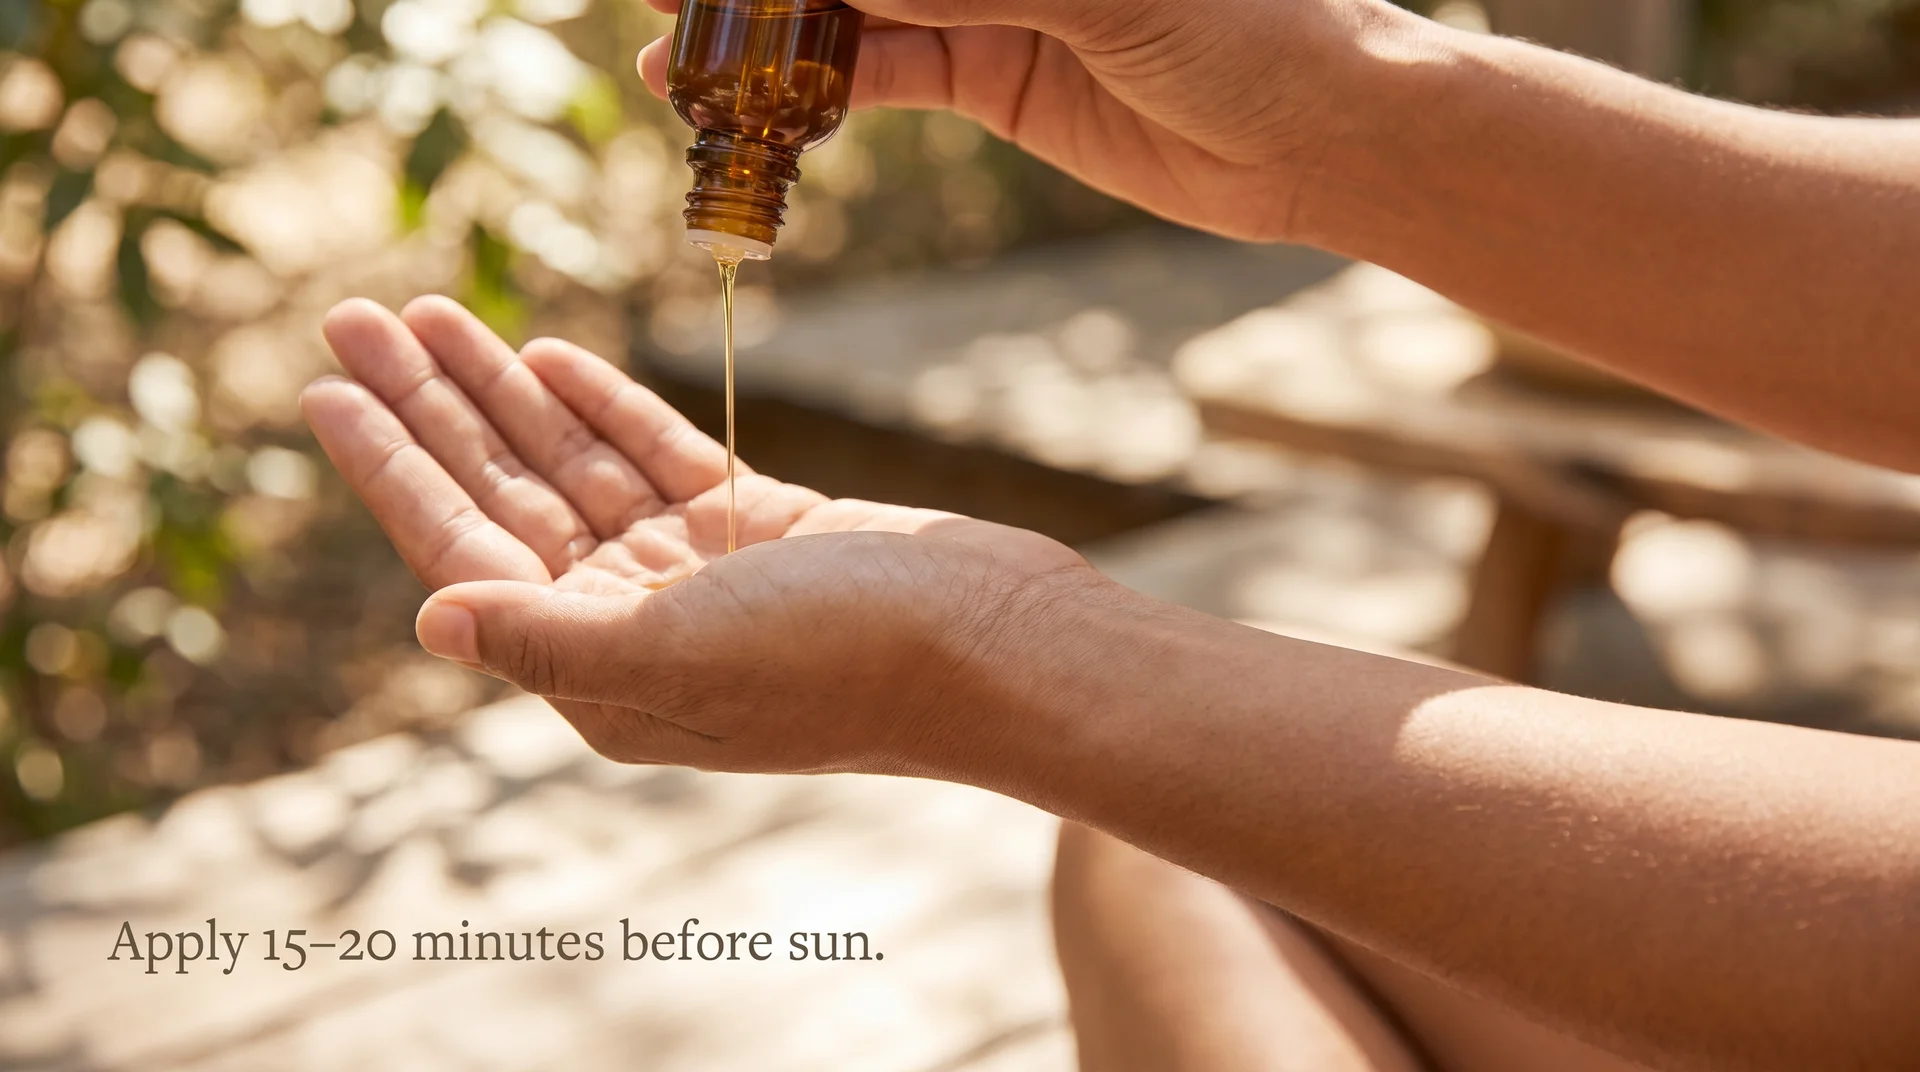
- Apply to clean, dry skin 15 to 20 minutes before going outside. The oil needs time to absorb before UV exposure begins for the best result — applying it immediately before sitting down in the sun reduces its effectiveness.
- Use on body skin: legs, arms, shoulders, and décolletage. Skip the face. Face skin has higher sebaceous gland density, smaller pores, and generally benefits from SPF-focused care rather than UV-accelerating products.
- If you’re layering SPF underneath, apply it to clean skin first and wait a full 20 minutes before adding the tanning oil. Don’t mix them in your palm — SPF needs to form a consistent layer directly against skin to function correctly.
- Reapply after swimming or heavy sweating. The oil washes off, and consistent coverage through the day produces more even results.
After Sun Exposure
The oils in your tanning formula support the tanning process during exposure. They don’t address the dehydration and surface stress that accumulates after several hours outside.
After you’re done, rinse off the oil and apply a separate moisturizer, ideally one with aloe vera or a humectant like glycerin. Sun-exposed skin needs water-binding ingredients to recover, and an oil-only product doesn’t deliver that.
One storage note: keep your formula in a dark glass bottle in a cool, dry spot. Heat and light degrade carrier oils faster than most people expect.
A rancid oil has a sharp, unpleasant smell that’s noticeably different from the fresh version. If you notice it, don’t use it.
Frequently Asked Questions
Does Homemade Tanning Oil Actually Work?
Yes, but “work” needs defining. Tanning oil supports faster, more even tanning by keeping skin hydrated and heat-retaining during UV exposure. It doesn’t create a tan on its own — you still need time in the sun. The difference it makes is in the evenness of color development and how your skin holds up during that exposure.
What Is the Best Oil for Tanning?
For most skin types, sweet almond oil is the most balanced base: a moderate comedogenic rating, lightweight texture, good stability, and enough UV-transmitting quality to function as a genuine tanning oil base. For acne-prone skin, jojoba or hemp seed oil are the better calls. Coconut oil works well for normal skin and is the most popular choice for a reason, but it’s not right for everyone.
Can You Use Coconut Oil as Tanning Oil?
Yes, with one specific condition. Coconut oil has a comedogenic rating of 4, which gives it a real potential to clog pores on warm, sweating skin during extended sun exposure. It works well for normal skin types on the body. It’s not a good choice as a face application, and it’s worth doing a test before committing to a full day at the beach if your skin tends toward congestion.
Is DIY Tanning Oil Safe?
It’s skin-safe when made with correctly diluted essential oils and quality carrier oils. It’s not sun-safe in the sense of offering UV protection. Treat it as a formula that creates conditions to support UV exposure, and handle sunscreen as a separate, intentional decision layered underneath.
Can I Mix Tanning Oil with Sunscreen?
Layer them rather than mixing them. Apply SPF to clean skin first, wait 20 minutes for full absorption, then apply the tanning oil on top. Mixing both in your palm before application dilutes the SPF and changes the texture of both products in ways that reduce how well either one performs.
How Long Does Homemade Tanning Oil Last?
Most formulas last 3 to 4 months stored in a dark glass bottle in a cool, dry place. Hemp seed oil-based formulas have a shorter window of around 6 to 8 weeks and do better refrigerated between uses. The indicator that any oil has turned is smell; rancid carrier oils have a sharp, unpleasant odor that’s unmistakable once you know it.
What Can I Use Instead of Tanning Oil?
Jojoba and sweet almond oil both work well as single-ingredient substitutes. Coconut oil is functional for most normal body skin types and is already in most kitchens. Baby oil will intensify tanning, but increases burn risk meaningfully, so that trade-off is worth understanding before choosing it.
End Note
A good DIY tanning oil is not complicated to make. Where most people go wrong is copying a recipe without understanding what each ingredient is doing, which means they can’t adapt it when something doesn’t work for their skin.
Once you understand that the base oil is a skin-type decision, that carrot seed oil earns its place as an antioxidant ingredient and not a sunscreen, and that the formula works with UV exposure rather than against it, putting it together is the easy part.