
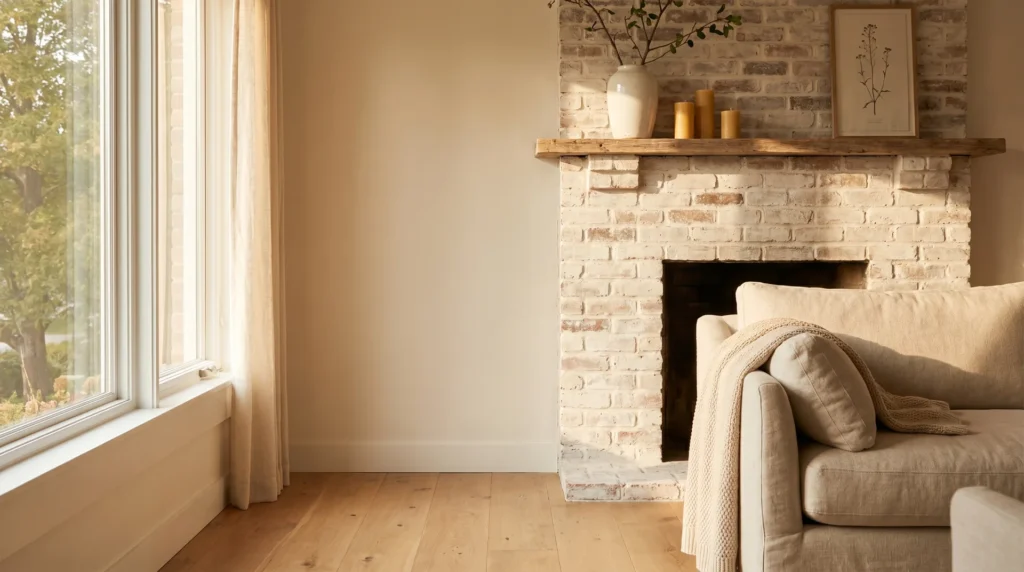
There’s a specific kind of frustration that comes with staring at an orange brick fireplace. You’ve lived with it long enough to stop seeing it, and then one day you really see it, and you can’t unsee it.
It feels dated, heavy, and stuck in a renovation era nobody asked to revisit. You go down the Pinterest spiral, save forty photos, and keep landing on the same two words: limewash and whitewash. Nobody gives you a straight answer.
I’ve spent over a decade advising homeowners on interior decisions, and this question, limewash or whitewash for a brick fireplace, comes up more than almost anything else. The anxiety is real, and it deserves a real answer.
| So here it is, before the breakdown: if your brick is raw and porous, and you want a finish that looks like it belongs in the room rather than like it was applied, limewash is your finish. If you want something faster, cheaper, and brighter, whitewash gets the job done. Your specific situation will refine that answer, and I’ll walk you through every factor that matters. |
The Short Answer: Limewash vs. Whitewash Brick Fireplace
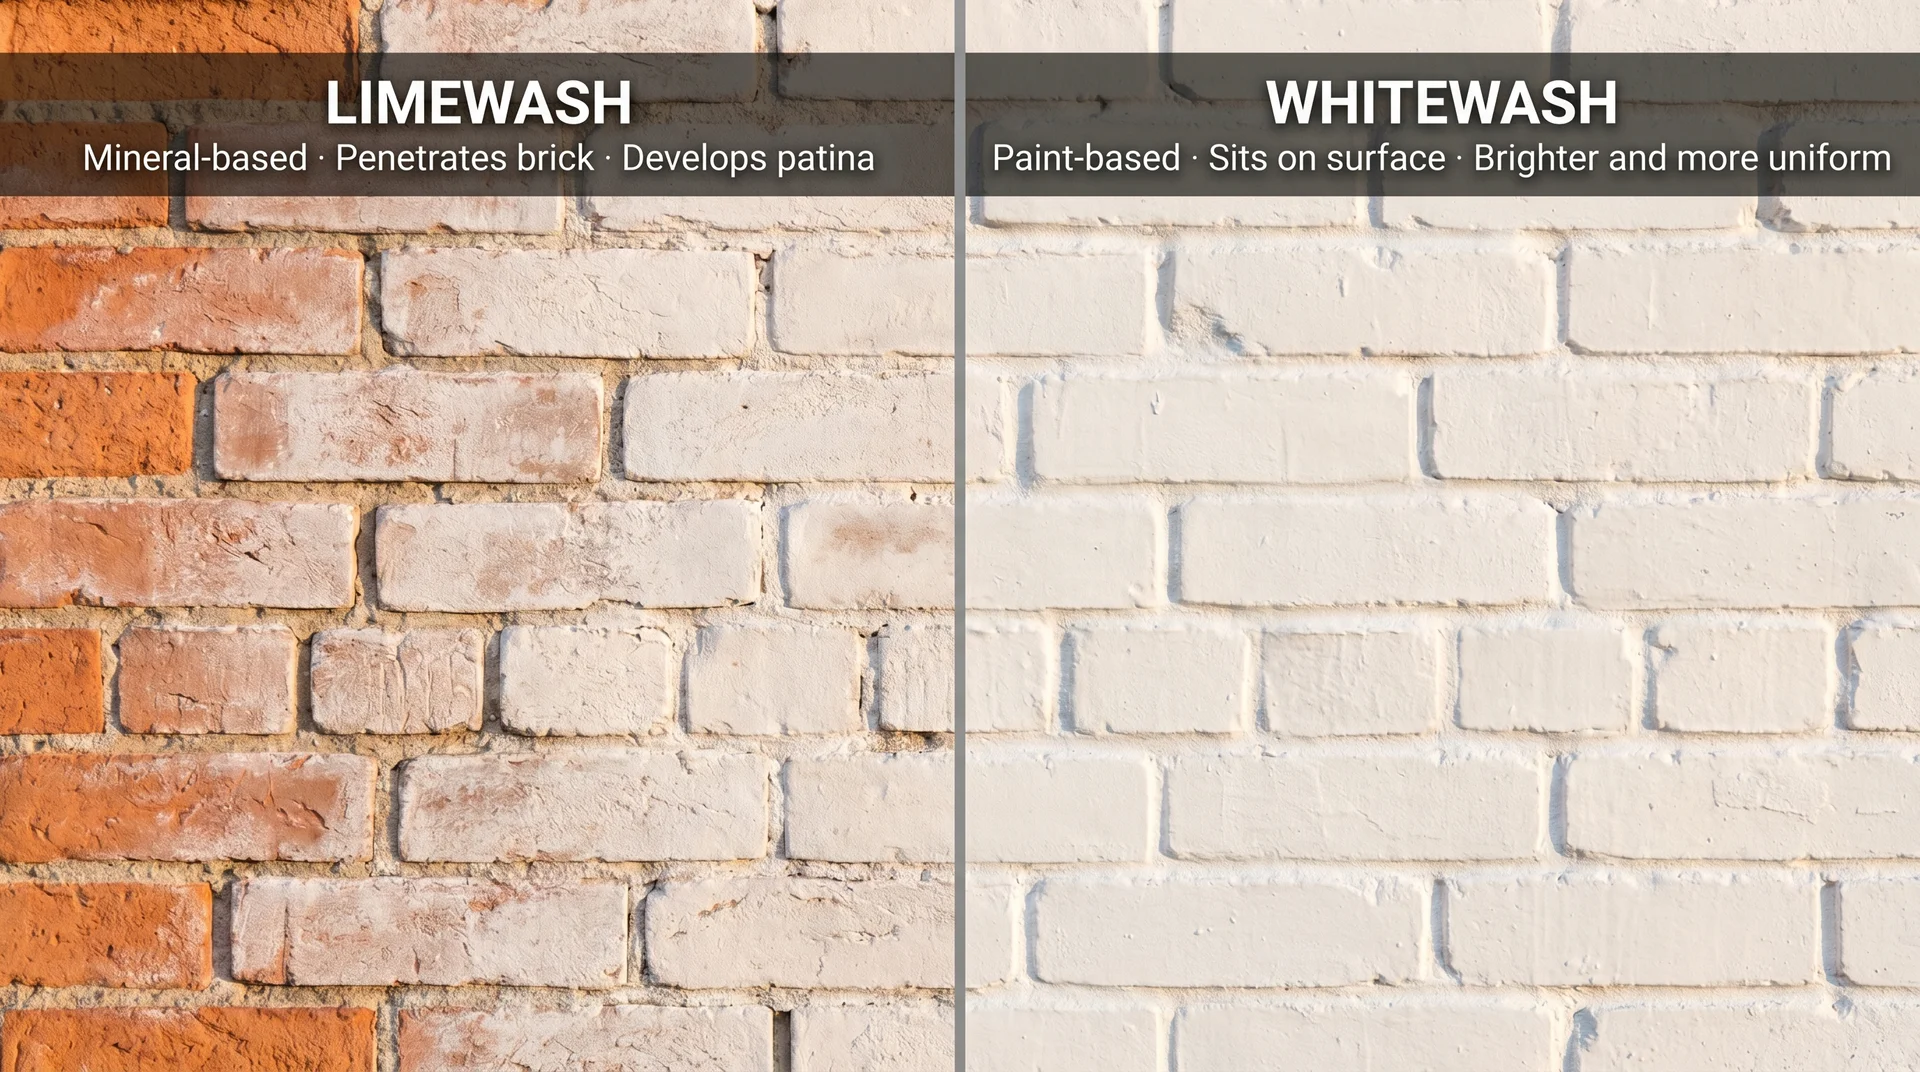
Limewash is the better finish for raw brick fireplaces in homes with warmth, age, or character in the design. It penetrates the brick rather than sitting on top of it. It develops a soft, chalky patina over time that looks earned. And, counterintuitively, it offers more flexibility if you change your mind mid-project.
Whitewash is the right call when you want speed, simplicity, and a cleaner, brighter result. It’s also your only wash option if the brick has already been painted, since limewash needs a porous surface to absorb into.
Both finishes can look genuinely beautiful. The real question is which one looks right for your fireplace, your room, and how you want to live with it.
What These Two Finishes Actually Are (And Why People Confuse Them)
Limewash: The Mineral Finish
Limewash is made from slaked lime, water, and natural mineral pigments. It’s one of the oldest surface treatments in the world, used for centuries on European masonry because it works with porous surfaces rather than against them.
When you apply limewash to brick, it seeps into the pores and undergoes a slow chemical process called carbonation, gradually converting back into a limestone compound.
The brick breathes underneath it, which matters more near a fireplace than people realise. The result is varied, matte, and dimensional in a way that a paint-based finish can’t replicate.
Limewash comes in more than just bright white. Products like Romabio Classico Limewash are available in off-white tones like Avorio White, soft grey options like Nube Gray, and warm creams.
You can also mix two colors on the same fireplace for a more dimensional, natural finish. That flexibility makes a real difference when you’re trying to warm up a room rather than bleach it.
Whitewash: The Paint-Based Approach
Whitewash is a 1:1 mixture of water-based latex paint and water. The dilution thins the paint enough that it partially soaks into the brick, giving you that semi-translucent effect where the original brick colour still shows through.
It’s the simpler formula, and that simplicity is genuinely one of its strengths. You can mix it at home with leftover white paint, adjust the ratio on the fly, and control how opaque or transparent the final look is.
The Visual Difference You’ll Actually Notice on a Brick Fireplace
The easiest way to distinguish the two results: limewash looks like something that happened to a building over time. Whitewash looks like a finish that was applied.
Limewash produces organic variation across the brick face. Some bricks absorb more than others. The colour shifts at different angles in different lights. It looks like Italian farmhouse walls, or the kind of fireplace you find in a house that’s been in a family for generations.
Whitewash produces a brighter, more uniform effect. It lifts the visual weight of a heavy brick fireplace and makes a room feel lighter. Where limewash whispers age, whitewash says renovation. That’s not a criticism. Plenty of rooms call for exactly that.
The Fear Nobody Talks About: What If You Hate the Limewash or Whitewash Finish?
“Most people choose whitewash because it feels like the safer bet. Limewash is actually the finish with the safety net.”
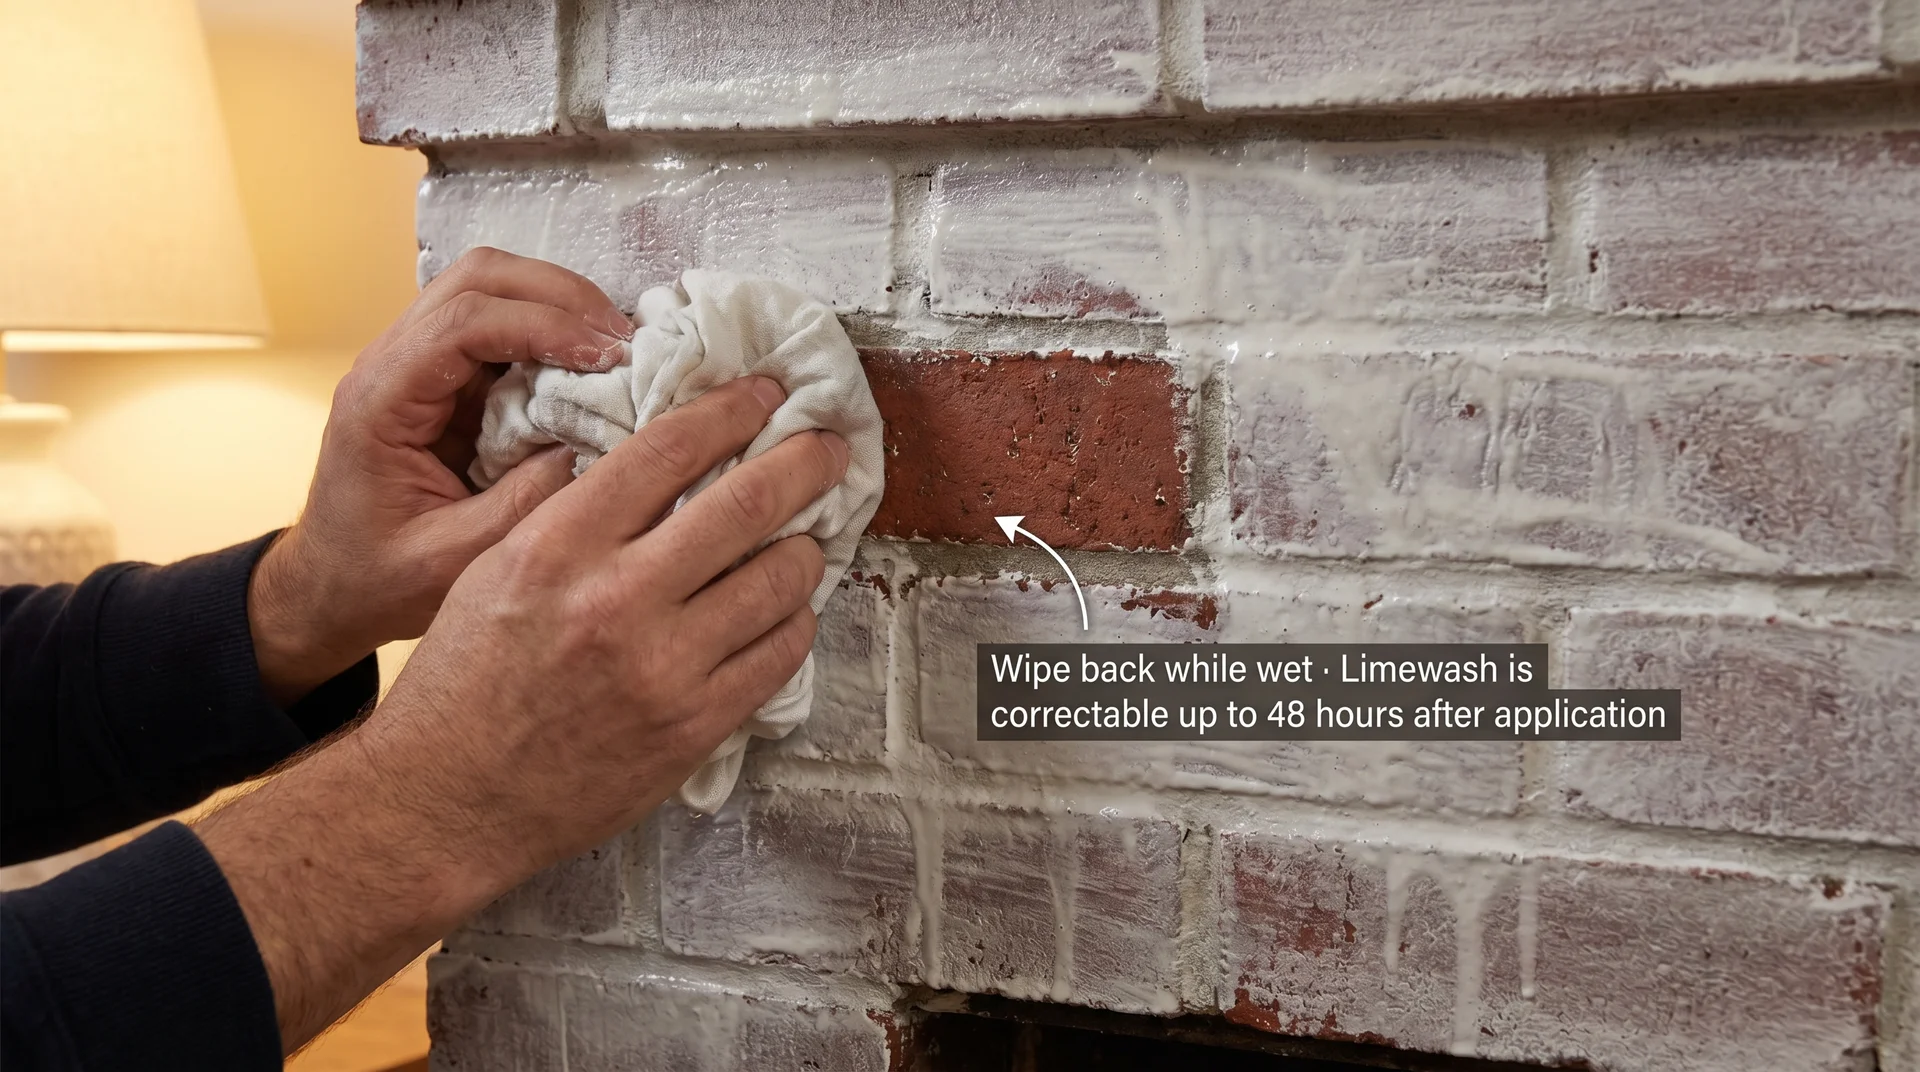
Here’s the thing: most articles get backwards. Whitewash feels safer because it’s simpler, but limewash is more reversible, particularly during application. Romabio confirms you can wipe limewash off within 48 hours of application using a damp cloth or even household vinegar.
That correction window is genuinely meaningful. If you apply it, step back, and decide the coverage is too heavy, you can dilute and pull back. Once fully cured, removal requires more effort but isn’t impossible with a pressure washer, a wire brush, and a cleaning solution.
Whitewash, by contrast, is harder to remove than people expect once it’s set. Because it’s paint-based, it bonds to the brick surface.
Getting it fully off typically means scrubbing with a stiff wire brush and a TSP or diluted muriatic acid solution, and even then, you’re unlikely to get the brick back to its original state without residual paint in the pores. If reversibility matters to you, limewash wins.
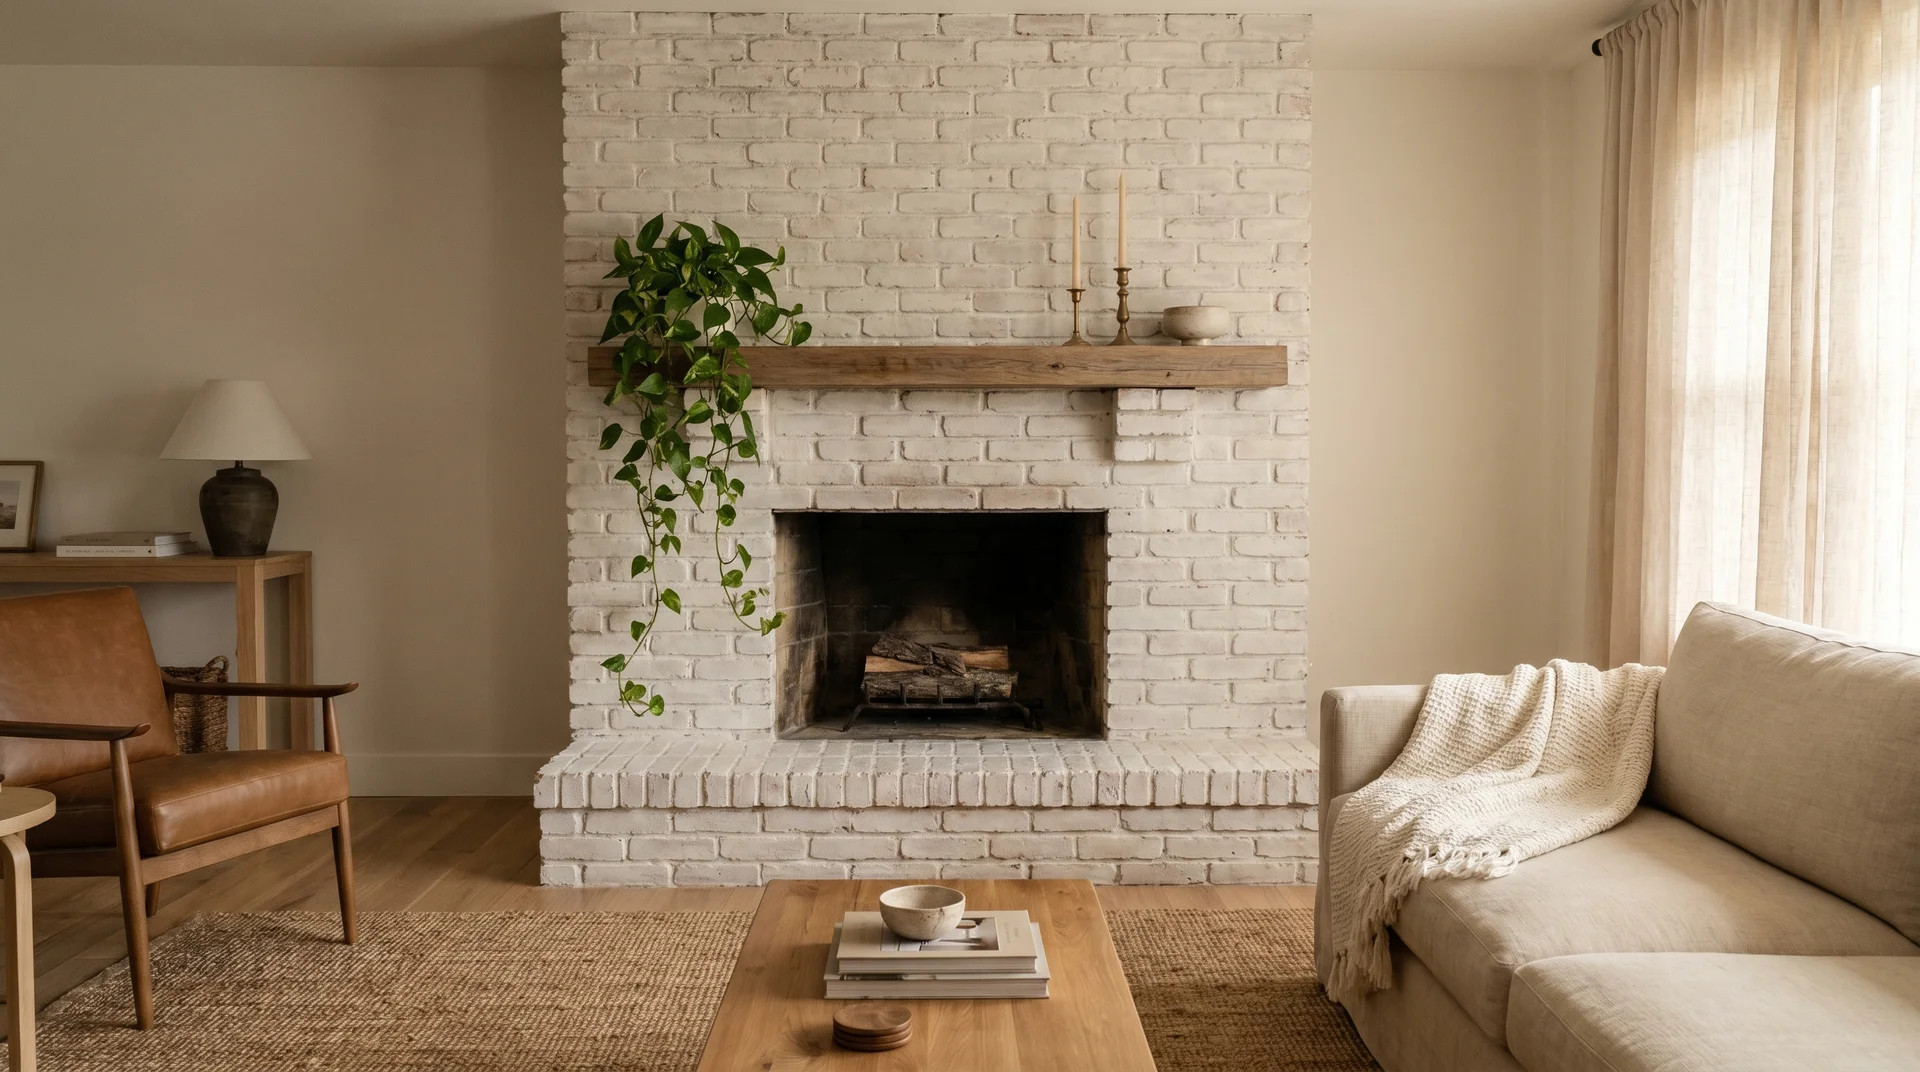
What Your Limewashed or Whitewashed Brick Fireplace Will Actually Look Like
Which Finish Matches Your Interior Style?
The style-match question is the one that guides most of my recommendations. The material differences matter, but the aesthetic fit matters more. Look at your floors, upholstery, hardware, and wall colour before you decide.
Warm wood floors, natural linen, and wrought iron hardware pair naturally with limewash. Clean lines, cool tones, and lots of white or pale grey tend to integrate more cleanly with whitewash.
| Interior Style | Recommended Finish | Notes |
|---|---|---|
| Farmhouse / Rustic Cottage | Limewash | The organic variation suits the aesthetic naturally |
| Modern Farmhouse / Transitional | Limewash at 50–60% opacity | Enough texture without reading as heavy |
| Coastal / Scandinavian / Bright | Whitewash | Cleaner and more luminous result |
| Traditional / Historic Home | Limewash | Preserves the character of the original brick |
| Contemporary / Minimalist | Whitewash or full paint | Wash finishes can feel inconsistent in very spare rooms |
Check Your Brick Before You Choose a Limewash or Whitewash Finish
Raw, Unpainted Brick: You Have Full Options
If your fireplace brick has never been painted or sealed, you’re in the best position. Both limewash and whitewash will absorb and adhere properly. You can genuinely choose based on aesthetics without any material constraint.
One quart of limewash product typically covers a standard fireplace surround, so a single fireplace kit from Romabio is enough for most projects.
Orange or Red Brick vs. Lighter Brick: This Changes Everything
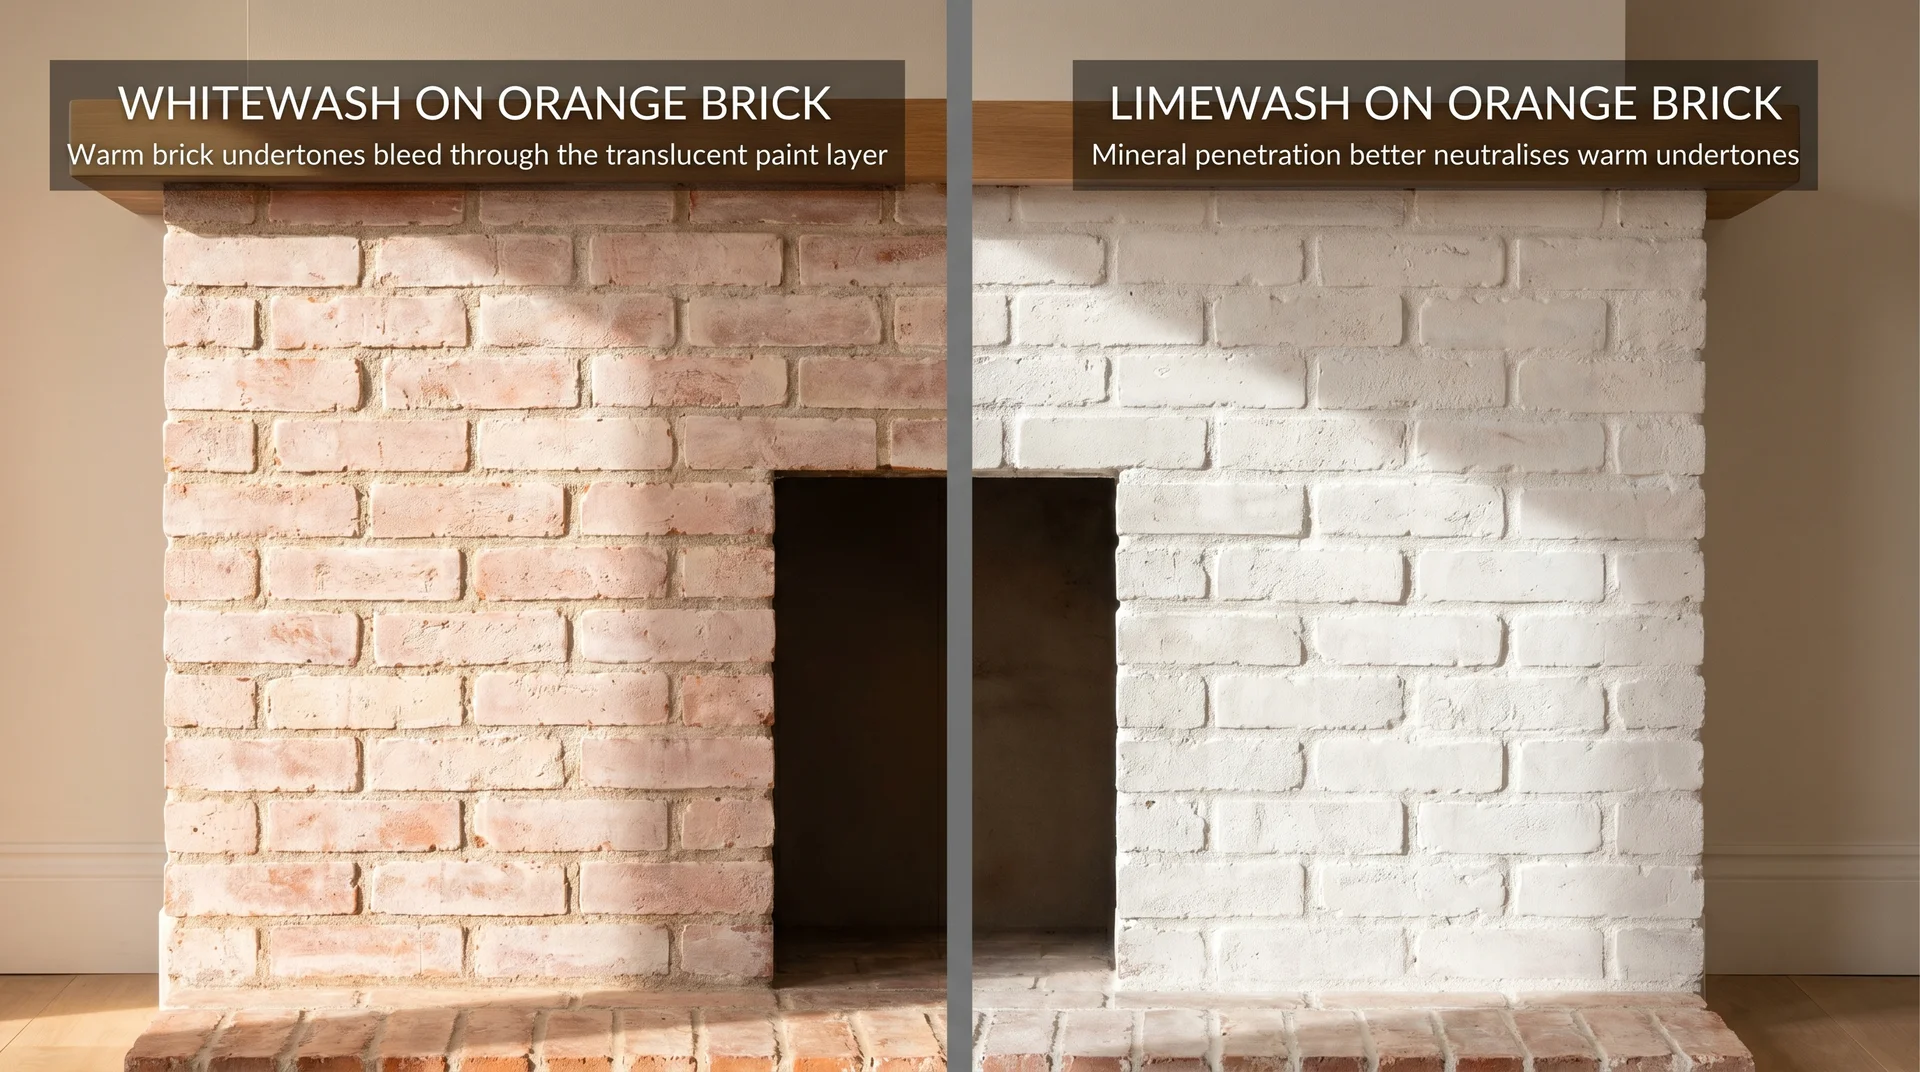
This is the factor most articles ignore completely, and it’s one of the most practically important. Orange and red brick have warm undertones that show through any translucent finish. Whitewash at a 1:1 ratio is often too transparent to fully neutralise that warmth. You can end up with a result that still reads orange, just softer, which isn’t what most people want.
Limewash, because it penetrates and mineralises within the brick, does a more effective job of neutralising orange undertones. Many homeowners with orange brick who try whitewash first end up redoing the project with limewash.
If you’re working with a room that already has a lot of warm tones and you’re thinking about how to approach the rest of the space, this guide to working with orange and rustic tones in a living room might help you see how the fireplace can anchor the space rather than fight it.
Test a small, discreet area first. There is no substitute for seeing the actual result on your actual brick before committing to the full surface.
Already-Painted Brick: Read This Before You Buy Limewash
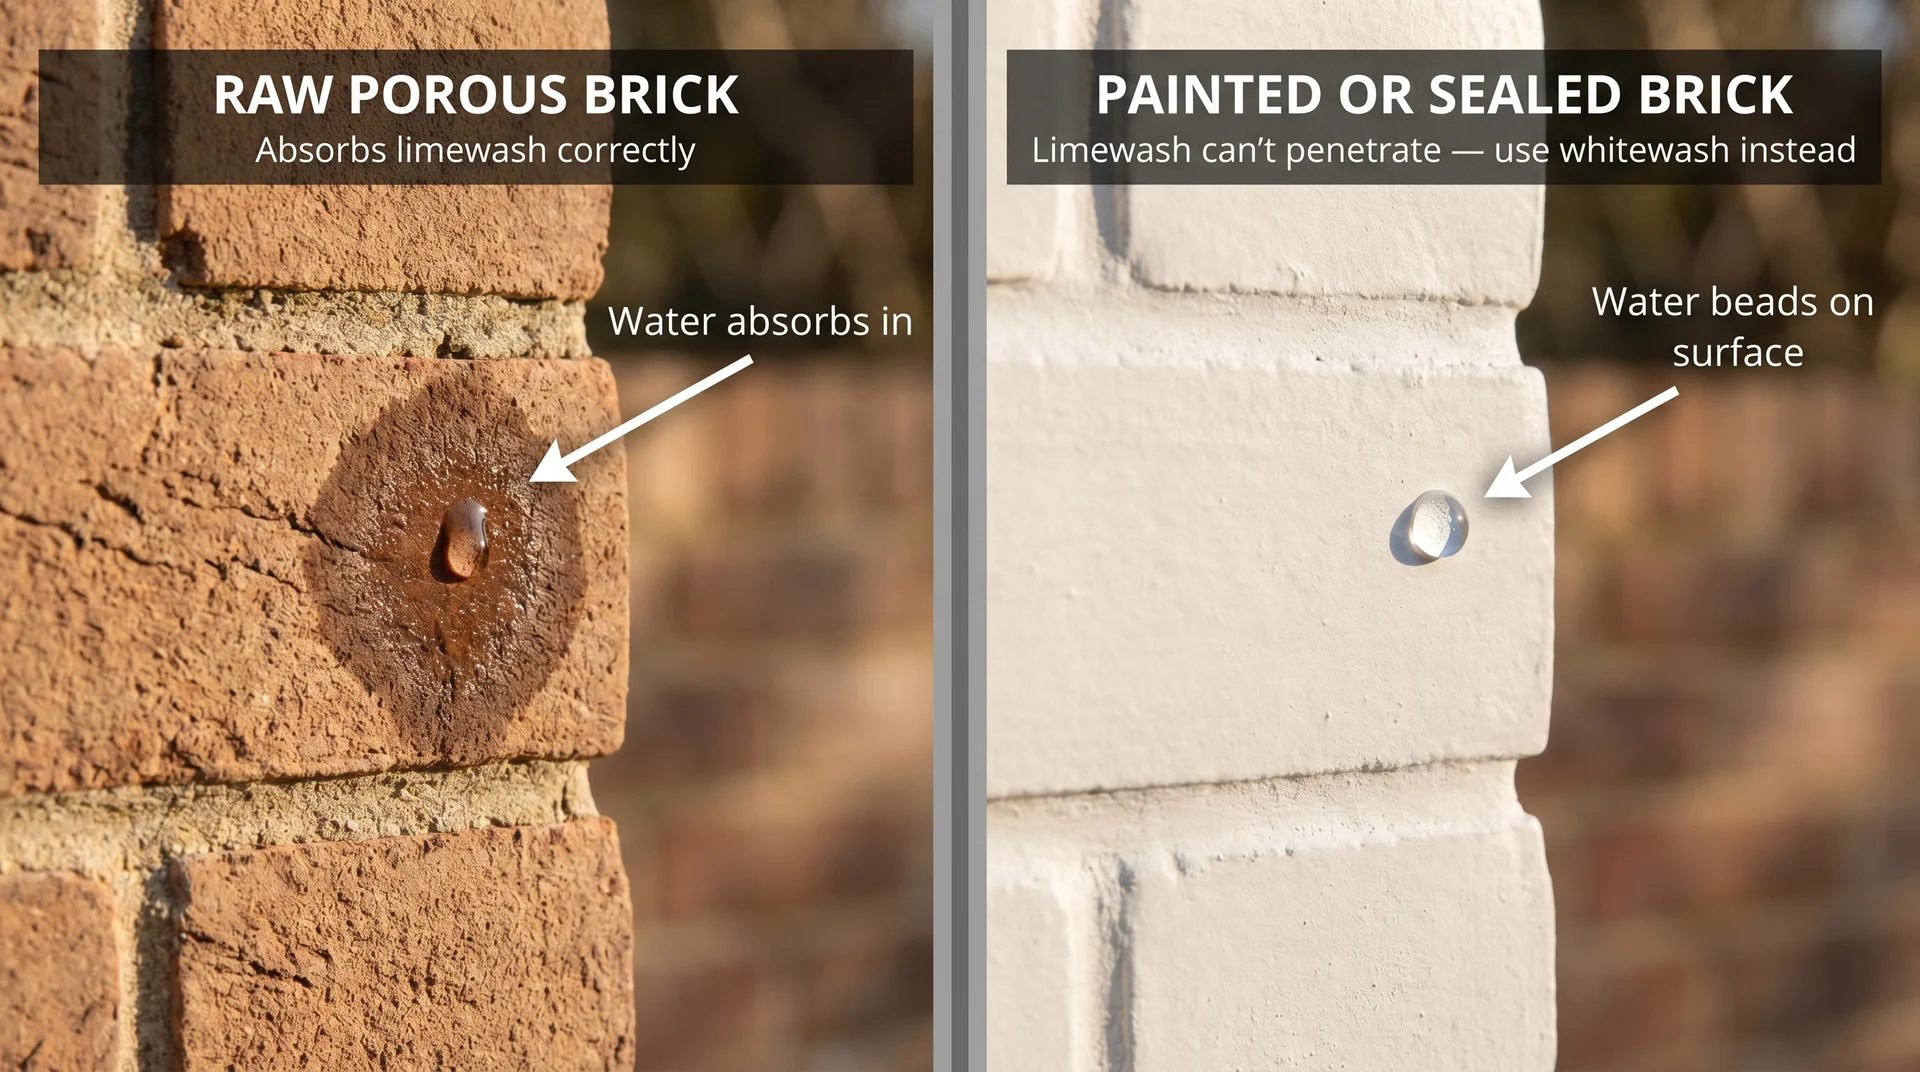
Limewash needs a porous surface to penetrate. If your brick has already been painted, even with a thin layer, limewash will not bond properly. It will sit on top of the paint rather than soaking into the brick, giving you uneven coverage and potential flaking.
With a masonry primer applied first, some products like Romabio Classico can adhere over painted brick, but you lose the distressed wipe-off effect entirely and end up with a more opaque, painted look.
If your brick has been painted, whitewash is your viable wash option. You can also strip the paint back first using a chemical stripper or mechanical sanding, which reopens both options, but it’s significant labour.
Whether that’s worth the effort depends on how much the limewash finish matters to you. Our complete guide to whitewashing brick covers the prep and process in detail if whitewash is your path.
Fireplace-Specific Factors That General Guides Miss
Most articles on this topic are written for brick walls and exterior facades. A fireplace is a different environment with specific considerations worth knowing before you start.
Is Limewash or Whitewash Safe to Apply Near a Fireplace?
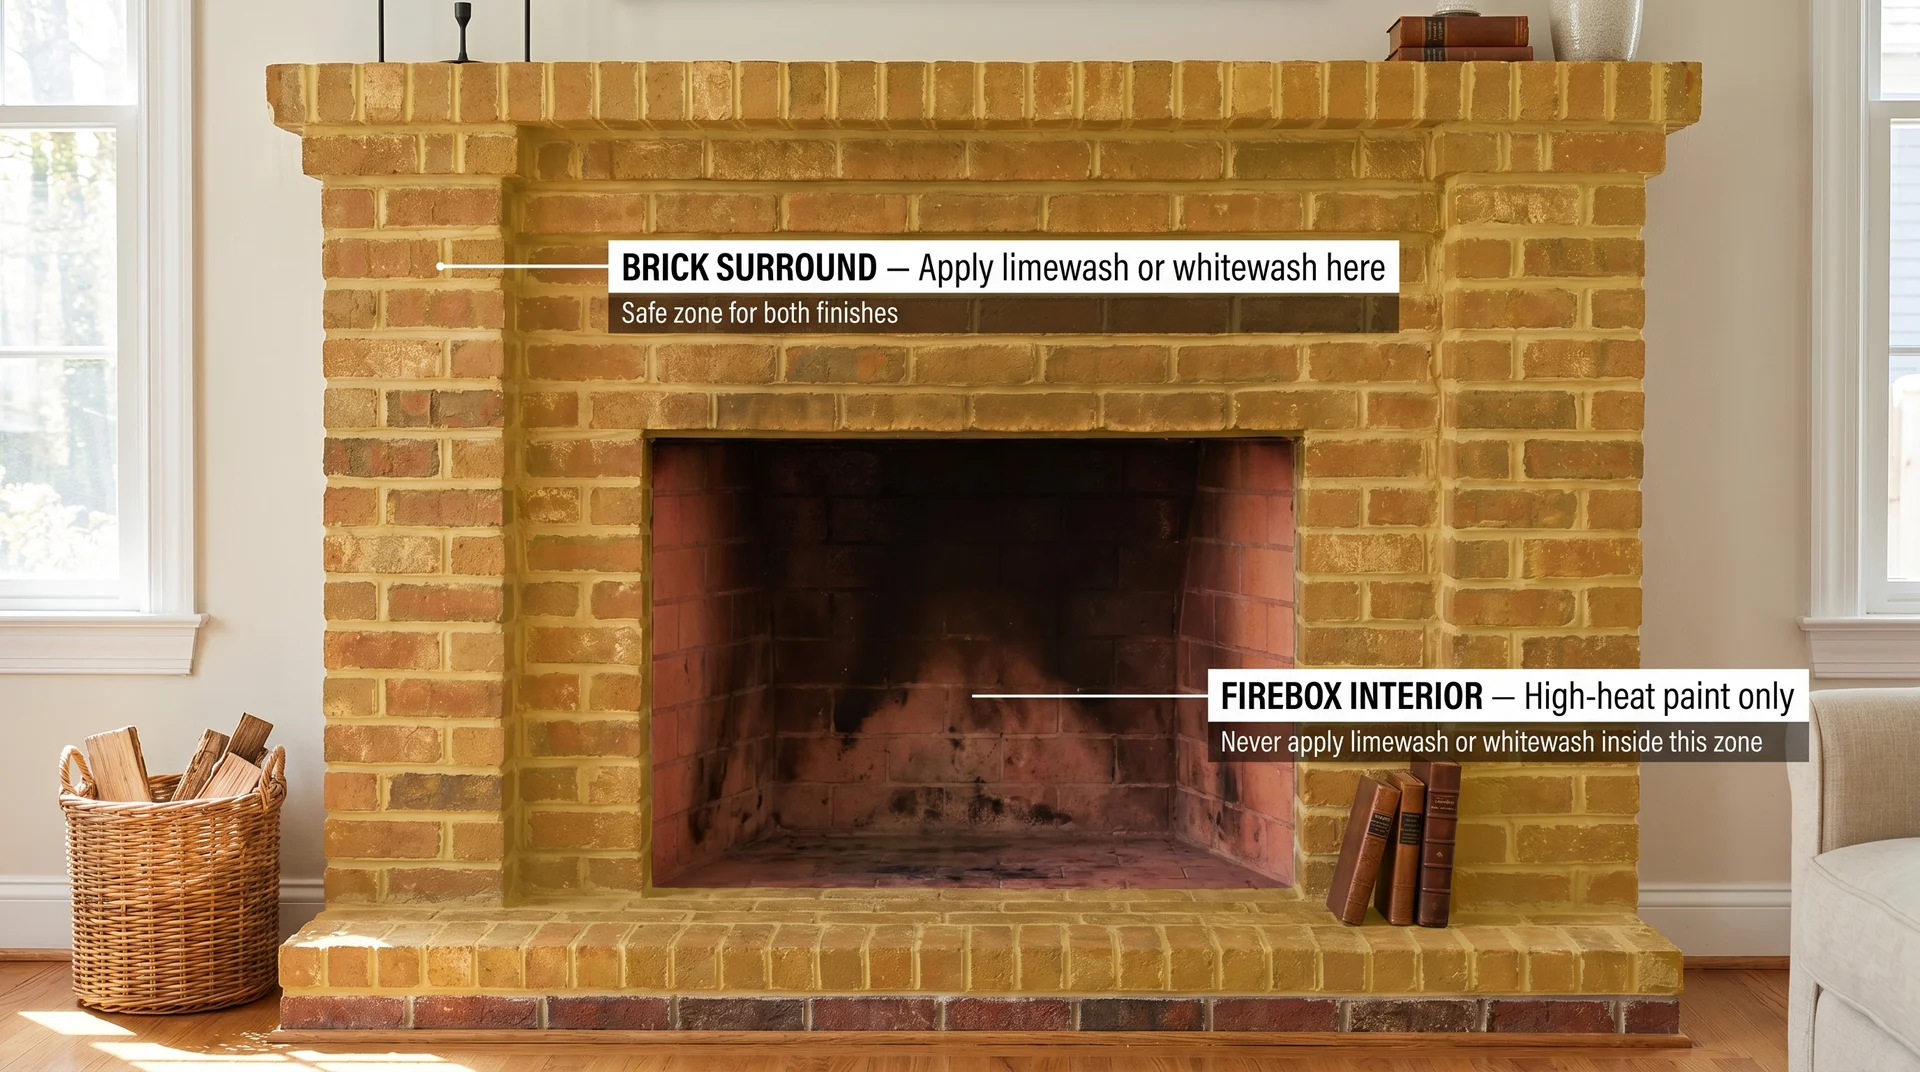
Both finishes are safe to apply to the fireplace surround, which is the brick facade around the firebox opening. Romabio Classico Limewash is specifically listed as non-flammable and non-combustible, making it suitable for fireplace surrounds.
The important boundary is the interior of the firebox itself, the actual burn chamber. Never apply any wash finish, paint, or coating inside the firebox. If you want to update the firebox interior, a dedicated high-heat paint rated for the temperatures involved is the right product for that zone. Apply it separately with a small brush before you start the surround.
Always ensure the firebox is completely cool and hasn’t been used for at least 48 hours before beginning any surface treatment on the surrounding brick. If your chimney is older or you have concerns about the brick’s condition, a chimney inspection before treatment is a sensible step.
Soot and Smoke Staining: Which Brick Finish Cleans Up Better?
Over time, regularly used fireplaces will show some soot migration above the firebox opening. Whitewash tends to show yellowing near the firebox after extended use, because the paint-based surface can absorb soot particles in a way that’s difficult to clean without disturbing the finish.
Limewash handles soot discolouration a little more graciously. Light soot marks often wipe off a cured limewash surface with a damp cloth, and if heavier staining builds up over the years, spot reapplication blends naturally because of the inherent variation in the finish.
One practical note: if you’re using Romabio Classico, their Mineral Shield topcoat can be applied to ledges or hearth surfaces to reduce chalking and make the surface easier to wipe clean, without adding visible sheen to the matte finish.
Mortar Lines on a Brick Fireplace: Cover Them or Let Them Show?
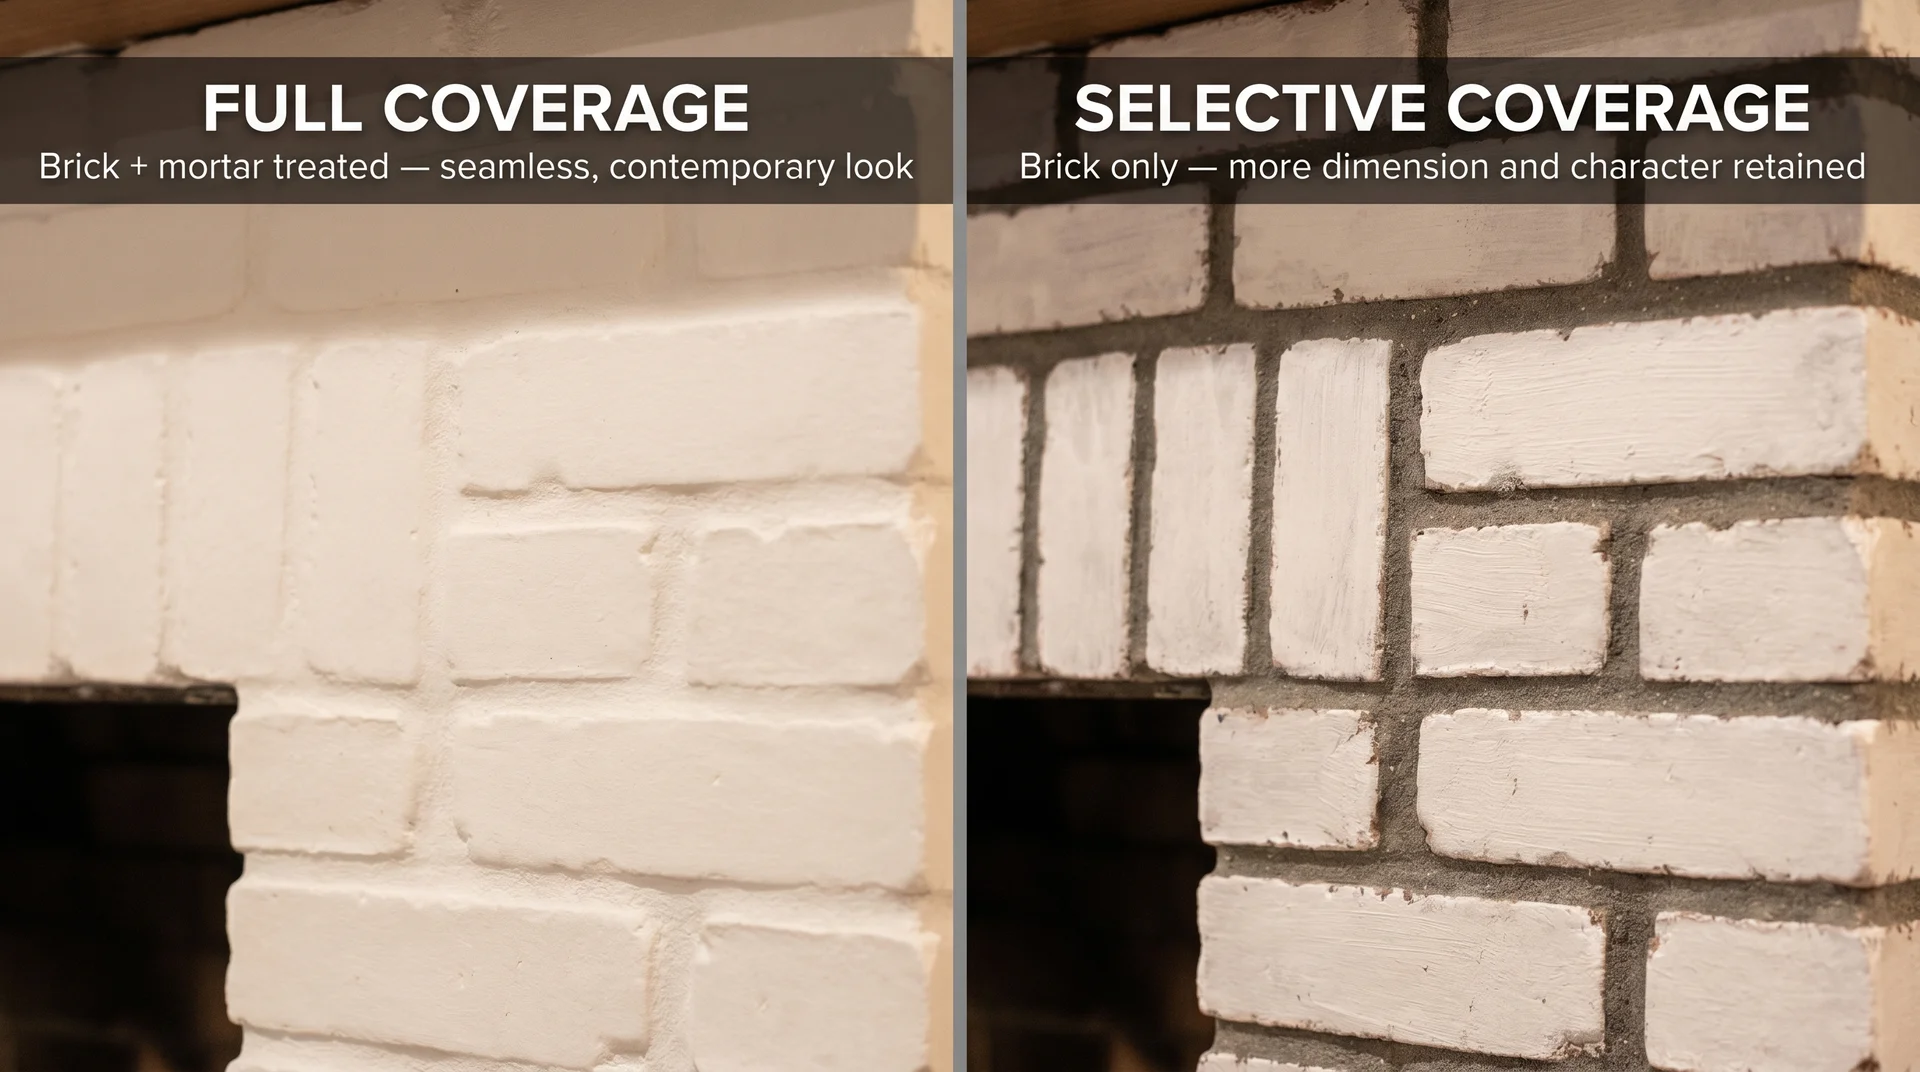
Getting clear on this before you start will produce a much better result. If you apply the finish uniformly to both brick faces and mortar, the fireplace reads as a more seamless, contemporary surface.
If you feather the finish lightly over the mortar, the lines stay visible, and the brick character is preserved. My preference in most rooms is to keep some mortar visibility. It gives the fireplace depth and prevents the wash from reading like a coat of paint rather than a genuine masonry finish.
Limewash vs. Whitewash Brick Fireplace: What It Actually Costs
| Whitewash (DIY) | Limewash (DIY) | |
|---|---|---|
| Materials cost | $20–$50 | $45–$80 |
| Total project cost | $35–$75 | $75–$130 |
| Application time | 2–4 hours | 3–6 hours |
| Skill level | Beginner-friendly | Beginner to intermediate |
| Coverage per quart | Covers a standard fireplace surround | Covers a standard fireplace surround |
For professional application on a standard fireplace surround, expect to pay $200–$500, depending on your region, the complexity of the surface, and whether cleaning is included.
If your fireplace has heavy soot staining, deep or irregular mortar joints, or brick that’s been unevenly patched, professional application is genuinely worth considering. The finish is only as good as the prep work.
How to Apply Each Finish: What You Should Know First
Limewash Application: The Non-Negotiable Details
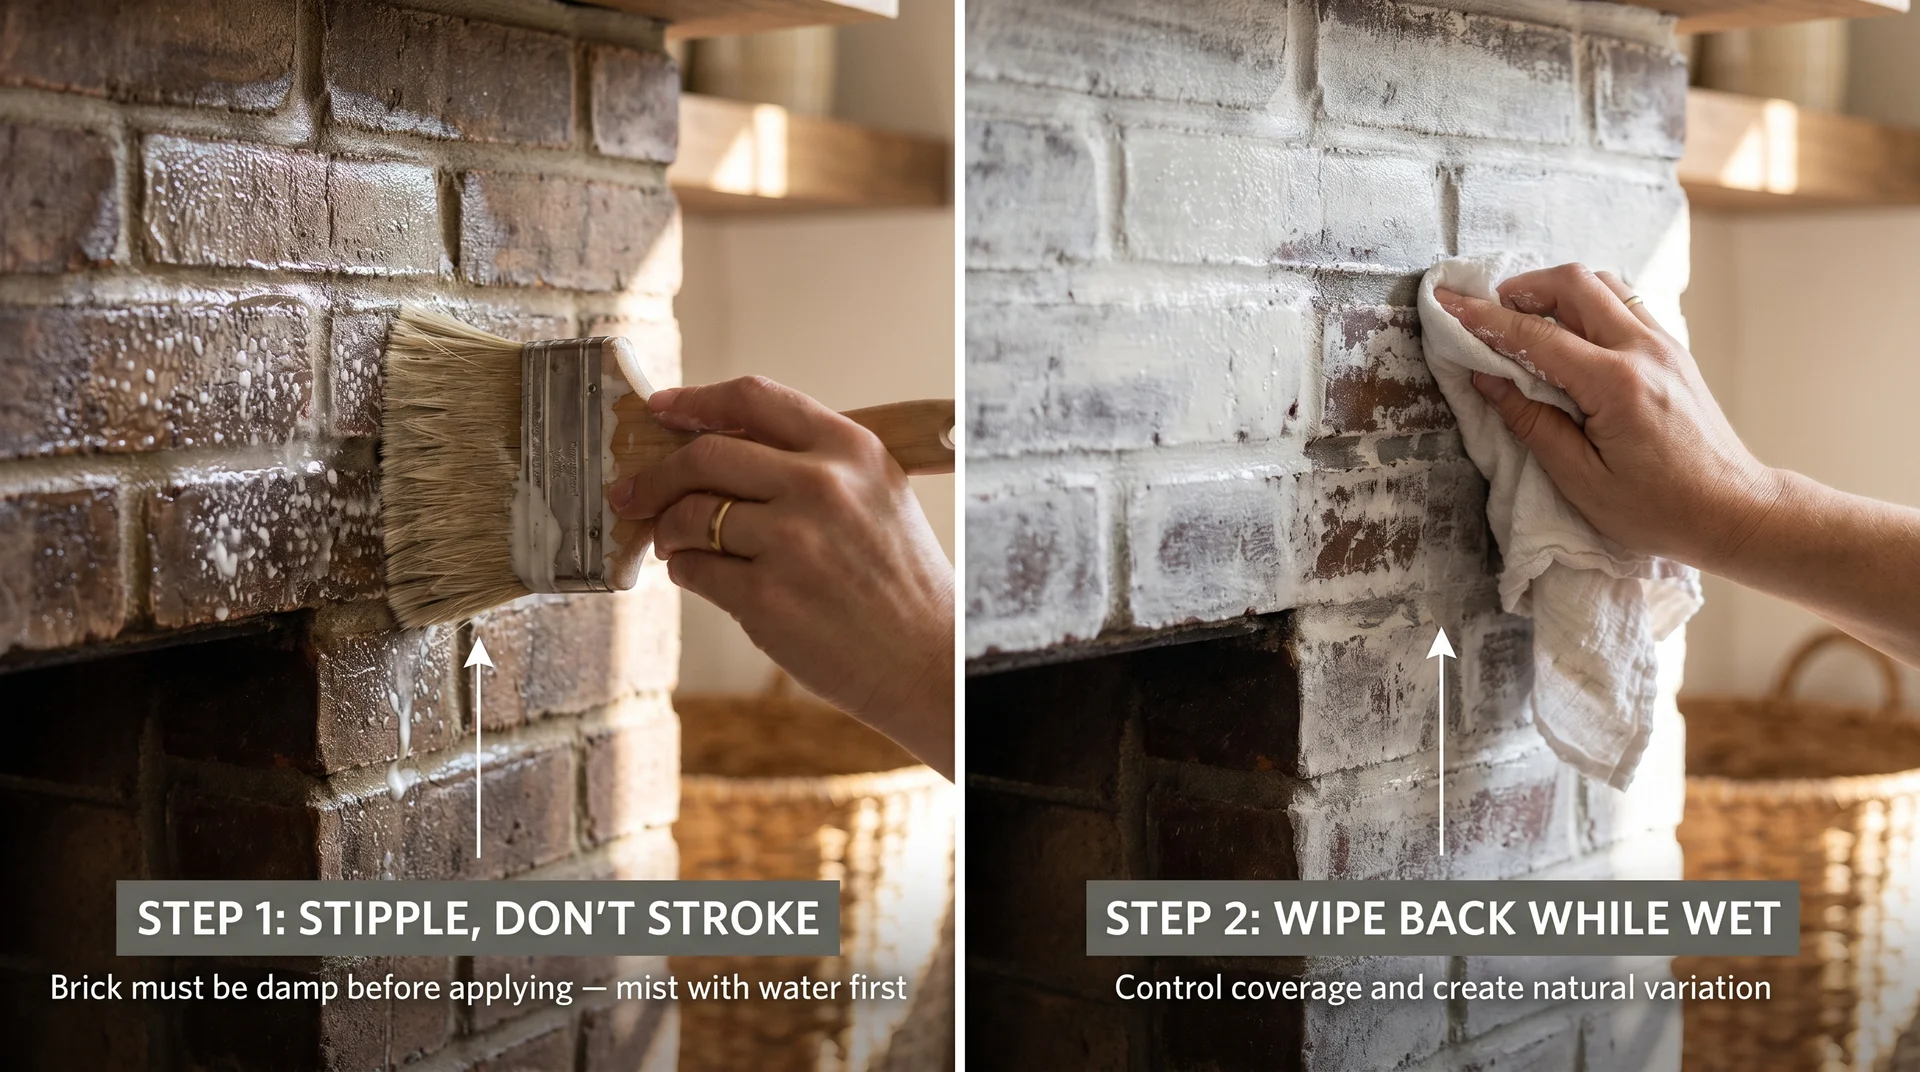
The single most important thing about applying limewash to brick: the surface needs to be damp before you start. Misting the brick with clean water from a spray bottle helps the mineral solution absorb evenly. Dry brick causes the limewash to dry too fast, and you lose the ability to work and blend.
Work in sections of roughly two to three square feet at a time. Apply with a masonry brush using a stippling motion, then use a damp rag to pull back coverage while it’s still wet. This push-and-pull technique creates the variation that makes limewash look authentic. Start with a more diluted mix (1:1 limewash to water) and build opacity with a second coat if needed.
You can add multiple thin coats to build toward a more solid, painted look, or keep it translucent for a washed effect. If you want to read more about timing between coats on any paint project, this guide covers how long to wait between coats for clean results.
Whitewash Application: Faster, With One Important Caveat
Start with a 1:1 ratio of white latex paint to water, apply to a small section with a brush or rag, and then wipe back with a damp cloth to your desired coverage level. The thing that ruins whitewash applications most often: letting sections dry before you’ve decided on coverage.
Whitewash dries quickly, especially over warm brick. Work in small sections and make your wiping decisions while the wash is still wet.
A section that dries at full coverage before you wipe it will create a visible boundary against the next section, and that patchy result is very hard to correct after the fact.
Mistakes That Ruin Either Finish
- Skipping brick cleaning. Brick holds onto years of dust, soot, and grease. Any finish applied over a dirty surface will adhere unevenly. Clean the brick with a stiff brush and diluted white vinegar solution, let it dry fully, then begin.
- Skipping the test patch. Everybody knows they should test first. Almost nobody does. A two-by-two-inch test section in an inconspicuous corner takes ten minutes and can save you an entire weekend of regret.
- Applying too thickly on the first coat. Thin coats build better results than one heavy coat. Start lighter than you think you need to, assess after drying, and add a second coat for more coverage.
- Sealing the brick afterward. A sealant traps moisture in the brick, which is a structural concern near a heat source, and creates a sheen that defeats the purpose of a matte wash finish. Neither limewash nor whitewash on an interior fireplace surround needs sealing.
A Note on German Smear: The Third Option Worth Knowing
If you’ve been researching this topic for a while, you’ve probably also come across German smear. It’s worth distinguishing: German smear uses actual mortar spread across the brick surface and partially wiped back, adding physical texture and a heavily aged, European look.
It’s essentially permanent once cured and is a notably more involved process than either a wash finish. For most interior fireplaces where the goal is a bright, lighter finish without the rustic texture, limewash or whitewash is the more practical choice.
German smear is worth exploring if you specifically want that rugged, mortar-dragged look and you’re comfortable with a permanent result.
Edwina’s Final Verdict: Which Finish Is Right for Your Brick Fireplace?
Choose limewash if: your brick is raw and unpainted, you have orange or red brick and want to genuinely neutralise the tone, your room has a warm or layered aesthetic, you want a finish that develops character over time, or you want the correction window during application if you change your mind.
Choose whitewash if: your brick has already been painted, you want the brightest and most uniform result, your room is coastal or minimal in feel, you’re working to a tighter budget, or this is your first time working on a masonry surface, and you want the simpler application.
Choose neither if: your brick is heavily sealed, smooth, or glazed. In that case, full paint with a masonry primer is the more reliable choice.
And above everything else, do the test patch first. Pick your finish, mix it at the ratio you plan to use, apply it to a hidden corner, and live with it for a day. See it in morning light and lamplight. Your instinct after seeing the actual result on your actual brick is better than any comparison article.
Frequently Asked Questions
Can I Apply Limewash Over Whitewash on a Brick Fireplace?
Not effectively. Limewash needs to absorb into porous brick. If whitewash has already sealed the surface partially, the limewash will sit on top rather than penetrating, producing uneven coverage. The existing whitewash layer needs to be significantly faded or removed first.
How Long Does Limewash Last on an Interior Brick Fireplace?
On an interior surface without weather exposure, limewash lasts 20 to 30 years or longer. You might choose to refresh it earlier for aesthetic reasons, or to touch up areas near the firebox. Touch-up applications blend naturally into the existing finish because of the variation inherent in the technique.
Does Whitewash on a Brick Fireplace Turn Yellow Over Time?
It can, particularly near the firebox opening on an actively used fireplace. Soot particles can absorb into the paint-based finish over the years. In areas away from direct heat and smoke, whitewash holds its colour much longer. Good firebox ventilation and clean burning habits reduce the yellowing risk significantly.
Can I Use Limewash in Colors Other Than White?
Yes. Romabio Classico Limewash is available in off-white tones like Avorio White, warm grey shades like Nube Gray, and can be custom-tinted by the retailer. Using two colours on the same fireplace, applying them in slightly overlapping sections, produces a more dimensional, natural-looking result than a single colour.
What’s the Difference Between Limewash and German Smear on a Brick Fireplace?
German smear uses actual mortar spread over the brick and partially wiped back, adding physical texture and a permanently altered surface. Limewash is a liquid mineral treatment applied in thin coats that absorbs into the brick. Limewash is the more practical and versatile choice for most interior fireplace makeovers.
Do I Need to Seal Brick After Limewashing or Whitewashing a Fireplace?
No. For an interior fireplace surround, sealing is counterproductive. It traps moisture in the masonry, adds unwanted sheen, and makes future touch-up or reapplication harder. If chalking is a concern on ledges or the hearth, Romabio Mineral Shield can be applied to those specific areas without a visible sheen.
Is Romabio Classico Limewash Suitable for Interior Fireplaces?
Yes, and it’s the product I’d recommend for most DIY limewash fireplace projects. It’s non-flammable, non-combustible, and specifically rated for fireplace surrounds. The slow-set formula gives you more working time than mixing your own limewash from scratch, and it comes tinted or in colors you can mix for a dimensional finish.