
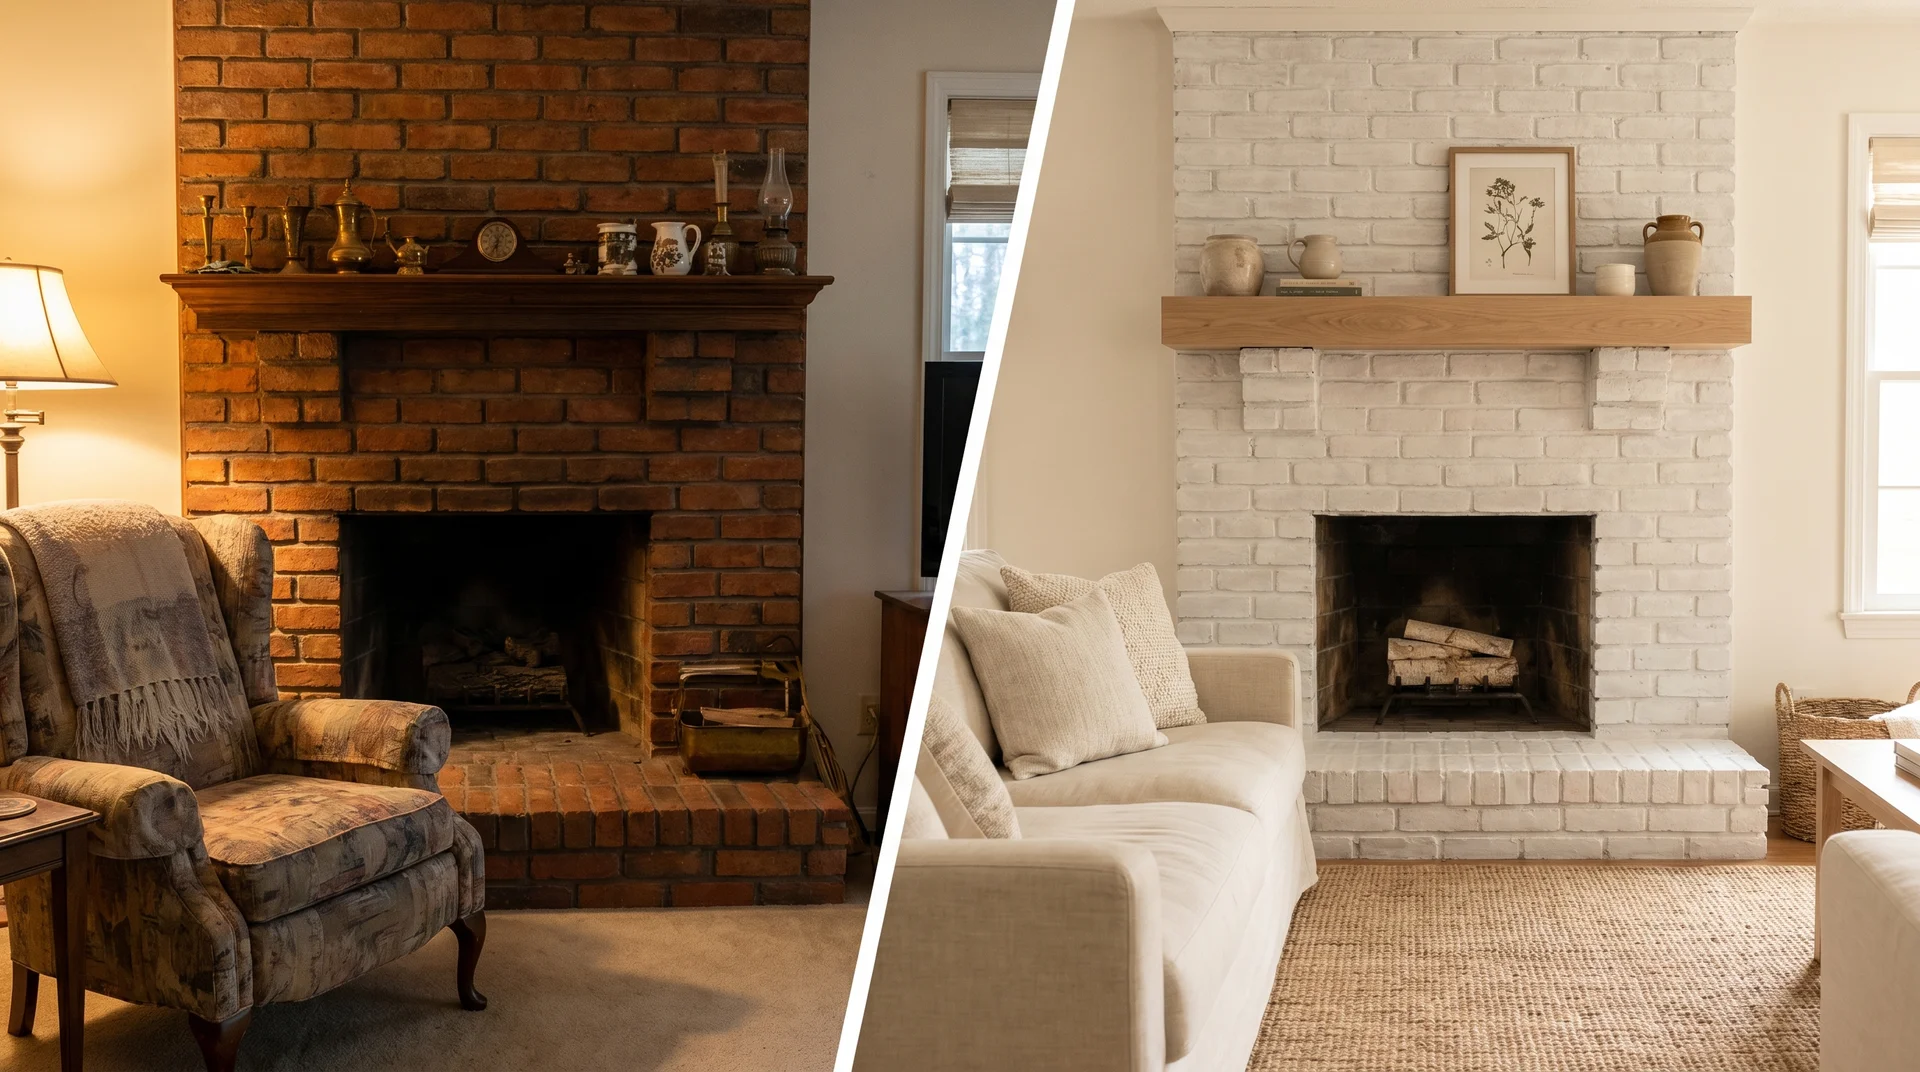
You’ve been staring at that brick for a while. Maybe it’s an outdated orange-red exterior from the ’90s, or a fireplace that pulls every eye in the room for all the wrong reasons.
You’ve seen the limewashed look online a hundred times, and you know it’s what you want. But you’re also wondering whether you’ll ruin something permanent, or end up on a home improvement forum asking strangers what went wrong.
That’s the real question underneath this search. And the answer, before anything else: limewash is one of the most forgiving and genuinely reversible finishes you can put on brick.
Done right, it gives you the kind of aged European texture that looks like it’s always been there. Done carelessly, it dries the wrong color, goes on too thick, and becomes the thing you have to explain every time someone visits.
This guide covers everything: interior fireplaces, full exterior walls, brick eligibility, the design decisions most tutorials skip, and the mistakes that quietly sink an otherwise good project. Read through before you buy anything.
What Limewash Actually Does to Brick
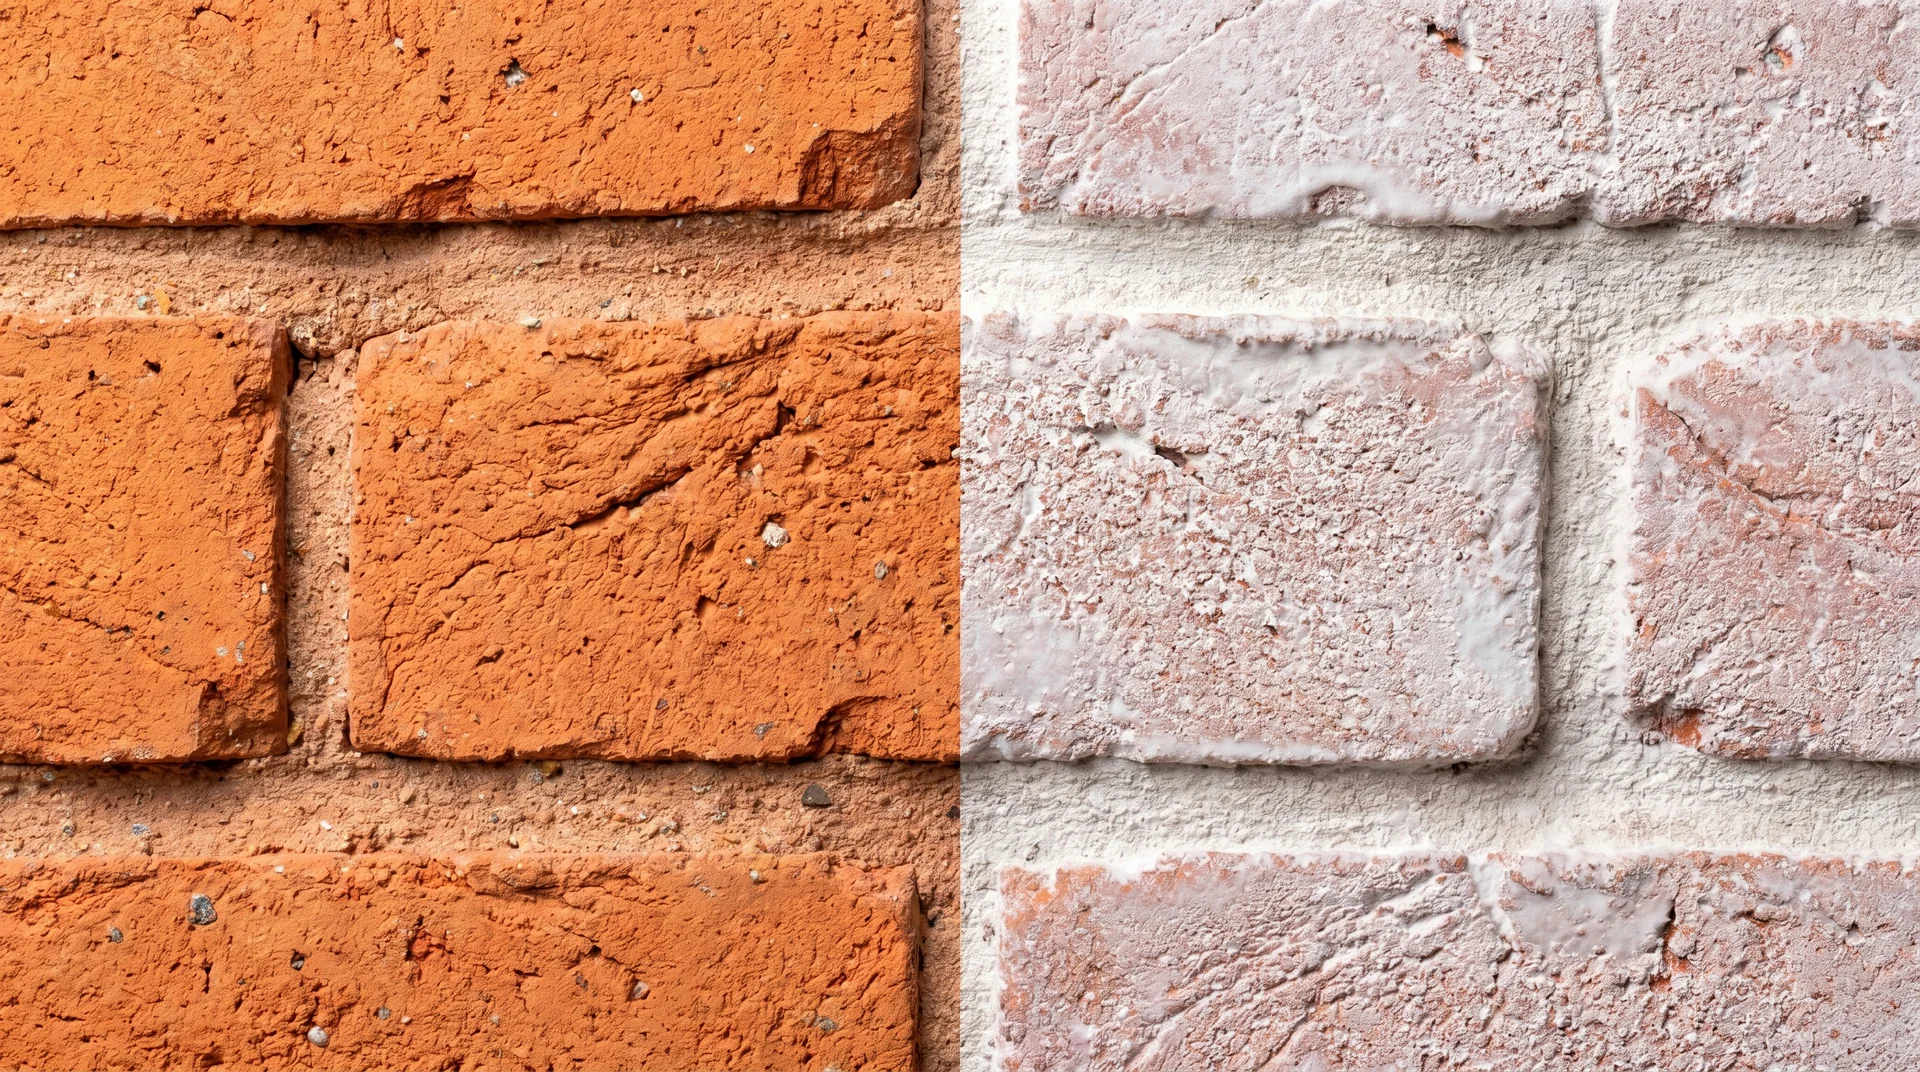
The finish works because of one specific quality: limewash penetrates the brick rather than sitting on top of it. It’s made from crushed limestone slaked with water into a putty, then diluted for application.
When you brush it onto porous brick, the calcium carbonate soaks into the surface and calcifies as it dries, producing a chalky, matte finish that lets the brick’s texture read through rather than masking it the way paint does.
That penetration is also why it weathers so differently from paint. Paint sits on the surface as a film, and when moisture eventually gets behind that film, it peels. Limewash has no film to peel.
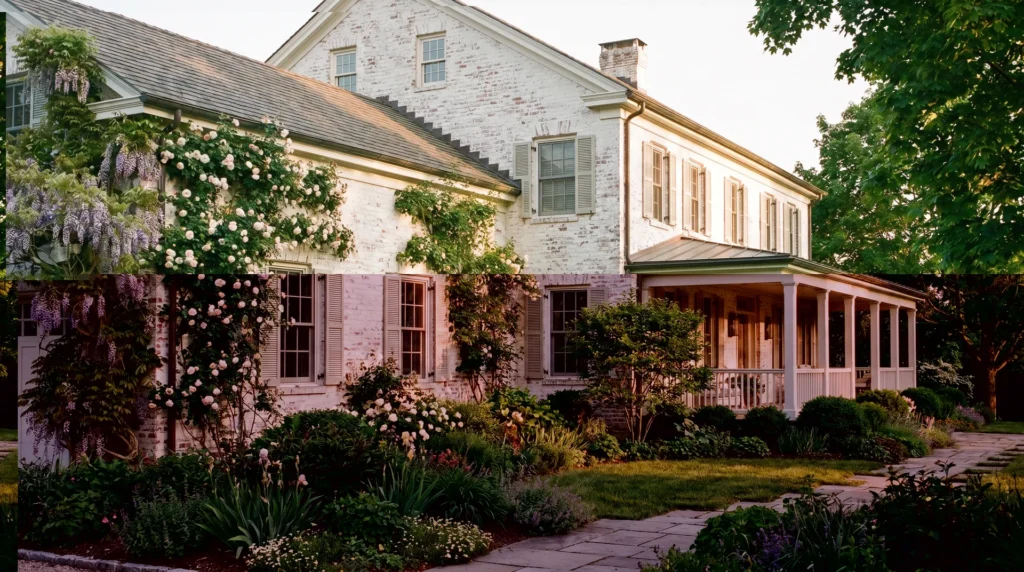
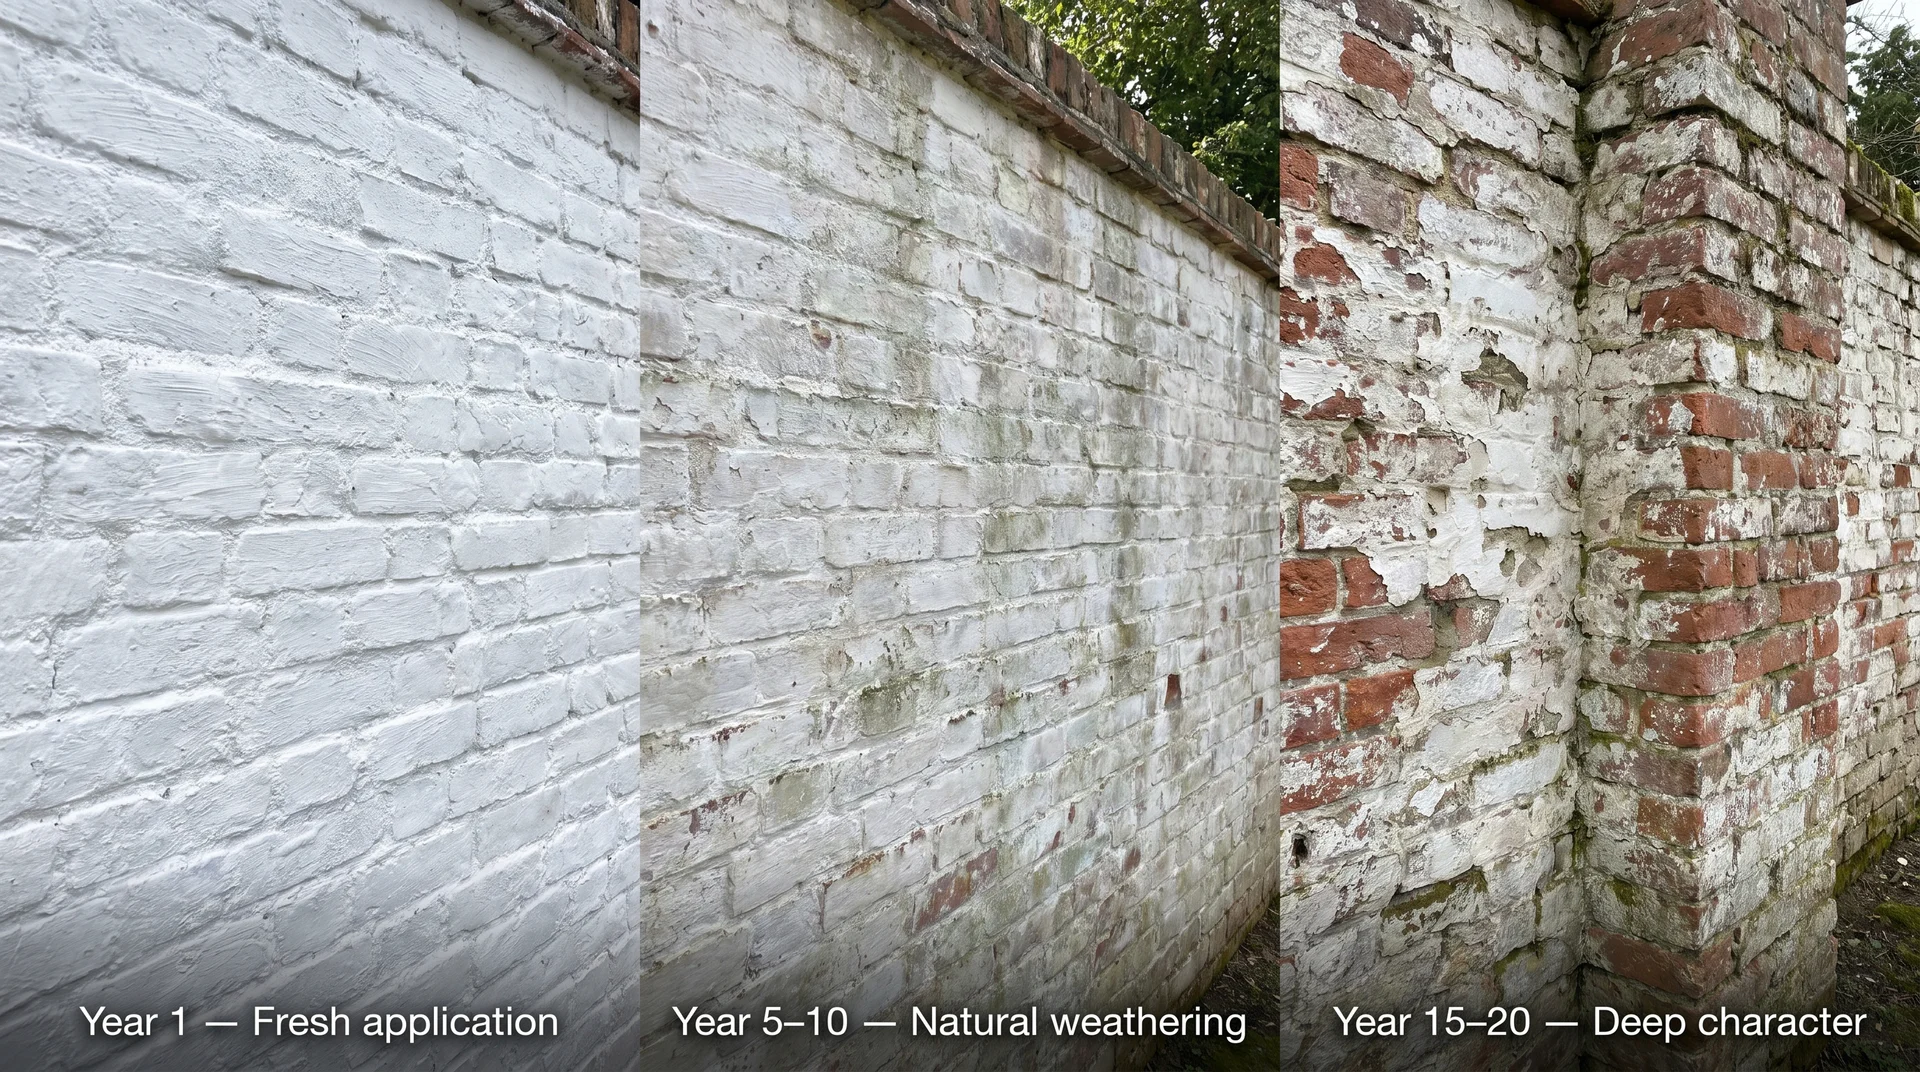
It erodes gradually from the outside, which means the aging process looks intentional. The best limewash jobs don’t look painted. They look like the brick got older.
“The best limewash jobs don’t look painted. They look like the brick got older.”
Over time, weathering adds character to a well-done limewash finish. Exterior areas in exposed positions wear down first, especially south-facing walls and chimneys. But that natural erosion reads as aged rather than neglected.
In mild climates, a properly applied limewash exterior can hold for twenty years or more. In harsher climates with heavy snow and freeze-thaw cycles, expect touch-ups every five to seven years. Indoor applications on fireplaces or accent walls last essentially indefinitely.
Limewash vs. Whitewash vs. German Smear on Brick
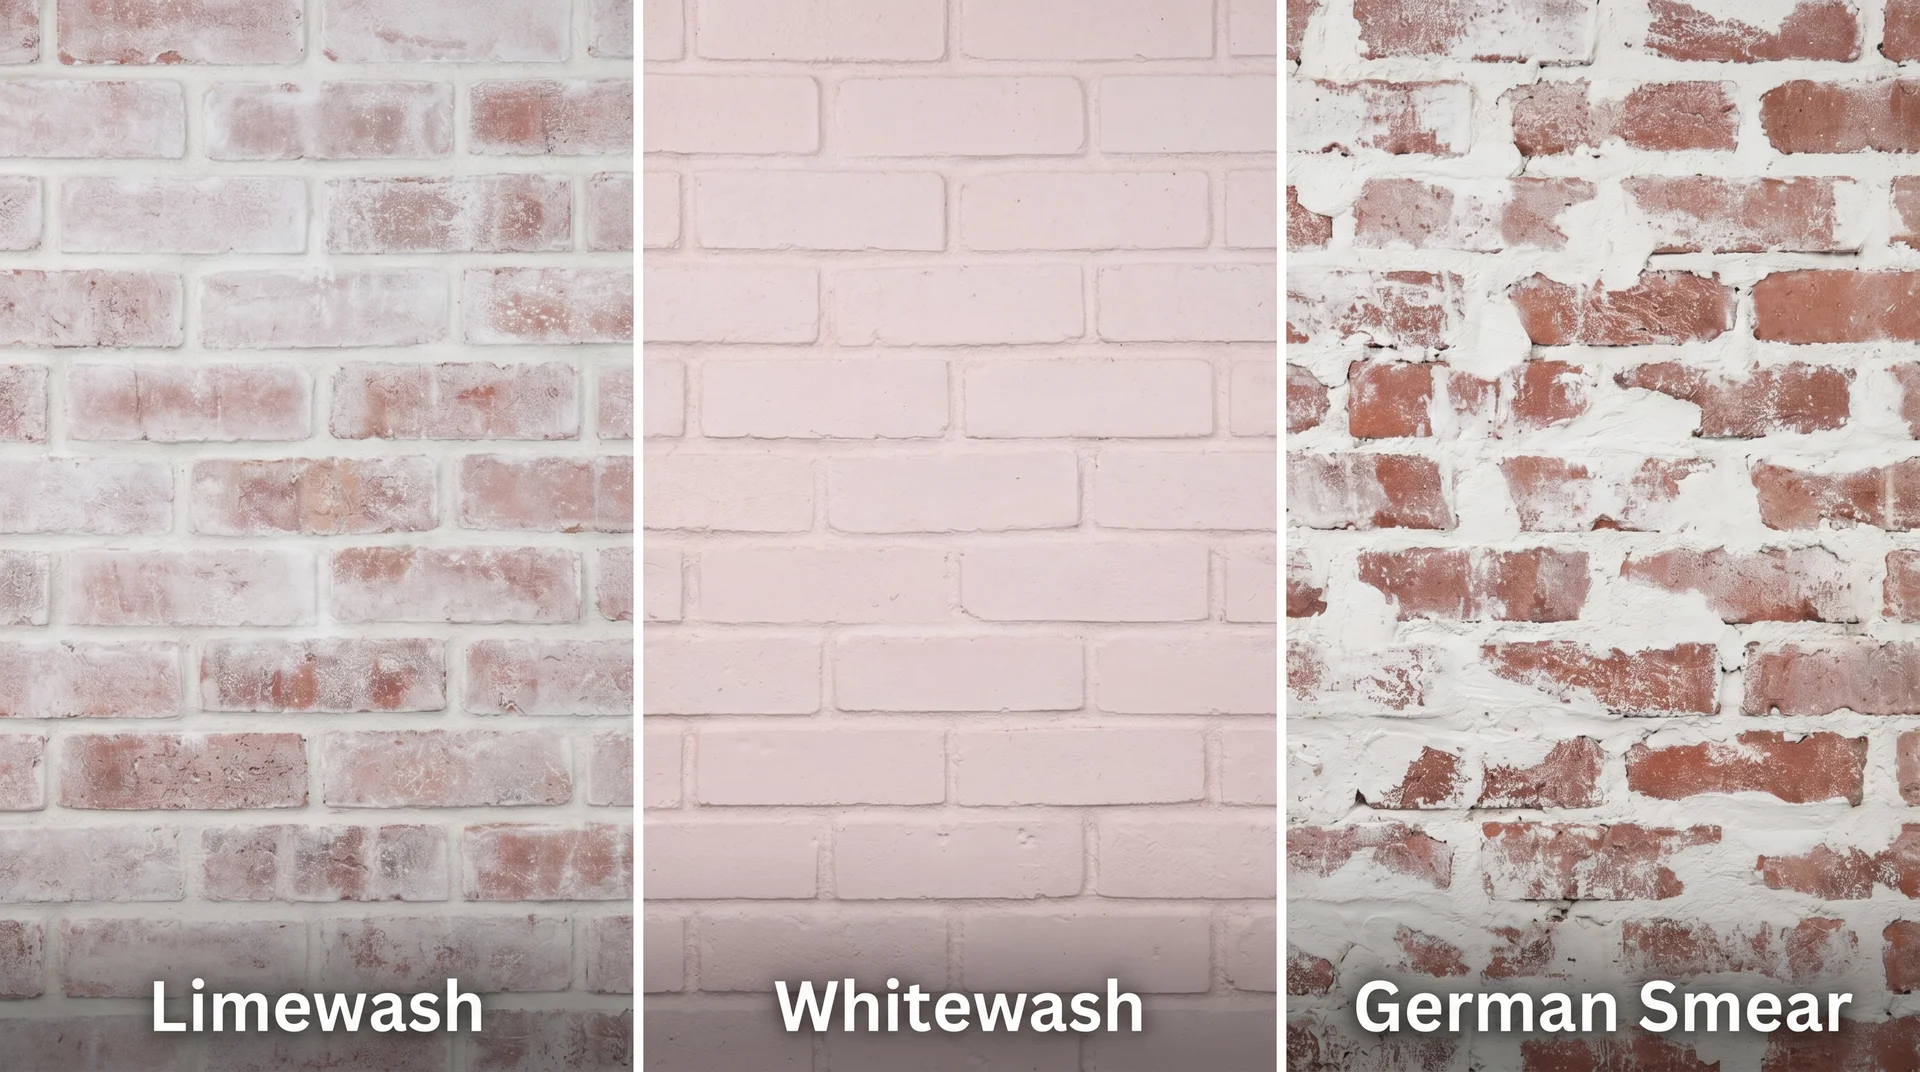
These three finishes are confused constantly, and the confusion leads to real mistakes. Here’s the honest comparison:
| Finish | What It’s Made Of | Penetrates Brick? | Removable? | Peels Over Time? | Texture |
|---|---|---|---|---|---|
| Limewash | Slaked limestone and water | Yes | Yes (while fresh; difficult once cured) | No, it erodes gradually | Chalky, soft, matte |
| Whitewash | Diluted water-based paint | No, coats the surface | Partially | Yes, within a few years | Flat, can pink over red brick |
| German Smear | Wet mortar applied and wiped | No | No, essentially permanent | No | Heavier, chunkier, opaque |
If you’re comparing limewash and whitewash specifically, this guide to whitewashing brick covers the whitewash process in full detail and helps you decide which finish fits your project.
Limewash sits between the other two in terms of texture and permanence. It’s less opaque than German smear by design, and it ages far more gracefully than whitewash.
Does Your Brick Actually Work with Limewash? Check This First
Brick porosity determines whether limewash bonds correctly. This is the single most skipped step and the most common source of limewash regret. If the brick can’t absorb the calcium mixture, the finish won’t hold, and no amount of prep will fully fix it.
The 60-Second Porosity Test for Limewash Brick
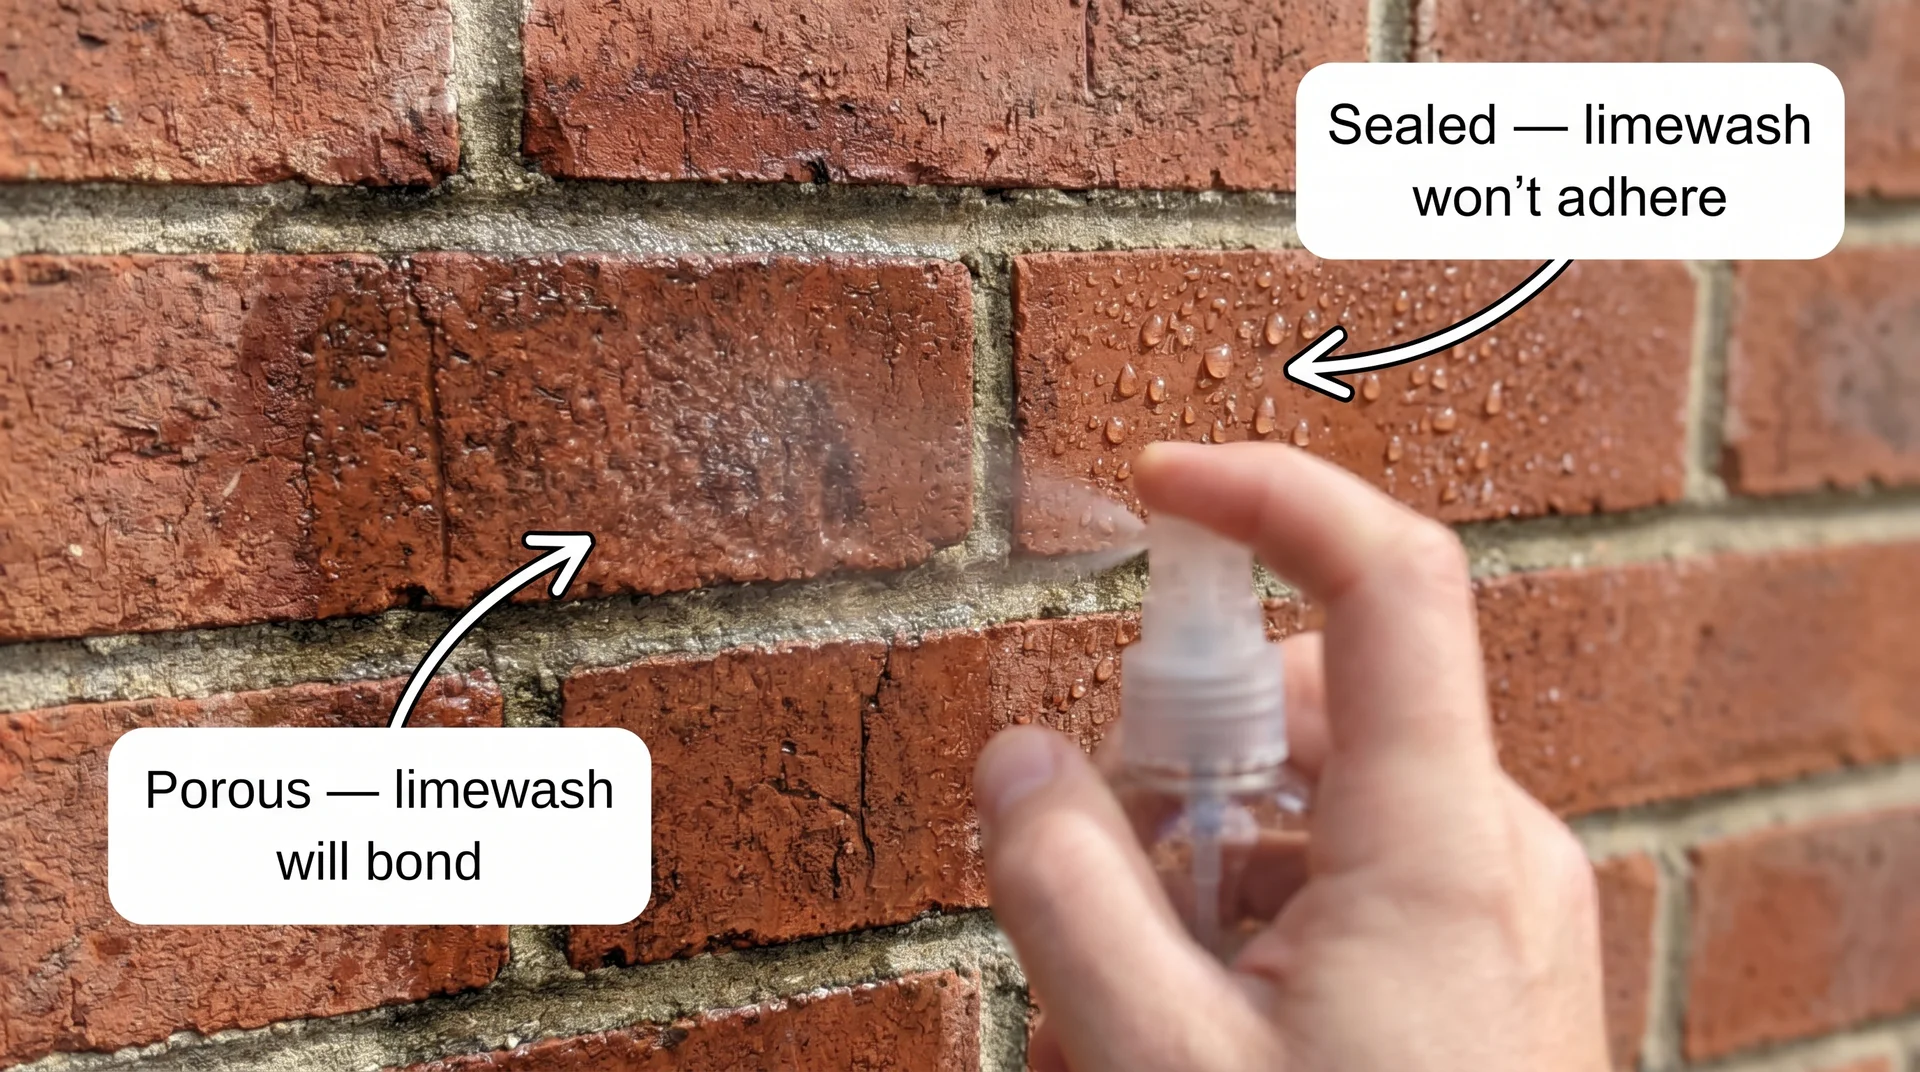
Spray a small amount of plain water onto the brick surface and watch what happens in the next sixty seconds. If the water absorbs quickly and darkens the brick, you have porous brick, and limewash will bond well.
If the water beads up or pools without absorbing, the brick is sealed, treated, or naturally non-porous. Limewash won’t adhere correctly to that surface. Run this test before you buy a single thing.
Can You Limewash Over Painted Brick?
No. Limewash needs a porous surface to penetrate and bond. Paint creates a sealed film that blocks absorption entirely. Limewash applied over paint will sit on top of the film rather than soaking in, and it’ll eventually peel or flake.
Some homeowners have had partial success after stripping the paint first, but that process is involved and risks damaging older brick. If your brick is painted, look at mineral masonry paints formulated for previously painted surfaces rather than traditional limewash.
Old Brick vs. New Construction Brick
Older brick, especially pre-1960s, tends to be softer and more porous. Limewash soaks in readily and usually produces a beautiful result. Newer extruded brick is often denser, which means it may require more coats to build the same coverage.
Deeply recessed mortar joints also require more time and a smaller brush. Know what you’re working with before you start, because the grout situation changes your timeline significantly.
Design Decisions to Make Before You Buy Anything
The limewash conversations that end badly almost always have one thing in common: design decisions made after the application started. I’ve worked through finish selections with enough homeowners to know that the hour you spend on this section is the one that actually determines your result.
Choosing Your Limewash Coverage Level
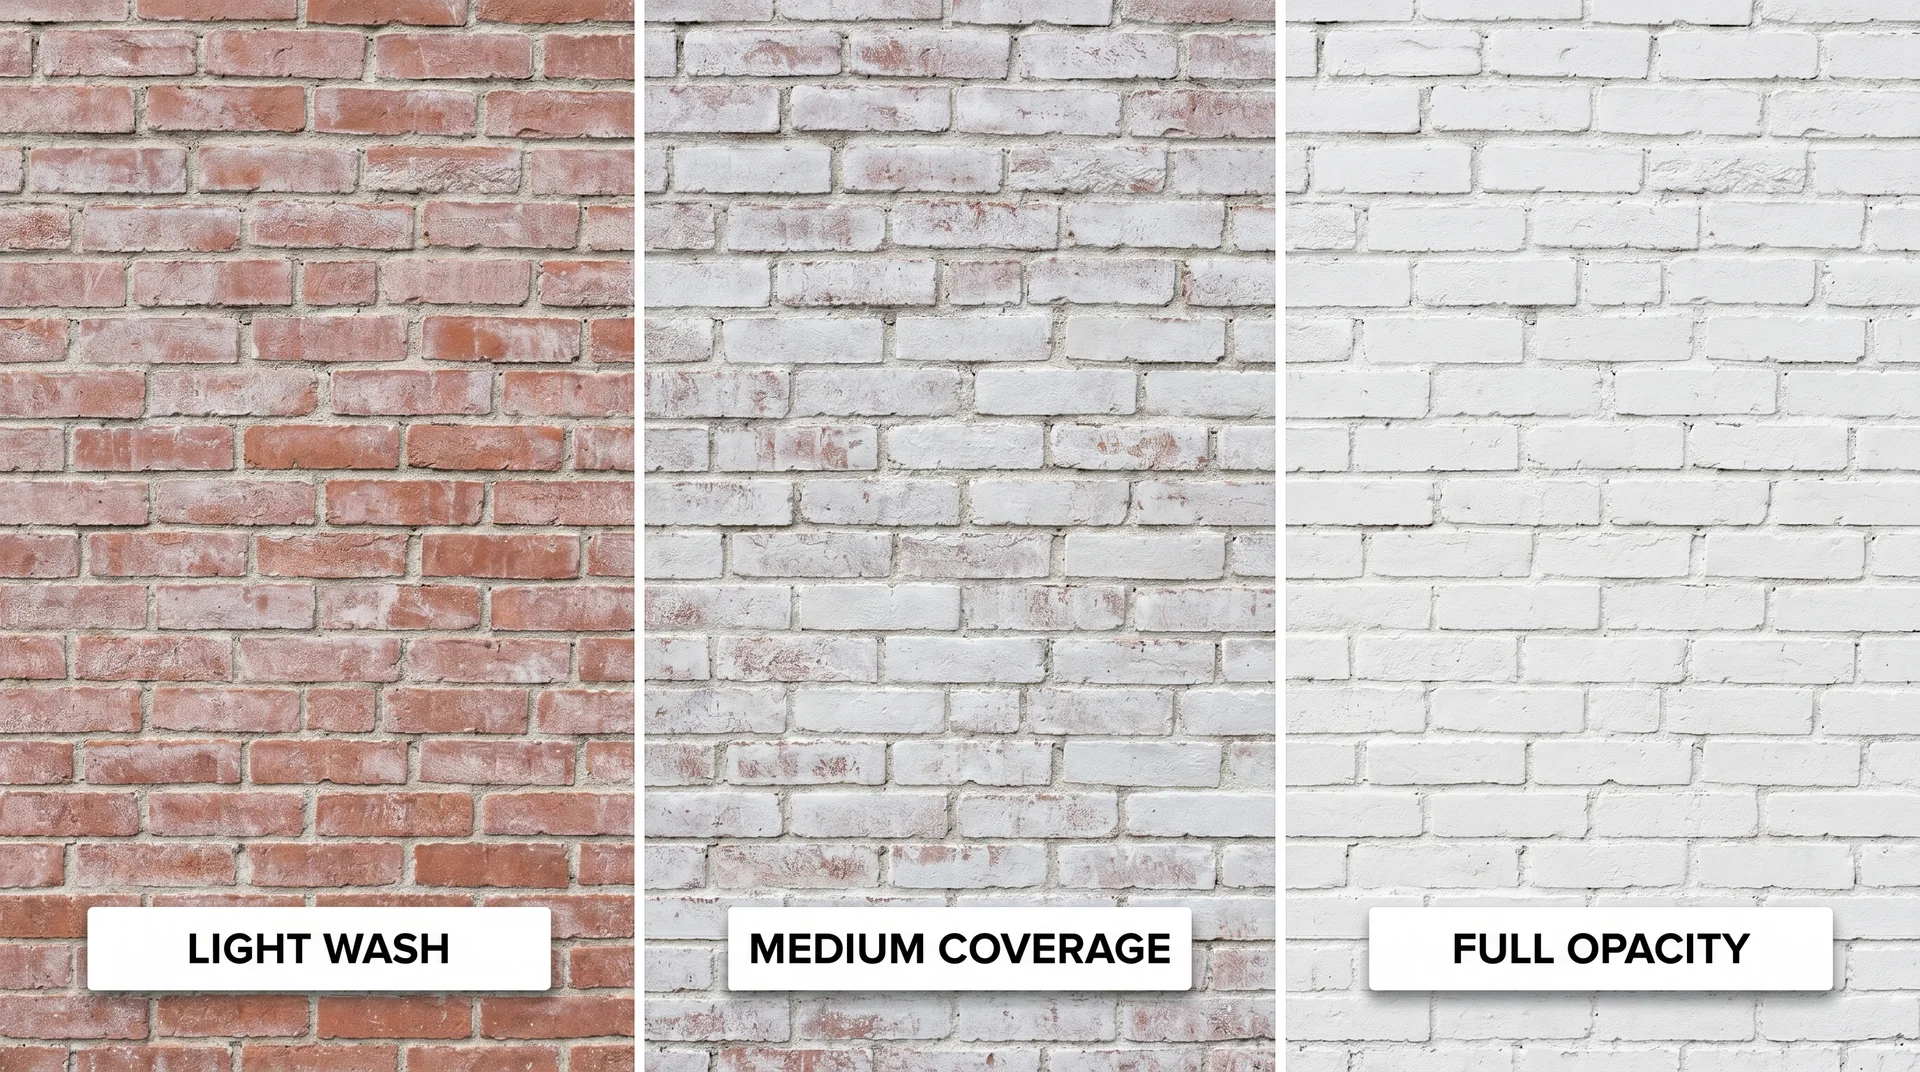
Limewash gives you a real spectrum of opacity depending on your dilution ratio and the number of coats you apply. But that flexibility only helps if you’ve decided what you want before the bucket is open.
- Light wash: High water-to-limewash ratio. Brick color shows clearly underneath. Works especially well on brick with natural color variation, since the limewash mutes the variation without erasing it.
- Medium coverage: Roughly 50 to 70 percent opacity. The brick reads as off-white from a distance, but the texture and some tonal variation show up close. This is the most popular finish for exterior applications.
- Full opacity: Solid, opaque coverage that looks closest to paint, though the texture still reads through. Requires more product and more coats. Valid for brick with significant color inconsistency, but be deliberate about it.
Why Limewash Color Looks Nothing Like the Label When Wet
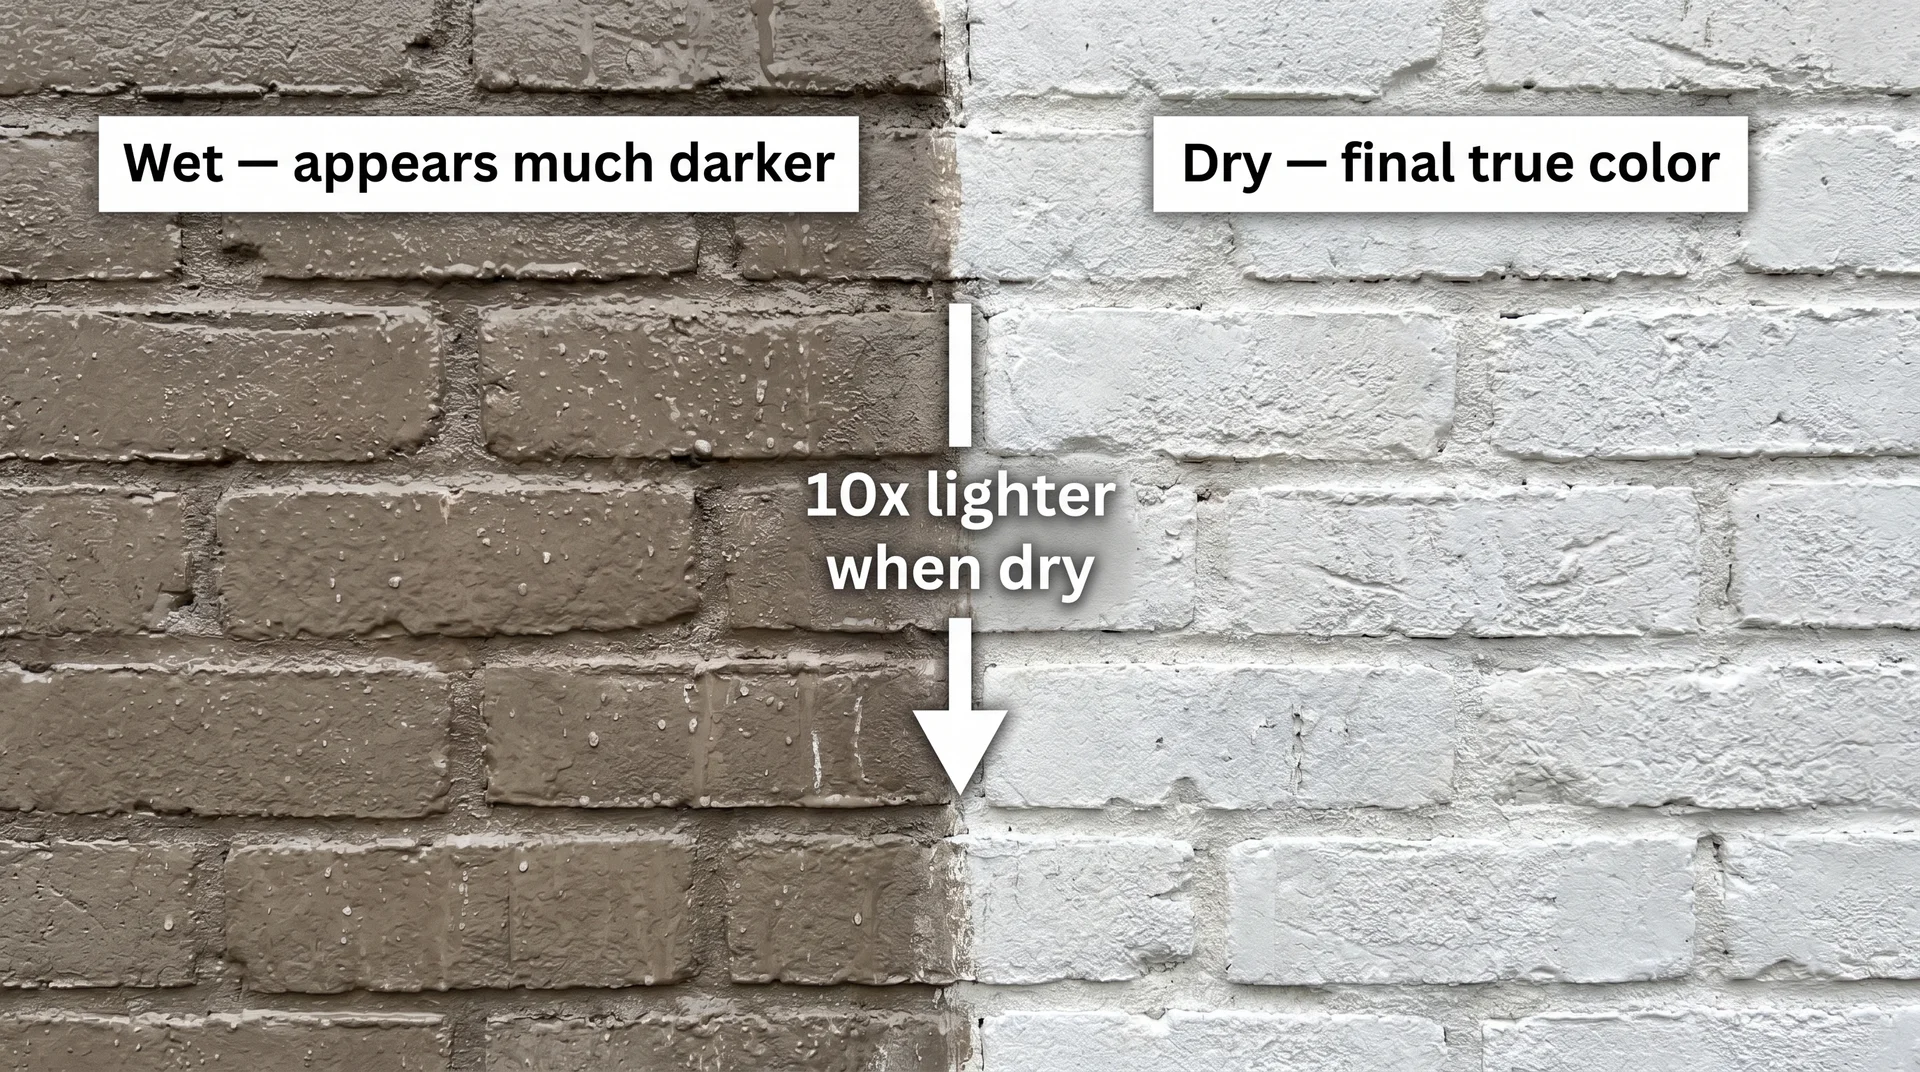
Limewash is typically ten times darker when wet than it will be once it dries. If a coat looks perfectly toned while still wet, it will dry considerably lighter. If it looks pale and wet, it’ll look almost invisible once cured.
Test on a small, inconspicuous section, let it dry fully, and evaluate the dried color before making any decisions. Never judge limewash wet.
Matching Limewash Tone to Your Trim, Siding, and Roof
Limewash isn’t just “white.” Romabio, one of the most widely used premixed options, offers seven tones: Bianco White, Avorio White, Nube Grey, Grigio Toscana, Sabbia, Bronzo Antico, and Portofino. The tone you choose needs to work with your trim, roof, and any siding.
A common mistake: choosing a grey-toned limewash to match grey siding, then finding the dried finish is considerably lighter than expected, leaving the materials looking disconnected rather than cohesive.
Always sample your chosen limewash color against your actual trim and siding, fully dry, in both morning and afternoon light, before committing. If you need help narrowing down white and off-white paint tones to pair with your limewash finish, this breakdown of Sherwin-Williams Alabaster covers undertone reading and pairing in detail.
Interior Fireplace vs. Exterior Brick Wall
The approaches diverge mainly on prep, dilution, and maintenance expectations. Interior fireplace projects typically use a thicker application (closer to 50% dilution) and prioritize getting into deep grout lines.
Exterior projects need weather timing, surface prep on a larger scale, and a sealer layer on exposed areas. Both follow the same core technique. The separate fireplace section below covers where the process specifically differs.
What You Need to Limewash Brick
Premixed Limewash vs. DIY Hydrated Lime
Premixed products like Romabio Classico Limewash come as a thick paste concentrate that you dilute yourself. They’re available at Home Depot, formulated for consistent results, and come in multiple tones. A gallon runs roughly $25 to $100, depending on the brand and quantity. For a first project, premixed is the lower-risk choice.
DIY hydrated lime costs around $8 for a 50-pound bag and produces a large volume of limewash when mixed with water. The trade-off is that you get only natural off-white; the consistency is harder to control for a beginner, and mixing requires more precision. It’s a genuine option for experienced DIYers who want to keep costs down.
Tools Checklist
| Tool | Purpose | Notes |
|---|---|---|
| Large natural bristle masonry brush | Primary application | Stiff bristles push limewash into grout lines |
| Smaller natural bristle brush (2–3 inches) | Deep recesses and grout lines | Essential for fireplace brick |
| Pump garden sprayer or spray bottle | Dampening the brick before application | Sprayer for exterior, bottle for interior |
| Power washer | Exterior cleaning and optional distressing | Do not use on soft or historic brick |
| Drill with paddle mixer attachment | Mixing limewash concentrate | Saves considerable time and arm effort |
| Drop cloths and plastic sheeting | Protecting surfaces | Limewash splatters significantly |
| Safety goggles and chemical-resistant gloves | Personal protection | Required: lime is caustic before curing |
The brush is worth spending money on. A cheap foam roller or synthetic brush will produce a flat, even coat that looks more like paint than limewash. The natural bristle brush creates the texture variation that makes the finish look right.
Limewash Dilution Ratios
| Dilution Level | Ratio (water:limewash) | Coverage Look | Best For |
|---|---|---|---|
| Heavy | 50% (1:2) | Opaque, near-solid finish | Full coverage, interior fireplaces |
| Medium | 75% (3:4) | Semi-transparent, brick texture visible | Most exterior applications |
| Light | 100% (1:1) | Transparent wash, brick color shows through | Distressed, antique look |
These are starting points. Mix a small batch at each ratio, test on a hidden section, let it dry completely, and then decide. The dilution for your full project becomes obvious once you see the actual dried result.
And on the one-coat question: Romabio Classico is formulated as a one-coat product for standard coverage, but most DIYers find they want a second coat for fuller results, especially on porous or older brick.
Safety Note: Hydrated lime and limewash products are caustic before they cure. Wear chemical-resistant gloves and safety goggles any time you’re mixing or applying limewash. Keep the product away from your eyes and skin, and rinse with water immediately if contact occurs. If you’re working indoors, ensure the space is well ventilated. Once fully cured, limewash is inert and environmentally safe.
How to Limewash Brick: The Full Step-by-Step Process
Step 1: Clean and Prep the Brick Surface
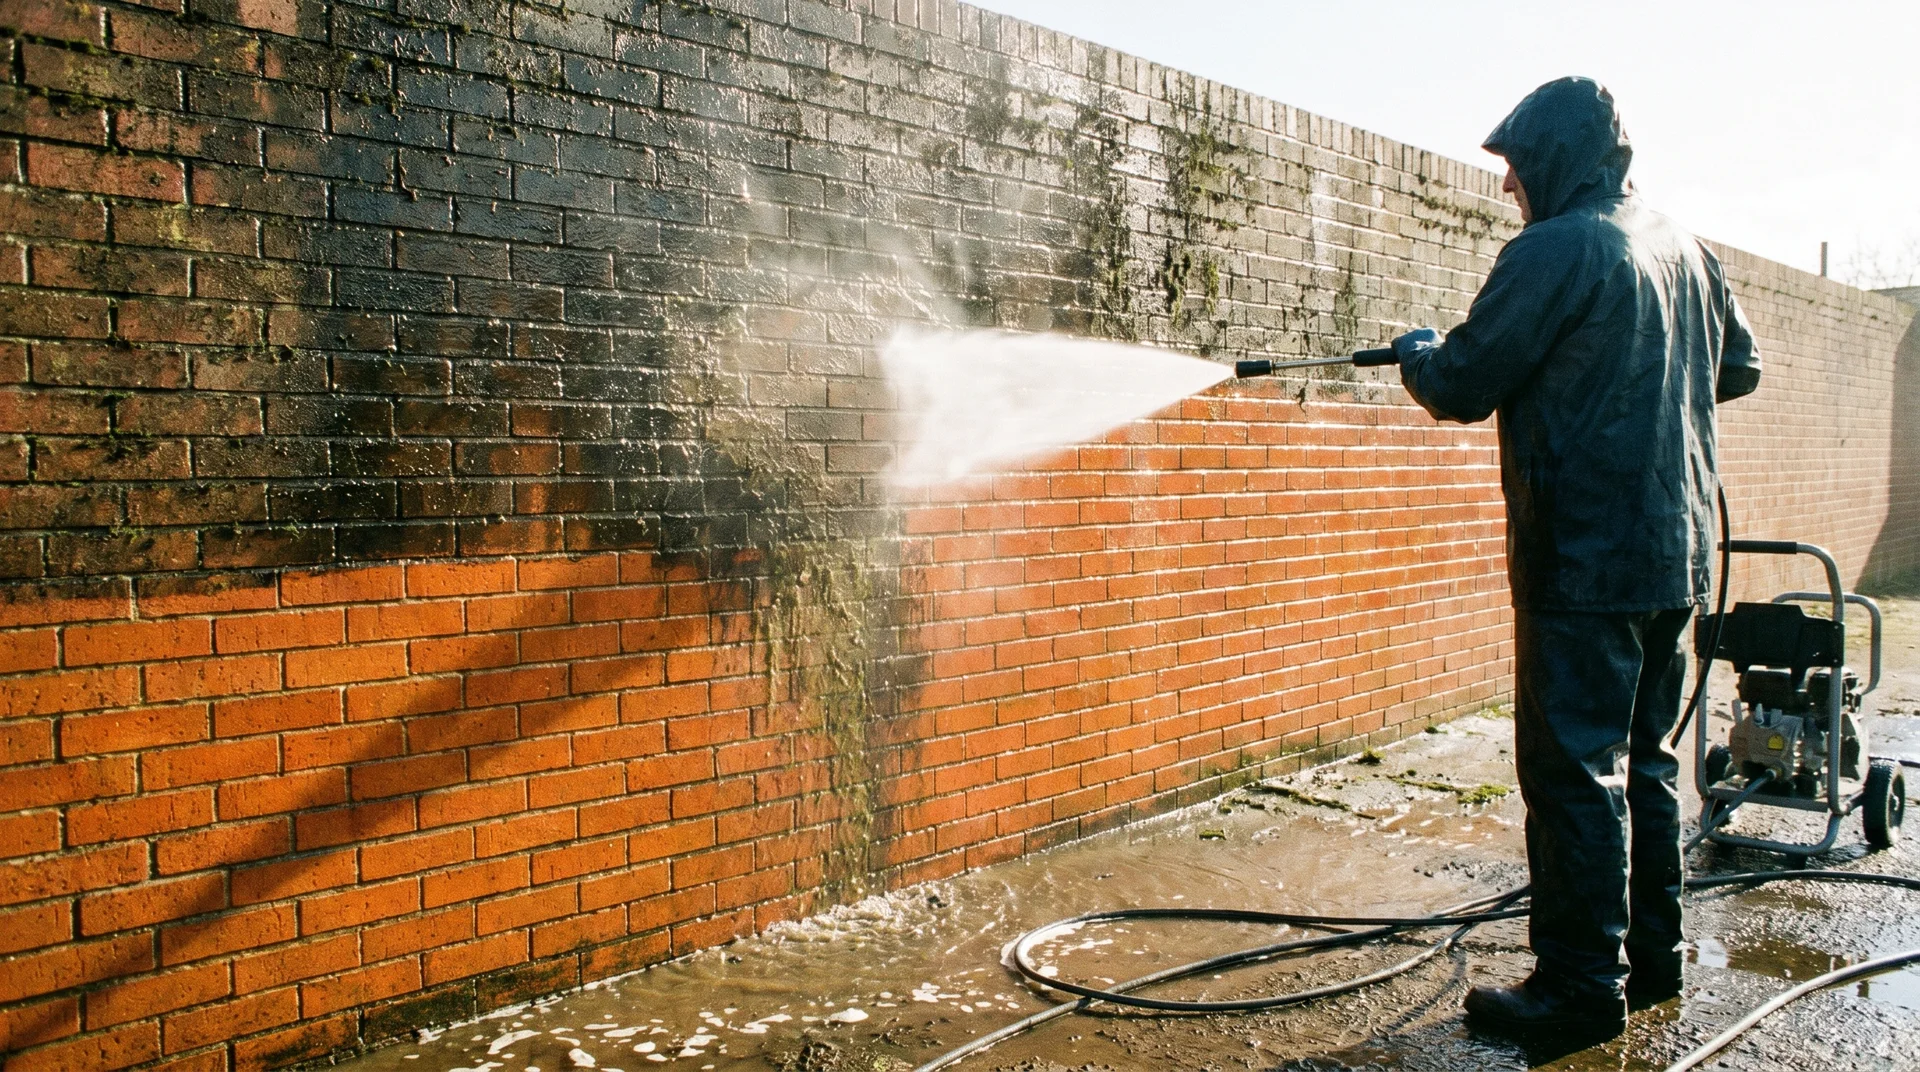
For exterior brick: Power wash the entire surface and let it dry completely, at least 24 hours. If you see mildew or algae on any section, treat it with a dedicated algae and moss cleaner, let it sit overnight, then power wash. The limewash needs to bond with clean, open pores. Dirt or residue in those pores interferes with adhesion and creates problems later.
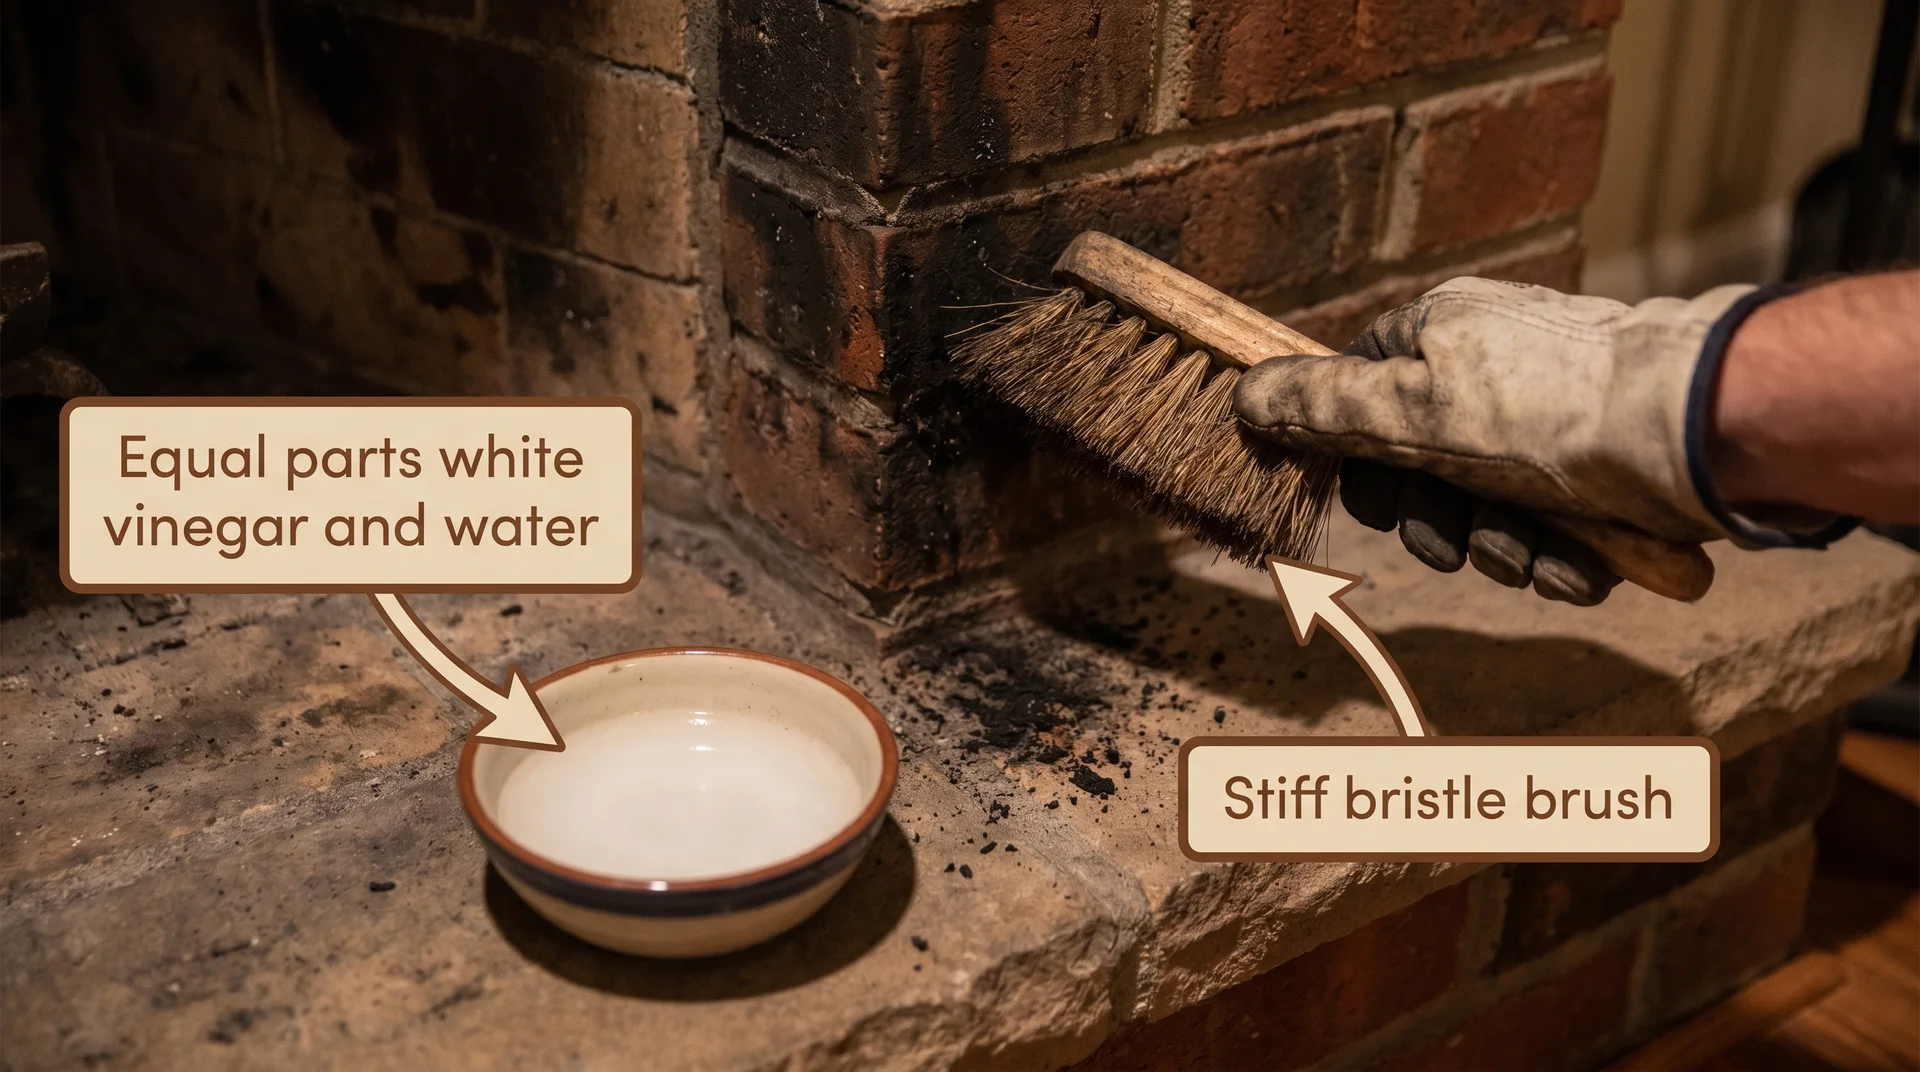
For interior brick: Scrub with a stiff brush and warm water. Rinse thoroughly and let it dry before proceeding. For fireplace brick with soot or residue, a solution of equal parts white vinegar and water, scrubbed in and rinsed off, handles most buildup. Let the brick dry completely.
Step 2: Run Your Test Patch First (Non-Negotiable)
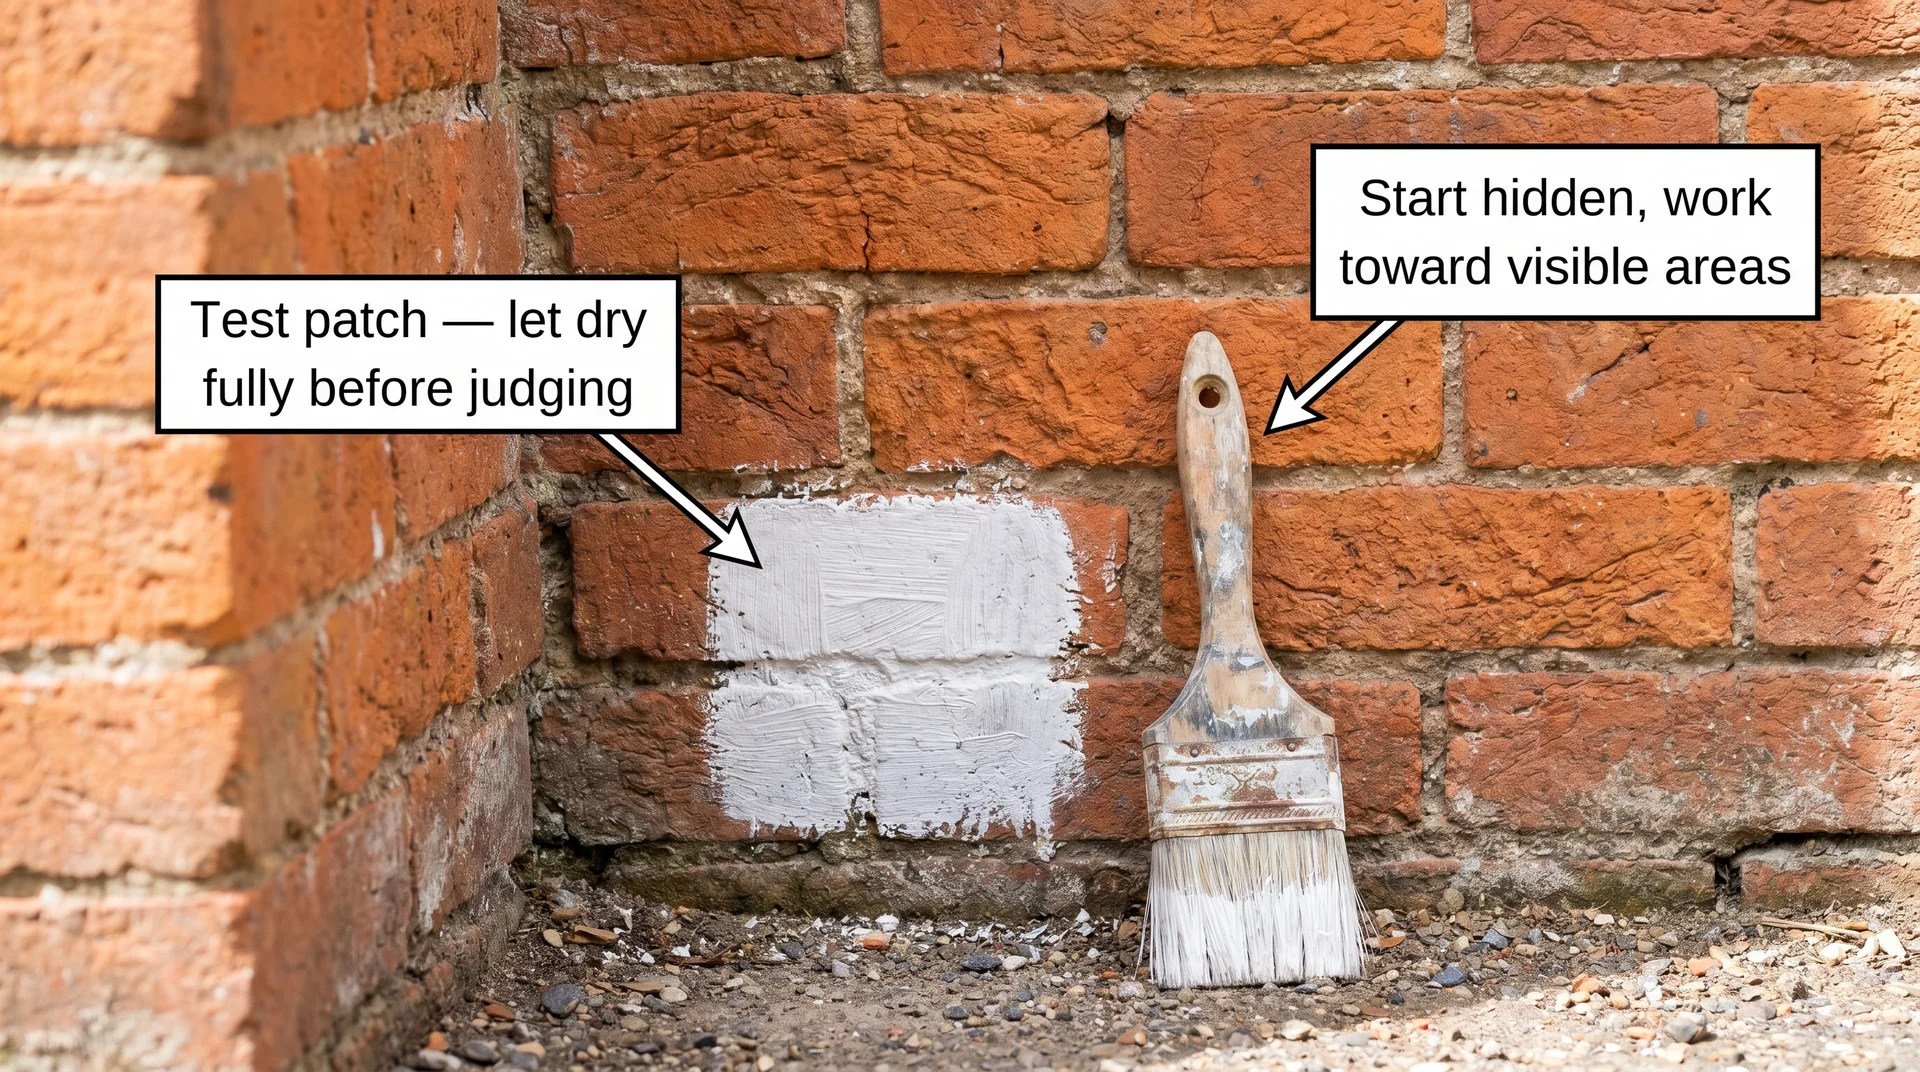
Find the least visible section of wall or exterior, a side that faces away from the street, or a corner behind furniture for interior walls. Mix your first dilution, apply it, and let it dry fully before touching anything else.
This step shows you the actual dried color, the actual texture, and whether your dilution is working as expected. Work from hidden sections toward visible ones for exterior projects, so your technique is dialed in before you’re on the front of the house.
Step 3: Dampen the Brick Before Each Section
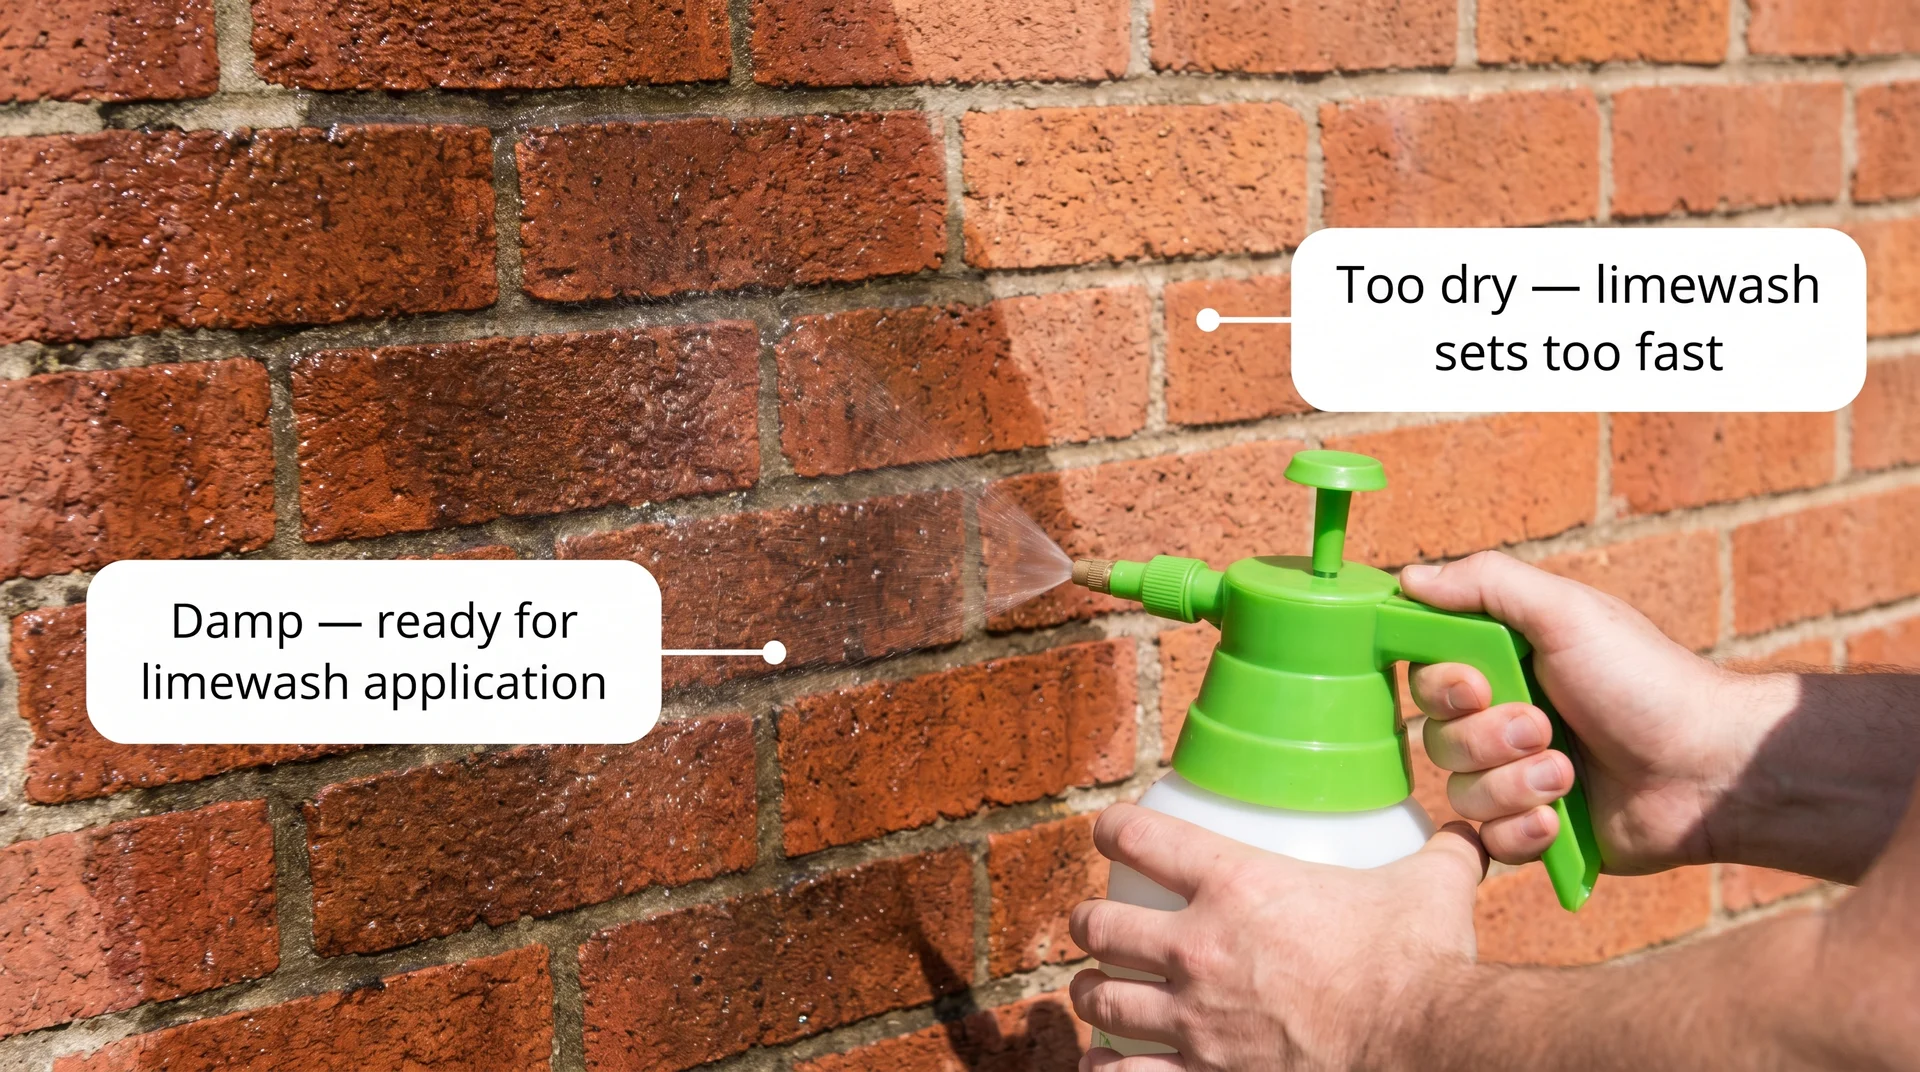
Mist the brick with clean water using a pump sprayer or spray bottle before you start each section. You want the surface damp, not soaking or dripping. In warm weather, especially damp brick gives you more working time before the limewash sets, which makes application more even. Work in manageable sections, so you’re always applying to a damp brick, because the product goes on very differently depending on surface moisture.
Step 4: Apply Your First Coat with the Right Technique
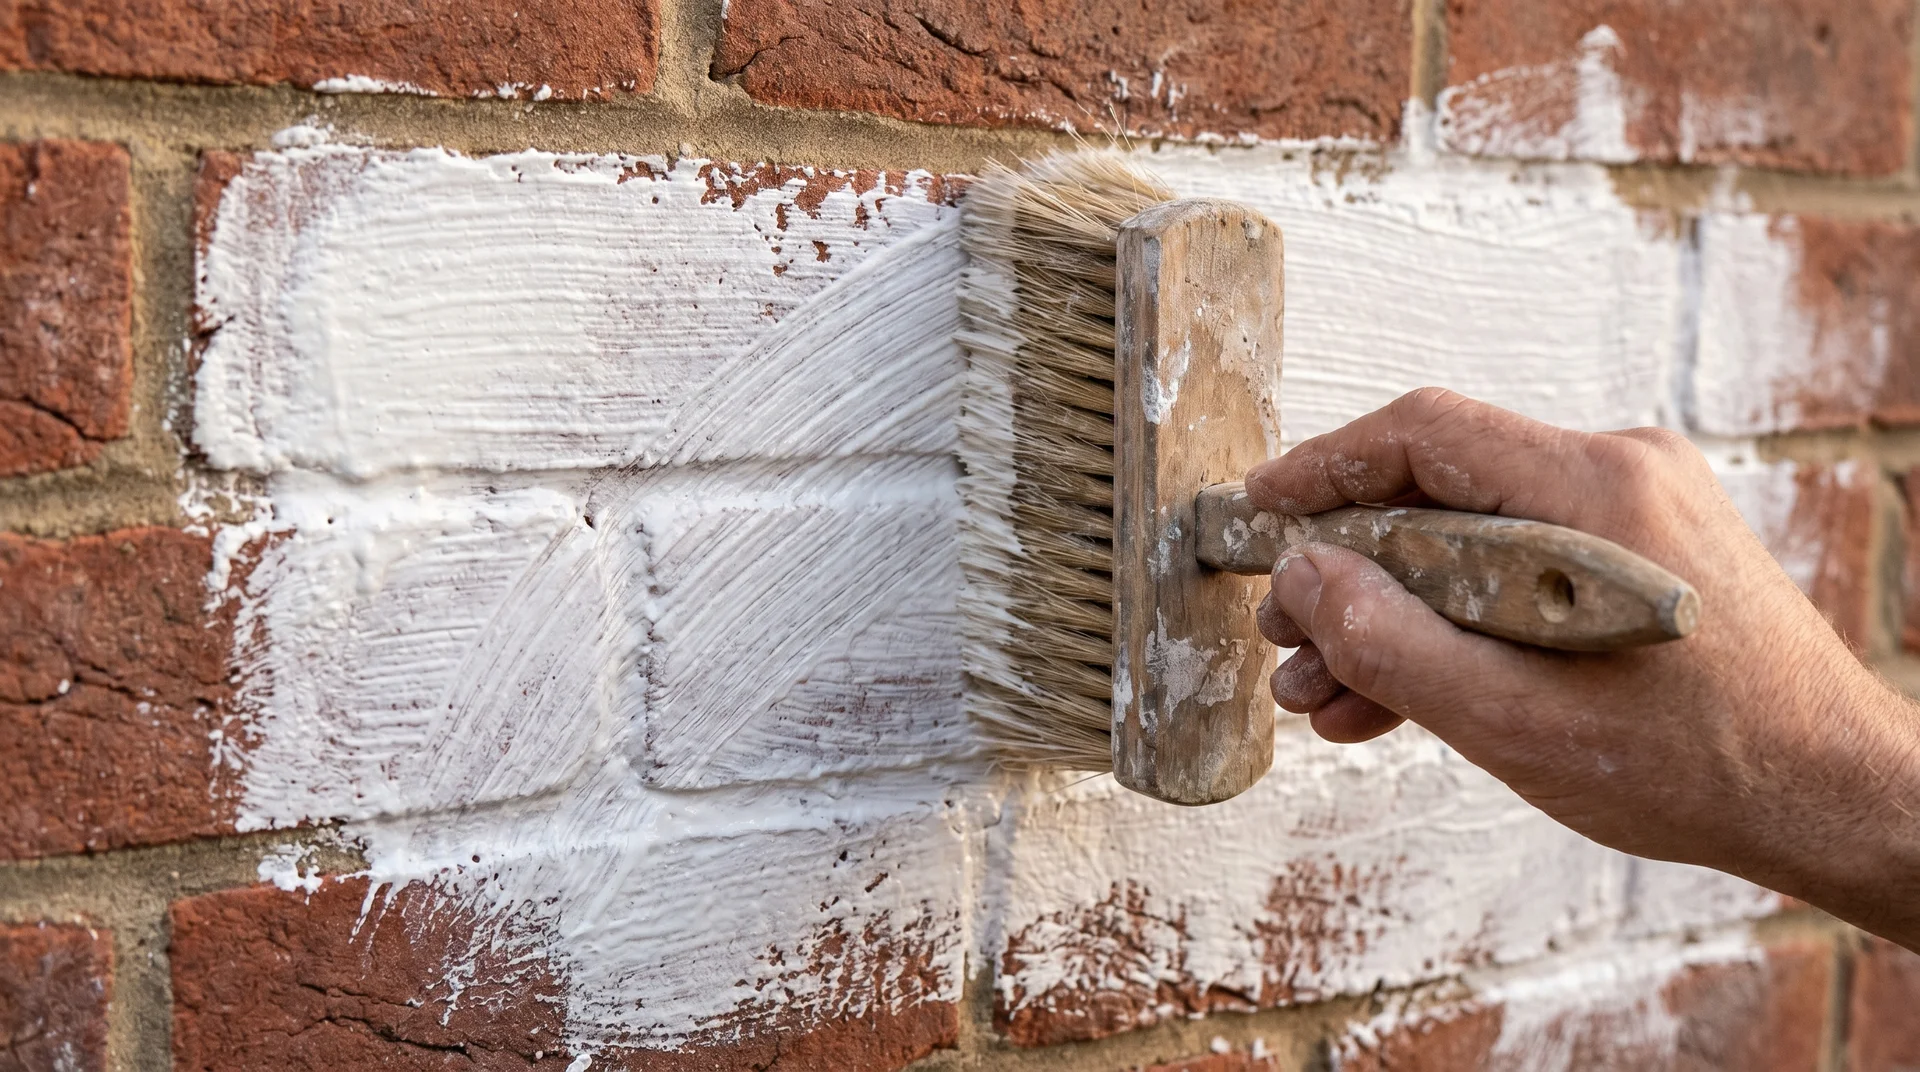
Dip your brush, remove the excess with a flick of the wrist, and work with loose, varying strokes rather than tight, uniform ones. Change direction frequently. Horizontal, vertical, and diagonal strokes applied to the same section create the natural variation that makes limewash look authentic. Let the bristles do the work rather than pressing hard.
Keep a wet edge as you move across the surface. Letting sections dry before the adjacent section is applied can create visible overlap lines. Work continuously and keep fresh limewash being mixed in the background if you’re doing a large exterior. For very large exterior surfaces, some people use a paint sprayer to apply and then brush it in, which speeds up the process significantly.
Step 5: Distress, Layer, or Leave It to Build Your Finish

While the first coat is still damp, you can create a distressed look. Spray water onto sections and blot or wipe gently with a rag to remove some of the limewash and allow the brick color to show through. For exterior applications, running the power washer briefly over sections after the first coat exposes more brick in a way that looks natural.
For fuller coverage, let the first coat dry completely and apply a second coat. The second coat builds opacity significantly. Most projects land between one and three coats. If you’re using Romabio Classico, it’s formulated for one-coat application at standard coverage, but apply a second coat if you want a more opaque result. Vary pressure and water removal between coats to create movement across the surface if you want a layered, distressed look.
Step 6: Let It Cure, and Leave It Alone
Freshly applied limewash needs time to calcify and harden. Avoid touching the surface, wetting it, or applying any sealant for at least 24 hours after the final coat. In humid conditions, allow more time.
Once fully cured, you can apply a mineral sealer like Romabio Mineral Shield to exterior surfaces that take direct weather exposure. This step is optional but worth doing on horizontal ledges, stoops, chimneys, and any surface that faces direct rainfall, since those areas wear fastest.
For a general reminder on why coat timing matters for any paint project, this guide on wait times between coats of paint is useful context.
How to Limewash a Brick Fireplace: What the Indoor Process Needs
The fireplace process follows the same logic as exterior brick, but a few things change.
Cleaning Soot from Fireplace Brick Before Limewashing
Fireplace brick accumulates soot and residue that blocks limewash adhesion. Clean the surface with a stiff brush and warm, soapy water first, then rinse thoroughly. For heavy soot, a 50/50 white vinegar and water solution, scrubbed in and rinsed off, works well. Let the brick dry completely before you go anywhere near limewash. If there’s old paint on the fireplace brick, that needs to come off first.
Getting Into Deep Grout Lines on Fireplace Brick
Fireplace brick often has deeply recessed mortar joints that a large brush can’t reach. Keep a smaller, stiffer-bristled brush for the grout lines and corners, and work those first, then go over the face of the brick with the larger brush. Skipping this step leaves visible unpainted mortar lines that break the finish and look uneven.
Dilution and Coverage for Interior Fireplace Brick
Interior fireplaces work best with a thicker application, typically around 50% dilution, because you usually want fuller coverage on a contained surface. You also have no weather working against you once it cures, so the finish holds indefinitely.
Most interior fireplace projects require one to two coats. A matte, chalky finish is standard for limewash on brick. If you want to understand how matte finishes compare to other paint sheens for the surrounding room, this comparison of flat vs. matte paint finishes covers the difference clearly.
Limewash Brick Mistakes to Avoid
Skipping the Test Patch
Every limewash regret story starts here. The color surprise alone, seeing a warm beige dry to near-stark white, has sent more than one homeowner back to the drawing board. Test first. Always.
Applying Limewash to Sealed or Non-Porous Brick
Running the water absorption test takes sixty seconds. Not running it and discovering mid-project that the limewash won’t bond costs significantly more time and money to fix. If the water doesn’t absorb, stop.
Getting the Dilution Wrong
Too thick and the limewash goes on like paste, dries unevenly, and looks nothing like the aged texture you were after. Too thin, and it takes too many coats to build any meaningful coverage. Start at 50% dilution, test, adjust, and work toward your target rather than guessing from a tutorial.
Starting on the Most Visible Wall First
Start at the back, or a side wall, or somewhere almost nobody sees. Work toward the front as your technique develops. By the time you’re on the most visible section, you should have a reliable feel that you built on the less visible areas. This is also how professionals approach it.
Working in the Wrong Temperature or Wet Conditions
For exterior applications, temperatures need to be between 50 and 90 degrees Fahrenheit. Below 50, limewash won’t cure properly. Above 90, it dries too fast to work evenly. Rain within a few hours of application is a real problem for fresh coats that haven’t set. Check the forecast, plan for a full dry day, and avoid the hottest part of summer afternoons.
Rushing the Distressing Step
Distressing works when limewash is still damp, not wet, and not dry. That window is roughly 15 to 45 minutes, depending on temperature and air circulation. Remove too early, and you expose raw brick in patches that look uneven. Wait too long, and the limewash has hardened enough that distressing requires significantly more force and still looks patchy. Watch the surface, not the clock.
How Long Does Limewash Last on Brick, and How Do You Maintain It?
Exterior Limewash Lifespan by Climate
In mild climates with moderate rainfall and no extreme freeze-thaw cycles, a well-applied limewash exterior using a quality product can last twenty to thirty years with minimal intervention. That’s not a marketing claim. Homeowners who’ve had their exteriors limewashed for five-plus years consistently report this when looking back on the project.
In climates with heavy snow, hard freezes, and significant rainfall, assess the surface every five to seven years and do spot touch-ups as needed. Exposed areas like chimneys, south-facing walls, and horizontal ledges wear faster than covered sections. Applying Romabio Mineral Shield to exposed areas after the final coat cures extends the lifespan considerably.
Interior Limewash Lifespan
Indoor limewash on a fireplace surround or accent wall lasts essentially indefinitely because it has no weather exposure. The main maintenance consideration is cleaning: use a soft cloth and a mild water solution, and avoid abrasive cleaners that could disturb the surface. High-traffic areas like mudrooms may show wear faster than low-traffic rooms.
How to Touch Up Limewash Brick Without Starting Over
Touch-ups blend naturally with limewash because the finish already has built-in variation. Clean the area, dampen it, and apply the same dilution you used originally. Feather the edges out to blend. It won’t look identical to the surrounding aged surface right away, but it will blend as it weathers, which is one of limewash’s genuine advantages over paint.
Can You Remove Limewash from Brick?
Yes, and this matters. While curing, water and a stiff brush remove it fairly easily. Once fully cured, a power washer on a medium setting combined with a stiff bristle brush will remove most of it, though some residue may remain in the pores.
A vinegar solution also breaks down limewash if used promptly after application. “Removable” doesn’t mean “easy to remove” at full exterior scale, but the option exists, unlike with German smear, which is essentially permanent from day one.
Cost to Limewash Brick: DIY vs. Hiring a Pro
DIY Limewash Brick Cost Breakdown
| Material | Approx. Cost |
|---|---|
| Premixed limewash, 1 gallon | $25 to $100, depending on brand |
| 4-gallon bucket (covers approx. 1,800 sq ft, one coat) | $100 to $400 |
| Hydrated lime, 50-lb bag (DIY mixing) | $5 to $15 |
| Natural bristle masonry brush | $15 to $40 |
| Pump sprayer | $20 to $35 |
| Drop cloths and safety gear | $15 to $30 |
For most standard-sized homes, a full exterior DIY limewash project runs $200 to $600 in materials, depending on product choice and whether you need one or two coats. Interior fireplace projects cost significantly less, usually $30 to $100 for materials.
Professional Limewash Cost
Hiring a professional to limewash a brick exterior costs roughly $1.50 to $5 per square foot, including labor and materials. For a 2,000 square foot home with approximately 1,700 square feet of paintable wall area, that works out to $2,500 to $8,500, depending on complexity and regional labor rates. If you want to compare, German smear typically runs slightly less at $30 or so for materials at DIY scale, but labor rates are comparable since the technique is equally involved.
When to Hire Out
DIY is genuinely viable for interior fireplaces, single accent walls, and small exterior sections. Full exterior projects on two-story homes, or any project where scaffolding is needed, are worth pricing professionally.
The physical demands are real, and the cost of a poor application on a large exterior often exceeds what you’d have paid a professional to begin with. If you do hire out, look for applicators with direct experience in mineral-based masonry finishes specifically, not general painters. The technique is different, and the results reflect it.
Is Limewash Brick Actually Worth It?
After years of working with homeowners through material and finish decisions, I can say that limewash is one of the more worthwhile transformations available for dated brick. The regret cases that exist, and they do exist, almost always share the same profile: a test patch was skipped, a design decision was made after the first coat was already on the wall, or the product was applied to brick that couldn’t absorb it.
When those decisions are made thoughtfully beforehand, the outcome is almost always something people love. The preparation matters more than the application itself.
The application is actually straightforward once you’ve tested your dilution and started on the hidden sections. It’s the hour you spend thinking before you open the bucket that determines whether you end up on a Houzz forum or sending before-and-after photos to your family.
If you want a finish that stays exactly the same for twenty years, limewash isn’t it. If you’re open to something that develops character slowly, that gets a little more weathered at the edges while staying beautiful in the sheltered areas, it’s one of the loveliest things you can put on brick. It looks like it belongs there. That’s the whole idea.
Frequently Asked Questions
Does Limewash Damage Brick?
No. Because limewash penetrates the surface and breathes with the masonry, it actually supports long-term brick health better than film-forming paints, which can trap moisture and contribute to deterioration.
How Many Coats of Limewash Does Brick Need?
Most projects need one to three coats, depending on the opacity you want. One coat at 50% dilution gives medium coverage. Two coats build toward full opacity. A light, distressed finish can be achieved with a single thinned coat, distressed while damp. Romabio Classico is formulated for one-coat application, though many DIYers apply a second coat for a more solid result.
Can You Limewash Over Painted Brick?
No, not with standard limewash. It needs a porous surface to penetrate. Painted brick needs the paint stripped first, or you’ll need a mineral masonry paint designed for previously painted surfaces.
What Happens if It Rains Shortly After Limewashing?
Rain within the first three to four hours of application can wash away fresh coats before they harden. After about four hours, most limewash is set enough to tolerate rain, though it continues curing for longer. Check your forecast before starting any exterior application.
Can You Limewash Brick in Winter?
Avoid it below 50 degrees Fahrenheit. Limewash won’t cure properly in cold temperatures and may not bond correctly to the brick. Schedule exterior projects for late spring through early fall.
Is Limewash Safe for Plants and Landscaping?
Yes. Limewash is made from limestone and won’t harm garden plants if it reaches the soil. It can very slightly raise soil pH, which is neutral to beneficial for most plants.