
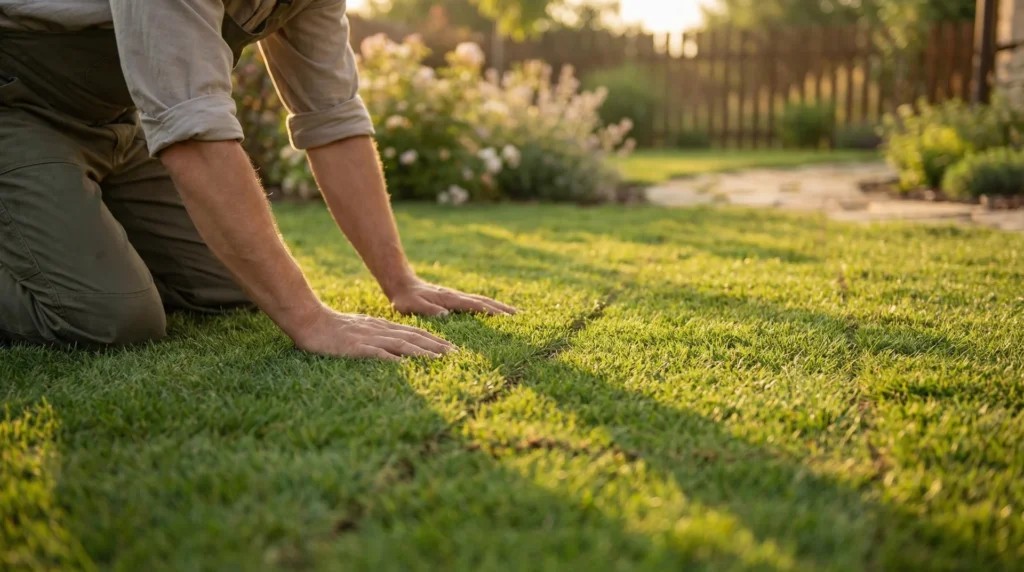
I remember standing in a client’s backyard in late April, watching her pace around freshly laid sod rolls, poking at the edges with her boot on day three.
She had spent a full weekend on installation and already wanted to know if it was working. I understand that completely. You put in the effort, the cost, and the physical work, and now you need to know: when does this actually take hold?
So here is the answer, right upfront.
Sod develops its first shallow roots within 10 to 14 days of installation. You can feel that gentle resistance when you tug a corner around the two-week mark. Full, deep rooting that makes your lawn stable and ready for regular use takes 4 to 6 weeks, depending on your soil quality, grass variety, installation season, and watering consistency. |
But if you want your sod to thrive past those first six weeks and become the lawn you actually imagined, the details matter.
Most sod problems trace back to the weeks right after installation, and most of them are completely avoidable. Let me walk you through everything I know.
What “Rooting” Actually Means: The Three Phases of Sod Establishment
When people ask how long sod takes to root, they are usually asking two questions at once without realising it.
- when can I stop panicking?
- when can I actually use my lawn?
These two milestones sit about three to four weeks apart, and understanding that difference changes how you care for your sod at every stage.
Phase One: First Contact (Days 1 to 14)
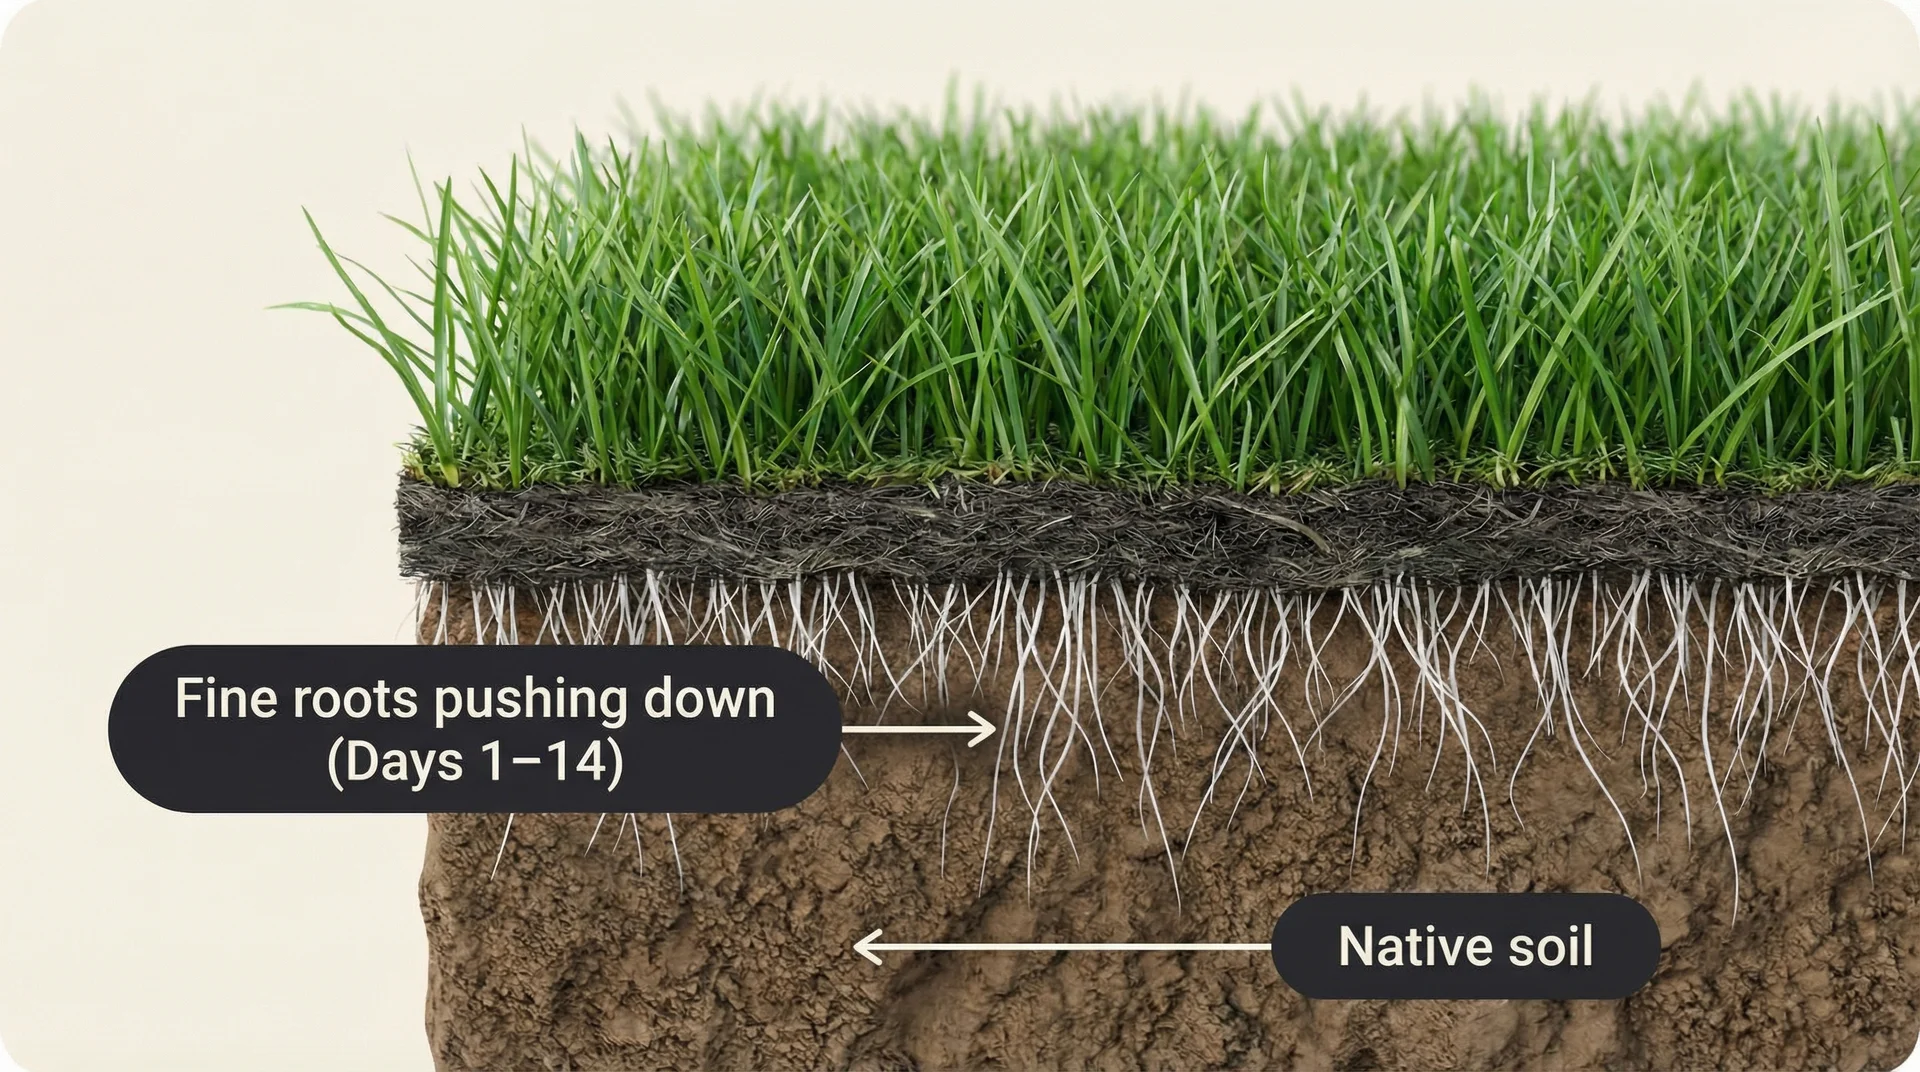
During the first two weeks, your sod pushes fine, hair-like roots downward into the soil in search of moisture and nutrients. You will not see this from above.
The lawn may look a little pale or slightly yellow in patches, but below the surface, the real work is already in progress.
Around day ten to fourteen, those roots make genuine contact with your native soil and begin anchoring. Think of it as a fresh wound that has just started to close: functional, but sensitive to pressure and disturbance.
Phase Two: Deepening and Knitting (Weeks 2 to 6)
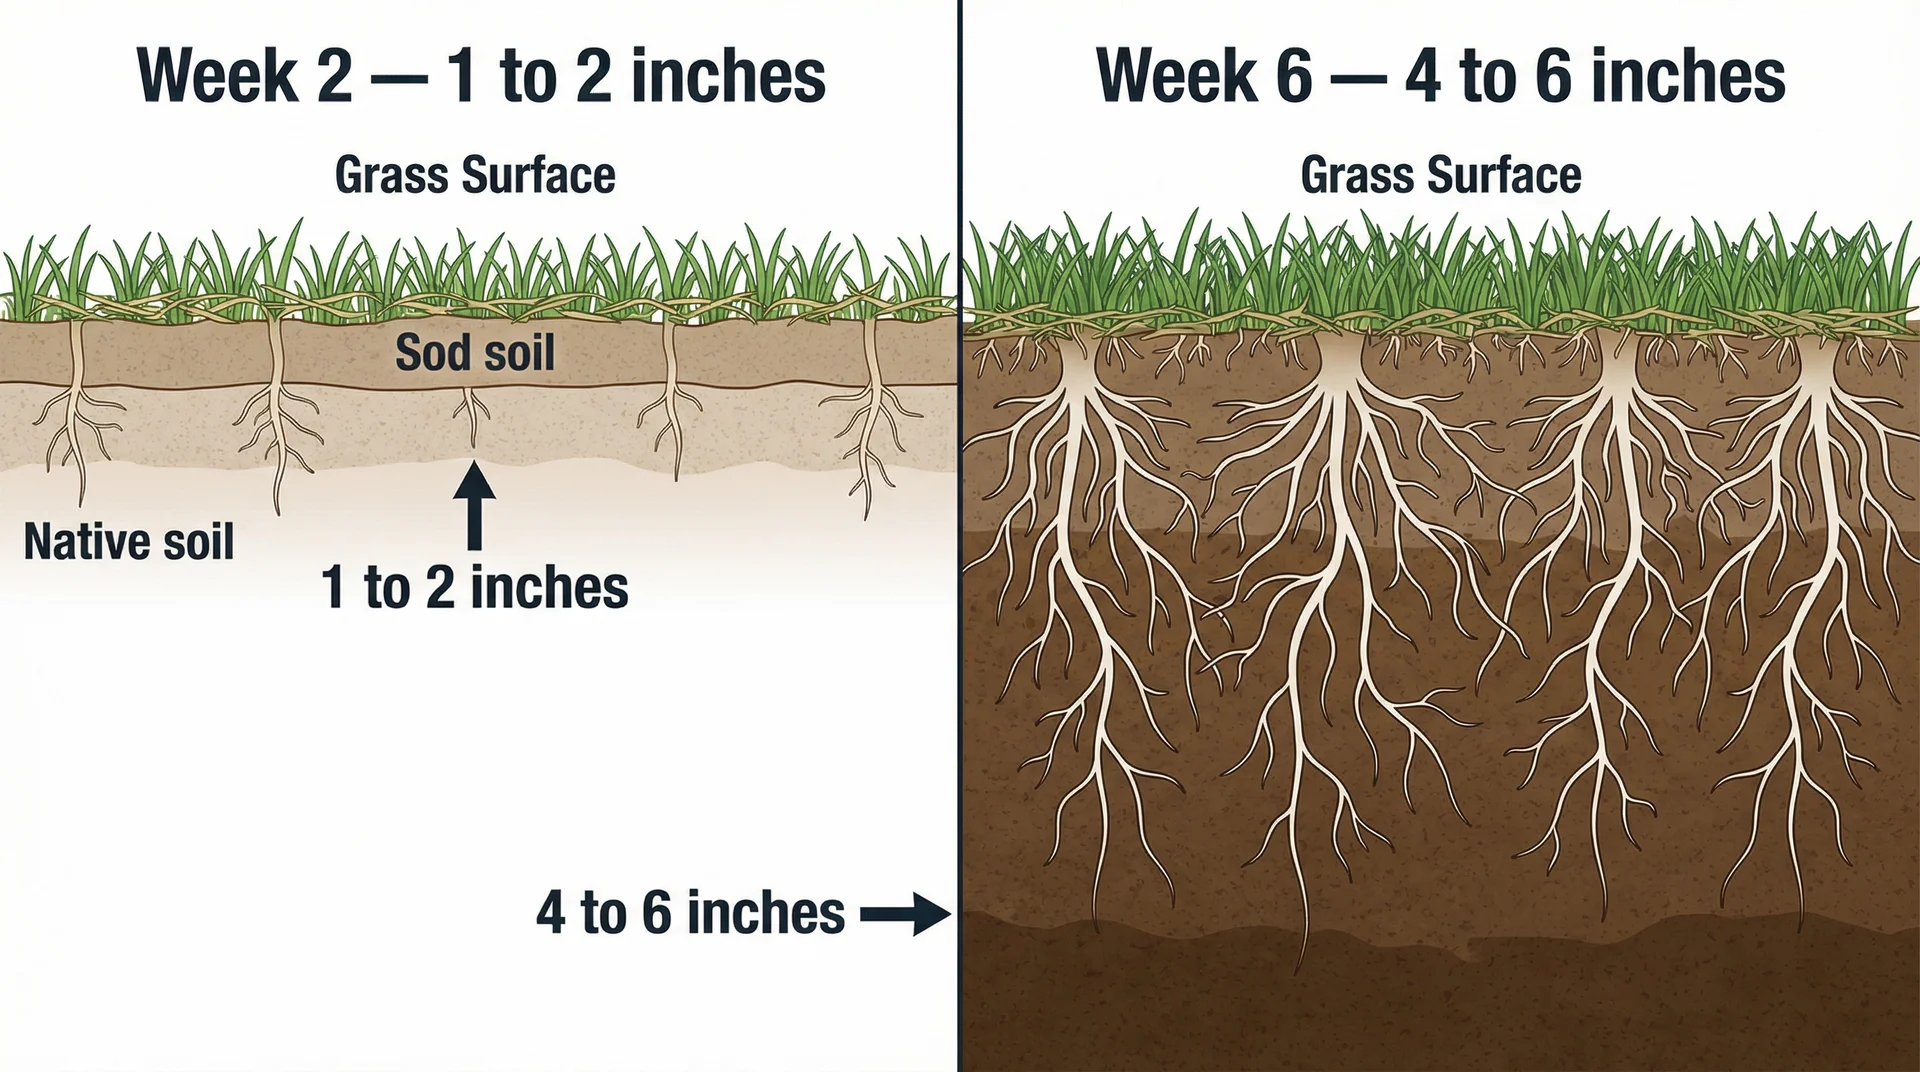
Between weeks two and six, the root system expands both downward and laterally. Individual sod rolls begin to knit together along their seams.
The grass draws nutrients more reliably from the native soil rather than surviving on what came packed into the sod mat itself.
How deep do sod roots actually grow? In the first two weeks, roots typically reach one to two inches into the native soil. By week six, a well-watered, healthy installation develops roots four to six inches deep.
Over a full growing season, established turfgrass roots can reach six to eight inches or deeper, depending on soil quality and grass variety.
| Timeline | What Is Happening Underground | What You Should Do |
|---|---|---|
| Days 1 to 3 | Sod adjusts to a new soil environment | Water deeply, twice daily if temperatures exceed 80°F |
| Days 4 to 14 | Fine roots begin extending into the native soil | Maintain consistent moisture, avoid all foot traffic |
| Weeks 2 to 4 | Roots deepen, seams begin knitting | Transition to once-daily watering, avoid heavy use |
| Weeks 4 to 6 | Full root contact established | Perform the tug test, prepare for the first mow |
| Week 6 onward | Deep establishment phase begins | Transition to a mature lawn watering schedule |
How Long Does Each Grass Type Take to Root?
Rooting speed varies meaningfully by grass variety, and knowing yours sets realistic expectations from day one.
| Grass Type | Climate | Initial Rooting | Full Establishment |
|---|---|---|---|
| Kentucky Bluegrass | Cool-season | 14 to 21 days | 6 to 8 weeks |
| Tall Fescue | Cool-season | 10 to 14 days | 4 to 6 weeks |
| Perennial Ryegrass | Cool-season | 7 to 14 days | 4 to 6 weeks |
| Bermudagrass | Warm-season | 7 to 14 days | 4 to 6 weeks |
| Zoysiagrass | Warm-season | 14 to 21 days | 6 to 8 weeks |
| St. Augustinegrass | Warm-season | 7 to 14 days | 5 to 7 weeks |
| Centipedegrass | Warm-season | 14 to 21 days | 6 to 8 weeks |
Zoysia and Kentucky Bluegrass consistently take longer to root than Bermuda or Ryegrass.
If you lay either of those slower varieties and you are at week two with no resistance on the tug test yet, that is normal. Give it another week before drawing any conclusions.
What Controls How Fast Your Sod Roots
Rooting speed is not a fixed number. I have seen sod anchor strongly in under two weeks under ideal conditions and watched other installations struggle past the five-week mark.
The difference almost always traces back to one of four factors.
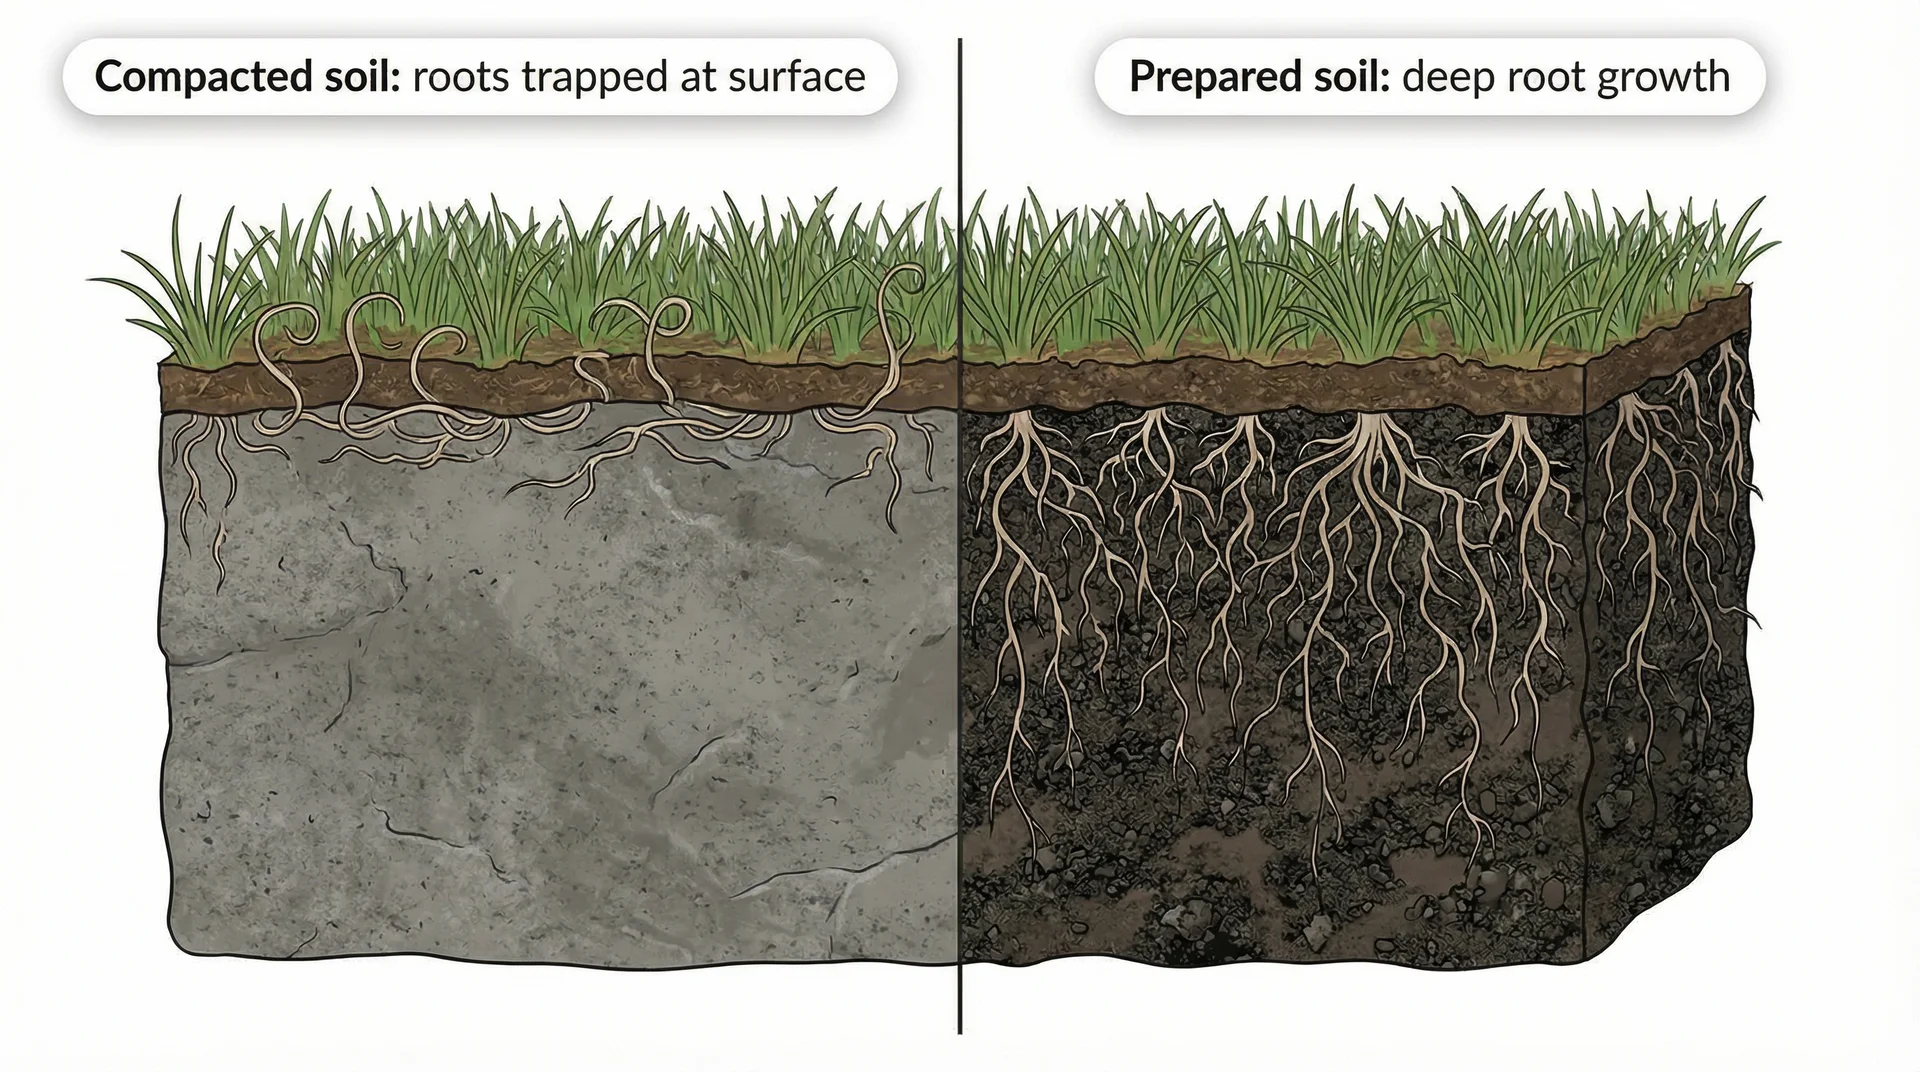
1. Soil Preparation
This is where I see the most installation mistakes, and it is the one factor that costs the most to fix after the fact.
Sod laid over compacted clay, rock-hard fill dirt, or ungraded topsoil will struggle to root deeply. The roots need to penetrate receptive, aerated soil.
If the ground is too dense, they circle at the surface and never develop the depth that makes a lawn genuinely resilient.
Before laying sod on any project, I check three things:
- Soil texture and drainage. Sandy soils drain fast and often need organic matter added. Clay soils hold moisture but compact easily. A loamy mix sits in the sweet spot for most sod varieties.
- Tilling depth. A minimum of four to six inches of loosened, graded topsoil gives roots the space they need to travel downward.
- pH level. Most turfgrass varieties prefer a soil pH between 6.0 and 7.0. Laying sod on acidic or highly alkaline soil slows rooting significantly.
“The lawn starts in the ground, not on top of it. Get the soil right, and the sod does most of the work on its own.”
On one project in a Denver suburb, the homeowners had laid sod directly over compacted subsoil left behind by a construction crew.
Six weeks later, the lawn looked green from a distance, but the roots had only penetrated about half an inch.
A dry week in July turned everything brown because there was no deep moisture reservoir for the roots to access.
We lifted it, regraded the entire area, and started over. Thorough soil prep before installation would have saved them several thousand dollars.
2. Temperature and Season
Sod roots fastest when soil temperatures sit between 50°F and 65°F for cool-season grasses and 65°F to 80°F for warm-season varieties. Outside those ranges, rooting slows considerably.
I recommend laying cool-season sod in early fall as a first choice. Air temperatures cool down while soil temperatures stay warm enough to encourage rooting, and you typically get more natural rainfall to support establishment.
Warm-season grasses install best in late spring through early summer when soil warmth drives their root systems.
| Season | Best Grass Type | Key Consideration |
|---|---|---|
| Early Fall | Cool-season (Fescue, Bluegrass, Ryegrass) | Ideal: warm soil, cooling air, natural rainfall |
| Early Spring | Cool-season | Viable but spring rains can cause inconsistency |
| Late Spring to Early Summer | Warm-season (Bermuda, Zoysia, St. Augustine) | Optimal soil temperature for warm-season rooting |
| Midsummer | Both types with intensive watering | High water demands, slim margin for error |
| Winter | Generally not recommended | Dormant soil severely slows or prevents rooting |
3. Sod Quality and Freshness
Sod deteriorates the moment it gets cut. Most suppliers recommend laying freshly cut sod within 24 to 48 hours of delivery. On every delivery I manage, I check three things before anyone starts rolling it out:
- Colour should be a vibrant, consistent green. Any yellowing signals heat stress or extended sitting time.
- Roots on the underside should appear white or pale yellow and feel slightly moist. Dry, brown roots are a warning sign.
- The soil mat should hold together without crumbling. Excessive crumbling means the structural integrity of the sod is already compromised.
Freshly cut sod from a reputable certified turfgrass farm will always outperform a cheap older product. The savings rarely offset the cost of a slow or partial establishment.
4. Watering
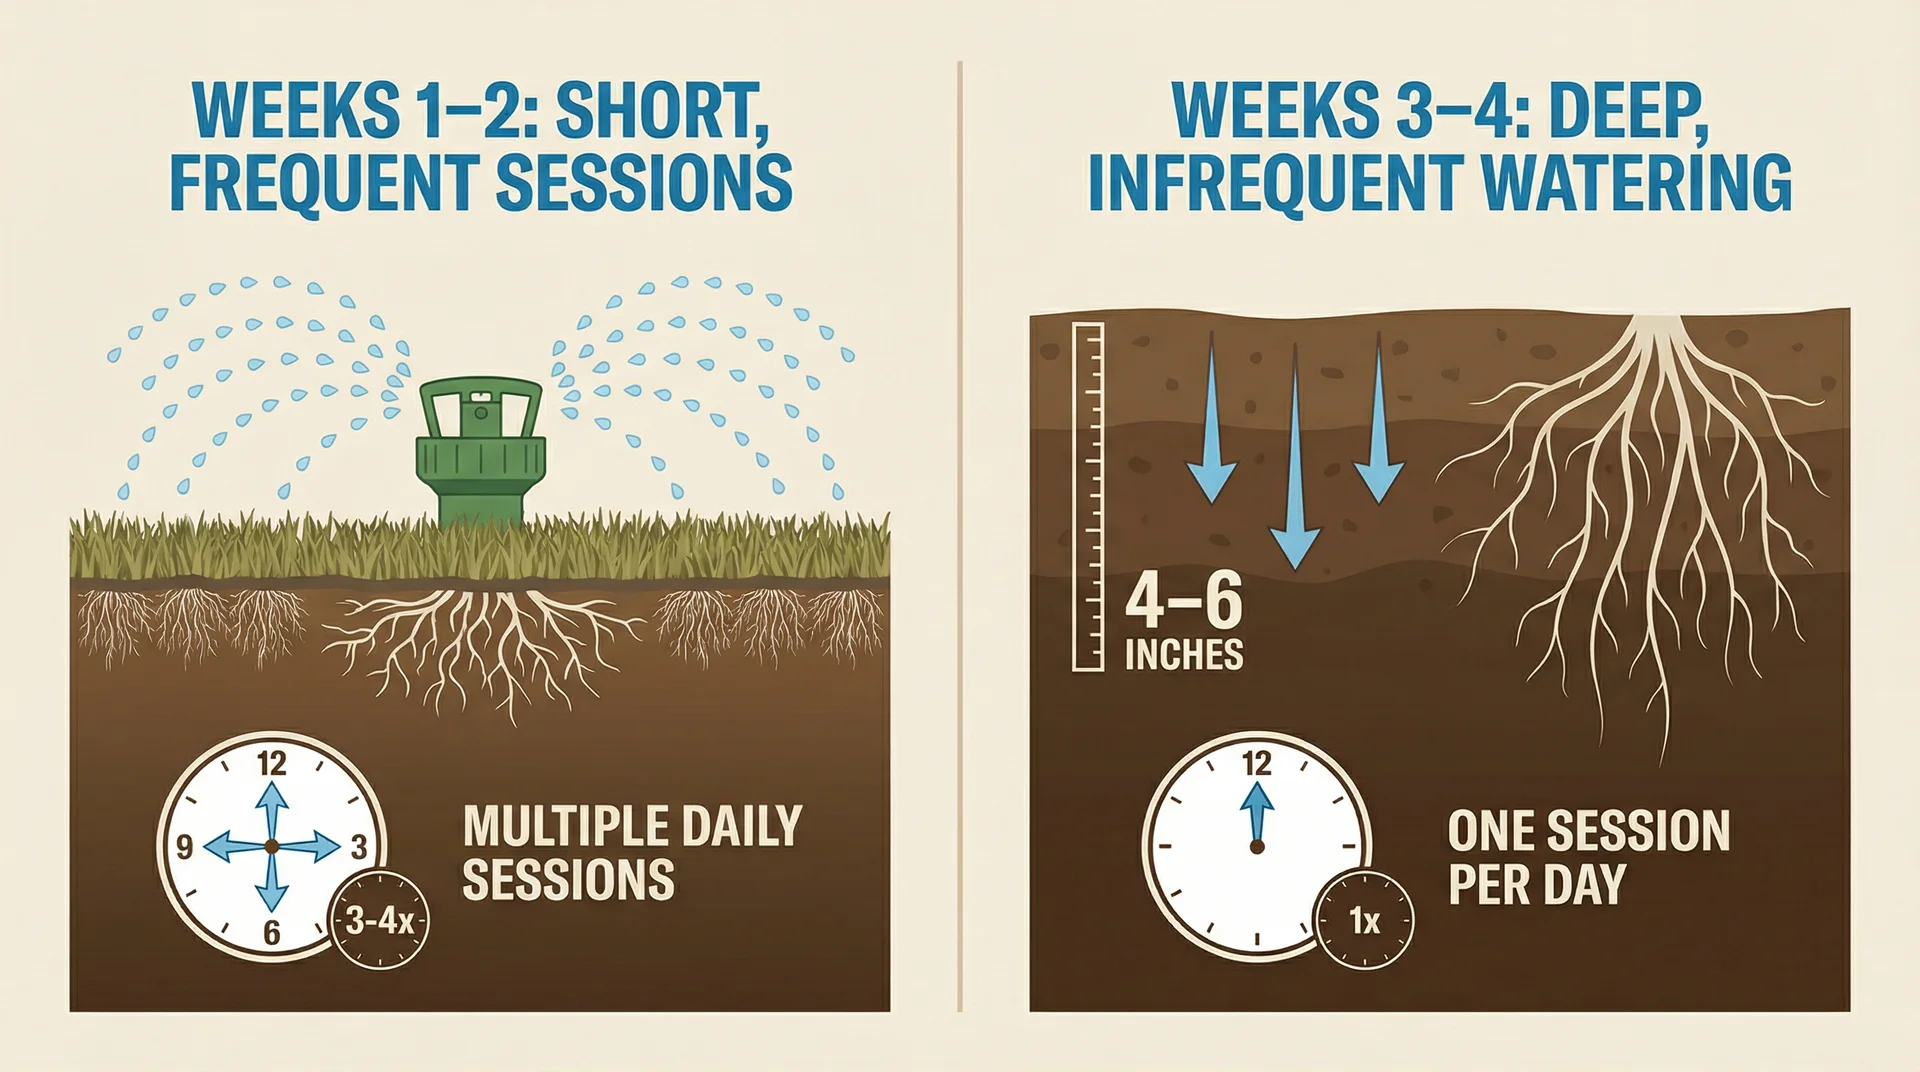
Weeks 1 to 2: Water two to three times daily in short sessions, especially in warm weather. The goal is to prevent the sod from drying out between waterings, not saturating the root zone.
Weeks 3 to 4: Move to one deep watering per day, in early morning or late evening. Encourage roots to chase moisture downward. Frequent shallow watering at this stage actively discourages deep rooting because the roots have no reason to travel down if moisture is always at the surface.
Weeks 5 and beyond: Transition to two to three deep waterings per week, depending on rainfall and climate. This is where the lawn begins behaving like an established plant rather than a fragile installation.
Can You Speed Up Sod Rooting?
Yes, within reason. You cannot force biology, but you can remove every obstacle that slows it down.
The highest-impact moves you can make to accelerate rooting are:
- Lay sod in the optimal temperature window for your grass variety. Timing accounts for more rooting speed variation than almost anything else.
- Prepare the soil thoroughly before installation. Loosened, pH-balanced, well-draining soil cuts rooting time meaningfully compared to compacted or poorly graded ground.
- Use a starter fertilizer with a high phosphorus content (the middle number in N-P-K) applied before or immediately after installation. Phosphorus directly supports root cell development in turfgrass.
- Keep the sod consistently moist in the first two weeks without waterlogging it. A sod mat that dries out even briefly in week one can suffer setbacks that add days to the rooting timeline.
- Eliminate foot traffic completely in the first two weeks. Every step on unrooted sod displaces soil contact and forces roots to reestablish that contact from scratch.
What you cannot do is water more aggressively than the soil can drain and expect faster results. Oversaturated soil suffocates roots by displacing the oxygen they need to grow.
Sod Rooting in Sun vs. Shade

Shade slows rooting, and the effect is more significant than most people expect.
Grass in full shade receives less direct energy from sunlight to drive photosynthesis and root development.
Shaded areas also retain moisture longer, which can create oversaturation problems even on a normal watering schedule.
Shaded sod installations routinely take one to two weeks longer to root than the same variety installed in full sun.
If you laid sod under a tree canopy or along a shaded fence line, here is what I do differently in those zones:
- Reduce watering frequency slightly in shaded areas compared to the rest of the lawn, as soil moisture persists longer.
- Choose a shade-tolerant sod variety in the first place. Fine Fescues and St. Augustinegrass (in warm climates) handle shade considerably better than Bermuda or Zoysia.
- Expect the rooting timeline to sit closer to the longer end of the range, around five to seven weeks, rather than the shorter end.
- Avoid any foot traffic in shaded zones even longer than the rest of the lawn, as the delayed rooting means they remain vulnerable longer.
Is It Working? How to Confirm Your Sod Is Rooting?
The waiting period generates real anxiety, and I understand why completely. Here is how I check progress without disrupting root development.
The Tug Test

Around day ten to fourteen, find a corner of a sod section along an outer edge. Place your hand flat on the surface and lift gently with your fingers.
In the first week, the sod lifts cleanly with almost no resistance. As rooting progresses, you feel increasing tension.
By week four to six on a healthy installation, you should find it genuinely difficult to lift the sod without real effort. That resistance is the roots doing exactly what they should.
Visual Cues You Can Trust
- New leaf growth is emerging from the surface. Fresh blade growth distinct from the original sod grass tells you the plant is in active growth mode, which follows root establishment.
- Consistent colour across the whole lawn. Patchy yellowing or brown areas that do not recover with watering often indicate rooting failure in specific zones.
- Seams are becoming invisible. When the edges of individual sod rolls stop being visible from walking distance, the lawn is knitting together laterally.
- The lawn is firming up underfoot. Freshly laid sod feels spongy when you walk on it. As roots anchor into native soil, it firms up noticeably and begins to feel like established turf.
How to Care for Sod During the Rooting Phase
Watering for Depth, Not Just Coverage
A mistake I see consistently is people watering frequently but shallowly for too long. Short, frequent watering in weeks three and four trains roots to stay near the surface because moisture is always available right there.
Deep, infrequent watering after the initial phase encourages roots to travel down to where soil moisture is more stable.
A simple check: After a watering session ends, push a six-inch screwdriver into the soil. It should slide through the first four to six inches without significant resistance. If it hits hardness at one to two inches, you are not watering deeply enough.
The First Mow: Getting the Timing Right
Mowing too early is one of the most common ways people damage a new installation. Wait until the grass reaches approximately three to four inches in height and the sod passes the tug test.
This typically falls somewhere between weeks three and five.
When you do mow for the first time:
- Set the blade to its highest setting and remove only the top one-third of the blade height.
- Use a sharp blade. A dull blade tears rather than cuts, creating stress points that invite disease on a lawn still establishing.
- Mow when the grass is dry to avoid clumping.
- Keep your turns wide and walk gently to reduce mechanical stress on the root system.
Foot Traffic and Physical Pressure
Keep people and pets off the new lawn for the first two to four weeks as strictly as you can manage. I have seen beautiful installations develop permanent ruts from a single busy weekend in week one.
The soil beneath is soft, the roots are shallow, and repeated compression disrupts root-to-soil contact at exactly the moment when that contact needs to strengthen.
After the four-week mark, light foot traffic is generally fine. I still recommend keeping activity moderate until week six, particularly avoiding anything that involves standing in one spot or moving heavy equipment across the surface.
Fertilization in the First Six Weeks
Most freshly cut sod arrives with a starter fertilizer already applied at the farm.
A second heavy dose on top of that pushes excessive top growth at the expense of root development. The plant directs energy toward new leaf production rather than root expansion.
If the lawn looks pale and struggling around week four, a light application of a phosphorus-rich starter fertilizer supports root growth specifically.
Look for a formulation with a high middle number in the N-P-K ratio, something in the range of 18-24-12.
After week six, a light-balanced fertilizer helps transition the lawn into deeper establishment and supports the full growing season ahead.
What to Do When Sod Refuses to Root?
Brown Patches That Do Not Recover
Overwatering: Soggy soil deprives roots of oxygen. If the soil feels waterlogged and the sod feels mushy underfoot, reduce watering frequency immediately.
Coverage gaps in your irrigation: Sprinkler systems frequently have dead zones where heads do not overlap sufficiently. Walk your lawn after a watering cycle and physically check soil moisture across every section.
Poor soil contact: Sod not pressed firmly against the soil at installation develops air pockets that dry out and prevent root contact. Roll the affected section firmly with a water-filled lawn roller to re-establish contact.
Reflected heat from hardscape: Sod laid near concrete walls, driveways, or dark mulched beds can experience localised heat stress even when the rest of the lawn is fine. I watch for this specifically in residential urban gardens where hardscape surfaces amplify ambient temperatures.
Signs Your Sod Is Actually Failing (And What to Do)
Sod failure is distinct from sod stress. Here is how to tell the difference:
| Symptom | Likely Cause | Action |
|---|---|---|
| Brown patches that stay brown after two weeks of watering | Poor soil contact or root death | Check for air pockets, roll if needed, consider replacement in localised areas |
| Sod lifts easily at six weeks with no resistance | Rooting failure | Investigate soil conditions beneath, check for grubs or pest activity |
| Yellowing with an orange or rust tint | Fungal disease | Adjust to morning-only watering, allow surface to dry before evening |
| Yellow areas that feel spongy with chewed roots visible | Grub or pest activity | Apply targeted treatment per label directions |
| Seams are still highly visible past week four | Drought stress along edges | Target seam lines with additional hand watering during regular cycles |
Yellowing That Spreads Gradually
- Nitrogen deficiency: Uniform pale yellow-green across the affected area. A light nitrogen application usually resolves it within one to two weeks.
- Fungal disease: Look for irregular patterns, ring shapes, or an orange-rust tint. Adjust your watering schedule to early morning only and allow the surface to dry before evening.
- Grub activity: Yellow areas feel spongy, and the sod lifts easily to reveal chewed-off roots. A targeted grub treatment addresses this promptly.
Beyond Six Weeks: Building a Lawn That Lasts
A Mature Watering Rhythm
Once fully established, deep and infrequent watering consistently outperforms frequent shallow watering. A general guideline for established turfgrass is one inch of water per week, delivered in one or two sessions rather than daily sprinkles. Morning watering reduces fungal risk by allowing the grass to dry before evening.
Seasonal Maintenance at a Glance
Spring: Begin mowing once active growth resumes, maintaining the one-third rule throughout. Apply a slow-release balanced fertilizer once soil temperatures consistently exceed 50°F. Check for thatch buildup; anything over half an inch restricts water and nutrient penetration and warrants dethatching.
Summer: Raise mowing height slightly during peak heat. Taller grass shades the soil and reduces moisture loss from evaporation. Scout for pest and disease signs during periods of high humidity.
Fall: Core aerate cool-season lawns in early fall to relieve compaction and improve root depth. Apply a fall fertilizer higher in potassium to strengthen roots for winter dormancy. Overseed thin areas on cool-season lawns while soil temperatures remain above 50°F.
Winter: Avoid heavy foot traffic on dormant or frozen turf. Clear leaf debris promptly to prevent matting and the disease pressure it creates going into spring.
Fitting the Lawn Into the Whole Landscape
Something I emphasise with every client is that the lawn functions as one component of a broader outdoor environment, not a standalone project. Trees and large shrubs cast shade that changes watering and mowing needs.
Hardscape edges affect drainage patterns and heat near the turf. Adjacent garden beds influence how moisture moves across the whole yard.
When I plan residential landscapes, I always think about the lawn in relation to everything surrounding it. A lawn that draws on its broader environment for moisture regulation and microclimate balance requires far fewer interventions to stay healthy.
Positioning drought-tolerant or native planting beds alongside your lawn creates a system where everything works together rather than competing for your time and resources.
Frequently Asked Questions
How long does it take sod to root in the summer?
In summer heat above 85°F, sod can root within 10 to 14 days if watered correctly, but the margin for error is much smaller. Watering demands increase significantly, and any drying out in week one can set the timeline back considerably.
Can I walk on sod before it roots?
You should avoid all foot traffic for the first two weeks. After that, light walking is generally acceptable, but I recommend keeping activity minimal until the six-week mark for the best long-term result.
How do I know if my sod has rooted?
The tug test is the most reliable method. Grab a corner of a sod section and pull gently. If you feel genuine resistance that makes the sod difficult to lift, the roots have anchored into the native soil successfully.
Why is my sod not rooting?
The most common causes are poor soil preparation before installation, inconsistent watering, laying sod outside its optimal temperature window, or excessive foot traffic disrupting root-to-soil contact in the first two weeks.
The Bottom Line
The first two weeks matter most, and patience through the full six weeks pays dividends you will enjoy for years.
Watch the soil moisture, resist the urge to walk on it, and trust the process you have set in motion.
Sod is resilient when it gets the right conditions. Give it those conditions, and it gives you back far more than a green lawn.
It gives you an outdoor space that holds up through seasons, supports your garden’s broader ecology, and becomes the foundation of everything else you want to build around it.
That is exactly the kind of lawn worth waiting for.
If you’re still weighing whether sod or seeding is right for your lawn, here’s what to know about whether grass seed will germinate on top of soil.