There is a moment on every shoot when something runs out at the worst possible time. For me, it happened during a bridal session in Portland, when a client’s store-bought gloss melted somewhere between the ceremony and the portraits, and I had nothing left in my kit that matched her colour.
I improvised using base ingredients from a skincare brand’s nearby setup table. The result held through the rest of the shoot, and it quietly changed how I thought about lip gloss formulation.
Making your own gloss is simpler than the beauty industry suggests. You need a base, a shine agent, an optional colorant, and a container. The process takes under 30 minutes. Everything below helps you do it well, fix it when it goes sideways, and make it genuinely yours.
| To make lip gloss at home, you need: a wax or oil base, castor oil for shine, vitamin E as a natural preservative, an optional colorant like mica powder, and a lip-safe flavour oil. Melt the wax and oils together over a double boiler, add your colour and flavour off the heat, pour into containers, and let it cool for 20 to 30 minutes. |
What You Actually Need to Make Lip Gloss
Most beginners screenshot a recipe, open Amazon, and end up with a cart full of things they don’t need. Understanding what each ingredient does means you’ll know exactly what to swap, skip, or prioritise.
Your Base Options
Your base controls texture, wearability, and feel. These are the three main directions:
| Base Type | Best For | Feel on Lips | Container |
|---|---|---|---|
| Beeswax + oil blend | Beginners, wand tubes | Smooth, slightly firm | Wand tubes, lip pots |
| Petroleum jelly | Quick crafts | Soft, slippery, very glossy | Small pots, jars |
| Oil-only (no wax) | Vegan, no-heat recipes | Light, serum-like | Roller balls only |
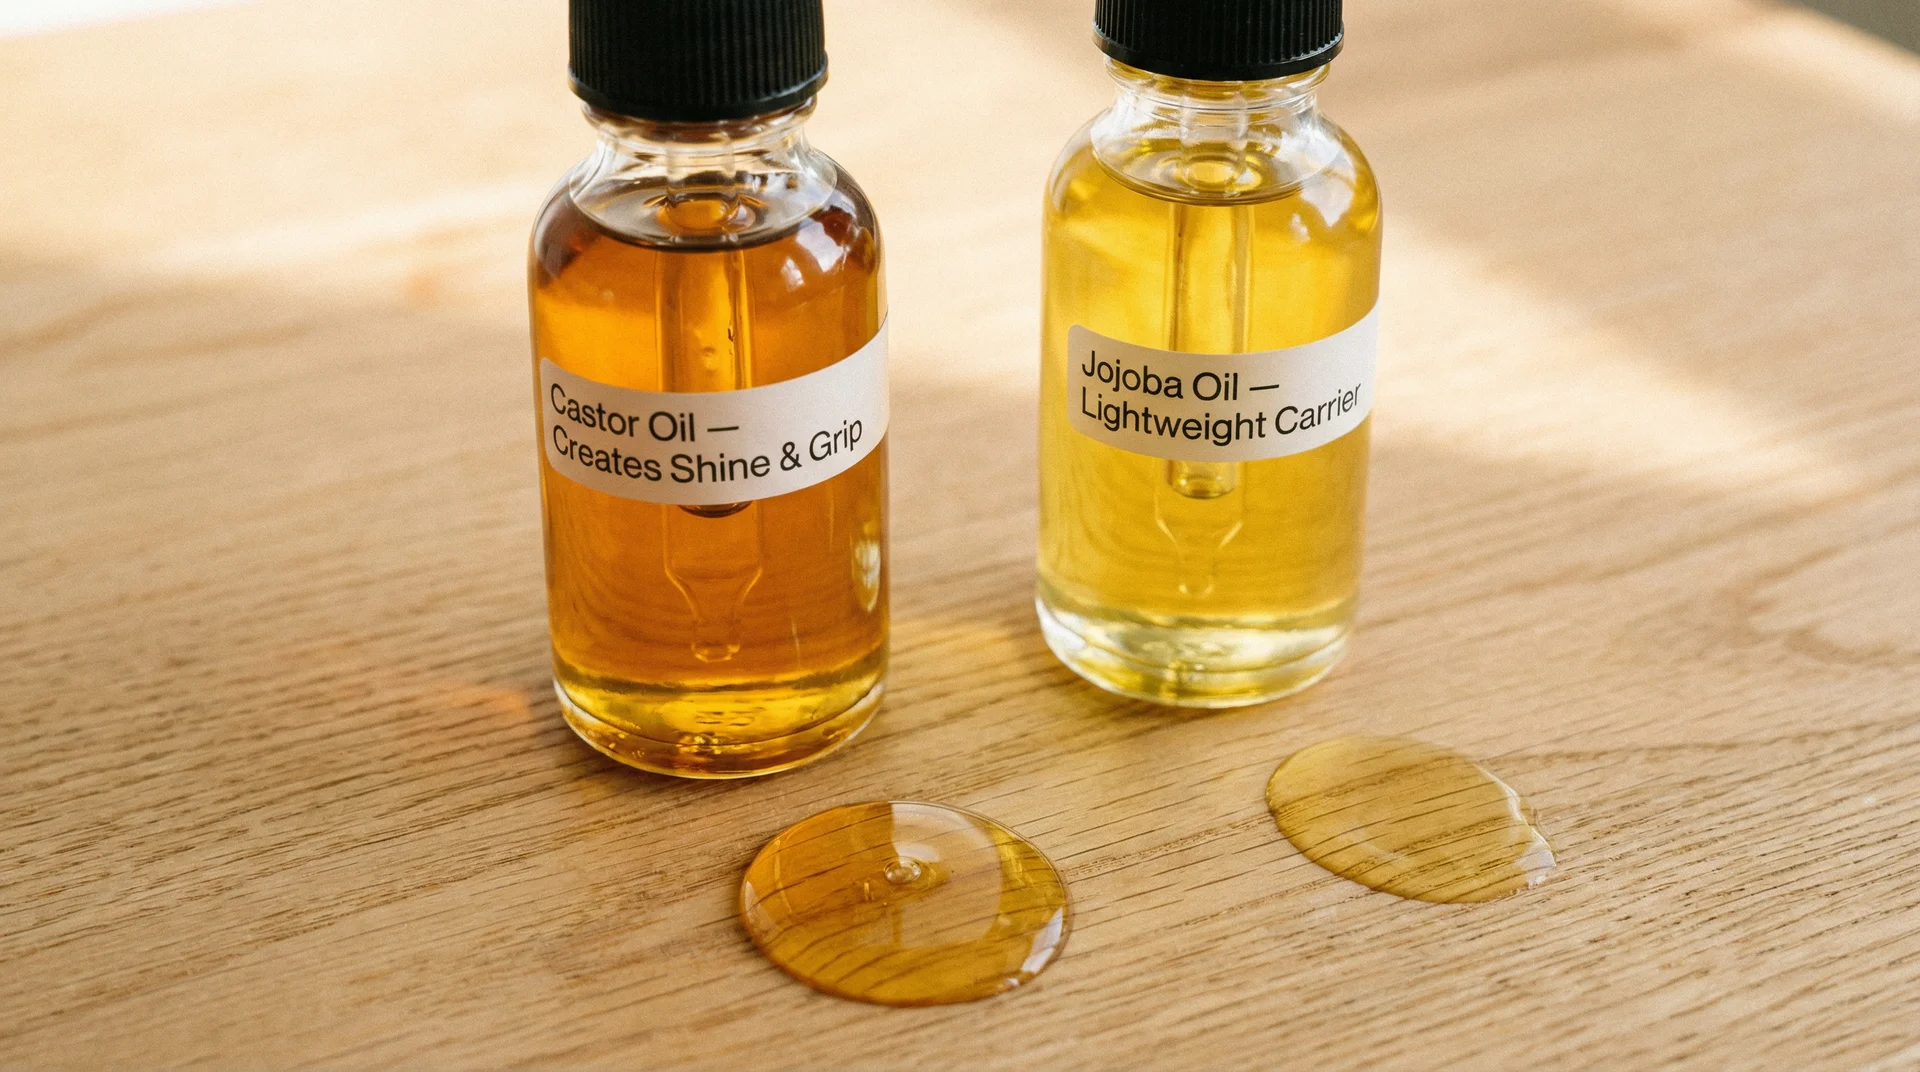
The ingredient most beginners skip is castor oil, and it is the one that matters most for shine.
Castor oil has a high concentration of ricinoleic acid, which gives it a naturally viscous, slightly tacky texture. That characteristic “grip” you feel with a store-bought gloss comes from castor oil. Without it, your formula will feel more like a light face oil than a gloss, and it will slide off your lips within minutes.
A useful addition that most beginner recipes miss entirely is glycerin. Glycerin is water-soluble, but when your formula contains a high enough percentage of castor oil and is properly thickened, it blends in successfully.
It intensifies the glossy effect and extends how long the gloss stays visible on the lips. Even a small amount, around 2 to 3% of your total formula, makes a noticeable difference. It is the ingredient that separates a good homemade gloss from a genuinely great one.
A solid starting ratio for a beeswax-based formula: roughly 15% wax, 70 to 75% oils (including castor oil), 2 to 3% glycerin, and the rest split between vitamin E and your actives.
The Difference Between Lip Gloss and Lip Balm
This is worth clearing up quickly, because the number of people who follow a balm recipe expecting gloss results is genuinely high. The difference is the wax-to-oil ratio. Lip balm uses more wax, making it firmer and more protective.
Lip gloss uses more oil, keeping it soft, shiny, and pliable. If your finished product looks and feels like a Chapstick, your wax quantity is too high. Keep beeswax at or below 15% of your total formula by weight for a true gloss result.
Colorants, Shimmer, and Scent
For colour:
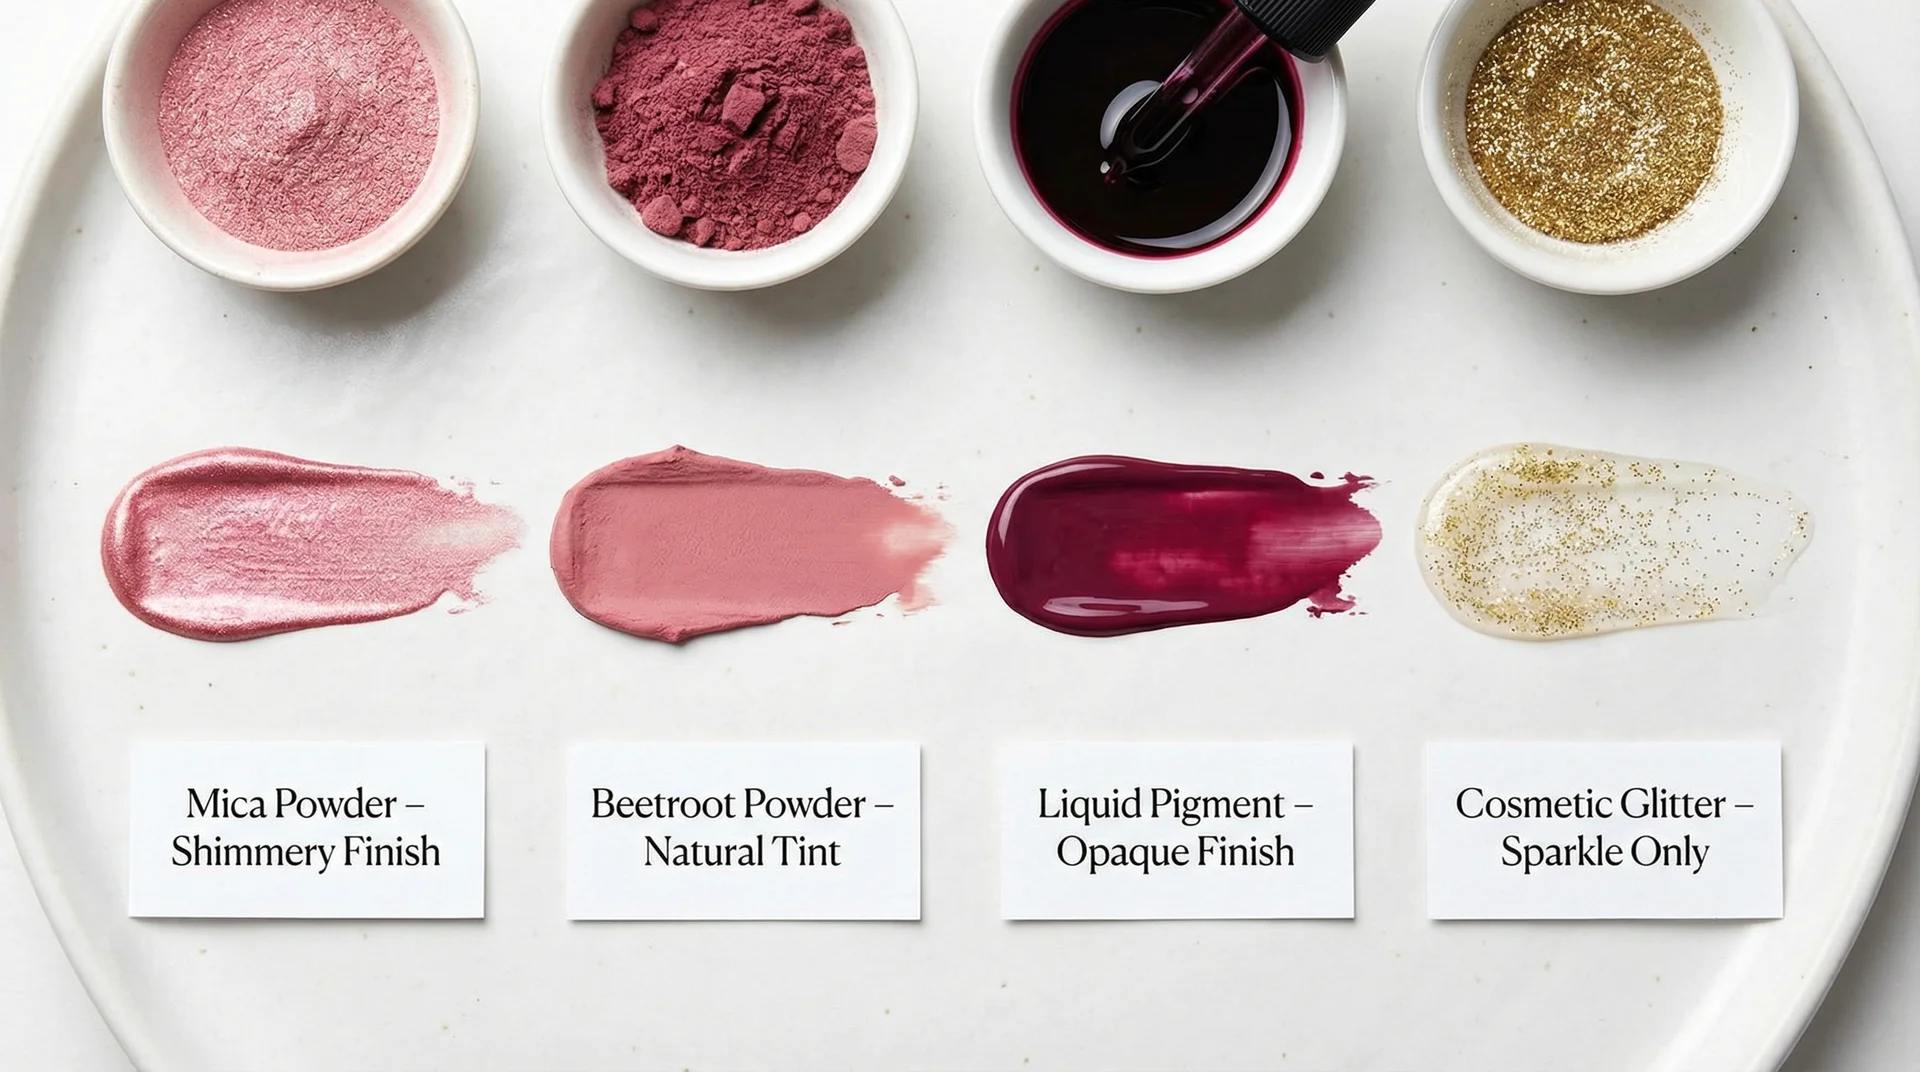
- Mica powder gives a shimmery, light-reflecting finish. Always blend it with a small amount of warm castor oil before adding to your batch to avoid streaks.
- Beetroot powder gives a natural soft pink that suits fair to medium skin tones well. It is food-grade and fully lip-safe.
- Liquid cosmetic pigments produce a more opaque, matte tint.
- Cosmetic-grade glitter adds sparkle, but the label must say cosmetic-grade. Craft glitter has sharp edges that can scratch lip tissue and is not safe near your mouth.
For scent and flavour:
Flavour oils and essential oils are different things, and the distinction matters more on the lips than anywhere else. Flavour oils designed for cosmetic use come pre-formulated at safe concentrations. Essential oils are highly concentrated plant extracts, and several of them cause irritation on the lips even in small amounts.
I always tell people: cinnamon, clove, and strong citrus essential oils have no business going on lips at full strength. I have seen reactions on set from people who assumed natural meant safe, and lip tissue is more sensitive than most people realise.
If you want a minty gloss, use a cosmetic-grade peppermint flavour oil rather than neat peppermint essential oil. Keep all flavour additions at around 1% of your total formula by weight.
Ingredients Worth Knowing About Safety
Because lip products sit close to your mouth and you inevitably ingest small amounts throughout the day, ingredient selection matters more here than in most other cosmetics. A few things to be aware of:
- All colorants used in a lip product must be FDA-approved specifically for lip use. Some mica shades and pigments are approved for general cosmetic use but not for lips. Always check the supplier’s specification sheet.
- Vitamin E (tocopherol) acts as a natural antioxidant and slows oil rancidity. It is not a full preservative, but it is an important protective ingredient for any oil-based formula.
- Parabens appear in many commercial formulas as preservatives. Most clean beauty DIY formulations avoid them and rely instead on vitamin E plus short shelf-life windows and dry, clean storage.
- Synthetic fragrances can contain a wide range of undisclosed chemical compounds. If sensitivity is a concern for you or the person you are making the gloss for, stick to identified flavour oils with a disclosed ingredient list.
Containers: Which Formula Works Where
| Container | Works With | Avoid |
|---|---|---|
| Wand tubes | Firm beeswax formulas | Thin oil-only formulas (will drip) |
| Lip pots/jars | Almost any formula | N/A (most forgiving option_ |
| Roller ball bottles | Oil-only thin formulas | Wax-heavy formulas (will clog) |
| Squeeze tubes | Softer beeswax formulas | Very firm or very thin formulas |
For a first batch, use lip pots. They forgive inconsistent consistency and let you assess your colour and texture before committing to specialised tubes.
How to Make Lip Gloss at Home: Three Methods
Start with Method 3 if this is your first time making any DIY cosmetics. It requires no heat, no equipment, and takes five minutes. Once you understand the feel of the finished product, Methods 1 and 2 will feel straightforward.
Method 1: The Classic Beeswax Base
Best for: Wand tubes or pots, good tint hold, store-bought-style texture.
Ingredients:
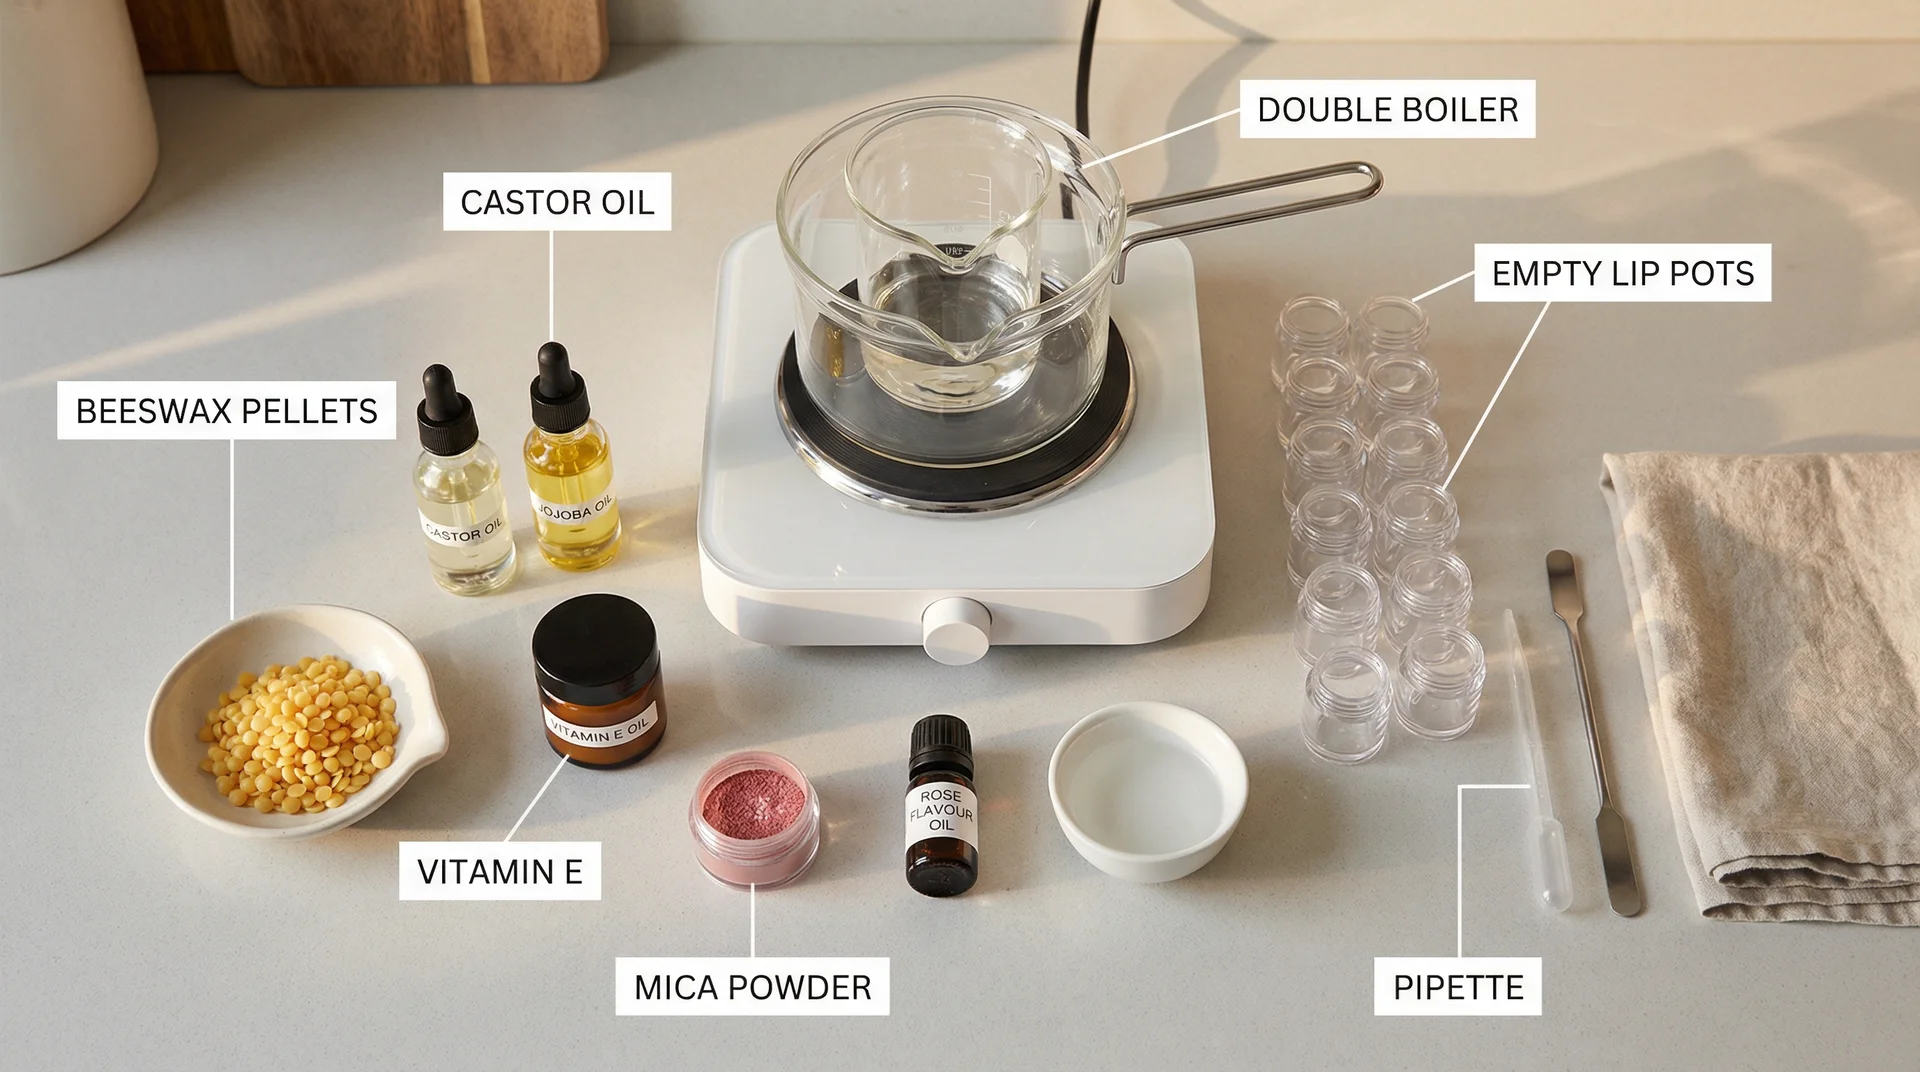
- 1 tablespoon beeswax pellets
- 1.25 tablespoons castor oil
- 1 tablespoon jojoba or sweet almond oil
- 1 teaspoon olive oil
- 0.5 teaspoon vitamin E oil
- 1 teaspoon glycerin
- 0.25 teaspoon mica powder pre-blended in warm castor oil
- 3 to 4 drops cosmetic-grade flavour oil
Equipment: Heat-safe glass jar or measuring cup, small pot for double boiler, small spatula, lip pots or wand tubes.
Steps:
- Set up a double boiler by placing your glass jar inside a small pot with about 2 inches of water at a gentle simmer.
- Add your beeswax pellets first and let them melt fully before adding anything else. Beeswax takes the longest and needs to be completely liquid before your oils go in.
- Once the beeswax has melted, add your castor oil, jojoba oil, olive oil, and vitamin E oil. Stir gently until everything combines into a smooth, clear liquid.
- Remove the jar from the heat carefully. The glass will be hot.
- Stir in the glycerin while the mixture is still warm. It will incorporate more easily at this stage.
- Add your pre-blended mica mixture and stir thoroughly.
- Add your flavour oil and stir once more.
- Pour into containers while the mixture is still warm and fluid. Tilt each container slightly as you pour to minimise air bubbles. If the mixture starts to firm in the jar before you have finished pouring, place it back over warm water briefly.
- Let glosses cool completely at room temperature before sealing, around 20 to 30 minutes.
What it should look like: A smooth, firm-enough gloss with an even shine and consistent colour. When you apply it, it should feel smooth without dragging. If it drags, your wax ratio is too high. Remelt and add a little more castor oil.
Method 2: The Vegan Formula (Candelilla Wax)
Best for: Anyone avoiding beeswax for vegan, allergy, or personal reasons.
Ingredients:
- 1.5 teaspoons candelilla wax (not tablespoons – this wax is harder)
- 2 tablespoons castor oil
- 1 tablespoon fractionated coconut oil or jojoba oil
- 0.5 teaspoon vitamin E oil
- 1 teaspoon glycerin
- 0.25 teaspoon mica powder pre-blended in castor oil
- 3 drops cosmetic-grade flavour oil
The critical thing about candelilla: it is harder than beeswax and melts at a slightly higher temperature, around 155 to 162°F, versus beeswax at 144 to 147°F. Use roughly half the quantity of candelilla compared to any beeswax recipe calling for a tablespoon-level amount, or you will end up with a firm balm. Give it more time over the heat before adding oils, and stir consistently throughout.
Follow the same steps as Method 1, substituting candelilla for beeswax.
Vegan colorant options: All mica powders are vegan. Beetroot powder, hibiscus powder, and spirulina (which gives a subtle bronze-green tint) are good natural choices. Avoid carmine, a red pigment derived from insects that appears on some cosmetic colorant lists.
Method 3: The No-Wax Oil Gloss
Best for: First-timers, lightweight feel, testing before committing to a larger batch.
Ingredients:
- 1 tablespoon castor oil
- 1 tablespoon jojoba or fractionated coconut oil
- 0.25 teaspoon vitamin E oil
- 0.5 teaspoon glycerin
- A small pinch of mica powder (optional)
- 2 drops of flavour oil (optional)
Steps:
- Combine all oils and the glycerin in a small bowl. No heat needed.
- If adding mica powder, blend it into a small portion of the castor oil first, then combine with the rest.
- Add flavour oil and stir everything together.
- Use a pipette or small funnel to transfer the mixture into a roller ball bottle.
- Snap the roller ball cap on firmly, then roll it across your lips to apply. Shake before each use if you have added pigment.
Being honest about this formula: it produces a genuinely beautiful, light gloss with a natural sheen. The trade-off is thinner hold, colour that settles over time, and shorter wear. For everyday personal use in a roller ball, it is wonderful and costs almost nothing to make.
Why Your Lip Gloss Didn’t Turn Out Right
The comment sections across every DIY gloss recipe repeat the same questions, and almost nobody answers them properly. Here is what went wrong and how to fix it.
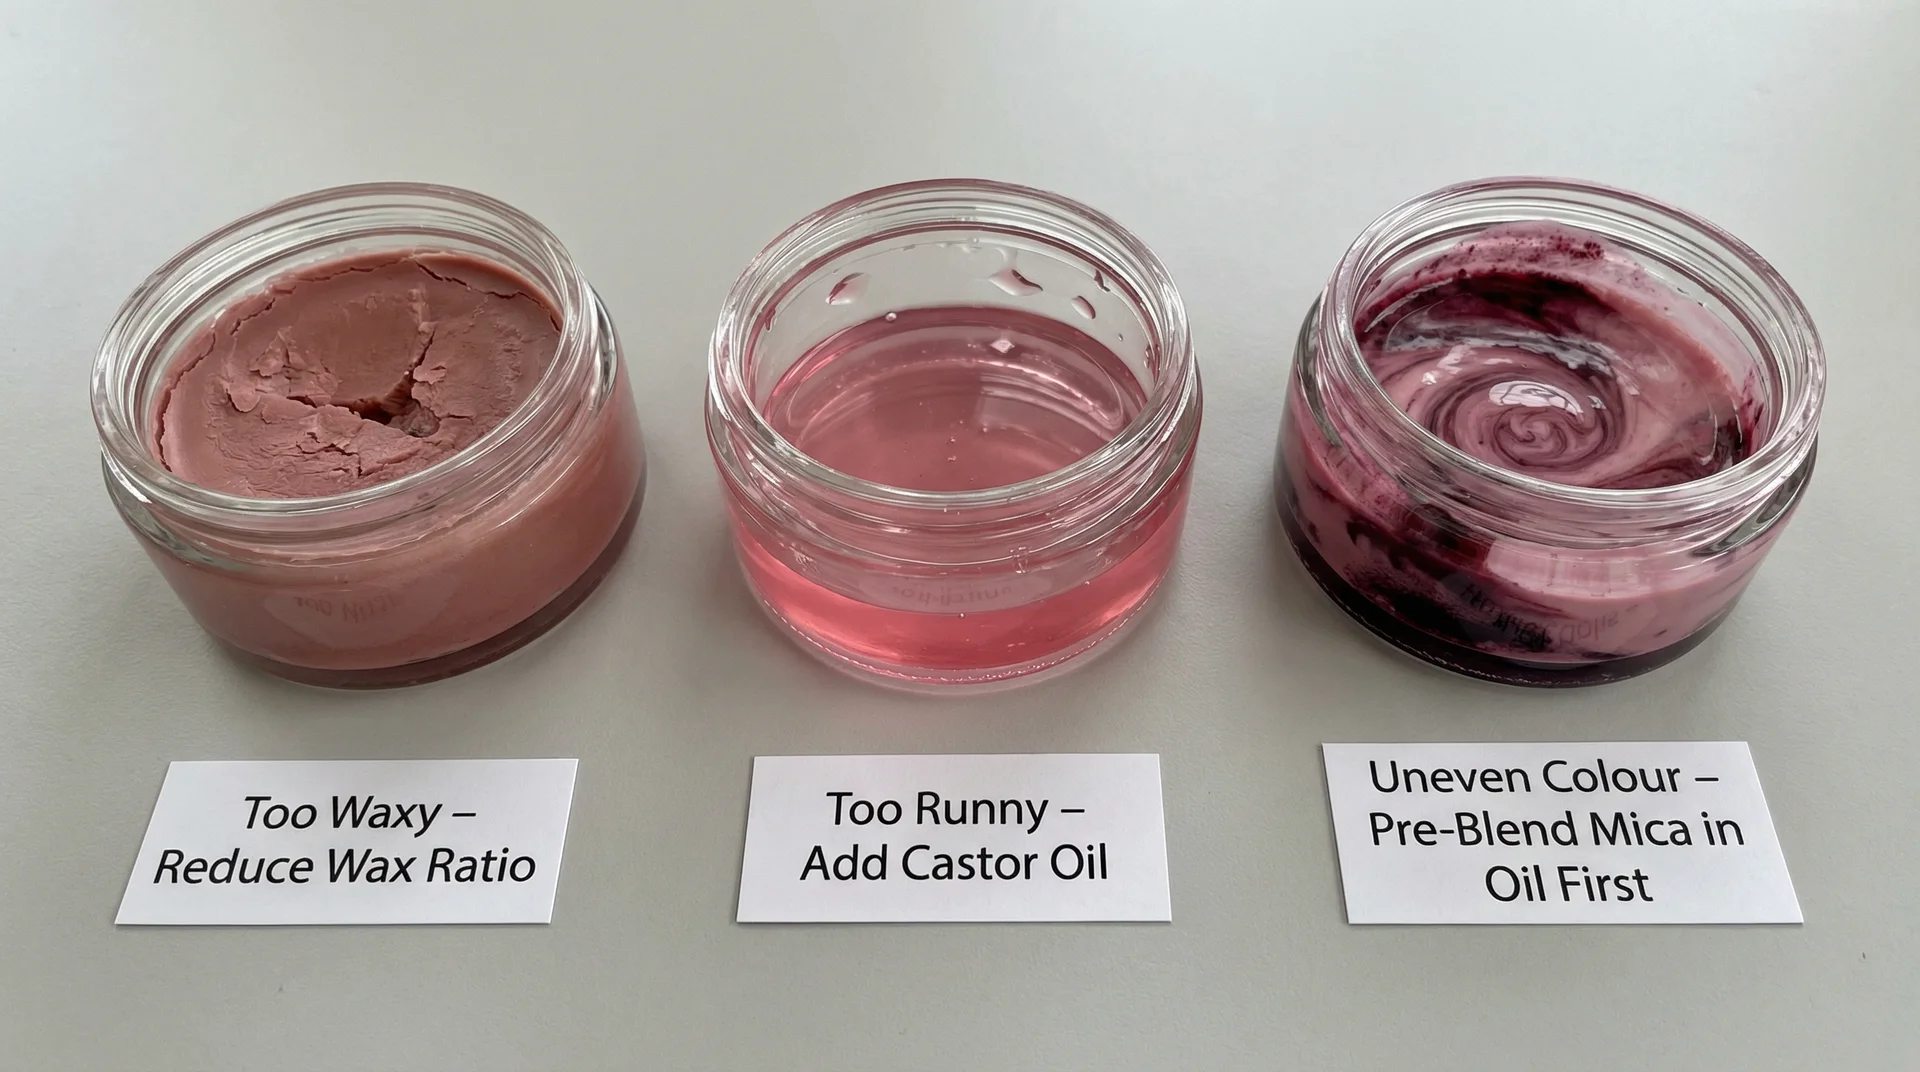
It’s Too Thick or Waxy
Your wax percentage is too high. Remelt the batch gently and add castor oil in half-teaspoon increments, stirring and checking between each addition. You are looking for the point where it flows off a spoon smoothly but still has some body. Most over-waxed glosses can be rescued this way.
It’s Too Runny or Slides Off Immediately
Two likely causes: insufficient wax or missing castor oil. Thin carrier oils like jojoba or almond oil do not have enough viscosity to hold a gloss in place on their own. Adding castor oil to a formula that lacks it makes an immediate and visible difference.
If the formula is already set and too thin, remelt and add a small amount of beeswax or candelilla.
The Colour Is Uneven or Settled at the Bottom
Your mica powder was not dispersed before pouring. When dry pigment hits a large volume of warm liquid, it clumps or sinks. Pre-blending your pigment into a small amount of warm castor oil until it forms a smooth paste, then adding that paste to your batch, solves this completely.
For a batch that has already set unevenly, remelt, stir thoroughly, and re-pour.
It Smells Strange After a Few Weeks
Your oils have started to oxidise. This happens when glosses are stored in warm or sunny spots, when fingers repeatedly contaminate pots instead of a spatula being used, or when vitamin E is not included. Vitamin E (tocopherol) neutralises the free radicals that cause fats to go rancid. Including it is not optional if you want a reasonable shelf life.
A well-made homemade gloss stored properly lasts three to six months. Discard any batch where you notice an off smell, texture change, or colour shift.
Signs Your Gloss Has Expired
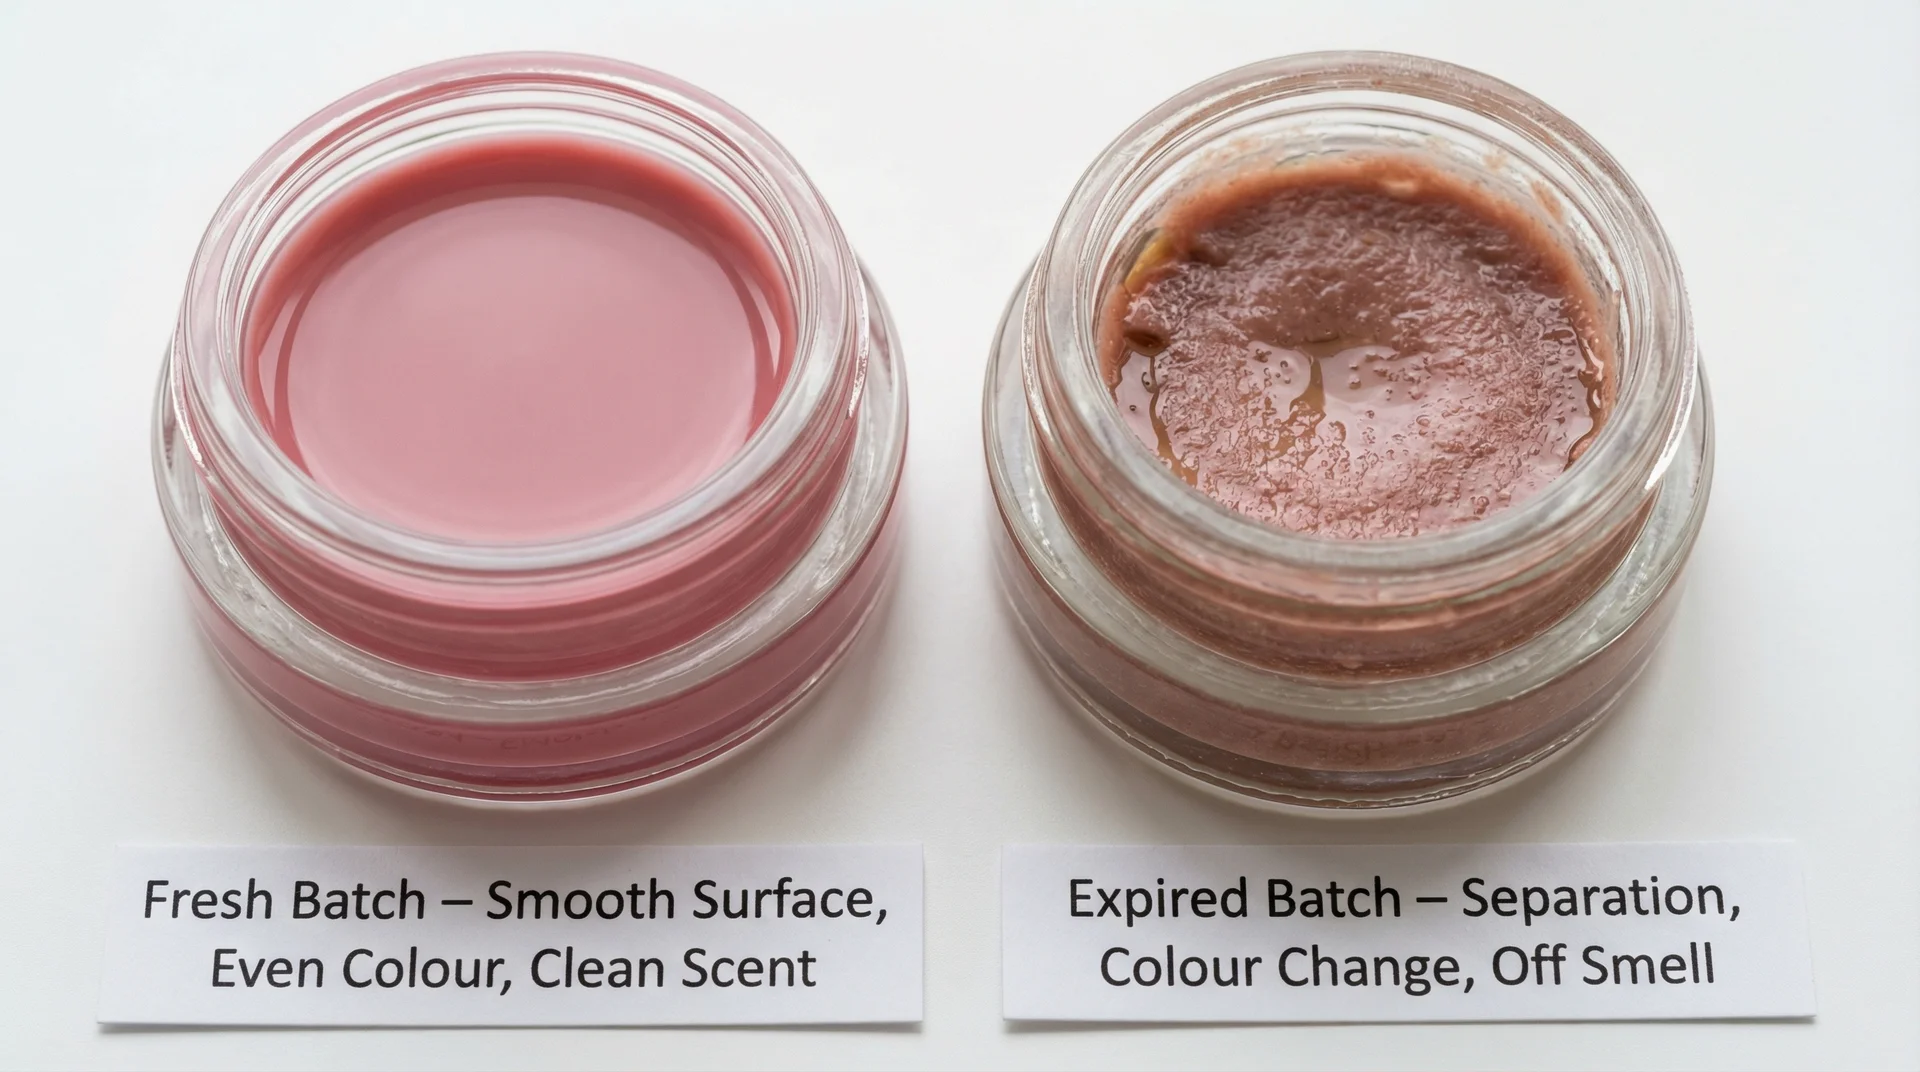
Watch for these specifically:
- The colour or consistency has changed noticeably from when you made it
- There is a sour, musty, or rancid smell
- The texture has become unusually thick, sticky, or separated
- You can see any mould growth near the container edges or on the surface
Lip products sit close to your mouth. When any of these signs appear, discard the batch.
How to Customise Your Gloss
This is where making your own gloss becomes genuinely creative, and where experience with different skin tones across different lighting conditions becomes useful.
Getting the Right Shade for Your Skin Tone
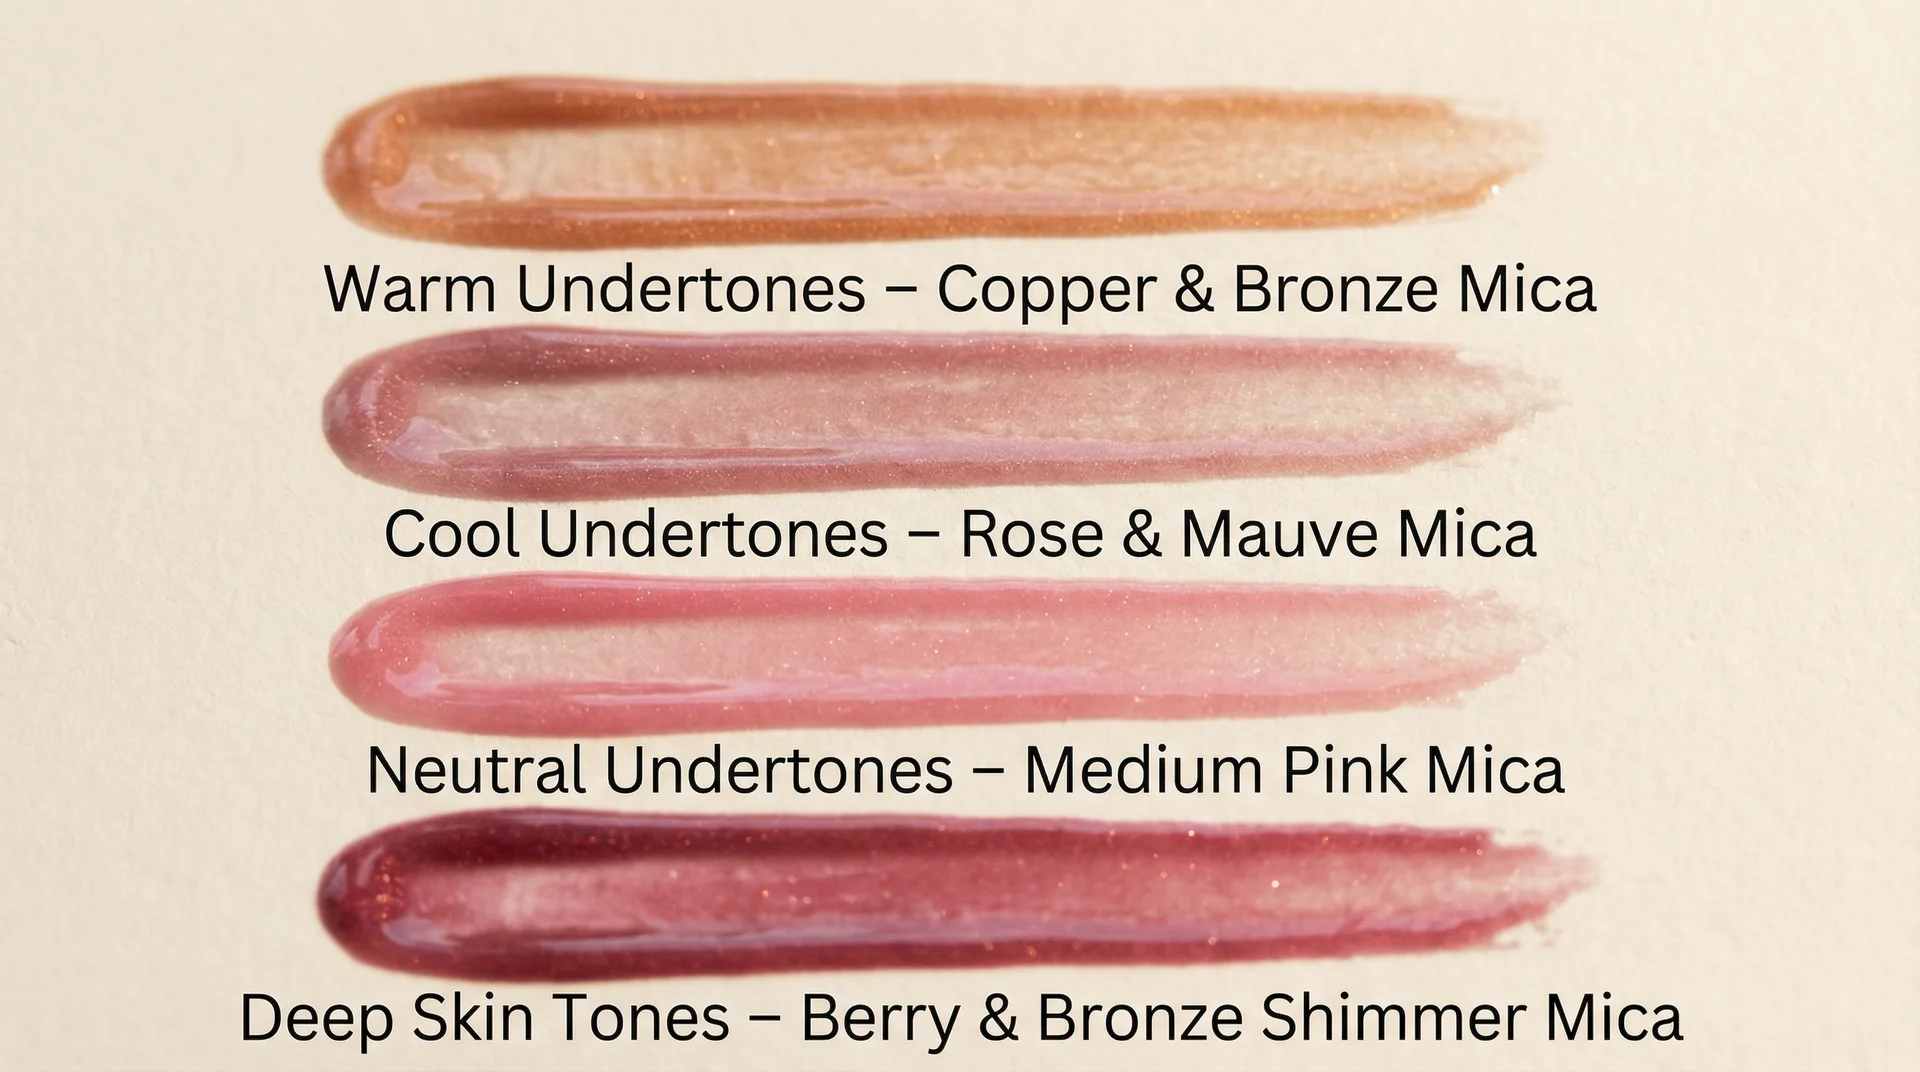
The sheer tinted gloss flatters the widest range of people because it adds colour without requiring precision application. Here is a practical reference:
| Undertone | Shades That Work Well | Use Carefully |
|---|---|---|
| Warm (golden, peachy) | Copper mica, bronze, warm rose, coral | Cool berry, blue-red |
| Cool (pink, bluish) | Rose, mauve, berry, cool pink mica | Orange-based corals |
| Neutral | Most shades, medium pink is a safe start | Very warm or very cool extremes |
| Deep skin tones | Rich berry, deep rose, bronze shimmer | Very light nudes (can look ashy) |
Start with less pigment than you think you need. You can reheat and add more, but you cannot take the colour back out once it is in.
Flavour Combinations That Work
- Vanilla + warm rose mica: the everyday gloss that suits almost every look
- Peppermint + clear base: classic, cooling, very clean on the lips
- Sweet orange + gold shimmer mica: a brighter option that works well for warmer months
- Raspberry flavour oil + berry mica: that fruity-tinted look that is fun without feeling juvenile
One to avoid: cinnamon flavour oil in any meaningful quantity. At above 0.5% of your formula, it causes real irritation for most people.
I learned this during a shoot when a client’s lips needed twenty minutes of soothing with plain jojoba oil before we could continue. If you enjoy the tingle, keep it well below that threshold.
Tinted Gloss Versus Sheer Gloss: An Honest Take
When you push pigment concentration high enough for an opaque result, you have essentially made a liquid lipstick, which is a different product with different expectations around precision and wear.
A sheer gloss allows a margin for imprecise application, wears away gracefully, and suits almost every skin tone. If you want a bold colour, pair a sheer gloss over a lip liner rather than trying to concentrate all of the pigment into your gloss formula.
The result looks more polished and lasts significantly better throughout the day.
Storing Your Homemade Lip Gloss
Heat, light, and contamination are the three things that shorten a homemade gloss’s life faster than anything else. Keep your containers away from windowsills, car dashboards (car interiors can exceed 120°F in summer, which melts wax components and permanently separates ingredients), and steam-heavy bathrooms. A bedroom drawer or cool makeup bag works well for daily storage.
For extra batches you will not use immediately, storing filled pots in the fridge at around 35 to 40°F extends freshness by slowing oil oxidation and bacterial activity. Bring them to room temperature before use.
For pots, use a small spatula or clean brush rather than your finger each time. Repeated finger contact introduces bacteria and significantly shortens the batch’s safe use window. A batch made with proper sanitation, stored well, and applied hygienically should stay fresh for three to six months.
Thinking About Selling Your Lip Gloss?
Making gloss for yourself is one thing. Selling it to other people introduces responsibilities that are worth understanding from the start.
The small indie brands I have worked with on editorial productions, the ones that have longevity, took the legal and safety side seriously from day one.
FDA Requirements for Selling Lip Gloss in the US
In the US, lip gloss falls under FDA jurisdiction as a cosmetic. You do not need to register the product with the FDA before selling, but every ingredient you use must be FDA-approved for cosmetic use.
Your colorants in particular must be FDA-approved specifically for lip products; not all cosmetic-approved colorants meet the lip-use standard, so check each one against the FDA’s approved colour additives list.
Label your products accurately with: the full ingredient list in descending order of concentration, your business name, and the net weight of the product. These are legal requirements for cosmetics sold in the US, not suggestions.
Product liability insurance is strongly advisable if you are selling beyond your immediate circle, even if you operate as a sole proprietor.
What Your Costs Actually Look Like
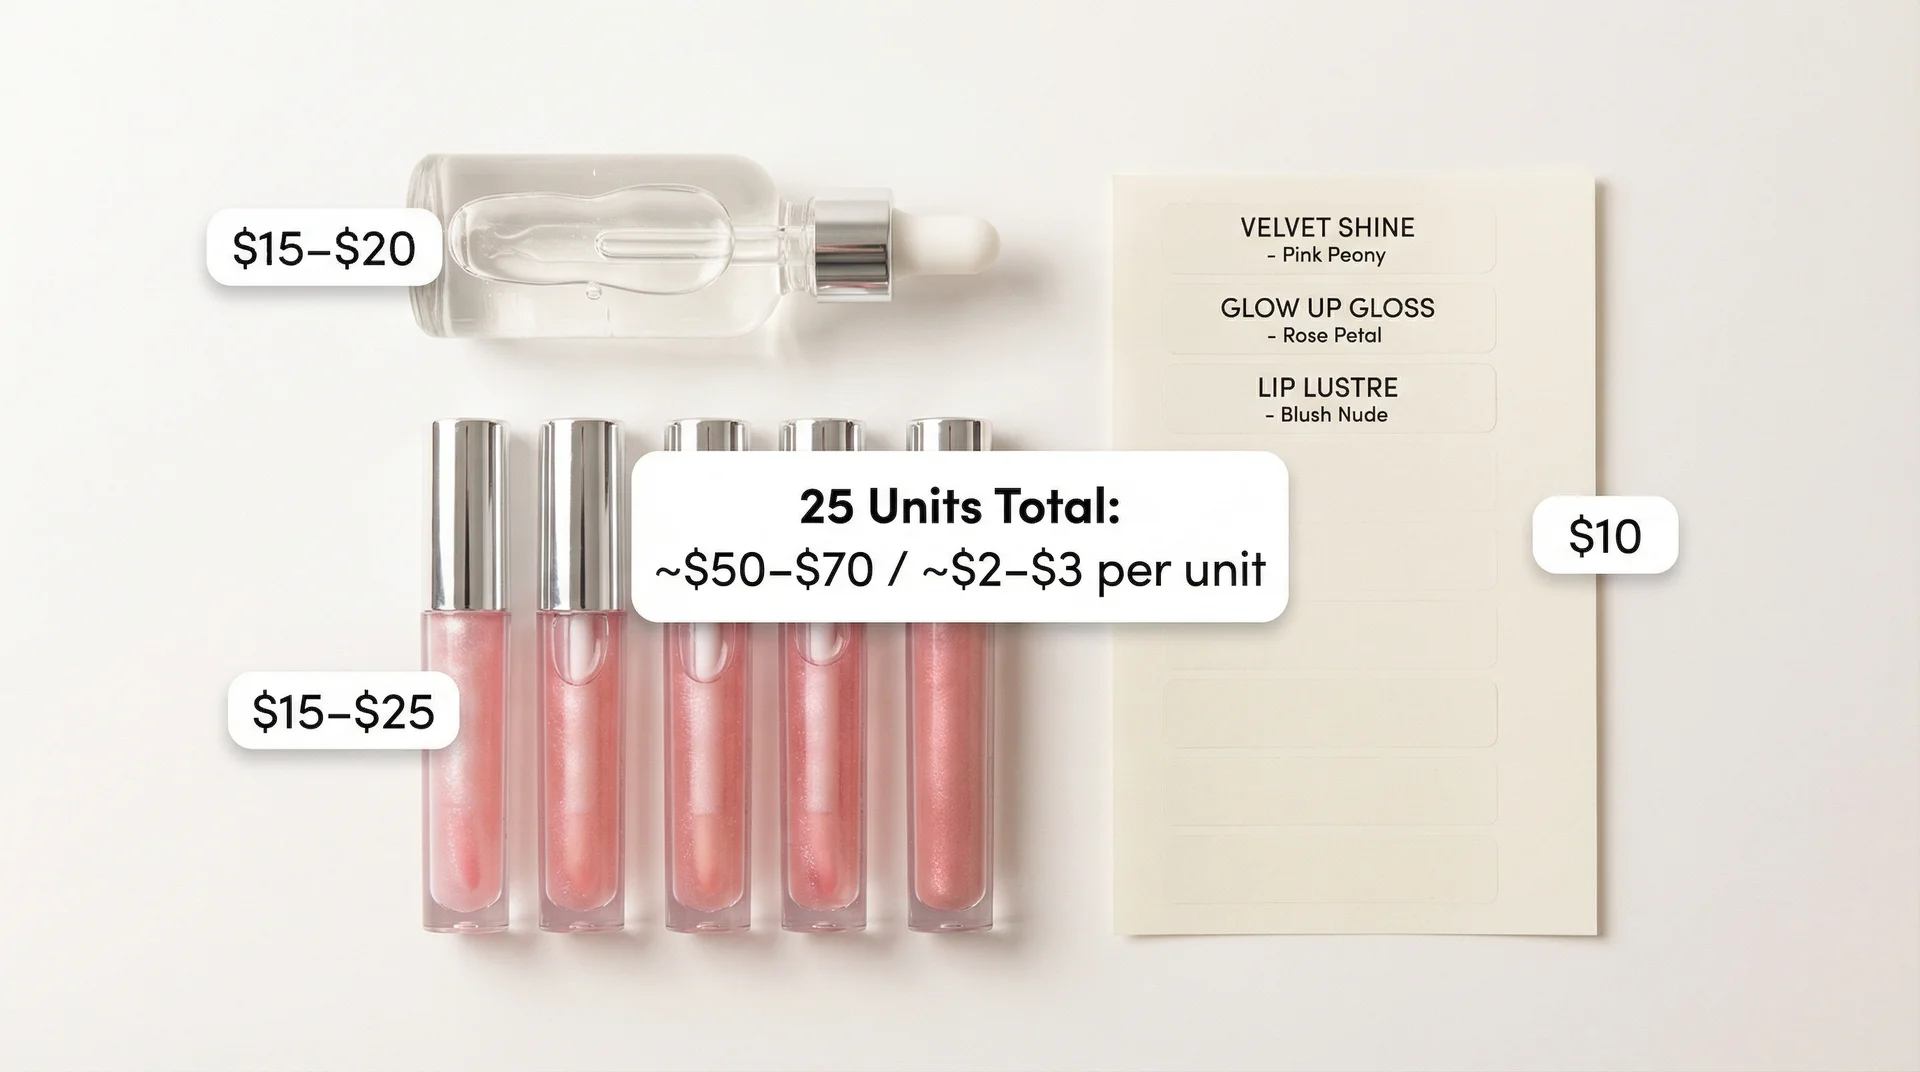
| Item | Approximate Cost | Notes |
|---|---|---|
| Lip gloss base (8 oz) | $15 to $20 | Makes roughly 25 units at 8ml each |
| Colorants and mica | $10 to $15 | Covers a range of shades |
| Wand tubes (25 units) | $15 to $25 | Quality varies considerably |
| Labels and packaging extras | $10 | Minimum estimate |
| Total per batch (25 units) | $50 to $70 | Roughly $2 to $3 per unit |
Pricing at $10 to $16 per unit for a small-batch artisan product gives you a viable margin. The cost most beginners undercount is time, including testing batches, packaging time, and photography if you are selling online. Factor that in before setting your final price.
Frequently Asked Questions
Can I make lip gloss with just coconut oil?
You can, but the result will be thin and will not behave like a gloss. Coconut oil melts at body temperature, so it absorbs into the lips quickly rather than sitting on the surface to create shine. Pairing it with castor oil and a small amount of wax gives you a much better result.
What makes lip gloss shiny?
Castor oil creates the primary shine by forming a reflective, viscous film on the lips. Glycerin intensifies this effect and extends how long the gloss stays visible. Mica powder adds a shimmer dimension on top of the base shine.
How long does homemade lip gloss last?
Three to six months when stored properly in a cool, dark place. Oil-only formulas without vitamin E sit at the shorter end of that range. Discard any batch where the smell, texture, or colour changes noticeably.
Is it safe to use essential oils in lip gloss?
Some are safe at low concentrations (below 1% of your formula), but many irritate lip tissue. Peppermint, sweet orange, and lavender are among the gentler choices. Cinnamon, clove, lemon, and bergamot are too strong or phototoxic for lip use.
Cosmetic flavour oils formulated specifically for lips are generally the safer option for beginners.
Can I make lip gloss without beeswax?
Yes. Method 2 in this guide uses candelilla wax as a vegan alternative. Method 3 skips wax entirely for a lighter, oil-based formula. The texture and wear time differ from a beeswax formula, but the result is a real gloss.
What is the difference between lip gloss and lip balm?
The wax-to-oil ratio. Lip balm uses more wax, making it firmer and more protective. Lip gloss uses more oil, which keeps it soft, shiny, and fluid. If you follow a balm recipe expecting gloss results, the texture will disappoint you.
What ingredients should I avoid in DIY lip gloss?
For a clean formula, avoid parabens as preservatives if you have sensitivities, synthetic antioxidants like BHA and BHT, which have been linked to skin irritation, phthalates, which can appear in fragrance compounds, and any craft-grade glitter not labelled cosmetic-grade.
Always use ingredients with an FDA-approved status for lip use, and if you are adding water-based ingredients like aloe, your formula will need a proper preservative system to prevent microbial growth.
Closing Thoughts
Your first batch probably will not be your best one. Start with Method 3 if you feel uncertain about two base oils, a roller ball, five minutes, no heat required.
Once you understand what the finished product feels like and how the formula behaves, the wax-based methods feel straightforward.
The formula is yours to adjust, layer, and refine, and that is genuinely the most interesting part of the process.