
Most people land on this question somewhere between pulling up old carpet and placing a late-night hardware store order they’re not entirely sure about.
You’ve chosen the flooring. The baseboards are up. Now, the two trim options look almost identical in the packaging, and you need to pick one.
| Here’s the direct answer before anything else. Shoe molding is the right choice for hardwood, engineered wood, and tile floors with small, consistent gaps. Quarter round belongs on floating floors, including laminate and LVP, where the expansion gap runs 3/8 inch or wider. |
The rest of the decision comes down to your home’s aesthetic and what your baseboard profile looks like. I’ve specified both across hundreds of residential projects, and neither is the wrong call in the right situation. Here’s how to find yours.
Shoe Molding vs Quarter Round: Understanding the Actual Difference
When you hold them side by side in the store, they look close to identical. Installed in a room, they read differently enough to matter.
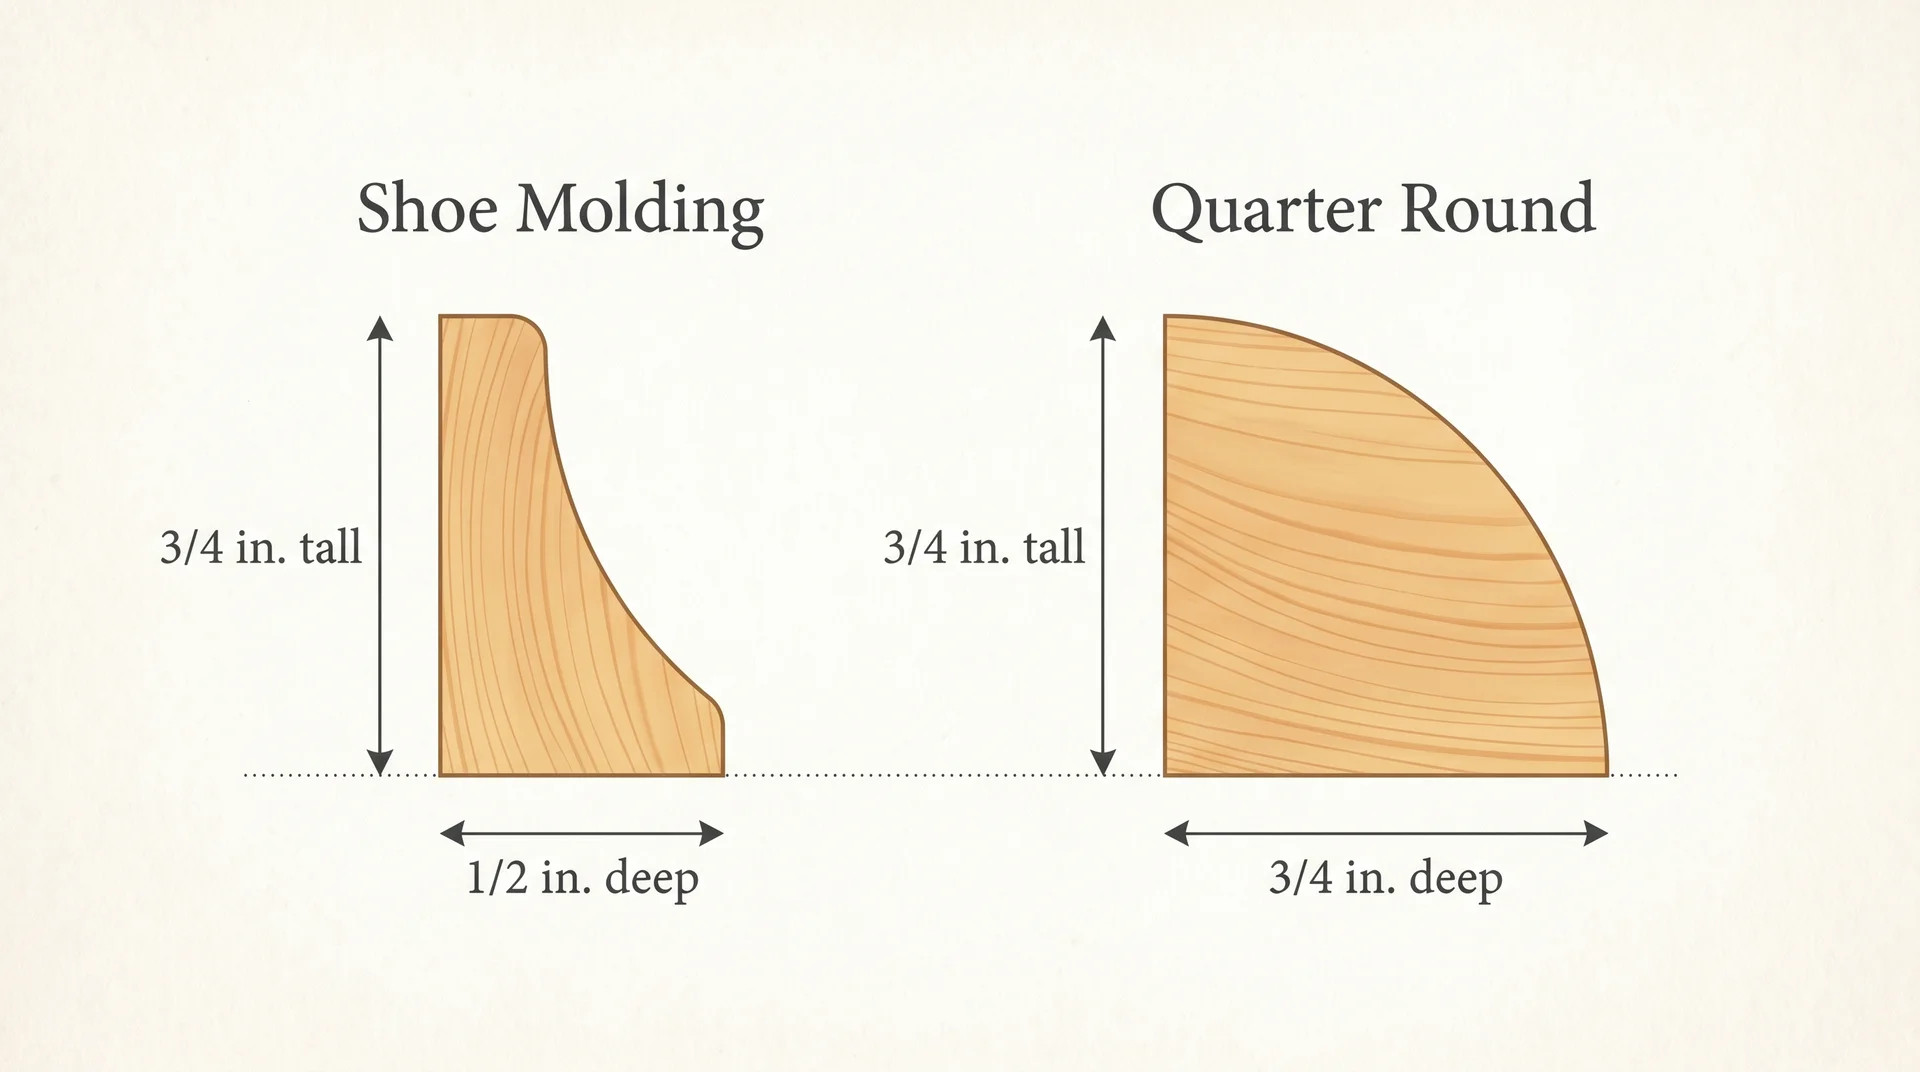
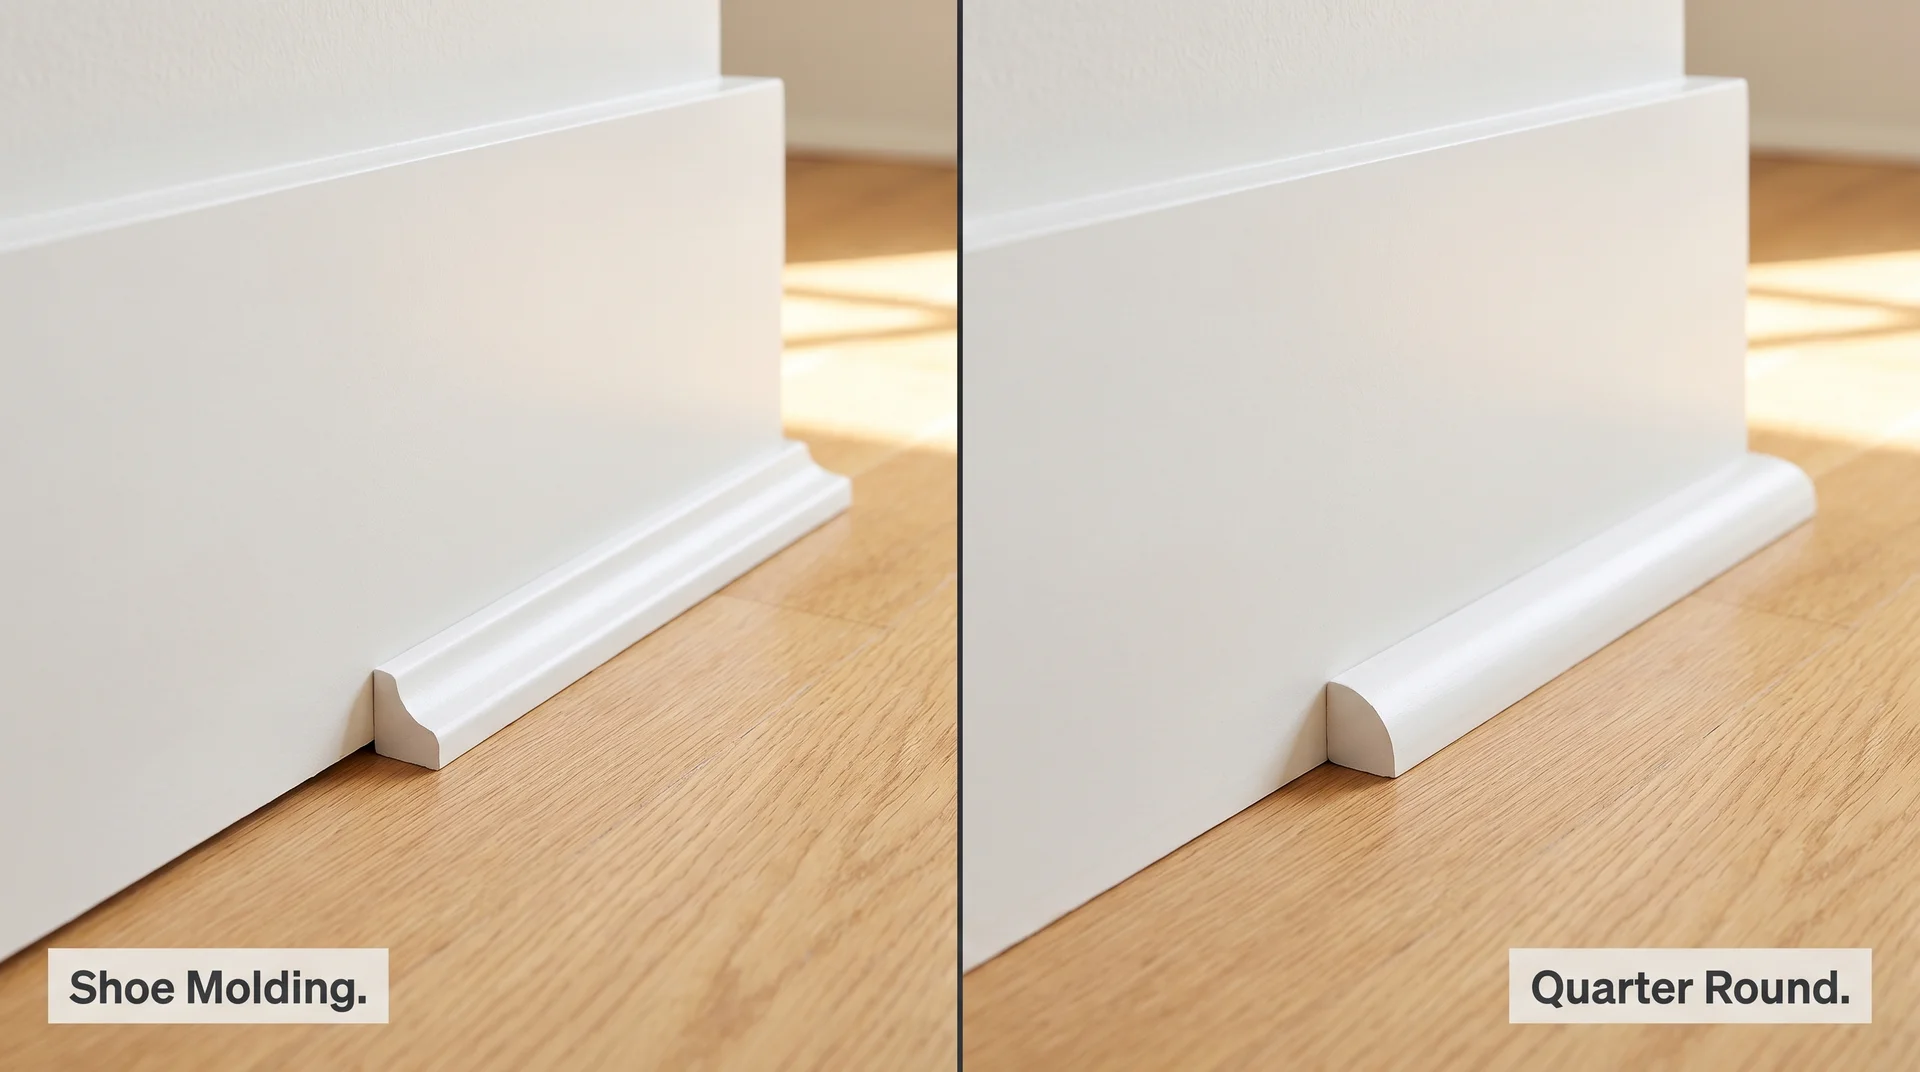
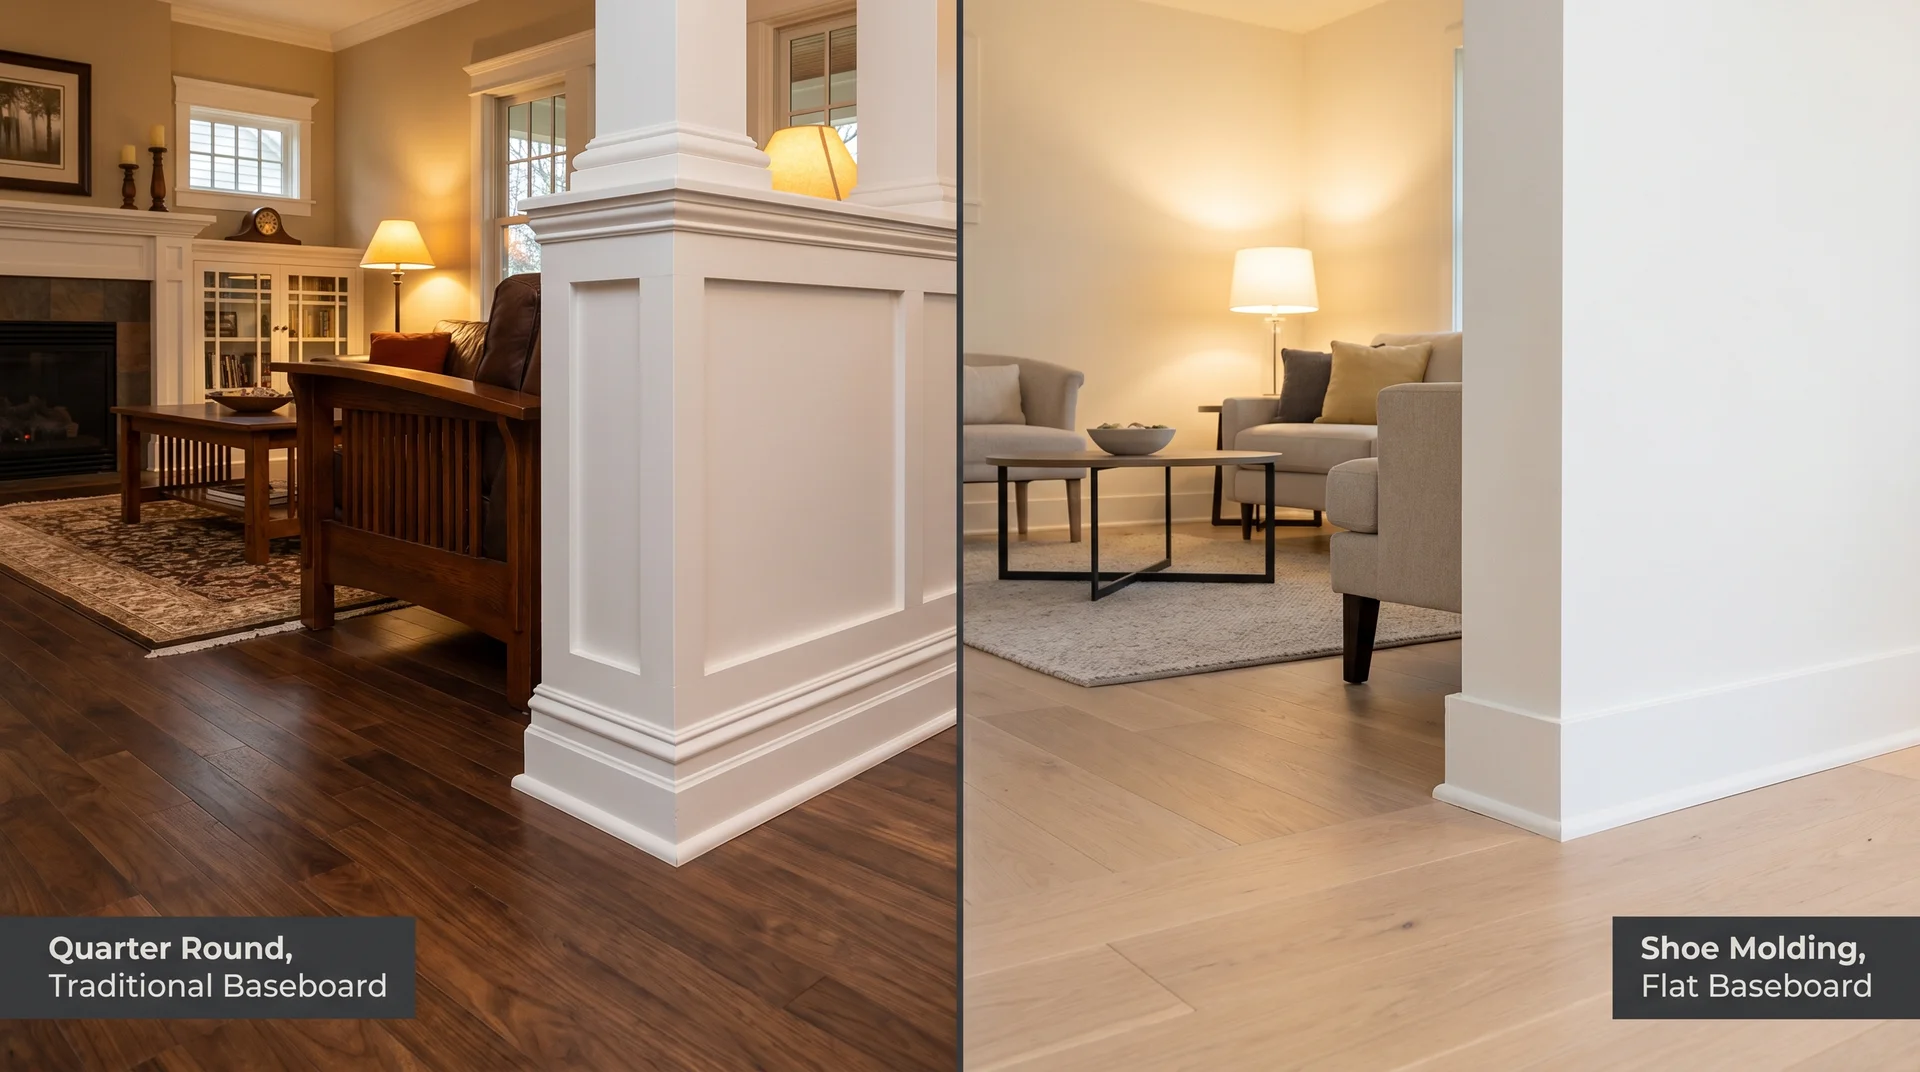
Quarter round is a perfect quarter-circle, usually 3/4 inch tall by 3/4 inch deep. Because it protrudes equally in both directions, it reads as a separate, rounded element at floor level. It has a substantial quality that suits traditional and craftsman trim packages well. In a room with simple, flat-profile baseboards, though, it tends to land a little heavy.
Shoe molding (also called base shoe) is taller than it is wide, typically 3/4 inch tall by 1/2 inch deep, with a tapered curve that flows into the baseboard rather than projecting outward from it. Painted to match the base, it nearly disappears. That’s the design intent, not a limitation.
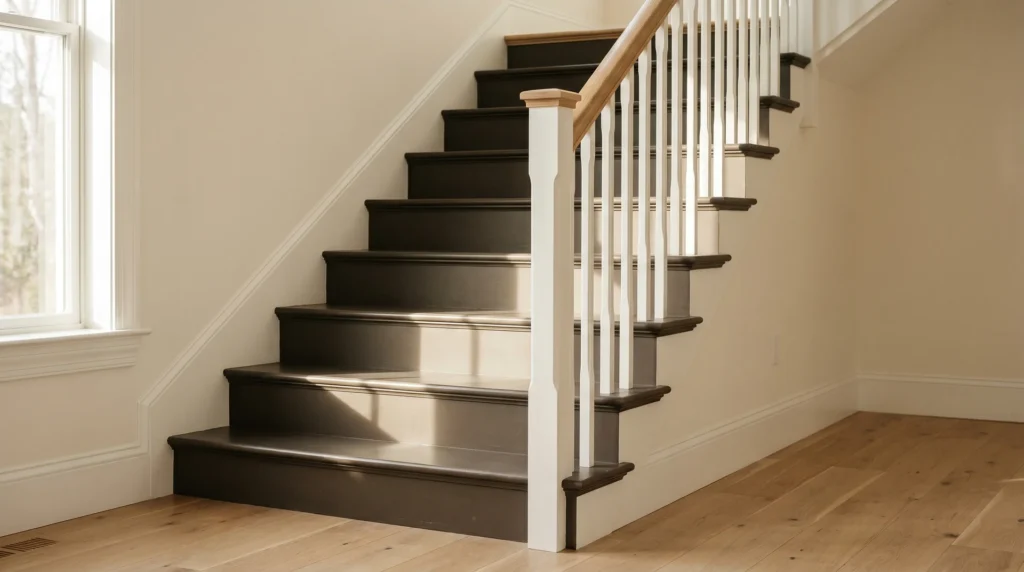
One element that sits outside these three zones but completes the staircase renovation is the trim at the very base of the staircase, where the bottom riser meets the floor.
Whether shoe molding or quarter round belongs there depends on the size of the gap and the style of your baseboard, but it’s the finishing detail that makes the whole project look intentional rather than abandoned at the bottom.
The Gap Coverage Difference That Drives the Practical Decision
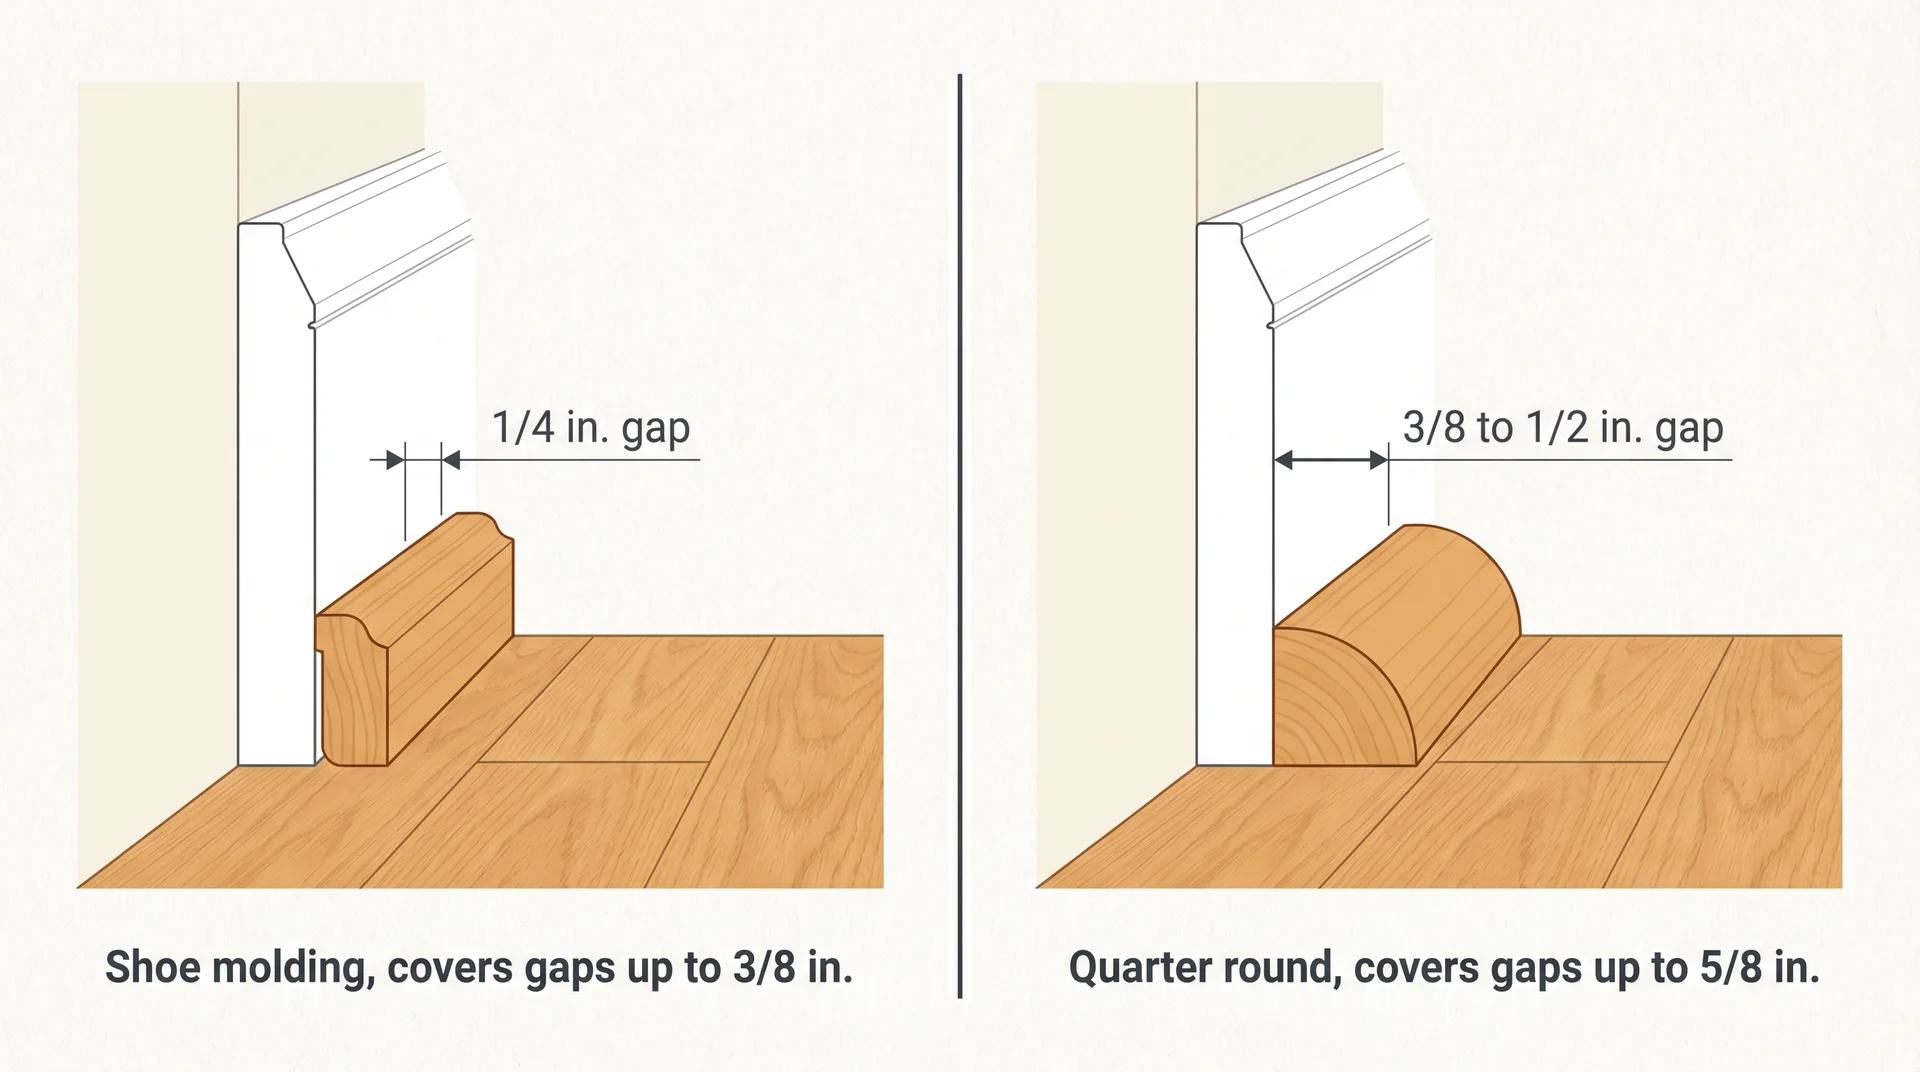
Shoe molding’s 1/2-inch depth handles gaps up to about 3/8 inch reliably. Quarter round, at 3/4-inch depth, covers gaps up to about 5/8 inch.
Solid hardwood floors typically leave a gap of about 1/4 inch at the wall, which puts coverage squarely within the shoe molding’s range.
Floating floors require a larger expansion zone, often 3/8 to 1/2 inch or more, and that’s where quarter round’s extra depth becomes a functional requirement rather than just a style choice.
Shoe Molding vs Quarter Round by Floor Type: Which One Do You Need?
Solid Hardwood and Engineered Wood Floors
Shoe molding is the right call for most hardwood and engineered wood installations. The gaps are typically small and consistent, and the shoe molding’s slim profile lets the baseboard stay the visual anchor in the room.
There’s also a practical reason to prefer it here: because the nail angle is easier to control with the shoe molding’s narrower profile, you’re less likely to accidentally drive a nail through the flooring when working close to the wall.
More on that in the installation section, because it’s the most common DIY mistake I see on these projects.
Laminate, LVP, and Floating Floors
If the expansion gap is 3/8 inch or wider, a quarter round is a better cover for floating floors. Laminate and LVP expand and contract across the full width of the room with humidity changes, and the gap at the wall exists to allow that movement.
Shoe molding doesn’t have the depth to cover a 1/2-inch gap reliably. If your installer managed a tighter gap, shoe molding can sometimes work, but where there’s any doubt, quarter round is the safer call. You don’t want to trim that barely clears the gap in February and reveals it in August.
Tile and Natural Stone Floors
Shoe molding has the edge on uneven tile surfaces because its more flexible profile conforms to minor height variation across grout lines. Quarter round sits more rigidly and can leave visible gaps against inconsistent tile edges over time.
On large-format tile with a level surface and consistent grout joints, quarter round installs cleanly and looks intentional.
Older Homes with Larger Gaps from Settling
If you’re looking at gaps wider than 1/2 inch, quarter round is typically the answer. Settled floors in older homes can create gaps that exceed what standard shoe molding covers.
In homes from the early to mid-twentieth century, the gap is sometimes wide enough that even standard quarter round falls short, and the right fix is a taller baseboard replacement rather than asking trim to do more than it was sized for.
Which Trim Looks Better?
There’s a reason so many homeowners end up searching “does quarter round look cheap.” The instinct behind that search is valid, and it deserves a direct answer rather than a diplomatic non-answer.
Quarter round is not cheap. The issue is context. Its perfectly symmetrical profile gives it a rounded bead quality at the floor. In a home with ornate craftsman baseboards, layered millwork, or traditional trim throughout, that rounded bead belongs.
In a home with flat-stock baseboards and a modern interior, the same bead reads as borrowed from a different design era. It’s a context mismatch, not a quality problem.
Shoe molding, because it tapers into the baseboard rather than sitting in front of it, fits naturally across a wider range of interior styles. I’ve used it in traditional homes, transitional remodels, and clean contemporary spaces, and it’s rarely the wrong design choice.
How to Match Shoe Molding or Quarter Round to Your Baseboard Profile
Flat-stock, paint-grade baseboards pair best with shoe molding. It flows from the base as a natural extension and reads as one coherent element rather than two separate pieces.
Layered or decorative baseboards, where the room already carries visual weight in its trim details, can absorb quarter round without a mismatch.
The combination to avoid is quarter round at the base of a flat, contemporary baseboard; that pairing suggests the two pieces were chosen independently rather than as a system, and it shows.
Should You Paint or Stain Shoe Molding and Quarter Round?
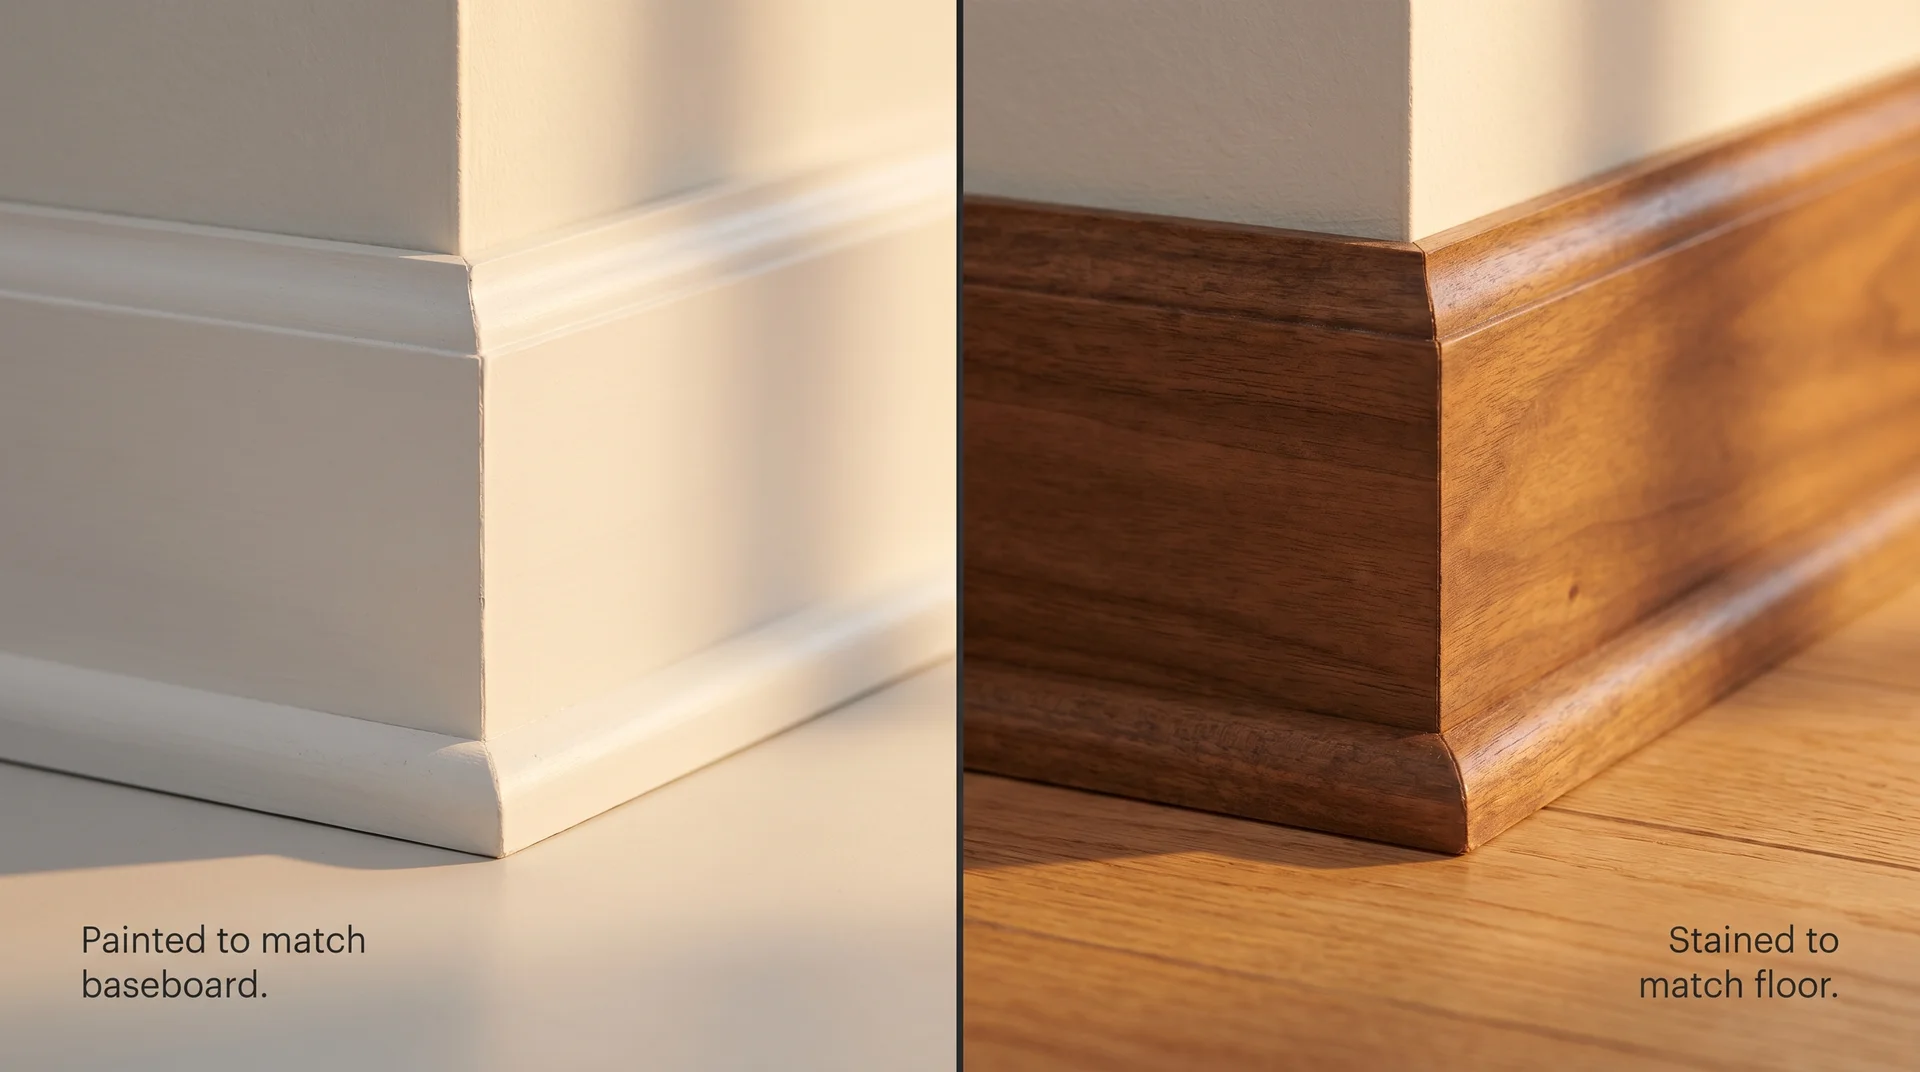
Painting the trim to match the baseboard is the choice I’d recommend for most applications. It makes the trim read as part of the baseboard assembly, keeps the visual hierarchy clean, and lets the flooring carry the eye.
Staining the trim to match the floor is also effective, particularly in rooms with hardwood you want to emphasize; it creates a visual anchor at floor level and gives the space a considered, finished quality.
When painting, a satin or semi-gloss sheen holds up better to mopping and scuffing than flat or eggshell. A urethane-based trim enamel produces a harder, more durable surface than standard latex, and it’s worth the step up for trim running through high-traffic hallways or entryways.
Mixing Shoe Molding and Quarter Round in the Same House
Within a single room, use one or the other, not both. Mixing them in the same space creates a visible discrepancy at inside corners because the two profiles don’t meet cleanly. Across different rooms, the distinction matters less.
Where it does matter is in open-plan spaces where two adjoining areas are visible from the same vantage point. A great room flowing from the kitchen to the dining to the living should use one trim type throughout.
Separated rooms with different flooring conditions? Using a different profile in each is a reasonable call.
Cost of Shoe Molding vs Quarter Round: What to Budget
The profile choice affects cost less than the material choice does. As a general guide for standard 3/4-inch profiles sold by the linear foot in the US:
- Pine shoe molding: $0.50 to $1.50 per linear foot
- Pine quarter round: $0.40 to $1.20 per linear foot
- Oak (stain-grade) in either profile: $1.50 to $3.00 per linear foot
- MDF (paint-grade): $0.30 to $0.80 per linear foot
- PVC: $0.80 to $1.50 per linear foot
Shoe molding can run slightly higher than quarter round in equivalent materials because the profile is less standard and requires a different cut. For a typical room, the total cost difference between the two is usually under $20. Labor costs are comparable; both install the same way.
Beyond Baseboards: Other Uses for Quarter Round
Quarter round works in more than just baseboard applications. It’s commonly used to cover the gap between the back edge of a countertop and the wall, and along the base of kitchen islands, bathroom vanities, and cabinetry where a 90-degree corner needs a soft, finished transition.
It also works around stair risers where the base of the riser meets the tread or the floor. If you’re working through a full stair painting project, the quarter round at the base of the staircase is often the trim that closes out the finish cleanly.
Shoe molding is more specific to baseboard applications, while quarter round is the more versatile general-purpose trim. That versatility is part of why contractors reach for it first when they need a quick solution in a variety of locations.
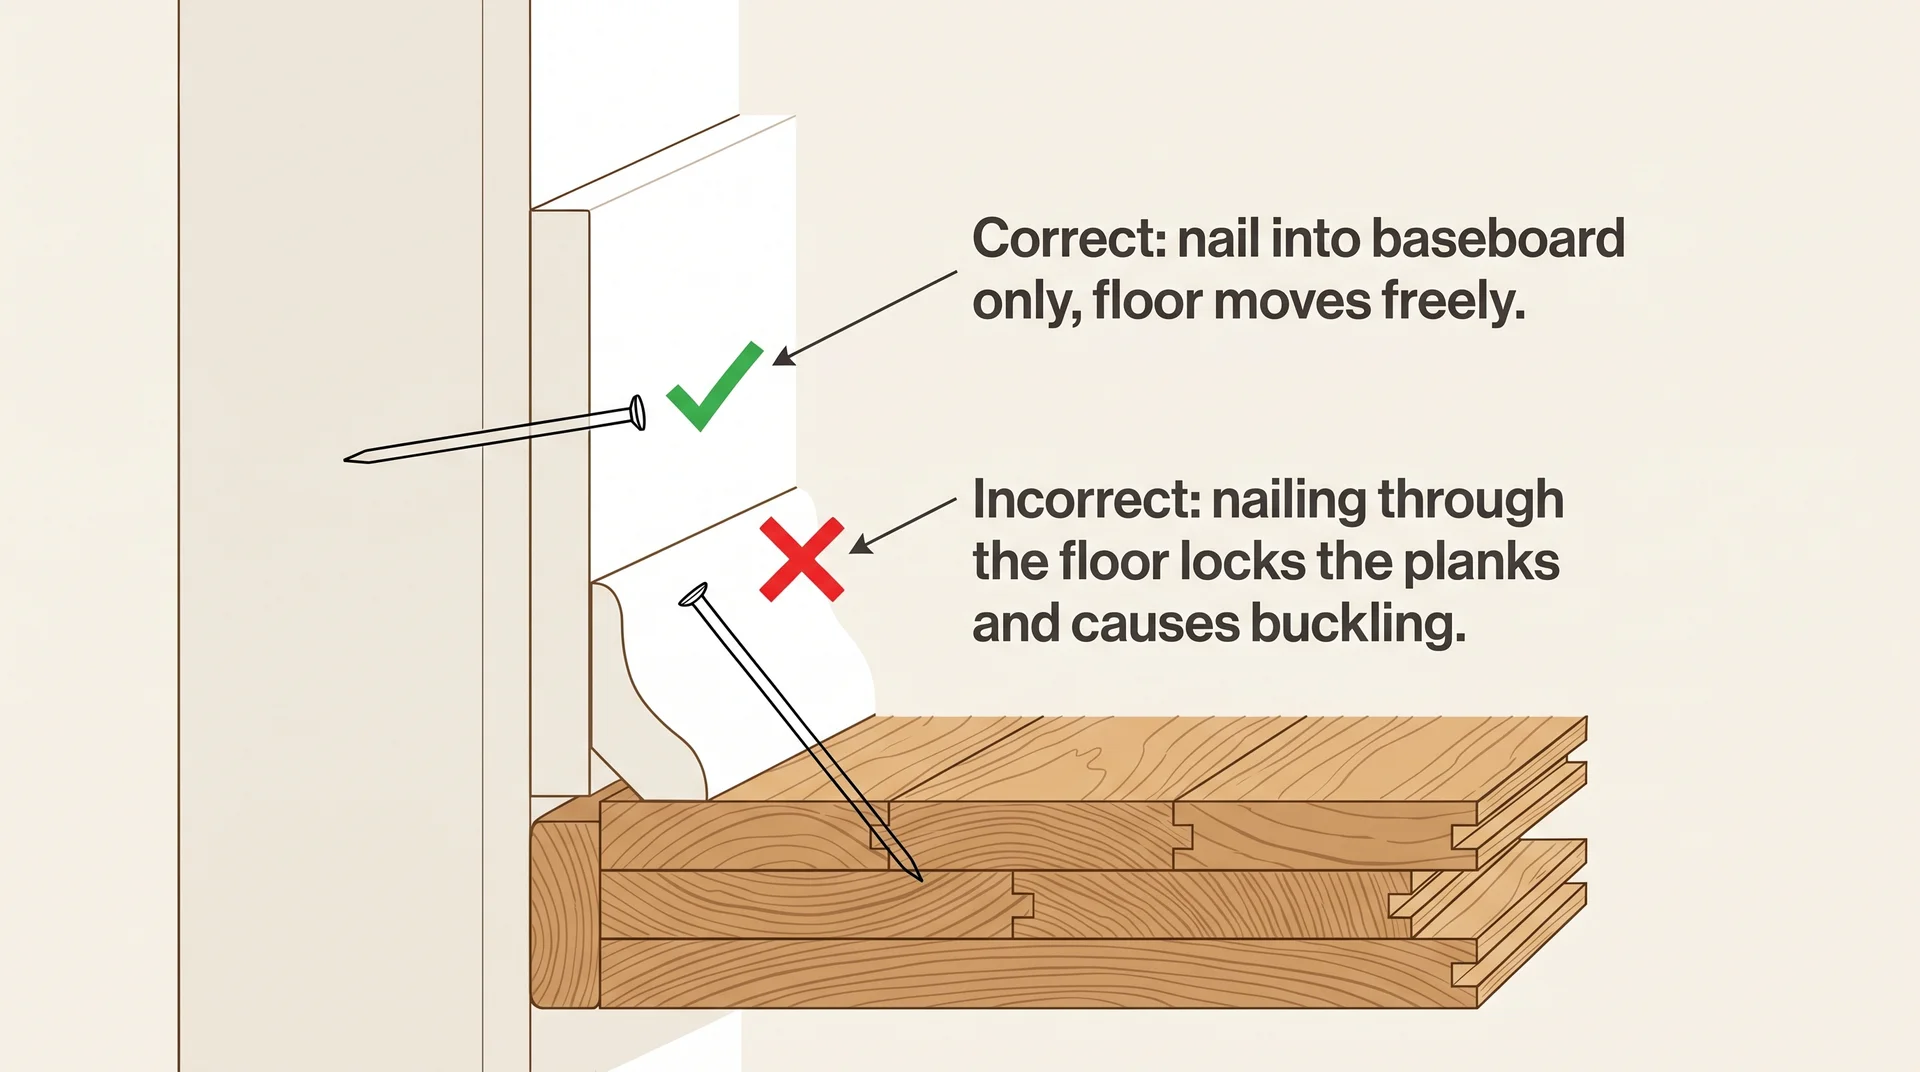
The Shoe Molding Installation Mistake That Ruins Everything
Do not nail shoe molding or quarter round through the flooring. Both pieces need to be nailed into the baseboard only.
The flooring beneath is supposed to move freely. Solid hardwood and floating floors expand and contract with seasonal humidity shifts, and if you nail the trim into the floor, you lock the flooring to the wall and remove the expansion space that the installation depends on.
The result, over months and years, is buckled flooring, squeaky boards, and planks under stress where the restricted movement has nowhere to go.
Angle your nails almost horizontally when driving them, aiming directly into the baseboard rather than downward toward the floor. An 18-gauge finish nailer with 1.5-inch or 2-inch brads handles both profiles well.
Space nails every 10 to 12 inches, and place one within 2 to 3 inches of any corner joint to prevent the ends from lifting. Shoe molding is slightly easier for DIYers here because its taller profile gives you a better nailing surface against the baseboard face.
Note: If you’re unsure about your specific installation conditions, particularly with older floors or unusual gap sizes, a licensed contractor can assess the situation before you commit to nailing anything down.
Caulk the Top Seam Only
Caulk only the top joint where the molding meets the baseboard. Use a paintable latex caulk, run a smooth bead, and tool it flat with a damp finger. The bottom edge, where the trim rests against the floor, does not get caulked.

The flooring needs to move freely underneath. On hardwood floors, trapped caulk at the base gets squeezed out in summer when the floor expands and pulled away in winter when it contracts. It looks bad, and it’s a signal that the installation didn’t account for how wood floors actually work.
Coping Inside Corners vs Mitering
For inside corners, a coped joint holds better over time than a mitered joint. Houses settle. A mitered corner that fits perfectly today will develop a visible gap in a few years as the room moves slightly.
A coped joint, where one piece is cut to profile and laps over the square-cut end of the adjacent piece, accommodates that movement and stays tight.
Shoe molding and quarter round are the easiest profiles to cope, and they’re the right place to practice the technique if you haven’t done it before.
Shoe Molding and Quarter Round Materials: What Holds Up vs What Gives Up
| Material | Best For | Avoid In |
|---|---|---|
| Solid wood (pine, poplar, oak) | Living areas, bedrooms, painted or stained finish | High-moisture rooms without proper sealing |
| Finger-jointed pine | Budget painted applications in dry rooms | Anywhere with moisture exposure |
| MDF | Dry rooms, paint-grade finish only | Bathrooms, kitchens, laundry rooms, basements |
| PVC | Wet areas, kitchens, bathrooms, and below-grade spaces | Stained applications (won’t accept stain) |
| Polystyrene | Painted wet-area applications, budget installs | High-traffic areas (dent more easily) |
Solid wood is the right material for most living areas, bedrooms, and hallways. Pine is the most common and most affordable. Poplar produces a smoother painted surface and is the better choice for paint-grade applications. Oak is the pick when staining to match warm-toned hardwood, because the grain character reads as consistent with the floor rather than awkwardly different.
MDF is not suitable for any room with genuine moisture exposure. It absorbs water through its exposed bottom edge, which is the edge sitting at floor level. Wet mopping, bathroom splash, and prolonged seasonal humidity all cause MDF trim to swell from the bottom up, soften, and eventually delaminate or bubble the paint surface. In a dry bedroom or formal living room, it holds up fine.
PVC is the right material for wet areas. It’s waterproof, doesn’t rot, and doesn’t swell. It won’t accept stain, so it’s a painted finish only, but in bathrooms and kitchens, that’s rarely a limitation. Polystyrene is lighter and more affordable, handles moisture well, and is a reasonable budget option in wet areas where traffic is lighter.
Quick Decision Guide: Shoe Molding or Quarter Round?
- Hardwood or engineered wood with small, consistent gaps: Choose shoe molding.
- Laminate, LVP, or floating floors with a gap of 3/8 inch or more: Choose quarter round.
- Modern, transitional, or minimalist interior with flat-profile baseboards: Shoe molding fits better here.
- Traditional, craftsman, or colonial home with layered or decorative baseboards: Quarter round belongs here.
- Replacing trim in a room that already has one profile: Match what’s there.
- Bathroom, kitchen, laundry room, or basement: Choose PVC or polystyrene regardless of which profile you select.
- Gaps smaller than 1/8 inch with precise installation: Consider skipping both for a cleaner, modern finish.
Frequently Asked Questions About Shoe Molding vs Quarter Round
Is Shoe Molding the Same as Quarter Round?
They’re similar but not the same. Both cover the gap between the baseboard and the floor, and both share a 90-degree flat back.
The difference is in the profile: quarter round is a perfect quarter-circle with equal height and depth (3/4 by 3/4 inch), while shoe molding is taller than it is wide (3/4 by 1/2 inch) with a tapered curve rather than a symmetrical arc.
They serve the same function but don’t look identical once installed.
What Is the Difference Between a Baseboard, Shoe Molding, and Quarter Round?
A baseboard is the primary trim piece that runs along the base of the wall, typically 3 to 6 inches tall, and its main job is to cover the gap between the wall surface and the floor while protecting the wall from furniture and foot traffic.
Shoe molding and quarter round are secondary trim pieces, installed at the very bottom of the baseboard where it meets the floor. Their purpose is to cover the smaller gap that remains between the base of the baseboard and the floor surface.
Think of the baseboard as the frame, and the shoe molding or quarter round as the final seal at the bottom.
Can You Use Quarter Round on Kitchen Cabinets and Countertops?
Yes. Quarter round is commonly used to cover the gap between the back of a countertop and the wall, and along the base of kitchen islands and bathroom vanities. This is one of the applications where quarter round’s versatility gives it a clear edge over shoe molding, which is designed specifically for baseboard use.
Do You Always Need Shoe Molding or Quarter Round?
Not always. In contemporary installations with precision-fit baseboards and negligible gaps, the seam can be tight enough to caulk flush without any trim. This works only when the installation is near-perfect. If there’s a visible gap of 1/4 inch or more, trim is always the more professional finish.
Should Shoe Molding or Quarter Round Match the Floor or the Baseboard?
Either approach works depending on the effect you want. Painting the trim to match the baseboard minimizes its visual presence and is the choice I’d recommend for most painted applications.
Staining it to match the floor anchors it downward and draws attention to the flooring material. Matching the baseboard tends to be the cleaner outcome in most rooms.
Is Quarter Round Outdated?
Quarter round is not outdated, but it is more visually assertive than shoe molding, and in contemporary or minimalist interiors, it can look out of place against flat-profile baseboards.
In traditional, craftsman, or colonial homes with decorative millwork, it reads as intentional and appropriate. The question isn’t whether quarter round is outdated; it’s whether it fits the design language of your specific room.
Final Thoughts
Every finished room has a seam where the floor meets the wall, and what you put there quietly tells you whether someone thought the job through or just got it done. Good trim doesn’t announce itself. It closes the gap, completes the line, and makes everything else in the room look more intentional.
The profile you choose matters less than choosing it deliberately, buying the right material for the conditions in that space, and installing it into the baseboard rather than the floor. From there, the room takes care of the rest.