
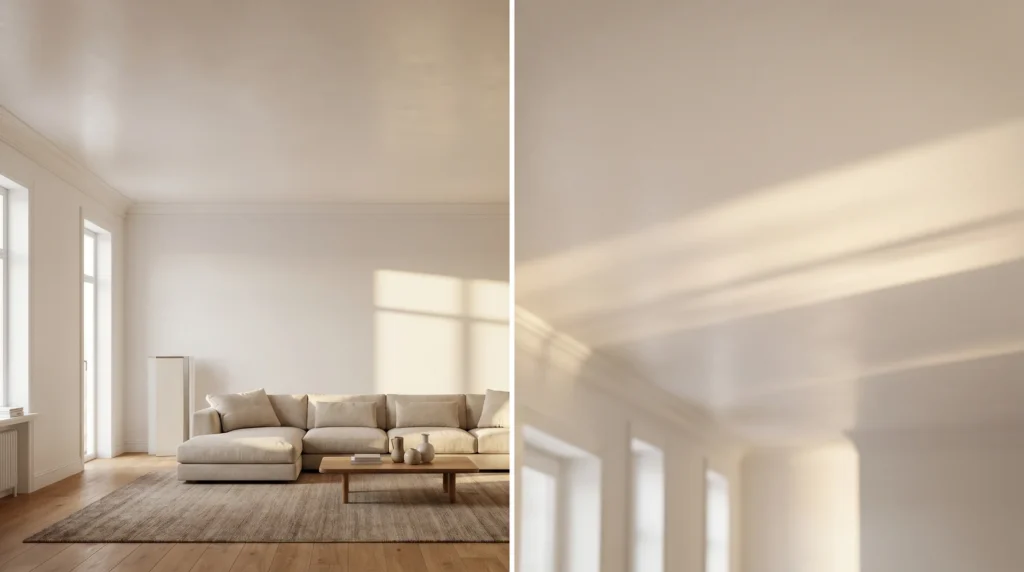
You painted your ceiling. You let it dry. You walked back in, looked up, and saw lap marks running across it like tire tracks. Or the yellowing came right back through. Or you’re in the bathroom again, watching the paint bubble at the corner for the third time in two years.
The ceiling is the only surface in your home that nobody touches, leans on, or spills coffee on, and somehow it’s the last thing anyone puts real thought into. That’s exactly why most ceiling paint jobs fail. The product you choose matters as much as the technique, and in some situations, it matters more.
After more than a decade working in residential design and interior styling, I’ve seen ceilings repainted three times in a row because the homeowner kept reaching for the wrong product. Here’s what to reach for instead.
Why Your Last Ceiling Paint Job Looked Off
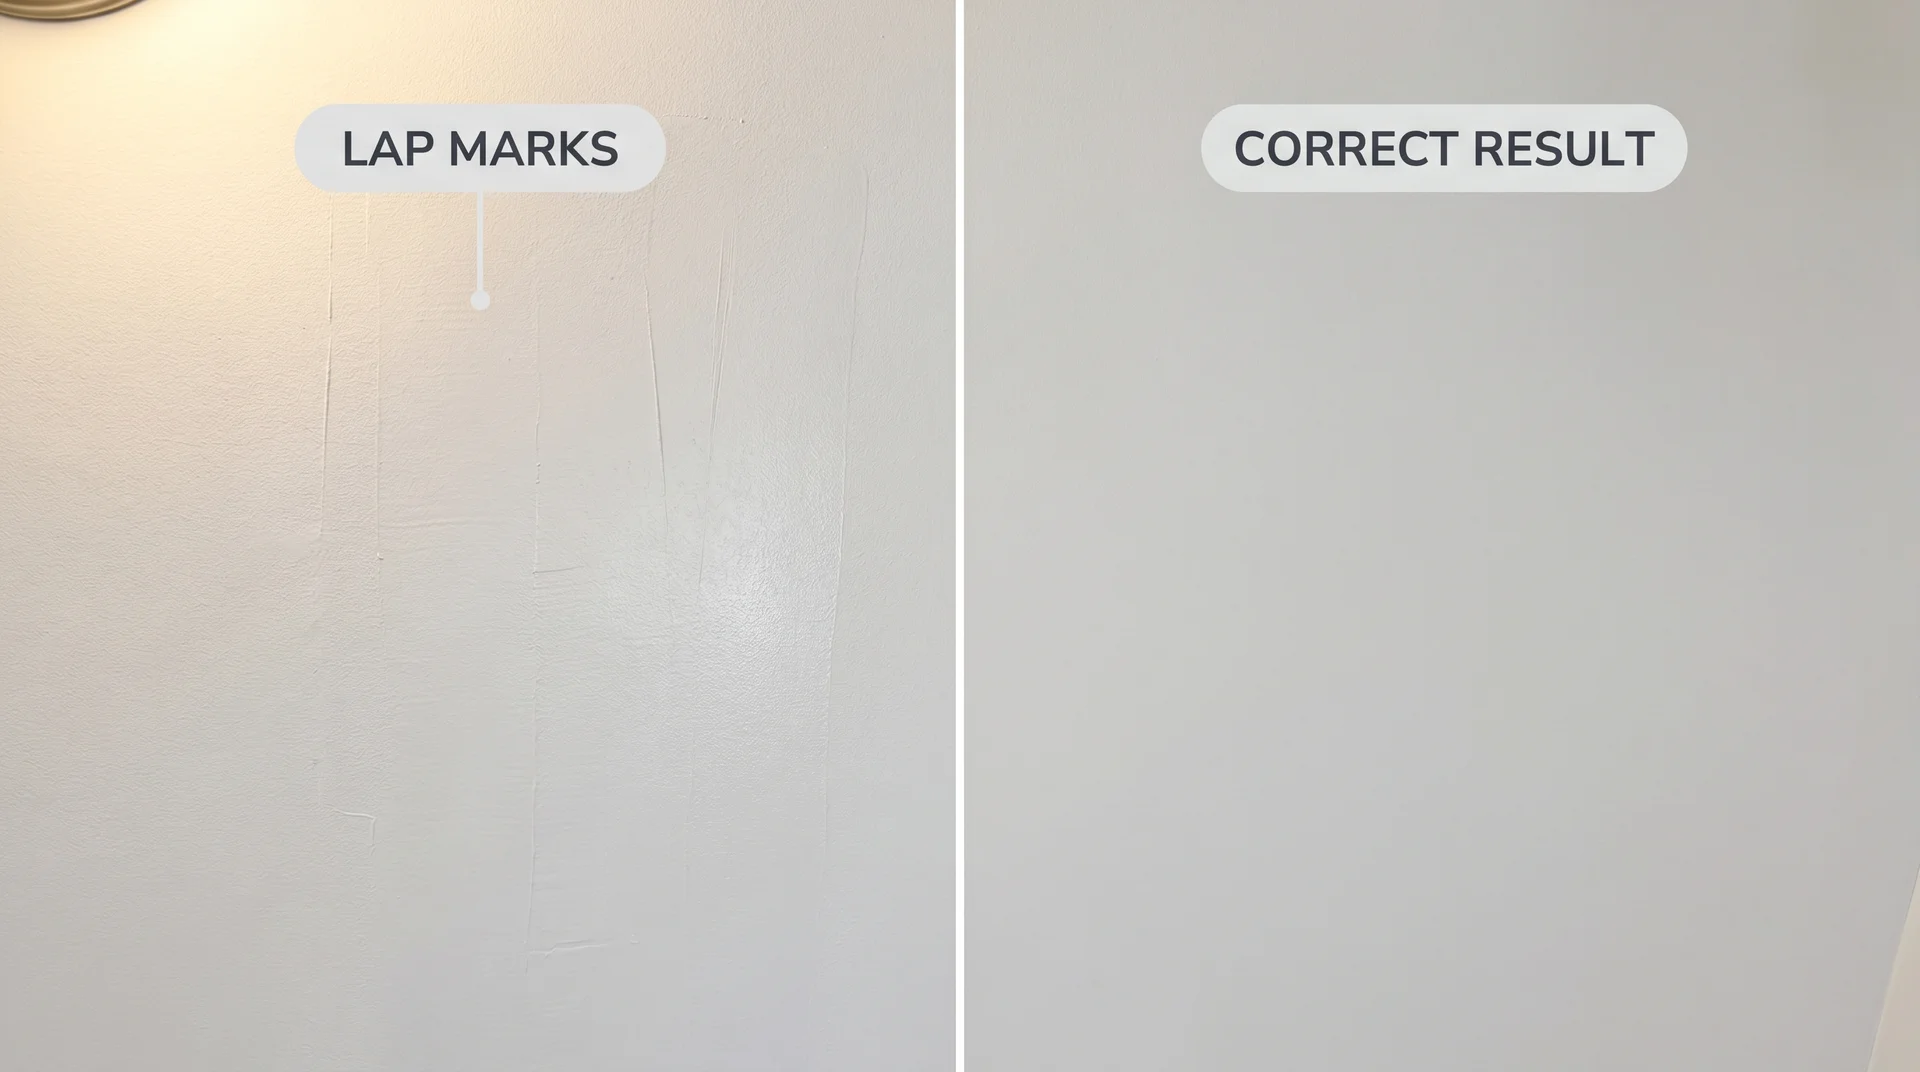
Lap marks are the most common complaint, and they happen for two reasons: the paint dried too fast between passes, or the paint you used wasn’t formulated for overhead application. Wall paint has a lower viscosity than dedicated ceiling paint. When you roll it overhead, it flows more freely, catches the angle of light on each pass, and leaves a visible line where one section dried before you could overlap the next.
Dedicated ceiling paint is engineered with higher viscosity and a longer open time specifically to prevent this. It stays workable while you move in sections, so the edges blend before they set. No technique tip fully compensates for using the wrong product overhead.
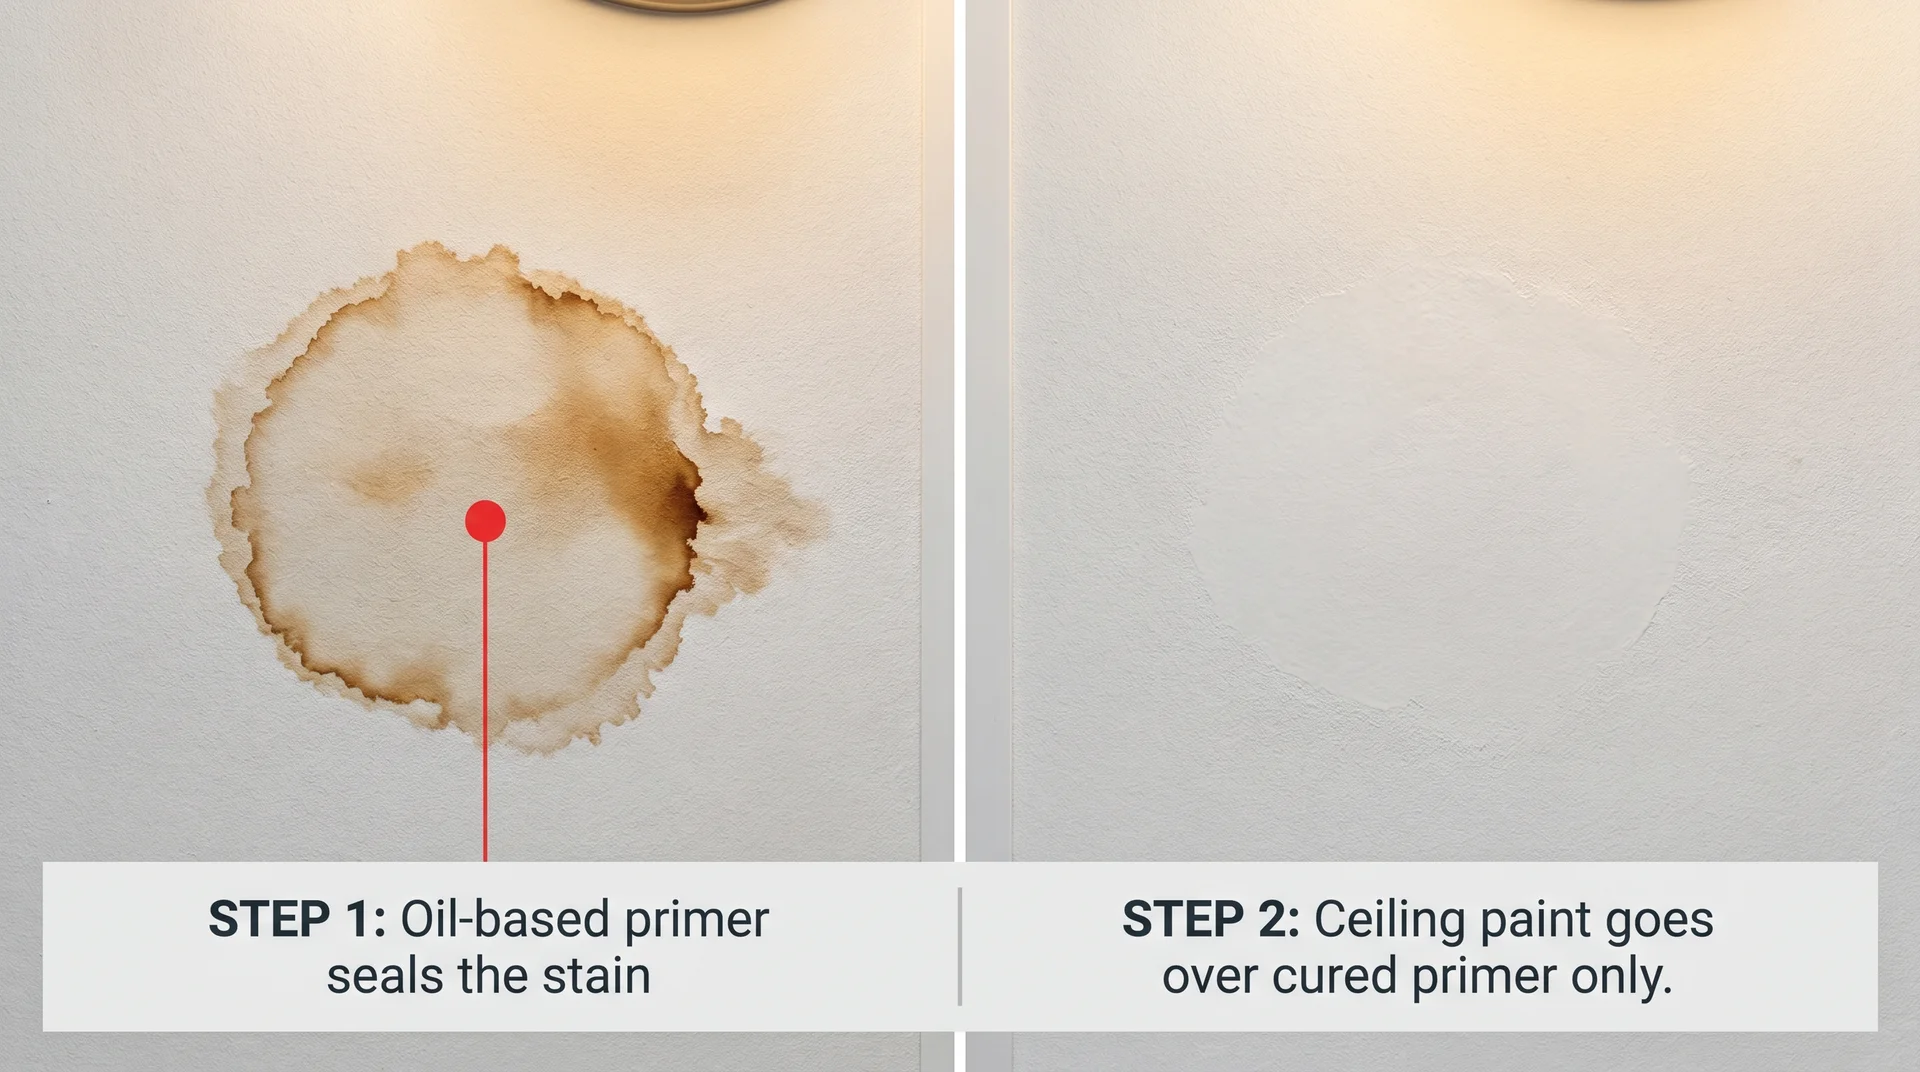
The other common failure is skipping primer on a stained surface. Paint doesn’t block stains. Primer does. If you painted directly over a water shadow or a nicotine patch, the stain bled back through, and a second coat of the same paint won’t stop it.
The markers that tell you a ceiling needs repainting: visible yellowing or graying, roller lines from a previous job that never blended out, a ceiling that reads flat gray instead of white under natural light, or any staining that paint has been applied over directly without primer. All of these are solvable with the right approach.
There are various other rules for painting ceilings that you should know before getting your lock-in.
Ceiling Paint vs. Wall Paint: Does It Actually Matter?
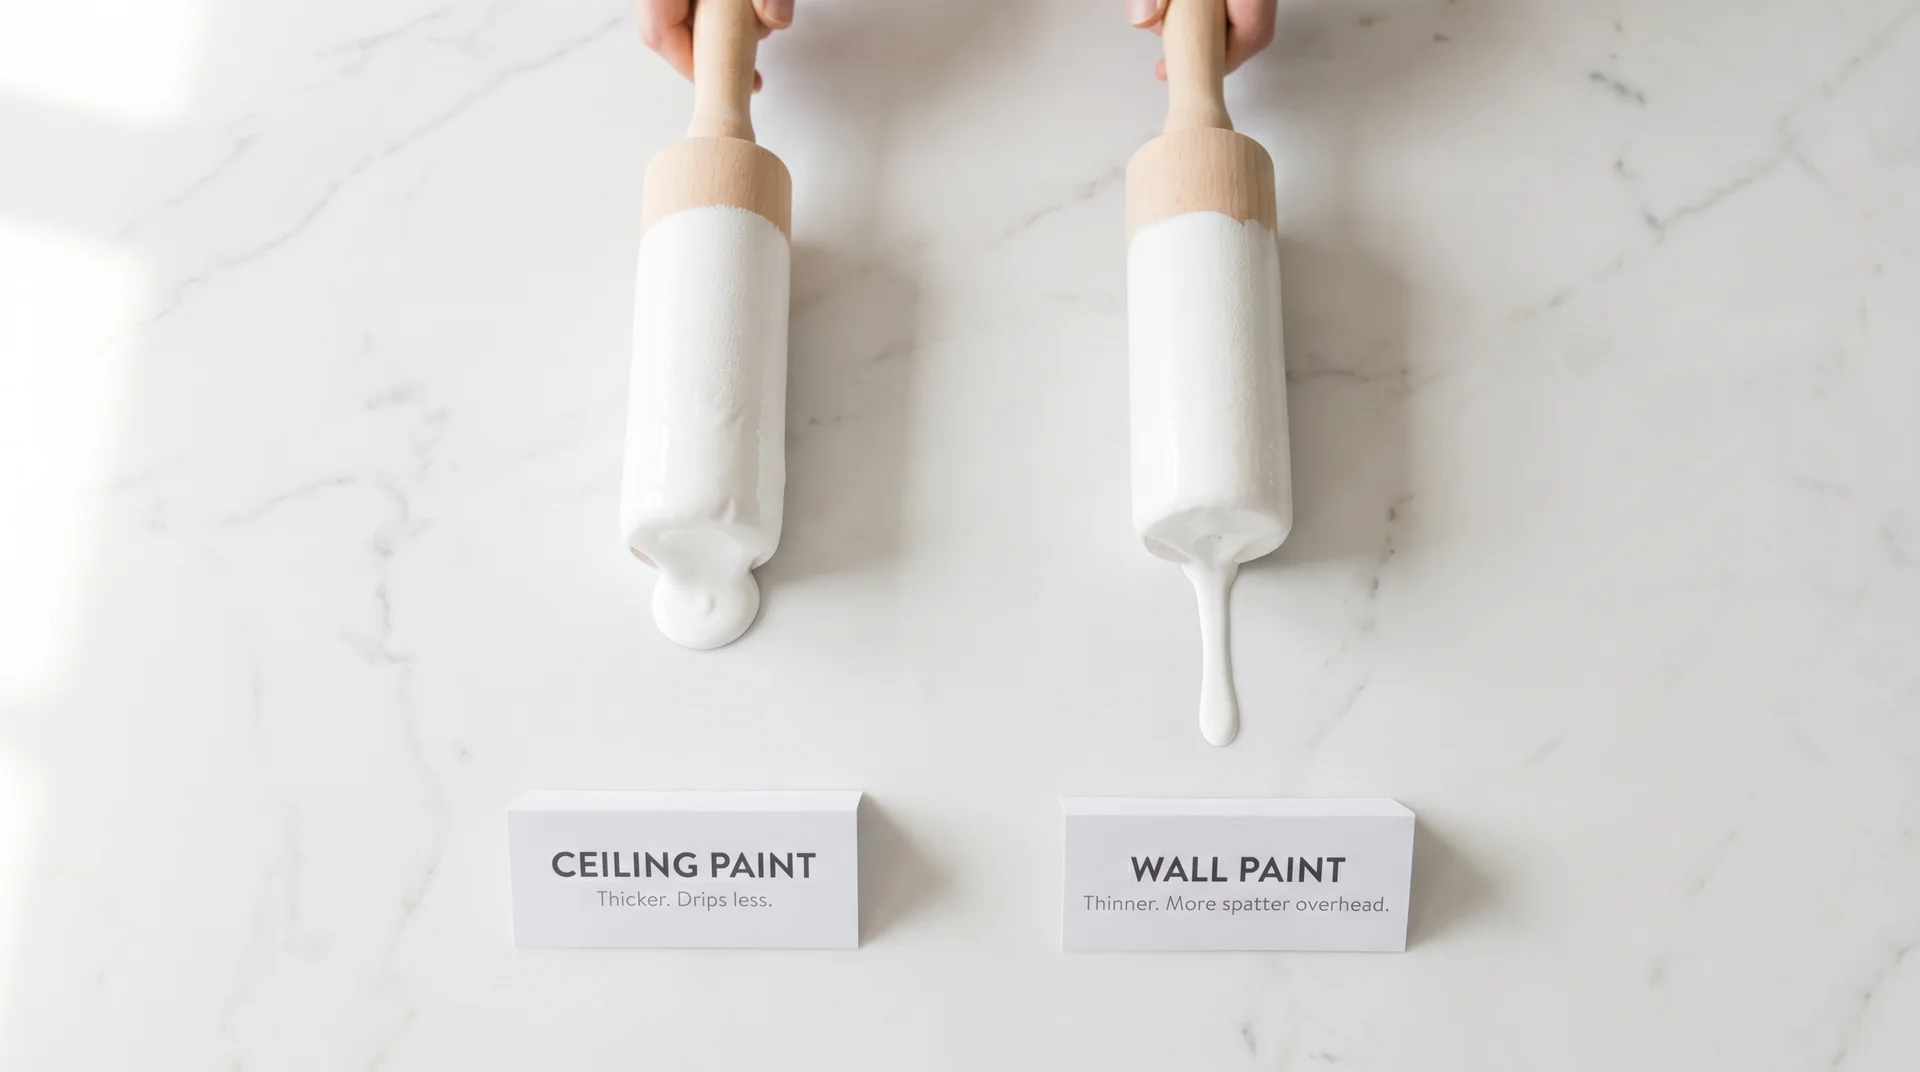
Yes. The differences are real, and they affect the finished result. Ceiling paint is thicker, spatters less when applied overhead, and holds to the surface with less dripping. It uses a flatter sheen because light hitting a ceiling from multiple angles will expose any reflectivity, and reflectivity on a ceiling reads as imperfection. It also delivers better one-coat hide than flat wall paint because it carries more filler pigment relative to resin.
The trade-off: ceiling paint is not washable, comes in a limited color range, and doesn’t work well as a substitute for wall paint in high-traffic areas. Using flat wall paint on a ceiling works for a same-color refresh, but expect more spatter and a higher risk of lap marks in rooms with strong natural light.
One rule worth knowing: never use ceiling paint on crown molding, even though it sits at the ceiling plane. Molding needs a semi-gloss or gloss finish for durability and a clean brush line. Use dedicated trim paint there, regardless of where the molding sits in the room.
If you want to know more in detail about pros and cons of keeping ceiling and wall paint similar, I have discussed it at length in this blog.
What to Look for in Ceiling Paint Before You Buy
Volume solids content is the percentage of the can’s contents that stays on the surface after the water carrier evaporates. Premium ceiling paints run 35 to 45% volume solids. Budget formulas can drop to 25%. More solids means better one-coat coverage, less dripping, and a more durable film. If a can feels unusually light for its size, that’s often a signal of a low-solids formula.
Self-priming claims vary significantly between products. Some premium ceiling paints are genuinely self-priming on clean, unstained drywall. Others use “paint and primer in one” as a label shorthand for a thicker formula that still requires separate priming on bare or stained surfaces. Read the product data sheet, not just the front label, to confirm what the self-priming claim actually covers in practice.
Zero-VOC or low-VOC formulas matter most in enclosed rooms with limited ventilation, and for households with children, pregnant family members, or anyone with respiratory sensitivities. Most major ceiling paint lines now offer zero-VOC versions with no meaningful performance trade-off.
On cost: expect to pay $25 to $45 per gallon for a premium ceiling paint from Benjamin Moore or Sherwin-Williams. Budget options at Lowe’s or Home Depot run $20 to $30 per gallon. Professional application for a standard room typically costs $200 to $400, depending on ceiling condition and the amount of prep work required.
Flat vs. Eggshell vs. Satin: Choosing the Best Ceiling Paint Finish
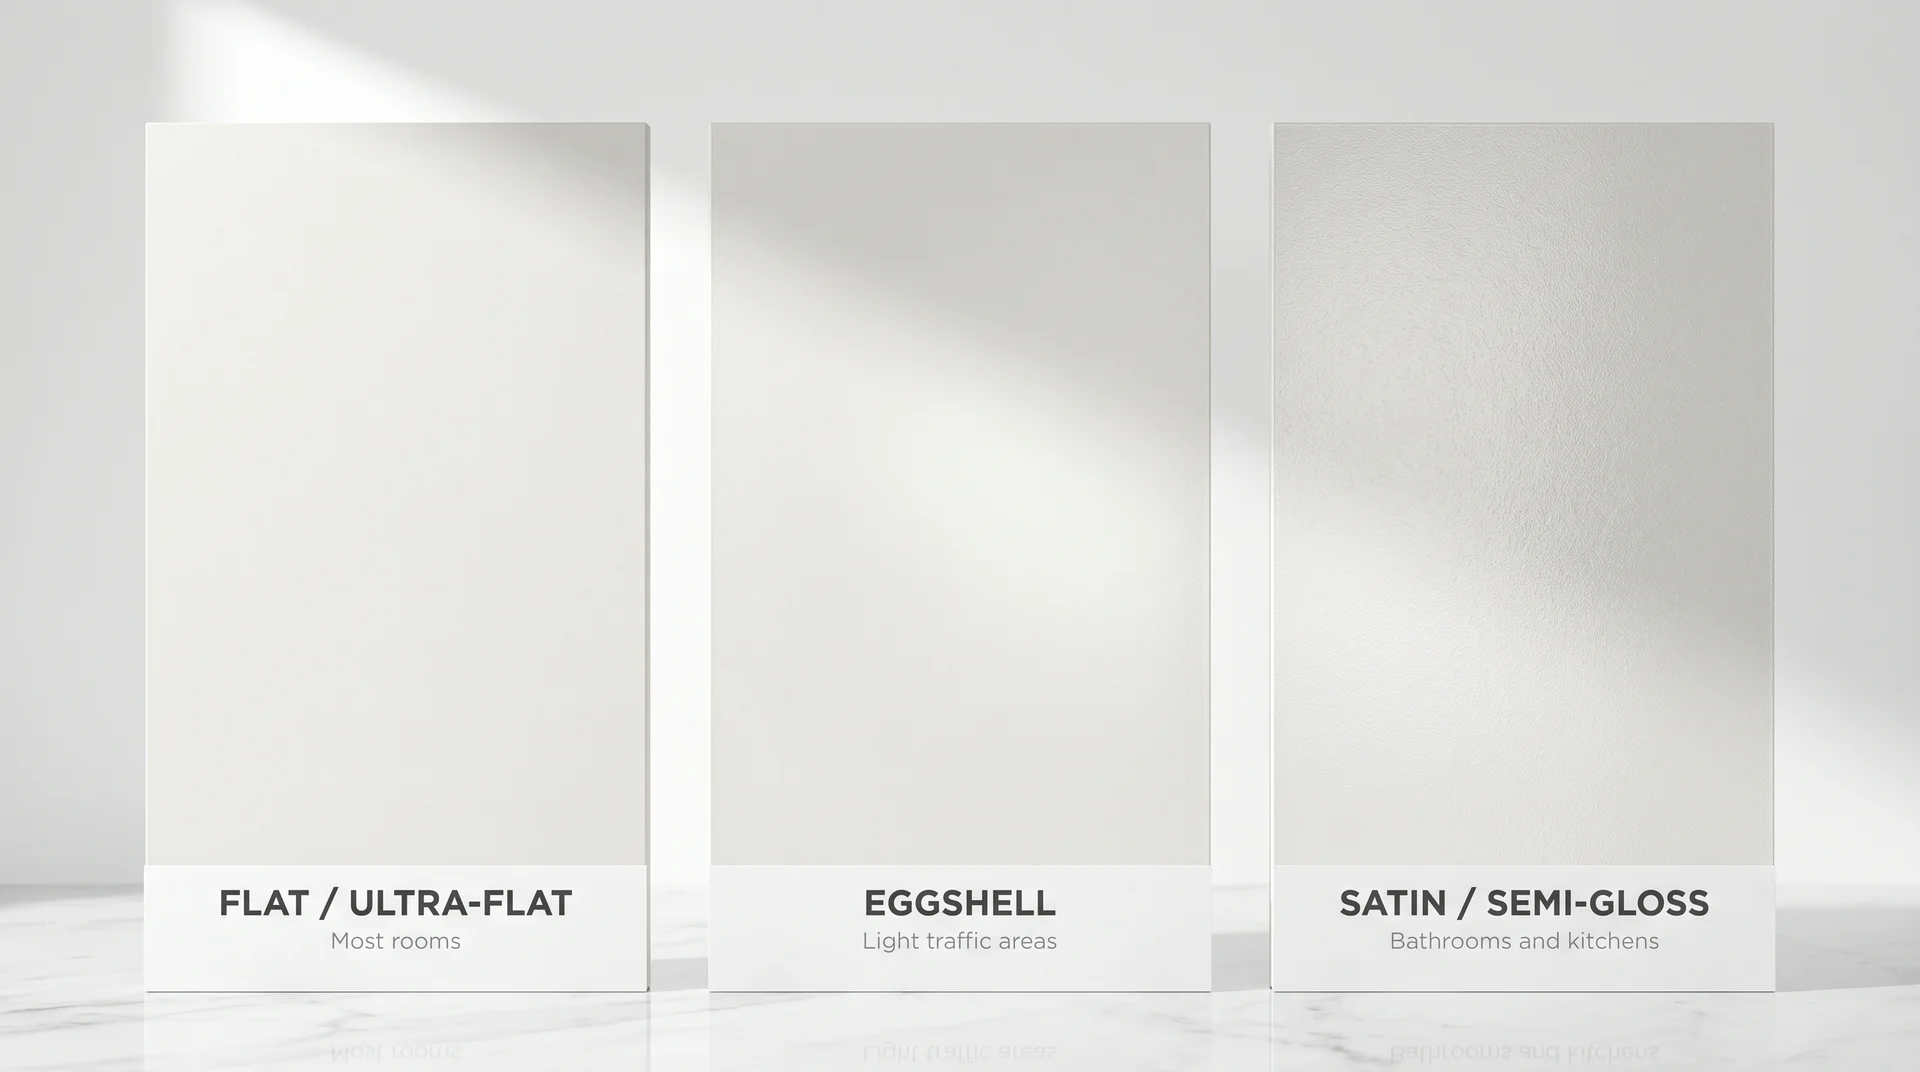
Flat or ultra-flat is the correct finish for most residential ceilings. It doesn’t reflect overhead light, hides texture and roller marks, and gives the ceiling a visual “receding” quality that makes it read as farther away from the eye. This is why designers default to flat white on ceilings in standard-height rooms. Sheen draws the eye toward a surface. Flat finish pushes it away.
Eggshell is occasionally appropriate on wood-plank ceilings where some durability is needed. It’s more washable than flat but picks up light differently and shows surface imperfections more readily, so surface preparation needs to be more thorough.
Satin or semi-gloss is the right finish for bathroom and kitchen ceilings. The higher sheen creates a moisture-resistant film that flat paints simply cannot match. In high-humidity environments, flat ceiling paint absorbs moisture into the film, weakens the bond with the surface, and begins to delaminate. Satin is the minimum for a bathroom with an enclosed shower. Semi-gloss is the stronger call for a smaller, poorly ventilated bathroom.
When You Need Primer Before Painting Your Ceiling (And When You Can Skip It)
- New drywall: always prime first. Bare drywall is porous and absorbs paint unevenly, regardless of how many topcoats you apply. A drywall primer seals the surface and creates a uniform base.
- Water stains: oil-based primer, not latex. Latex primer does not reliably block water stains. Use Zinsser Bulls Eye 1-2-3 or Kilz Original, let it cure fully, then paint over it.
- Smoke or nicotine stains: shellac-based primer only. Zinsser BIN Shellac-Base Primer is the professional standard here. It blocks odor as well as staining. Use it with adequate ventilation.
- White over white, clean surface, no staining: skip the separate primer step. A quality self-priming ceiling paint like Benjamin Moore Waterborne Ceiling Paint handles this reliably on previously painted, unstained surfaces.
- Significant color change: Use a tinted primer. Ask the paint store to tint a gray primer close to your final color. It reduces the number of topcoats required and improves color depth in the finished result.
The Best Ceiling Paint by Room: A Quick-Reference Guide
| Situation | Best Pick | Budget Pick | Finish |
|---|---|---|---|
| Living room / Bedroom | Benjamin Moore Waterborne Ceiling Paint | HGTV Home by Sherwin-Williams Flat White | Ultra-flat |
| Bathroom with shower | Benjamin Moore Aura Bath and Spa | Zinsser Perma-White | Satin / Semi-gloss |
| Kitchen | Sherwin-Williams Duration Home (satin) | Valspar Ultra Flat (eggshell) | Eggshell / Satin |
| Water stains | Zinsser Ceiling Paint and Primer in One | Kilz Original (primer) + flat topcoat | Flat |
| Popcorn / Textured | Valspar Color-Changing Ceiling Paint | Any flat acrylic latex | Flat |
| General / Budget | Valspar Ultra Flat Ceiling Paint | HGTV Home by Sherwin-Williams | Flat |
Best Ceiling Paint for Living Rooms and Bedrooms
Benjamin Moore Waterborne Ceiling Paint Ultra Flat is the benchmark product for standard residential ceilings. It has an ultra-flat finish, covers in one coat on previously painted surfaces, and has a longer open time than most competitors.
That open time is the feature that prevents lap marks. It’s water-based, zero-VOC, and available in the full Benjamin Moore color range. Coverage runs approximately 400 to 450 square feet per gallon on smooth drywall.
For budget jobs, the HGTV Home by Sherwin-Williams Flat White Ceiling Paint and Primer performs well on clean, previously painted ceilings with no staining and costs roughly half the price.
Best Ceiling Paint for Bathrooms
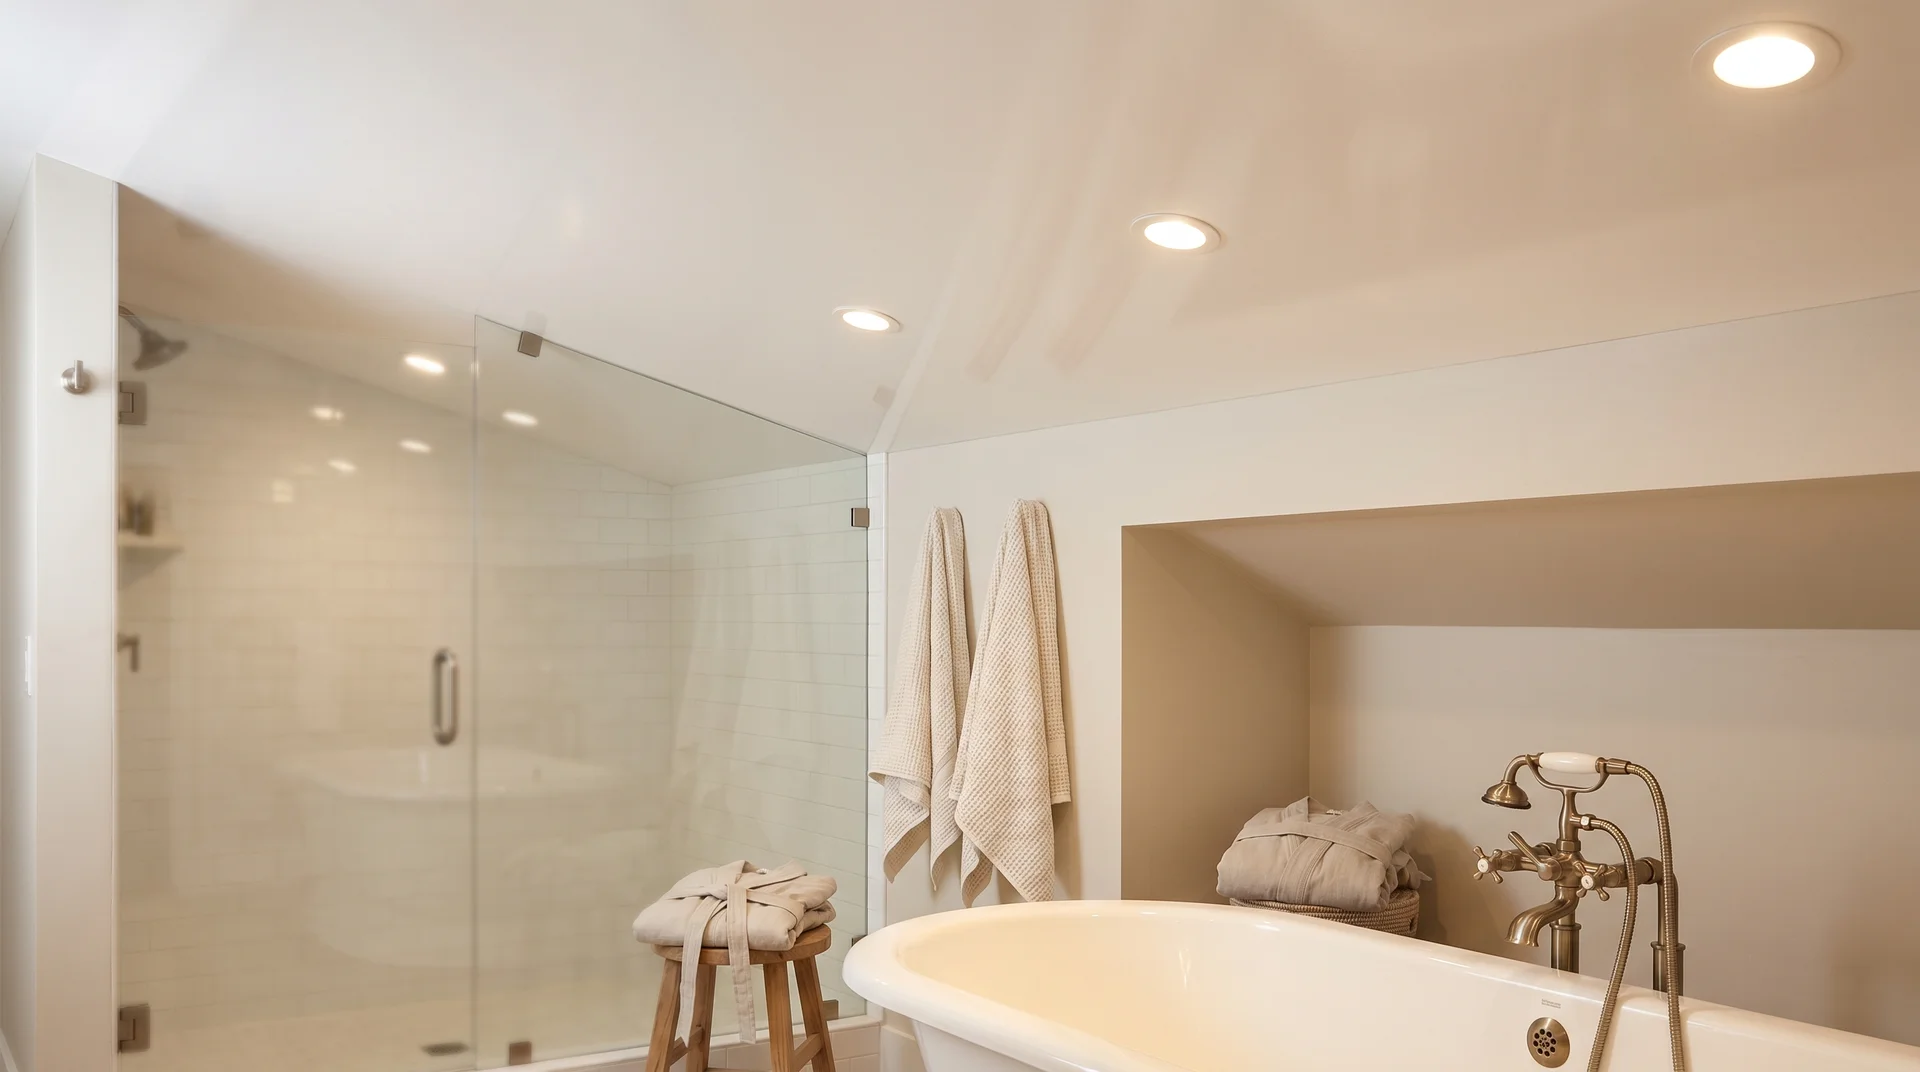
Steam from hot showers condenses on the ceiling, pushes moisture into a flat paint film, weakens the bond with the surface, and the paint begins to delaminate. Flat ceiling paint is not appropriate for an enclosed bathroom with regular shower use, regardless of brand or price.
Benjamin Moore Aura Bath and Spa is the best ceiling paint for bathrooms with active showers. It’s formulated for high-humidity environments, holds its color through repeated moisture exposure, and is the only flat-finish paint on the market that can be scrubbed.
Zinsser Perma-White is the more affordable alternative, with antimicrobial additives and a five-year mold and mildew resistance guarantee. For a bathroom with minimal shower use, a standard satin-finish latex is sufficient.
Best Ceiling Paint for Kitchens
Kitchen ceilings collect grease vapor and cooking steam, so washability is non-negotiable. Ultra-flat formulas don’t belong in kitchens. Sherwin-Williams Duration Home Interior Acrylic Latex in satin offers strong stain resistance and moisture handling for high-use cooking environments. Benjamin Moore Waterborne Ceiling Paint in an eggshell finish works well for lighter-use kitchens.
On color: kitchen ceilings read better with a warmer white than the stark bright whites that work well in living rooms. The yellow-toned light from most overhead kitchen fixtures makes a cool or blue-tinted white read gray and flat. Benjamin Moore White Dove or Chantilly Lace reads cleaner and brighter under that light source.
Best Ceiling Paint to Cover Water Stains
No ceiling paint will permanently cover a water stain without an oil-based or shellac-based primer underneath. This has no exception.
Fix the source of moisture first, allow the area to dry for a minimum of 48 hours, apply Zinsser Bulls Eye 1-2-3 or Kilz Original to the stained area and a few inches beyond its edges, let it cure completely, then apply two coats of ceiling paint. Applying topcoat before the primer is fully cured traps solvents in the film and produces a soft, adhesion-prone finish.
For ceilings with widespread staining, Zinsser Ceiling Paint and Primer in One is useful because it applies visibly pink, confirming coverage as you go, and dries to a flat, bright white.
It blocks water stains in a single coat on most previously painted surfaces. Coverage runs 250 to 400 square feet per gallon, depending on surface porosity.
Best Ceiling Paint for Popcorn and Textured Ceilings
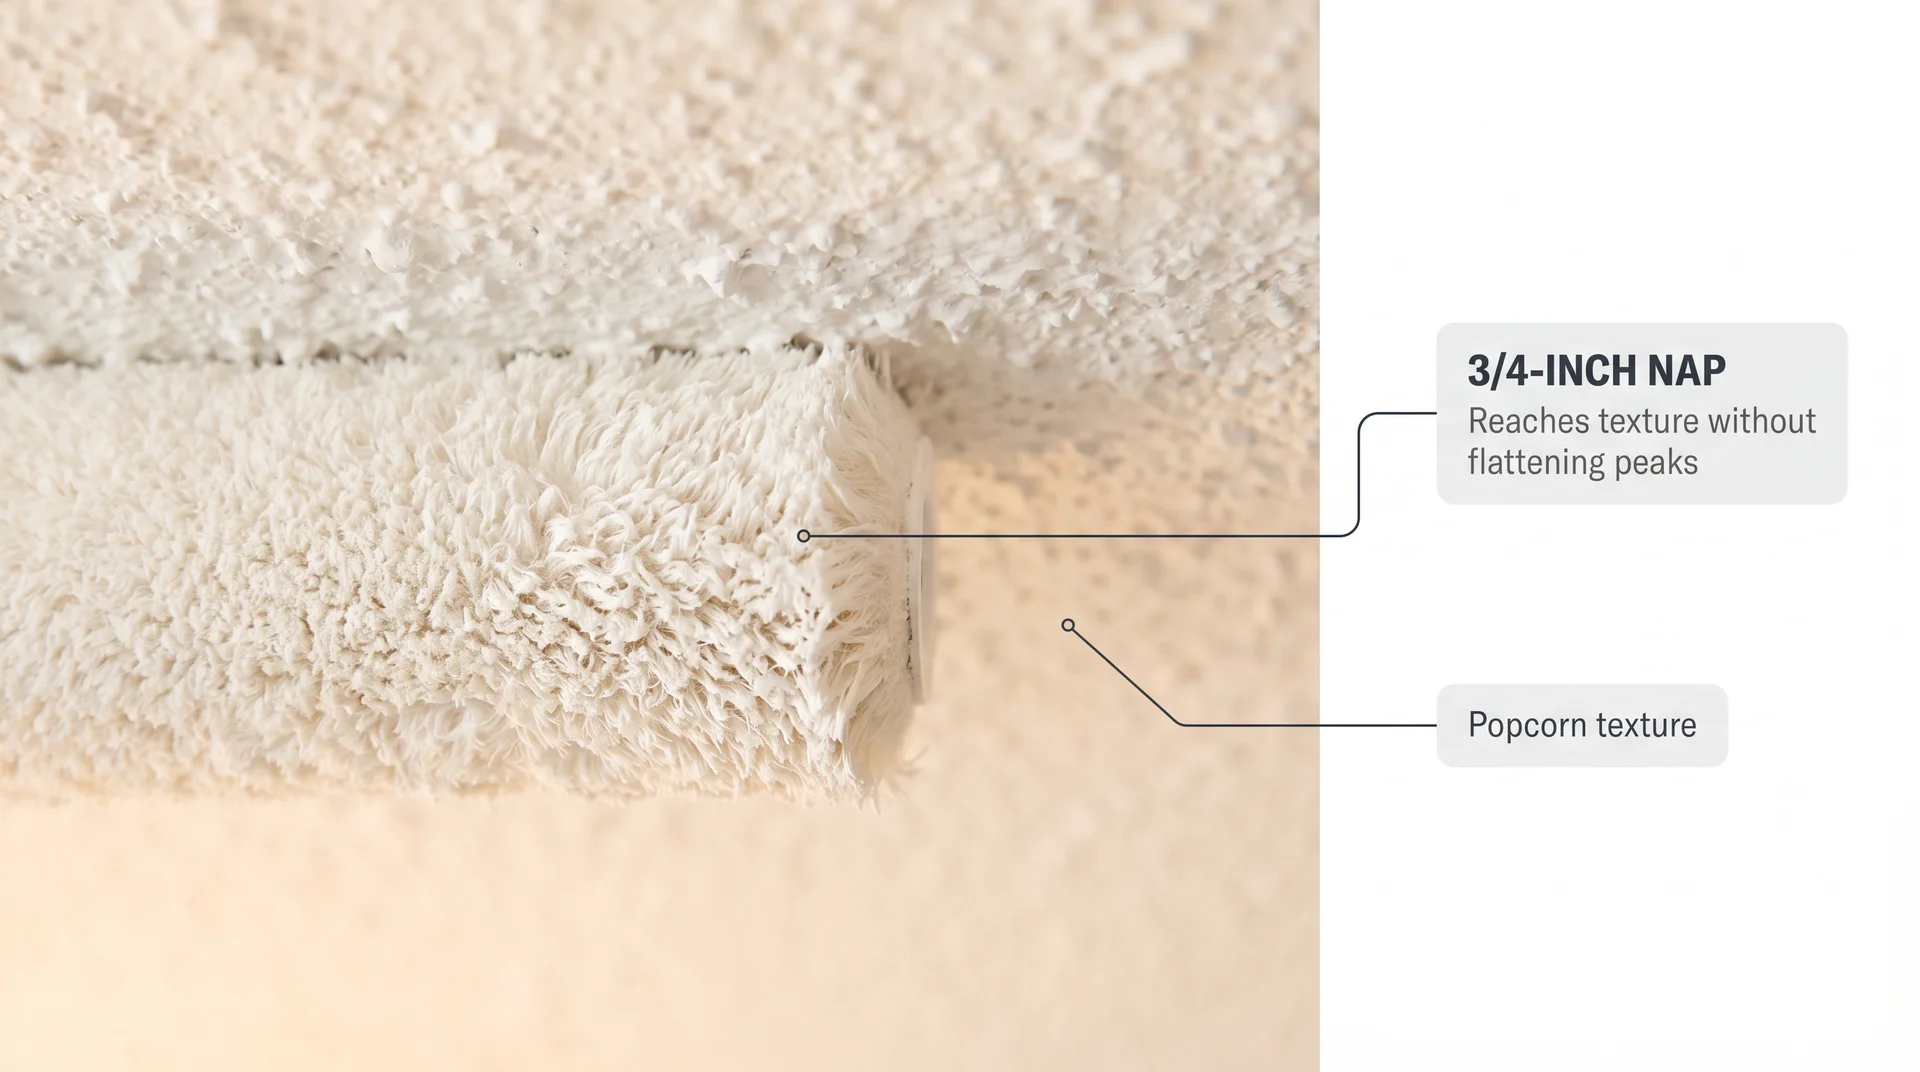
Interior acrylic latex in a flat finish is the standard recommendation for textured ceilings. The texture is highly absorbent, so plan to use significantly more paint than the label’s coverage estimate suggests. Use a roller with a 1/2 to 3/4 inch nap to reach into the texture without flattening the peaks. Keep roller pressure light. Aggressive pressure on wet paint pulls the texture material off the ceiling.
If your home was built before 1980, have the ceiling tested for asbestos before painting or disturbing the texture in any way. Popcorn texture applied before the late 1970s commonly contained asbestos fibers. Painting over an undisturbed texture is safe. Sanding, scraping, or removing it without professional testing is not a safe DIY project.
For unpainted popcorn ceilings: apply Zinsser Gardz Problem Surface Sealer first. Unprimed popcorn texture absorbs water-based paint rapidly, softens, and can crumble on contact with the roller. The sealer stabilizes the surface before any topcoat goes on.
Valspar Color-Changing Ceiling Paint is worth calling out for textured surfaces specifically. It applies visibly pink and dries to a flat bright white, making it easy to see where you’ve rolled and where you’ve missed. On an uneven textured surface where coverage gaps are harder to spot in real time, that’s a practical advantage rather than a novelty feature.
What Flat White Is Actually Doing in Your Room?
The ceiling is the only surface in your home that nobody touches, leans on, or spills coffee on, and somehow it’s the last thing anyone puts real thought into. Most people default to white without knowing why, and when the result looks right, they chalk it up to ceilings just being white. It’s doing far more than that.
A flat white ceiling does three specific things: it reflects light across the room without creating glare, it creates a visual plane that recedes away from the eye, and it provides a neutral top to any wall color without introducing a competing tonal variable.
Ceilings catch the color reflected from walls and floors. In a room with warm wood floors and terracotta walls, even a “pure white” ceiling will read slightly warm. Choosing a cool white in that same room creates a tension that reads as an error without anyone being able to name it.
Getting the Ceiling White Right: Undertones and Lighting
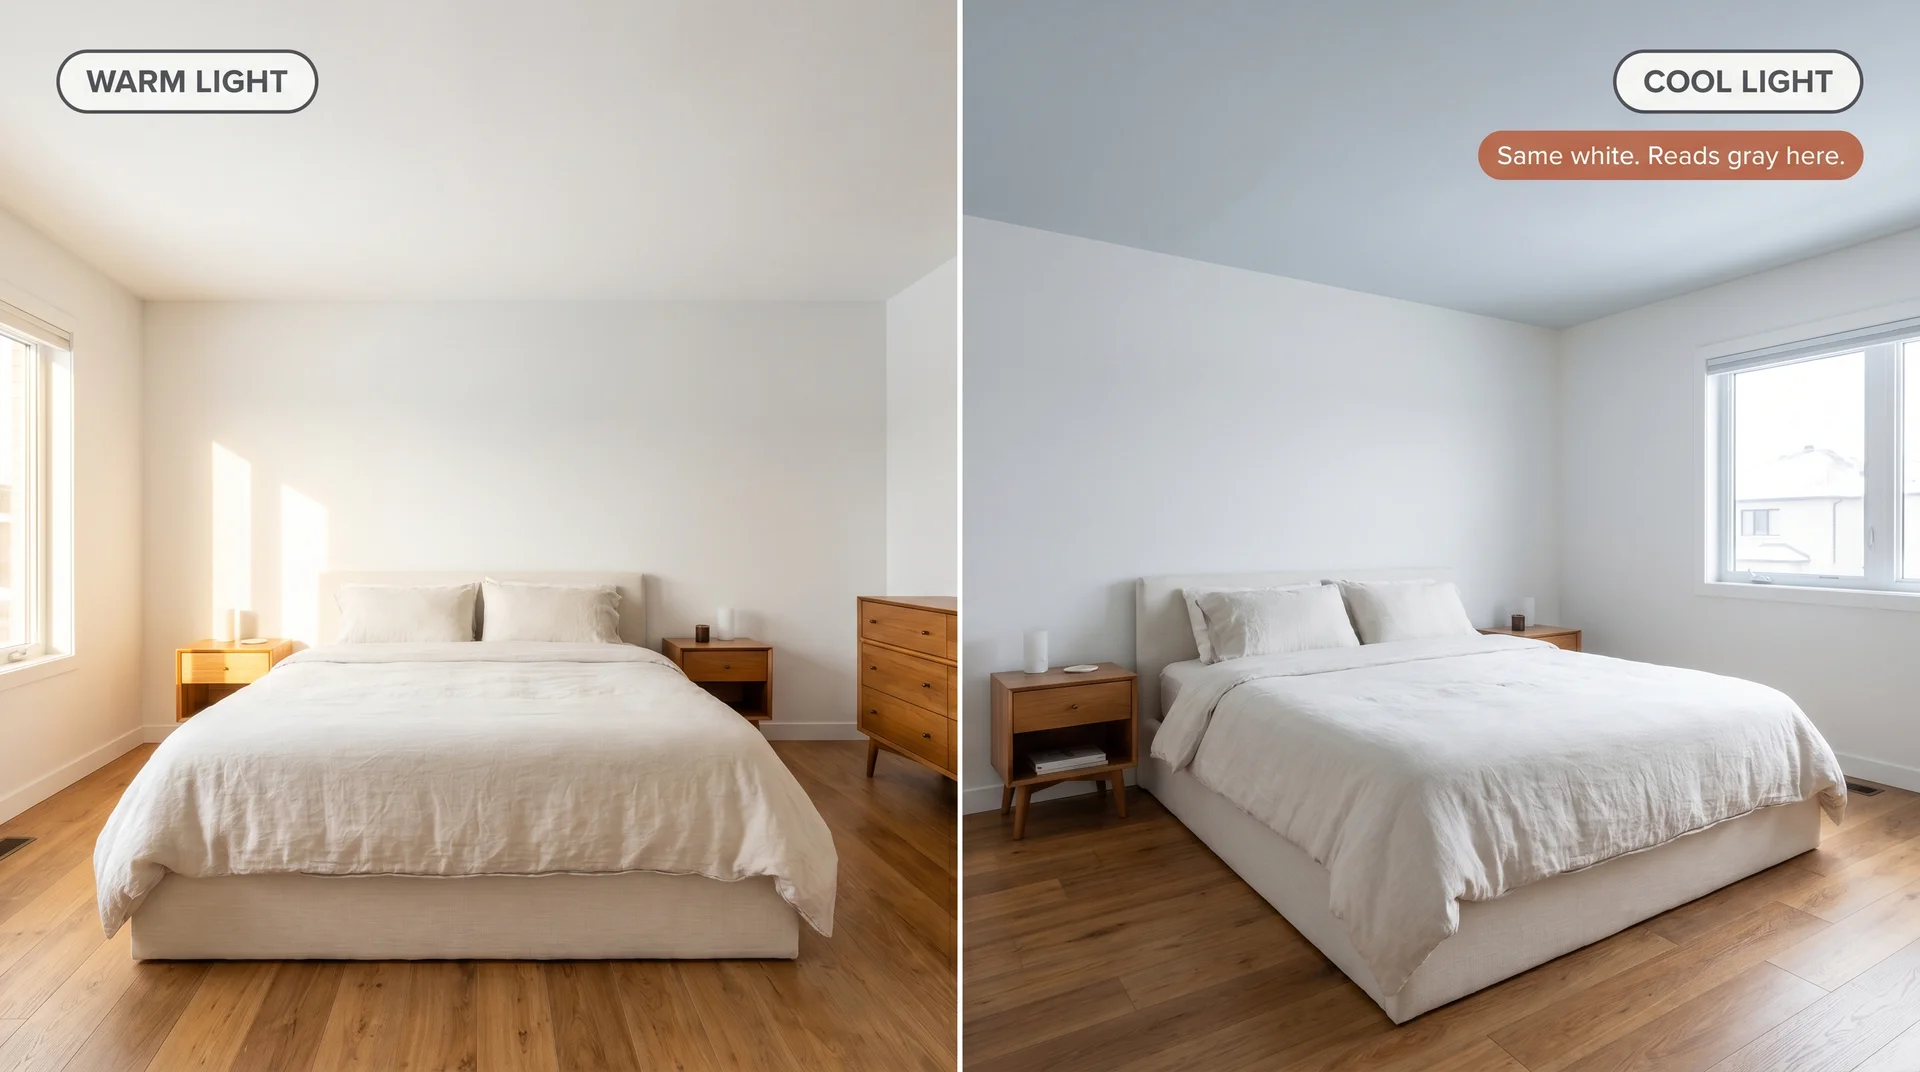
The most common complaint after a fresh ceiling job is that it looks gray, slightly blue, or just flat rather than white. In most cases, this isn’t a product quality issue. It’s an undertone mismatch with the wall color or the dominant light source in the room.
Rooms with south or west-facing windows can handle cooler whites on the ceiling because warm afternoon light neutralizes the blue undertone.
North- facing rooms need a warmer white or the ceiling reads cold and dim, regardless of paint quality. Test ceiling whites on a large piece of cardboard held horizontally against the ceiling, under your actual lighting conditions, not vertically on a wall, where the angle changes the color reading entirely.
Benjamin Moore Chantilly Lace is a clean, bright white with minimal undertone that works across most lighting conditions. Benjamin Moore White Dove carries a subtle warmth that reads well in north-facing rooms. Sherwin-Williams Extra White is crisper and slightly cooler, a strong choice in rooms with warm-toned walls where you want the ceiling to read as visually distinct.
When to Paint Your Ceiling a Color?

A ceiling painted lighter than the walls reads higher. A ceiling painted darker reads lower and more intimate. In rooms with ceilings above ten feet, where the proportions can feel cavernous, painting the ceiling one to two shades deeper than the wall color brings the room into better visual scale.
In rooms with exposed beams or architectural ceiling detail, a deeper ceiling color draws the eye upward and reads as an intentional design decision rather than an accident.
Colors that translate well to ceilings: soft sage, pale terracotta, dusty blue, and deep navy in rooms where drama is appropriate. Colors that tend to fail: saturated brights, anything with a strong green cast under standard lighting, and high-LRV yellows, which cast a warm, unflattering reflection onto every surface and face below them.
When painting a deep or saturated color on a ceiling, use a tinted primer in a dark base first. You’ll need at least two topcoats, and the tinted primer cuts down the count significantly while improving color depth.
How Many Coats of Ceiling Paint Do You Actually Need?
- One coat is legitimate only when you’re applying white paint over a white ceiling in good condition, using a premium self-priming ceiling paint, on a surface with no staining or color change. All conditions must be true. In any other scenario, one coat will show thin spots under raking natural light.
- Two coats are the reliable standard for most color refreshes, previously painted ceilings with minor imperfections, and all textured ceilings where single-pass coverage is harder to achieve.
- Three coats are necessary for significant color changes, heavily stained surfaces that have been primed, and textured ceilings with deep relief. The third coat is a finishing topcoat, not a substitute for correct priming.
Wait a minimum of two to four hours between coats of latex ceiling paint under normal temperature and humidity conditions. In high humidity or summer conditions, extend that to four to six hours. Applying a second coat over an insufficiently dry first coat creates adhesion failure and a finish that peels early. The wait time costs nothing.
If lap marks from a previous job are already dried into the ceiling, lightly sand the affected areas with a fine-grit sanding sponge, prime those sections, and repaint. For future coats, rolling in one consistent direction across the entire ceiling reduces lapping significantly.
Ceiling Painting Mistakes Worth Knowing Before You Start
Always paint the ceiling before the walls. Rolling overhead generates a fine mist that settles on everything below. If the walls are already painted, you’re protecting finished work from unavoidable contamination. Paint the ceiling first, then paint the walls, and cover any ceiling drips in the process.
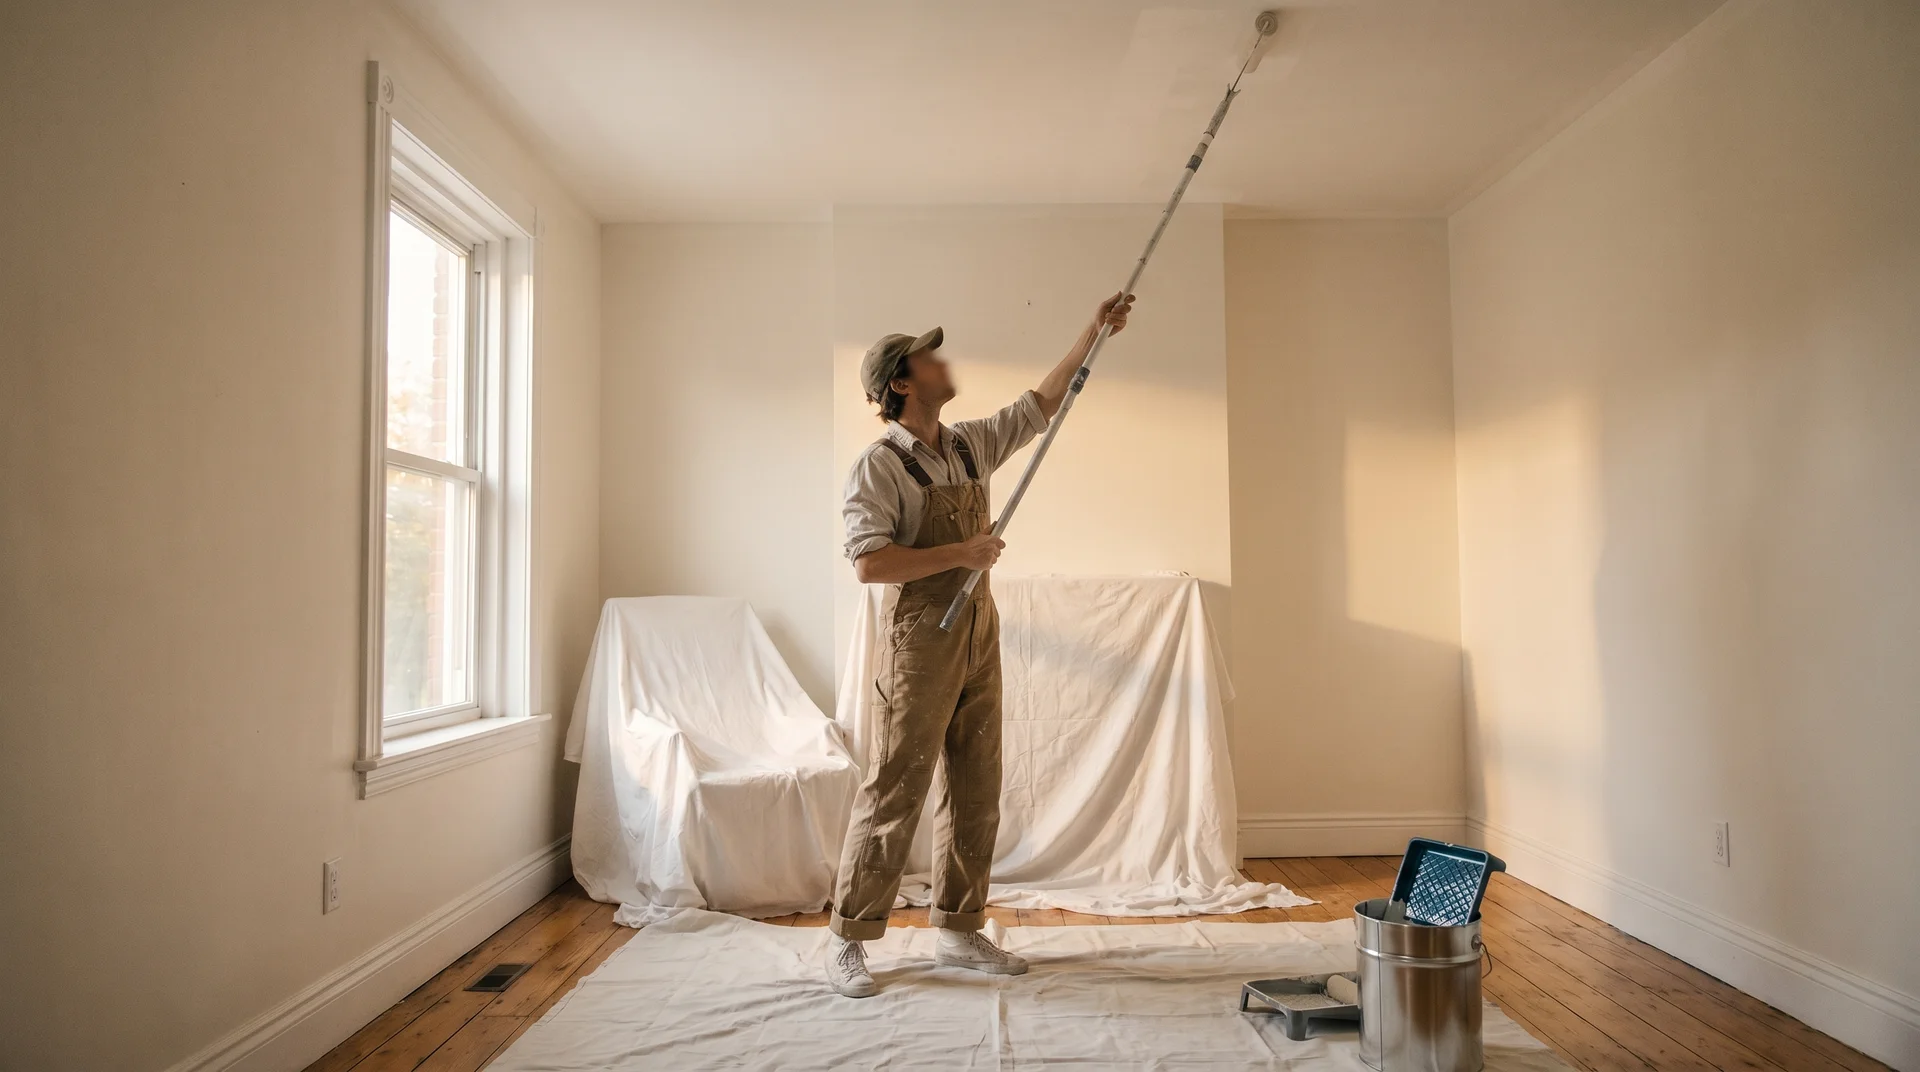
Use an extension pole. This appears in almost every professional guide for a reason. Painting a ceiling from a ladder puts your neck at an angle that becomes uncomfortable within minutes and leads to rushed, uneven passes. An extension pole lets you work from the floor, maintain consistent pressure across the ceiling, and cover more area without losing control of the roller. For standard ceiling heights, a four to six-foot extension pole works for most people.
Overloading the roller is the most common application mistake. Too much paint drips, creates runs at the ceiling edges, and produces a thick, uneven film that dries with visible texture. Load the roller until it’s evenly saturated but not dripping when held horizontally. A bucket with a roller grid controls loading more precisely than a standard paint tray.
Roll in slow, overlapping passes using a W pattern and work in three-foot sections while maintaining a wet edge. Fast, wide sweeps generate spatter and produce an uneven film that dries inconsistently.
Wrong roller nap thickness is more common than most people expect. Smooth drywall ceilings need a 3/8 inch nap. Lightly textured surfaces need a 1/2 inch nap. Heavy texture, like popcorn, needs a 3/4 inch nap. A nap that’s too thin on a textured ceiling produces skips that dry as light- catching thin patches.
Budget roller covers shed lint into wet paint, producing a finish that feels rough when dry and requires sanding before repainting. A quality wool-blend roller cover lasts for multiple projects and costs a few dollars more. That’s a result purchase.
Painting in poor light leads to missed sections that only show up after everything dries. Use a work light or position a floor lamp to cast raking light across the ceiling during application. It picks up thin spots and roller texture in real time, while you can still correct them.
Frequently Asked Questions About Ceiling Paint
Is ceiling paint different from regular wall paint?
Yes. Ceiling paint is thicker, has a flatter finish, applies with less spatter overhead, and has a longer open time that prevents lap marks. Wall paint is thinner, available in a wider range of finishes and colors, and more washable. Using them interchangeably produces noticeably worse results than using the right product for the right surface.
Can I use ceiling paint on walls?
Technically yes, but it’s not recommended for most walls. Ceiling paint comes in limited colors and finishes, is not designed to be scrubbed, and costs more per square foot than standard flat wall paint. It can work on very low-traffic walls, but it shouldn’t replace wall paint in kitchens, bathrooms, or high-traffic hallways.
What is the best ceiling paint for a bathroom?
Benjamin Moore Aura Bath and Spa is the best option for bathrooms with active shower use. Zinsser Perma-White is a reliable, more affordable alternative. For bathrooms with minimal moisture exposure, a standard satin- finish latex ceiling paint is sufficient. Flat ceiling paint should not be used in a bathroom with an enclosed shower.
Do I need to prime before painting a ceiling?
New drywall, water-stained ceilings, smoke-damaged ceilings, and surfaces requiring a significant color change all require primer before topcoat. A clean, previously painted ceiling in the same color can use a self-priming ceiling paint without a separate primer step.
How often should a ceiling be repainted?
Most residential ceilings last seven to ten years before visible aging, yellowing, or degradation sets in. Bathroom and kitchen ceilings may need attention sooner due to moisture and grease exposure. A ceiling with water staining should be addressed as soon as the moisture source is repaired, regardless of how old the existing paint is.
What finish should a ceiling have?
Flat or ultra-flat for most rooms. Satin or semi-gloss for bathrooms and kitchens. High-gloss should be avoided on ceilings. It picks up every surface imperfection under overhead lighting.
Can I paint a popcorn ceiling without removing it?
Yes, and for most homeowners, this is the better option. Painting over an intact popcorn ceiling is safe, inexpensive, and achieves a fresh result without the mess or hazard risk of removal. In homes built before 1980, removal carries potential asbestos exposure risk. Have the ceiling tested before any removal work. Painting over it is a clean, low-risk solution that holds for five to ten years.
What is the best ceiling paint to cover water stains?
No ceiling paint reliably covers water stains without a primer underneath. Apply an oil-based stain-blocking primer like Zinsser Bulls Eye 1-2-3 or Kilz Original, let it cure completely, then apply two coats of ceiling paint. Zinsser Ceiling Paint and Primer in One handles minor staining in a single step, but oil-based primer remains the most dependable option for significant or old water discoloration.