

When I first started advising homeowners on window treatments, curtain headings were always the most overlooked decision in the entire process.
People spent weeks picking fabric and rod finishes, then rushed through the heading style. And almost every time, that rushed decision is what made the whole setup look off.
So let me give you the short answer first.
| Eyelet and grommet curtains are curtains with large, reinforced metal or plastic rings punched through the top of the fabric, allowing them to slide directly onto a curtain rod. The rings create evenly spaced, soft folds that drape beautifully and glide open and closed with almost zero effort. If you want curtains that look polished, feel modern, and work every single day without fuss, this style is one of the most reliable choices you can make. |
Whether you are buying ready-made panels, adding grommets to fabric you already love, or just trying to style your room better, this guide covers all of it.
I have walked through this process with dozens of clients across different home styles, and I want to share everything that actually matters, including the things most product pages and quick tutorials leave out.
Eyelets vs. Grommets: What Is the Actual Difference?
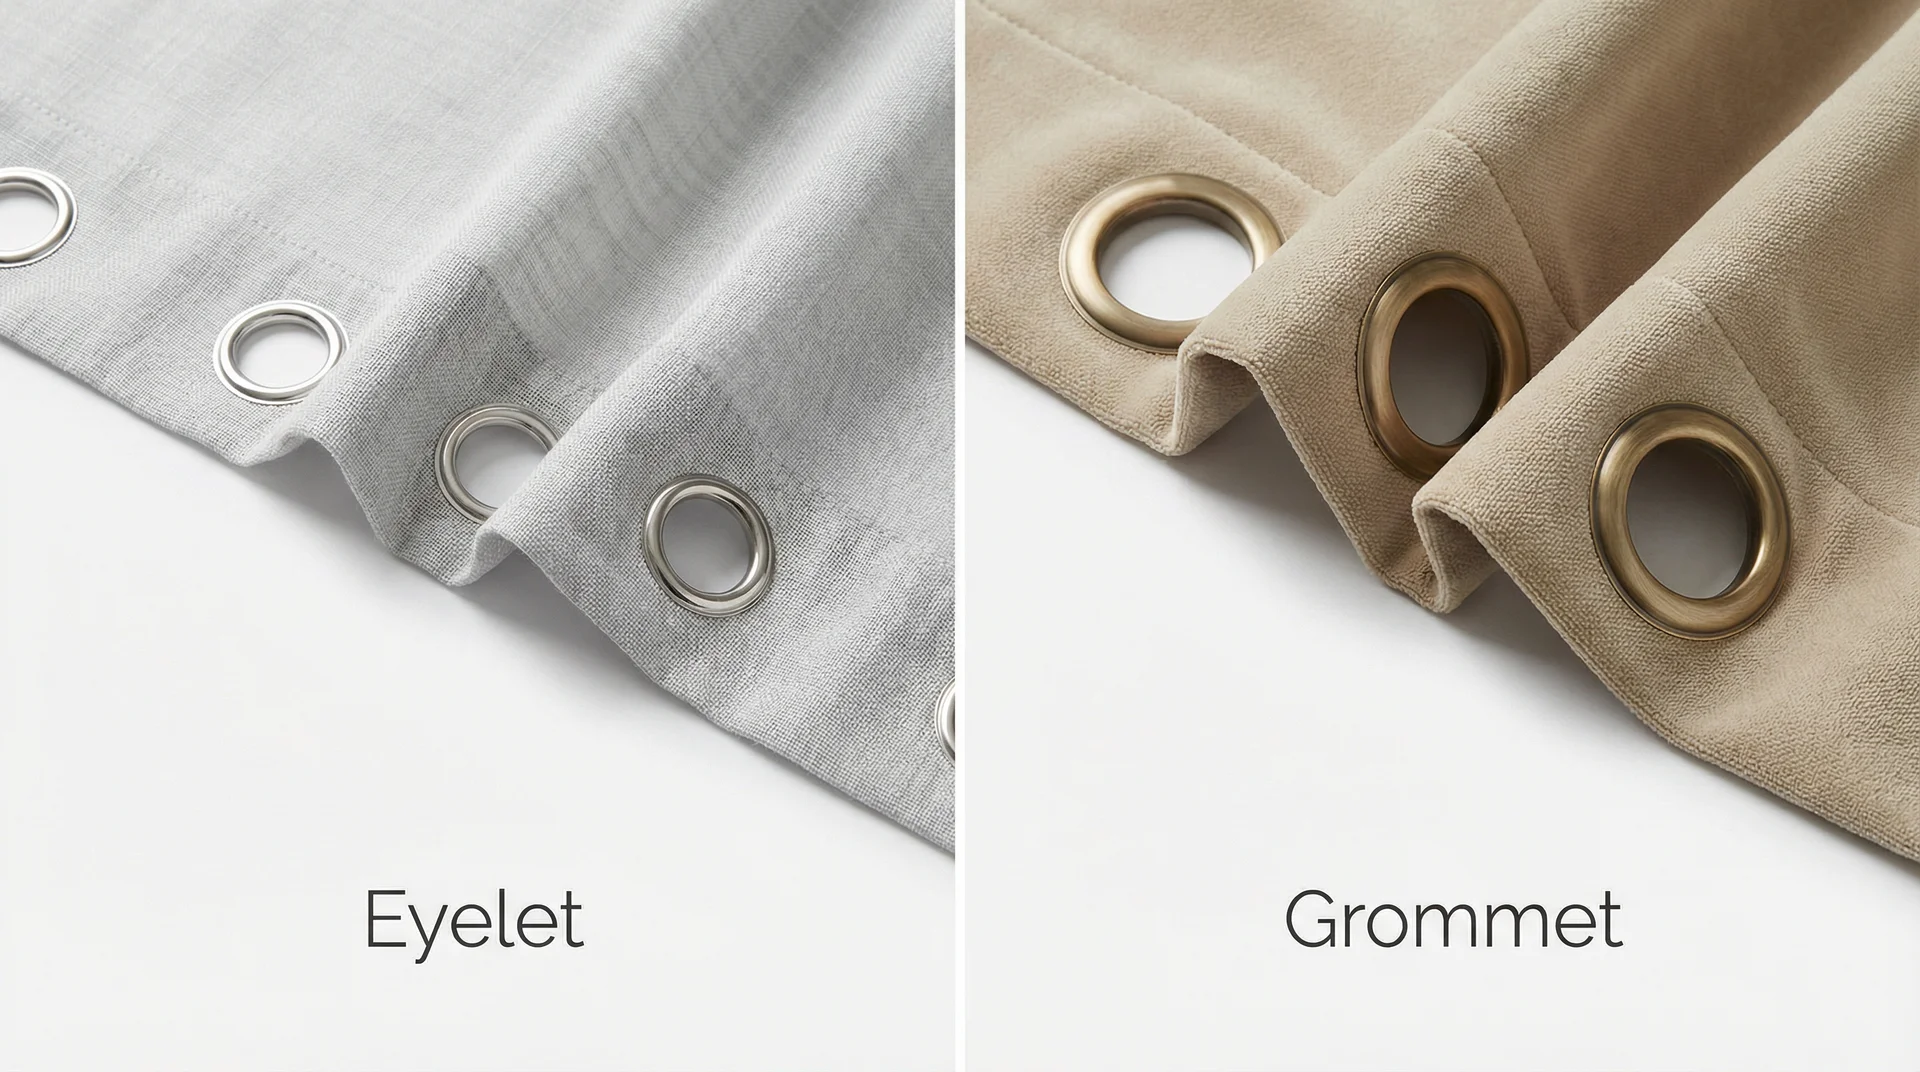
This confusion comes up constantly, even among people who have been decorating their homes for years.
What Each Term Means
An eyelet is a small, two-piece fastener made of thin metal or plastic. It consists of a ring and a washer that press together through a punched hole in fabric, keeping the opening from fraying or tearing. Eyelets come from a tailoring tradition and appear on everything from shoes to bags. In curtains, the term “eyelet curtains” typically refers to curtains with rings around 35mm to 40mm in diameter along the heading.
A grommet comes from an industrial and marine background. Grommets are generally larger, more robustly constructed, and designed for heavier fabrics. In the American home decor market, “grommet curtain” is the dominant term, and inner diameters typically range from 1.5 inches (about 38mm) to 2 inches (about 51mm).
| Feature | Eyelet | Grommet |
|---|---|---|
| Origin | Tailoring and fashion | Industrial and marine |
| Typical Inner Diameter | 25mm to 40mm | 38mm to 51mm+ |
| Common Material | Thin metal, plastic | Brass, nickel, zinc alloy |
| Where the Term Is Used | UK and Australia | USA and Canada |
| Fabric Suitability | Light to medium | Medium to heavy |
Are They the Same Thing for Curtains?
For practical home decorating purposes, yes. The ring-top curtain heading style in virtually every home furnishing store works on the same principle regardless of what the label calls it. The terminology shifts by geography. In the UK, “eyelet” dominates. In the United States, “grommet” is what most retailers and designers use.
Throughout this guide, I use both terms, and wherever a technical distinction matters, I flag it clearly.
Why Choose Eyelet and Grommet Curtains?
Every curtain heading style has its strengths. Pinch pleat curtains carry a formal elegance that grommets cannot replicate. Tab tops have a relaxed charm. But grommet and eyelet curtains have a specific set of qualities that make them genuinely versatile for modern homes.
Effortless Daily Operation
The rings sit directly on the rod with a smooth interior, so opening and closing feel almost frictionless. In rooms where you adjust curtains multiple times a day to manage afternoon light, this matters more than people realise.
I have seen homes where beautifully pleated curtains go untouched for weeks because they are simply too awkward to manage daily, and the whole point of having them is lost.
Uniform Folds That Look Intentional

When grommet curtains hang from a rod, the fabric falls into consistent, rounded folds between each ring. This creates a rhythmic visual pattern that reads as polished and considered. Unlike gathered headings that can look uneven, the folds in grommet curtains have a geometry that suits contemporary interiors especially well.
The spacing of the rings determines fold depth. Rings spaced around 4 inches apart create fuller, more pronounced folds. Rings spaced further apart create flatter panels with a more streamlined look. For most living rooms, a middle ground gives you visual interest without the curtains looking overly dramatic.
Strong Durability Over Time
The reinforced rings distribute the weight and stress of the curtain evenly across the heading, so the fabric at the top does not bear all the tension alone. This extends the life of the curtains considerably, especially in households with children or pets. I have seen the same set of grommet curtains in a client’s dining room look virtually unchanged after seven years of daily use.
Eyelet and Grommet Curtains vs. Other Heading Styles
This is one of the most searched comparisons in this category, and for good reason. Choosing the wrong heading style for your room or rod type is a genuinely common and frustrating mistake.
| Heading Style | Best For | Drawbacks | Rod Compatibility |
|---|---|---|---|
| Grommet / Eyelet | Modern, transitional, everyday use | Minor light gap at top | Standard rods, decorative rods |
| Rod Pocket | Traditional, stationary panels | Hard to open and close smoothly | Standard rods only |
| Pinch Pleat | Formal, tailored interiors | Requires hooks and track or ring clips | Tracks, rings, or specialty rods |
| Tab Top | Casual, relaxed spaces | Slow to open, wears over time | Thin decorative rods |
| Back Tab | Clean modern look | Cannot use on thick or heavy rods | Standard and slim rods |
For most families who need curtains that open and close multiple times daily, grommet and eyelet headings consistently outperform rod pocket and tab top styles in both ease of use and long-term appearance.
If you have been wondering whether grommet curtains still hold up stylistically in today’s interiors, the answer is more nuanced than a simple yes or no.
Here is an honest, designer-led breakdown of whether grommet curtains are out of style and what has actually changed about how people use them.
How to Choose the Right Eyelets and Grommets
This is where most buying decisions go wrong. Getting the specification right is what separates curtains that look professionally done from curtains that look like a well-intentioned attempt.
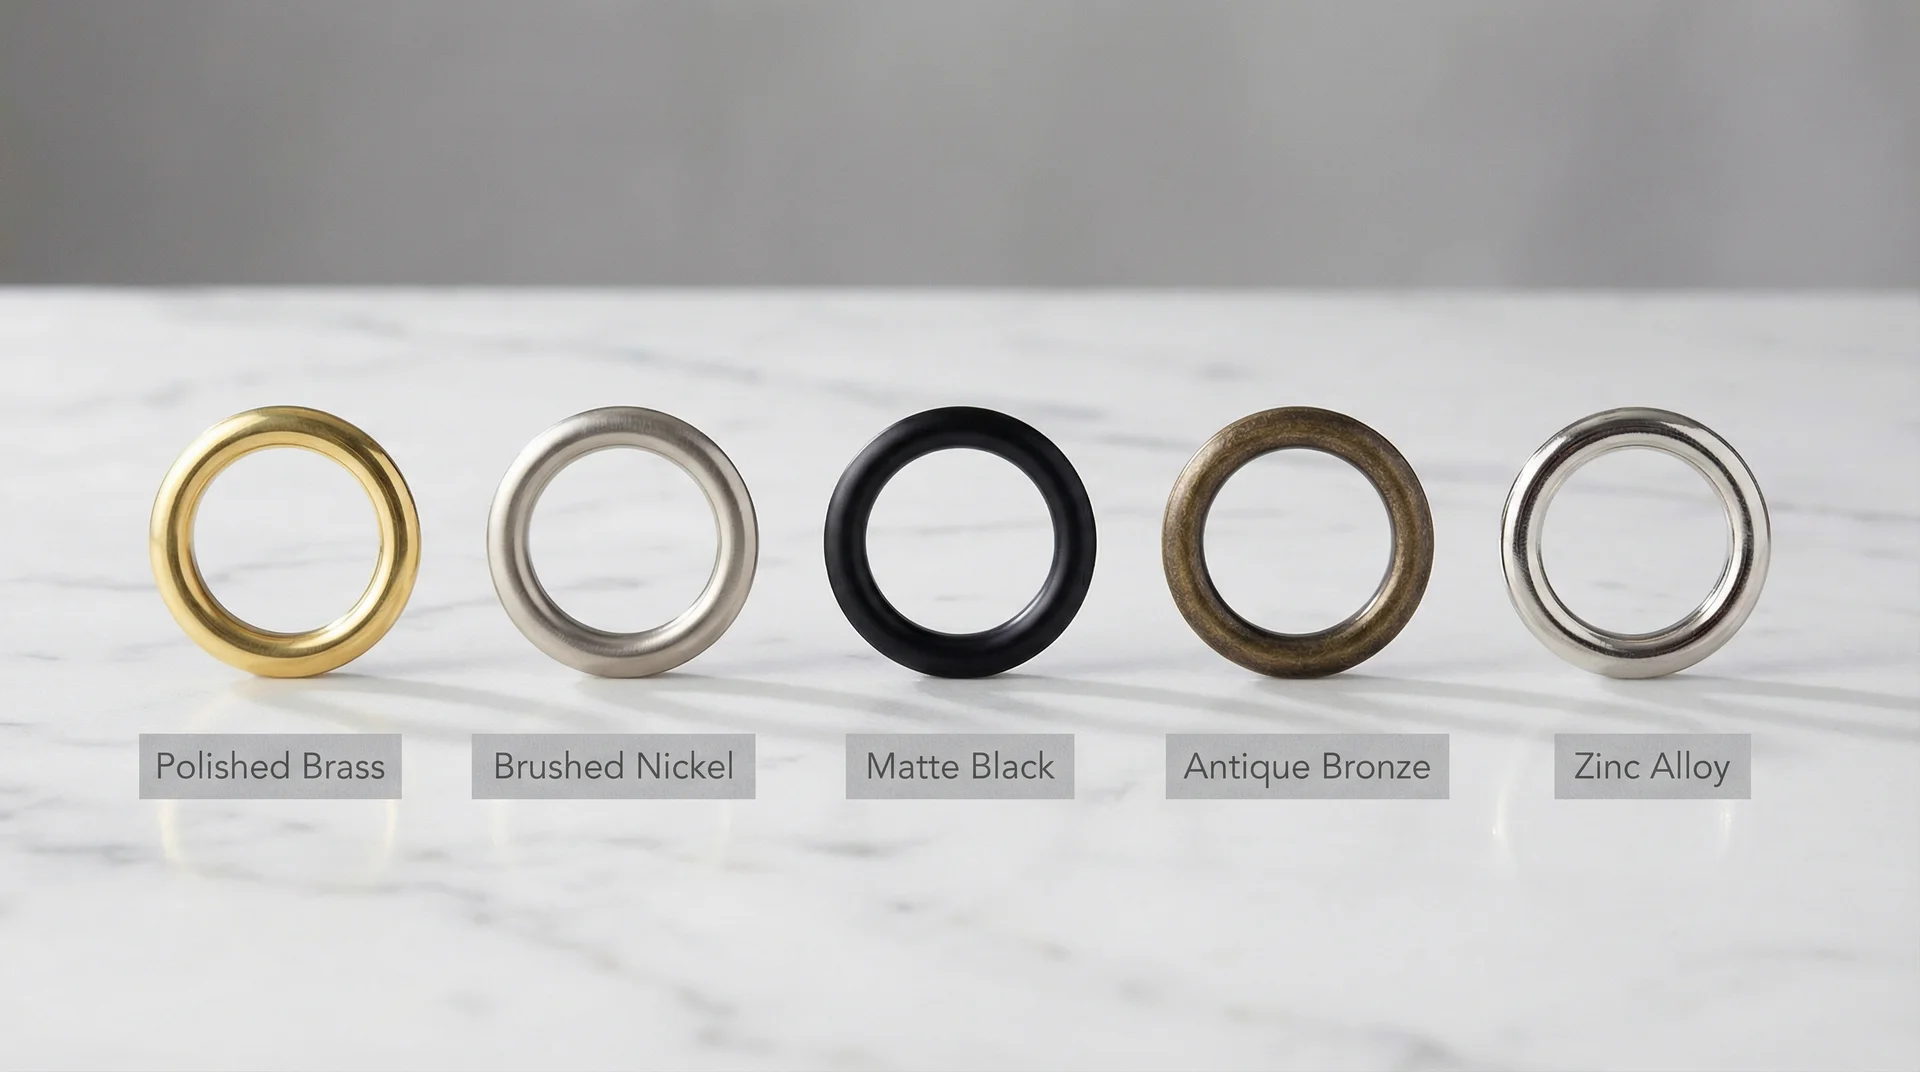
Material Options and What They Mean in Practice
| Material | Appearance | Durability | Best For |
|---|---|---|---|
| Solid Brass | Warm, golden | Excellent, rust-resistant | Traditional, warm-toned rooms |
| Brushed Nickel | Cool, silver-grey | Very good | Modern, Scandinavian, minimal spaces |
| Matte Black Steel | Bold, dark | Very good | Industrial, contemporary rooms |
| Antique Bronze | Vintage, warm brown | Good | Rustic, eclectic, transitional interiors |
| Zinc Alloy | Versatile | Good | Mid-range, general use |
| Plastic / Resin | Varies | Moderate | Budget or temporary setups |
I steer clients away from purely plastic grommets for any permanent installation. They look fine at first but develop a dull, cheap quality over time that undermines even beautiful fabric. The cost difference between plastic and solid metal grommets is small relative to the rest of the project, and the difference in outcome is significant.
Getting the Grommet Size Right
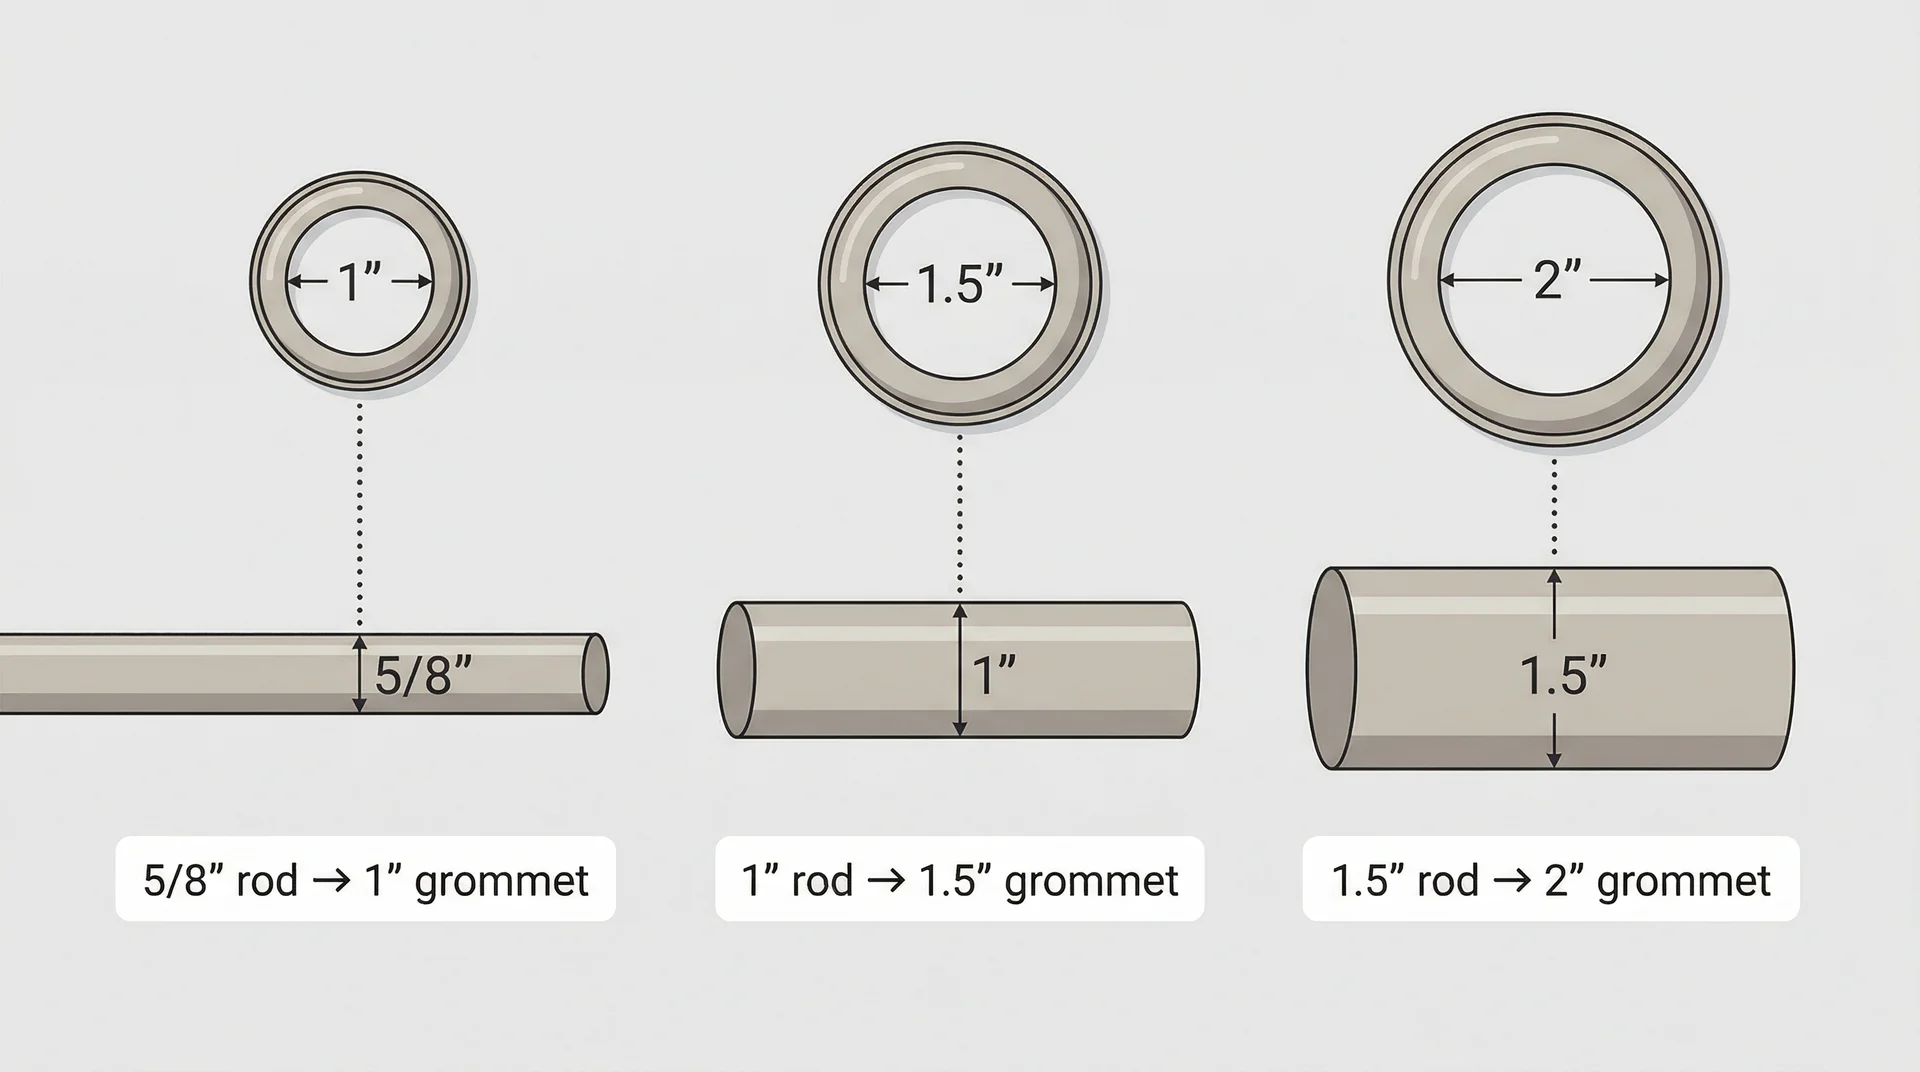
The inner diameter of your grommets needs to be at least 3/8 inch larger than the outer diameter of your curtain rod. This gap allows the rings to slide smoothly without binding.
| Curtain Rod Diameter | Recommended Grommet Inner Diameter |
|---|---|
| 5/8 inch (16mm) | 1 inch (25mm) minimum |
| 1 inch (25mm) | 1.5 inches (38mm) recommended |
| 1.25 inches (32mm) | 1.75 inches (44mm) recommended |
| 1.5 inches (38mm) | 2 inches (51mm) recommended |
Grommets too small for the rod create a dragging, binding feel and damage both the grommet interior and the rod finish over time. Grommets too large create a loose, floppy hang that reads as unintentional.
Matching the Finish to Your Room

My general rule, applied across more than a decade of residential projects, is to match or coordinate your grommet finish with at least one other metal element in the room.
This could be your curtain rod, light fixtures, cabinet hardware, furniture legs, or decorative accessories. You do not need a perfectly matched look; mixing metal tones is a very current design approach, but there should be a visual conversation between the metals in the space.
Fabric Compatibility
The fabric needs enough body to hold the folds cleanly and enough strength to support the grommet without distorting over time.
Works beautifully:
- Medium-weight linen and linen blends
- Cotton canvas and duck cloth
- Polyester velvet and velour
- Interlined blackout panels
- Wool blends
- Faux silk (polyester satin weave)
Works with care:
- Lightweight cotton voile (benefits from an interlining strip at the heading)
- Sheer polyester (requires a reinforced header tape)
- Loosely woven textures (may need heading stabilisation)
Needs specialist handling:
- Very heavy upholstery-grade fabrics (requires industrial-sized grommets and a strong header)
- Delicate silks (punching holes risks laddering the weave)
When a client wanted flowing silk curtains with grommets in her bedroom, I sewed a separate linen heading band onto the silk panels before installing the grommets. The band carried all the stress, the silk looked stunning, and the rings sat perfectly. There are always solutions, but you need to understand what you are working with first.
How Wide Should Grommet Curtains Be?
This is one of the most commonly searched questions in this category, and it has a direct impact on how beautiful your curtains look once they are hung.
Fullness ratio refers to how wide your curtain fabric is compared to the width of your window or rod span. For grommet and eyelet curtains specifically, the structured ring placement already creates defined folds, so you need slightly less fullness than gathered heading styles.
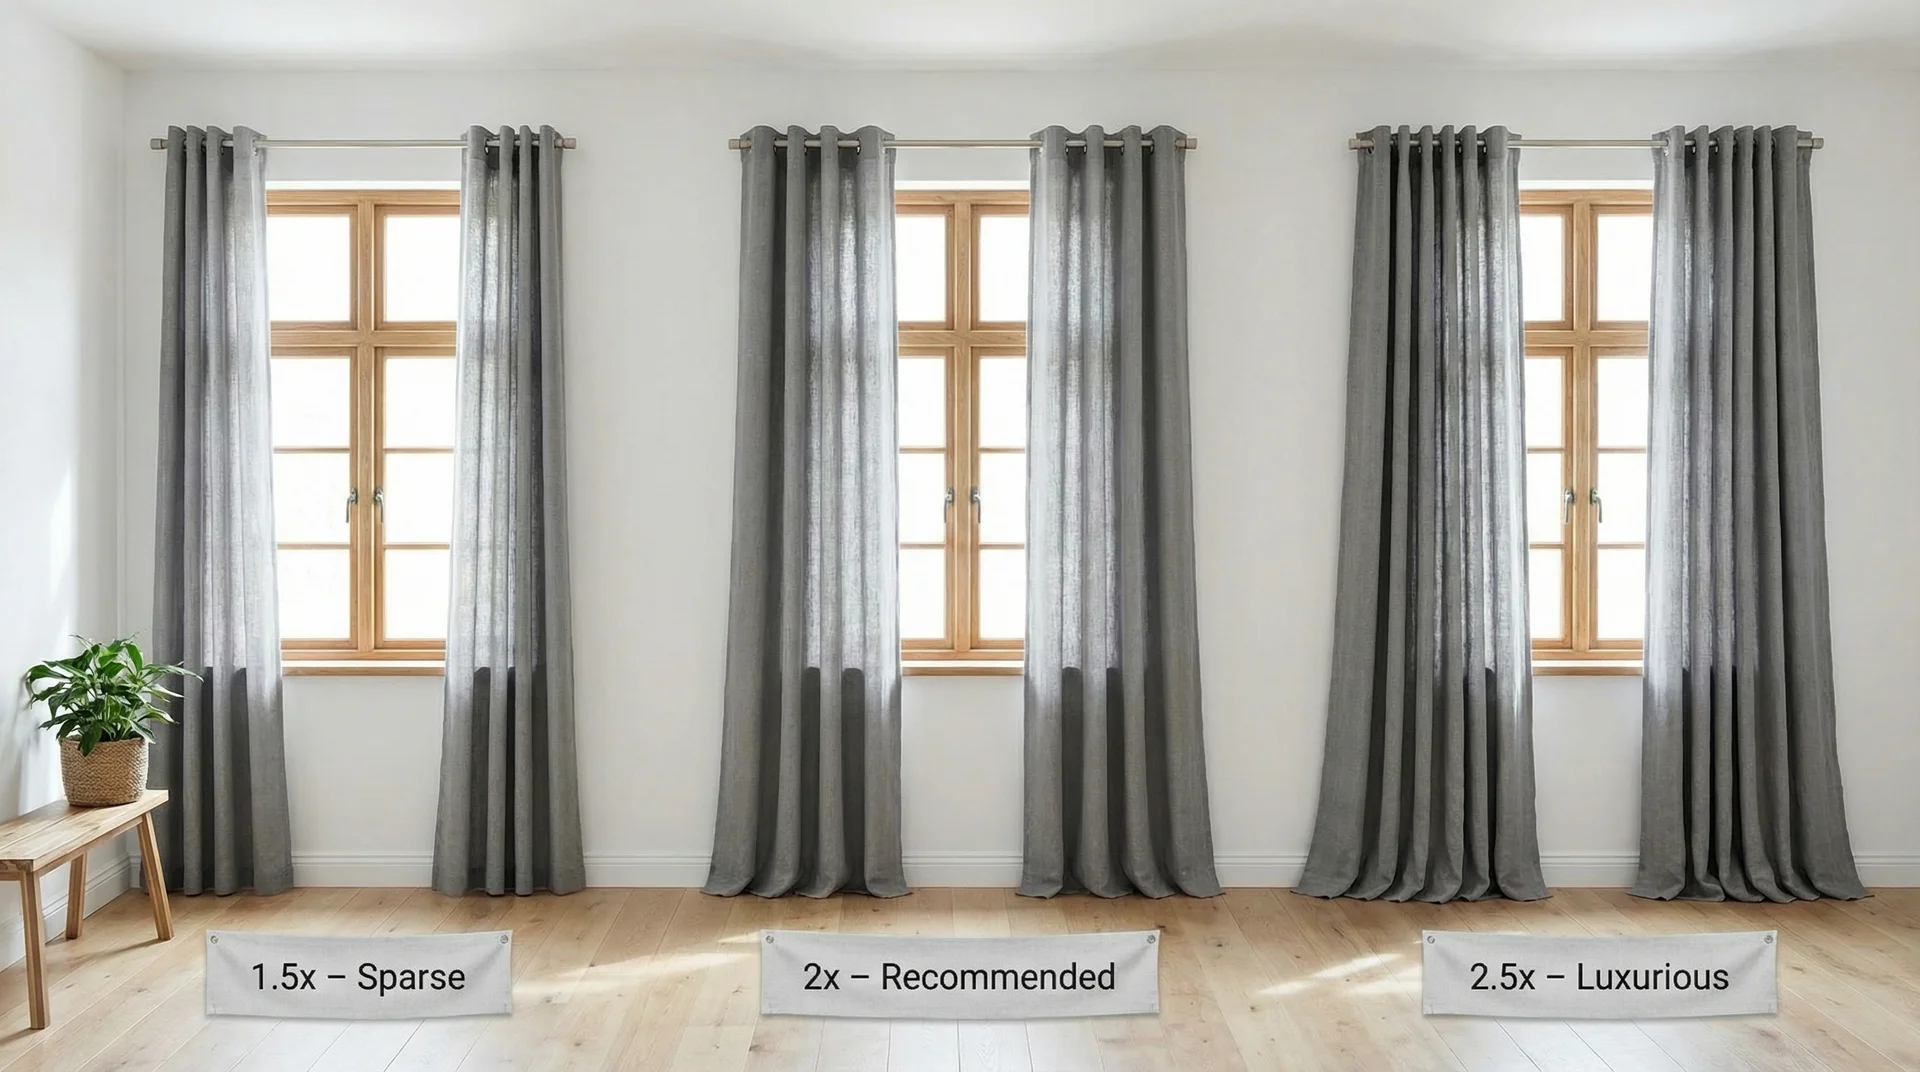
| Fullness Ratio | Curtain Width vs. Window Width | Visual Result |
|---|---|---|
| 1.5x | Curtain is 1.5 times window width | Flat, minimal drape |
| 2x | Curtain is 2 times window width | Standard, recommended for most rooms |
| 2.5x | Curtain is 2.5 times window width | Full, rich, luxurious look |
For most living rooms and bedrooms, a 2x fullness ratio gives you a clean, balanced drape. If you are working with a textured or patterned fabric that you want to showcase, 2.5x brings out the best in the material. Going below 1.5x makes even expensive fabric look sparse and flat.
How to Add Grommets to Curtains: DIY Step-by-Step
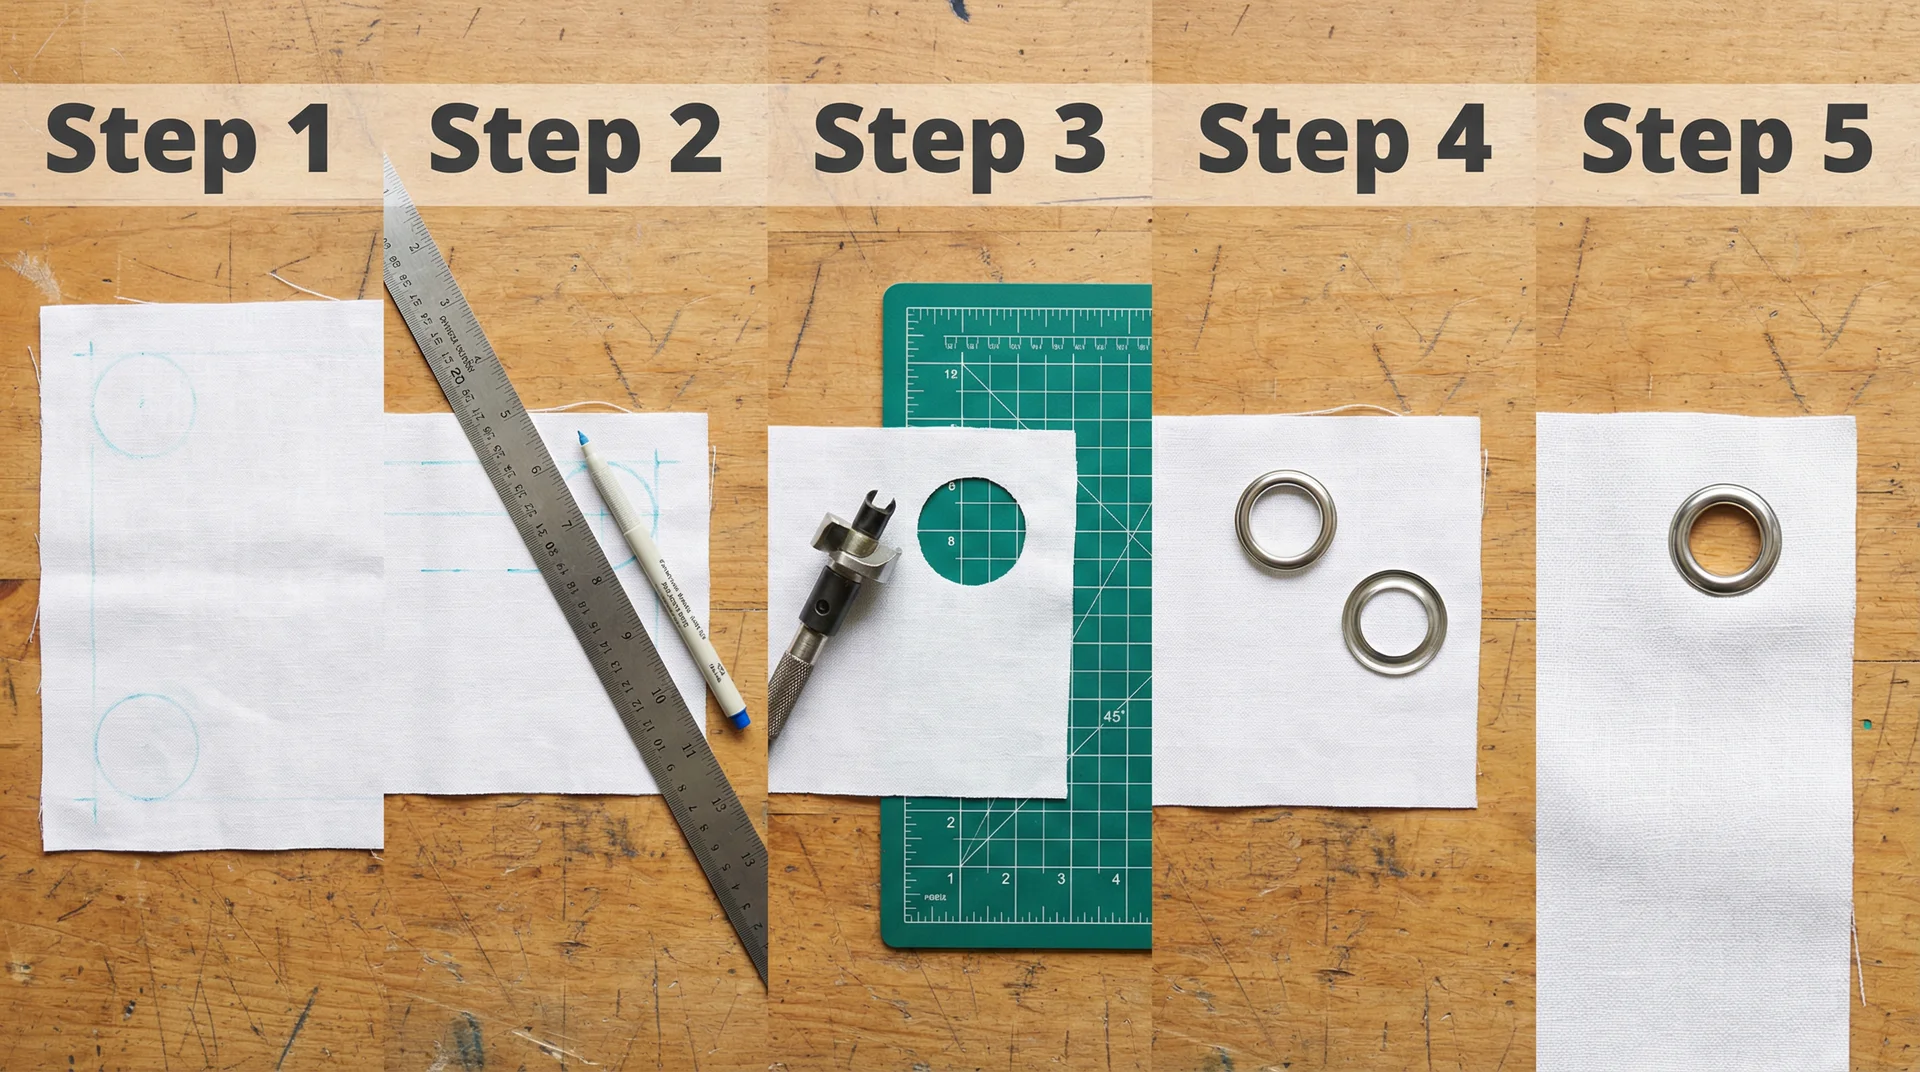
Adding grommets to curtains is genuinely achievable as a DIY project, but it requires patience and accurate measuring. When I watch people rush this process, the result almost always shows. When they take their time, the result looks professional.
What You Will Need
- Grommet kit (includes grommets, hole cutter, and setting tool)
- Fabric marker or tailor’s chalk
- Measuring tape and ruler
- Cutting mat or thick scrap of wood
- Hammer or rubber mallet
- Sharp fabric scissors or rotary cutter
- Iron and ironing board
- Seam sealant or fray stop liquid
Step One: Prepare the Curtain Header
Iron the heading of your curtain completely flat before you mark anything. Wrinkles at this stage translate directly into uneven grommet placement. If your curtain fabric is lightweight, fuse a strip of medium-weight interfacing along the top 4 inches of the heading first. This gives the grommets a firmer base and prevents the fabric from distorting over time.
Step Two: Calculate Spacing and Mark Positions
Start and end with a grommet near each side edge, leaving about 1.5 to 2 inches from the very edge. Use the table below as a starting guide:
| Curtain Width | Recommended Number of Grommets | Approximate Spacing |
|---|---|---|
| Up to 45 inches | 7 grommets | Around 6.5 inches apart |
| 45 to 60 inches | 8 to 9 grommets | Around 6 to 7 inches apart |
| 60 to 90 inches | 10 to 12 grommets | Around 6 to 7 inches apart |
Mark the centre of each grommet position, placing each mark about 1 inch down from the top folded edge. Use a ruler to confirm all marks sit at exactly the same height across the full width of the panel. Even a 3mm variation in height reads as uneven once the curtains are hung.
Step Three: Cut the Holes
Place your cutting mat under the marked area. Position the hole cutter centred over each mark and strike firmly and evenly with the hammer. Apply force straight down for a clean, round hole. After each cut, apply a thin ring of seam sealant around the raw edge and allow it to dry before setting the grommet. Skipping this step is the most common shortcut people later regret, especially after the first wash.
Step Four: Set the Grommets
Each grommet has two pieces: the front ring (visible from the room) and the back washer or barrel. Press the front ring through the hole from the right side of the fabric, then place the back piece over it from the wrong side. Set your setting tool into the barrel and strike firmly with the hammer until the pieces lock together. Test each one with a gentle tug before moving to the next.
Troubleshooting Common Issues
- Grommet feels loose: Re-set it with additional firm strikes. If it still moves, the hole may be slightly too large. Try the next grommet size up for that position.
- Fabric puckering around the grommet: The heading fabric lacks enough body. Add interfacing and reset.
- Uneven grommet heights: Remove the grommet carefully with a seam ripper, adjust your mark, and redo the placement.
How to Hang Grommet Curtains on a Rod
This is a question that shows up constantly in searches related to this topic, and it deserves a clear, direct answer rather than being buried in a styling section.
The Basic Process
- Install your curtain rod brackets at the correct height and width (more on height below).
- Slide the grommets onto the rod before attaching one bracket, or use a rod that separates at the centre.
- Alternate the direction of the fabric folds as you slide each grommet on, so they naturally fall forward and backward in an alternating pattern.
- Attach the final bracket and check that the rod sits level.
- Dress the folds by hand, shaping each one evenly, and leave the curtains in position for 24 to 48 hours to train the fabric into shape.
The Rod Placement Rule That Changes Everything
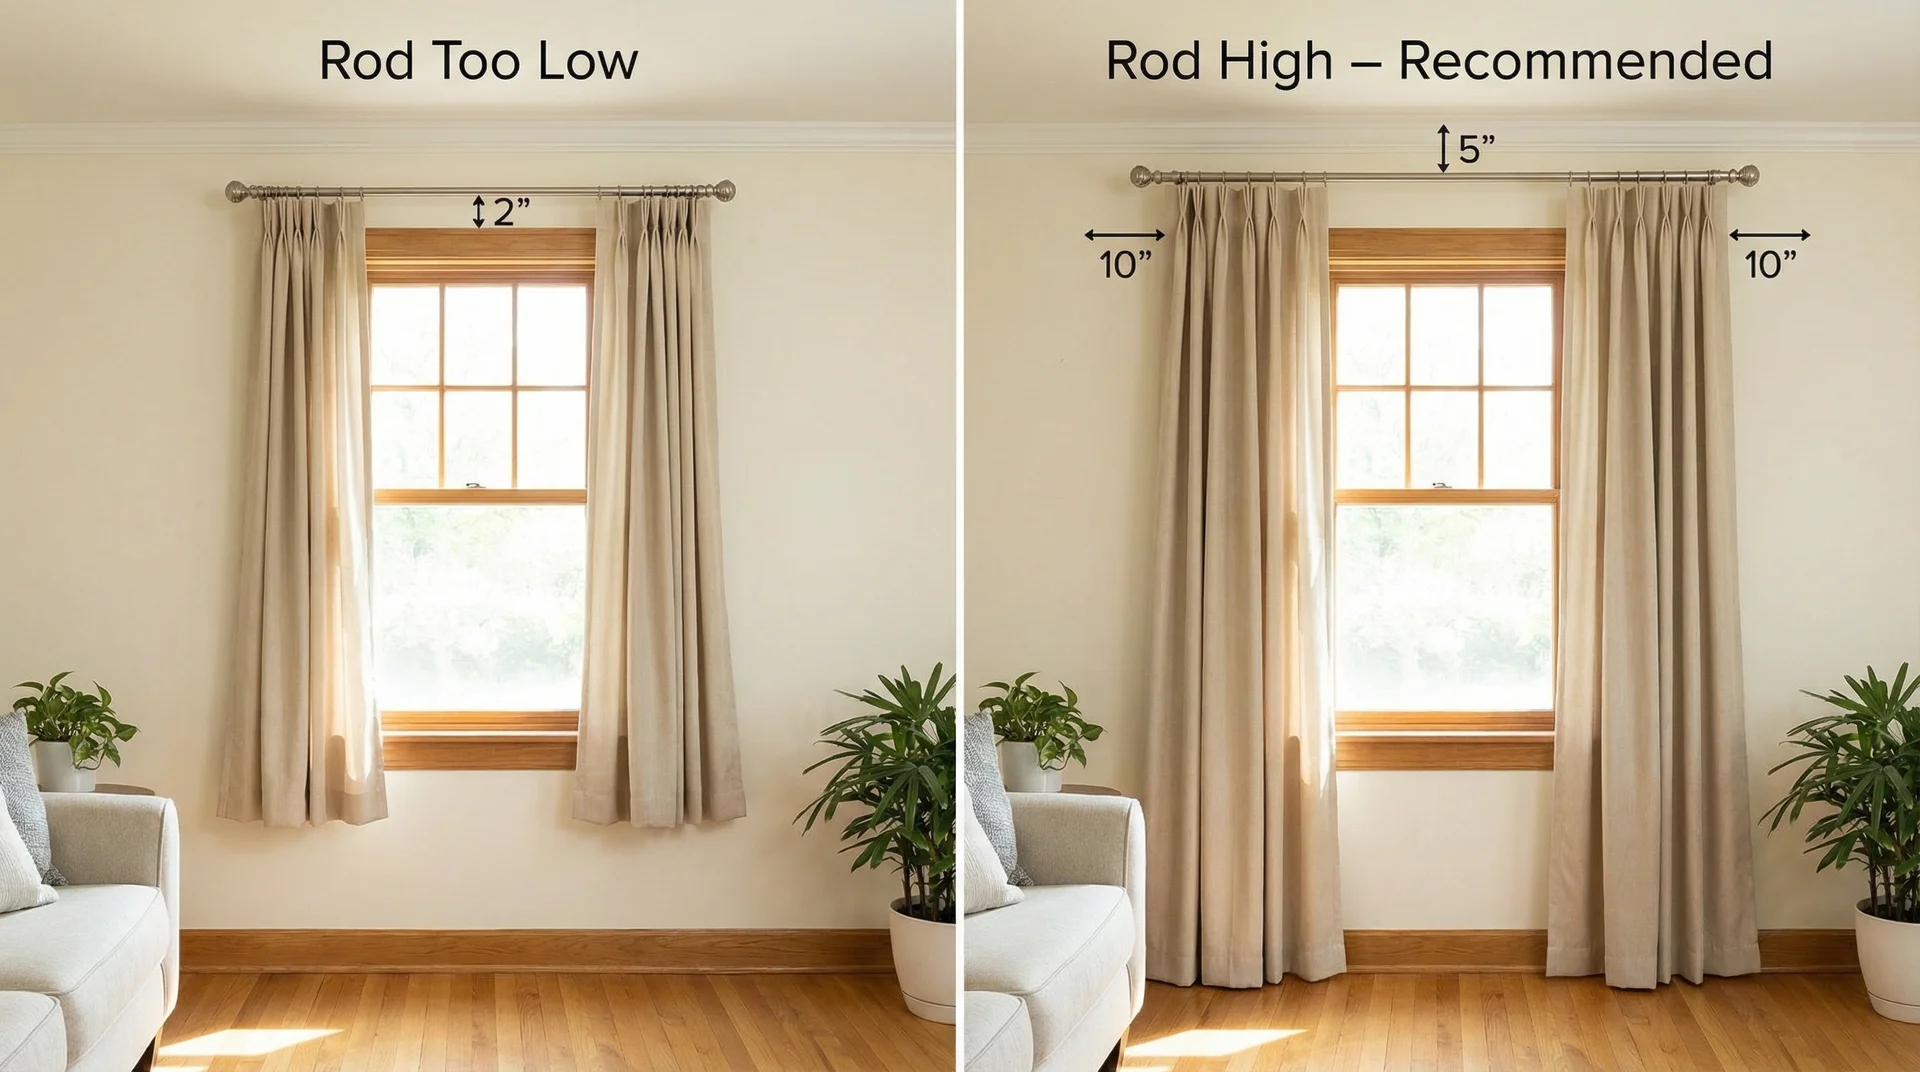
Hang the rod as close to the ceiling as possible, ideally 4 to 6 inches below the ceiling line, and extend it 6 to 12 inches beyond the window frame on each side. This makes your windows look taller, your ceilings look higher, and your curtains look styled rather than functional.
I have walked into client homes where basic panels from a chain store looked genuinely elegant simply because the rod was hung correctly. The reverse is equally true. Expensive fabric hung just above the window frame, stopping 2 inches from the floor, will always look underwhelming.
Which Rod Types Work Best with Grommet Curtains
| Rod Type | Compatible with Grommets | Notes |
|---|---|---|
| Standard decorative rod | Yes, ideal | The most common and recommended pairing |
| Double curtain rod | Yes | Use the outer rod for grommets, the inner rod for sheer |
| Tension rod | Yes, with caution | Only for lightweight panels; they can slip over time |
| Cafe rod | Yes | Good for kitchen or half-window applications |
| Traverse rod (cord-operated) | No | Grommets require a manual slide rod |
| Curtain track | Not directly | Requires ring clips; loses the grommet aesthetic |
Where to Buy Eyelet and Grommet Curtains: What to Look For
The market for grommet curtains ranges from very affordable to genuinely luxurious, and understanding the price bands helps you make a smarter decision before you shop.
Price Ranges and What They Reflect
| Price Range (Per Panel) | What You Typically Get |
|---|---|
| Under $20 | Polyester fabric, plastic grommets, limited sizing |
| $20 to $60 | Better polyester or cotton blend, metal grommets, wider size range |
| $60 to $150 | Linen blends or quality cotton, solid metal grommets, fuller sizing options |
| $150 and above | Specialty fabrics (velvet, wool, silk blend), premium hardware, custom sizing |
What to Check Before You Buy
- Grommet material: Look for metal hardware at any price point above $30 per panel.
- Fabric weight: Hold the panel up and let it drape over your hand. Lightweight panels that collapse on themselves will not hang well.
- Panel width: Confirm the listed width is per panel, not per pair. Many retailers list the price per panel width.
- Grommet inner diameter: Check this against your rod diameter using the sizing table in the selection section above.
- Lining options: Unlined panels look beautiful but offer minimal insulation or blackout function. Lined and interlined options cost more but perform significantly better.
Design and Styling: Making Grommet Curtains Look Intentional
Hanging curtains is easy. Hanging curtains that make a room look genuinely well-designed is a different skill, and it is one I have spent years refining both in client spaces and in my own home.
Matching Curtain Style to Your Interior
| Interior Style | Fabric Suggestion | Grommet Finish | Styling Notes |
|---|---|---|---|
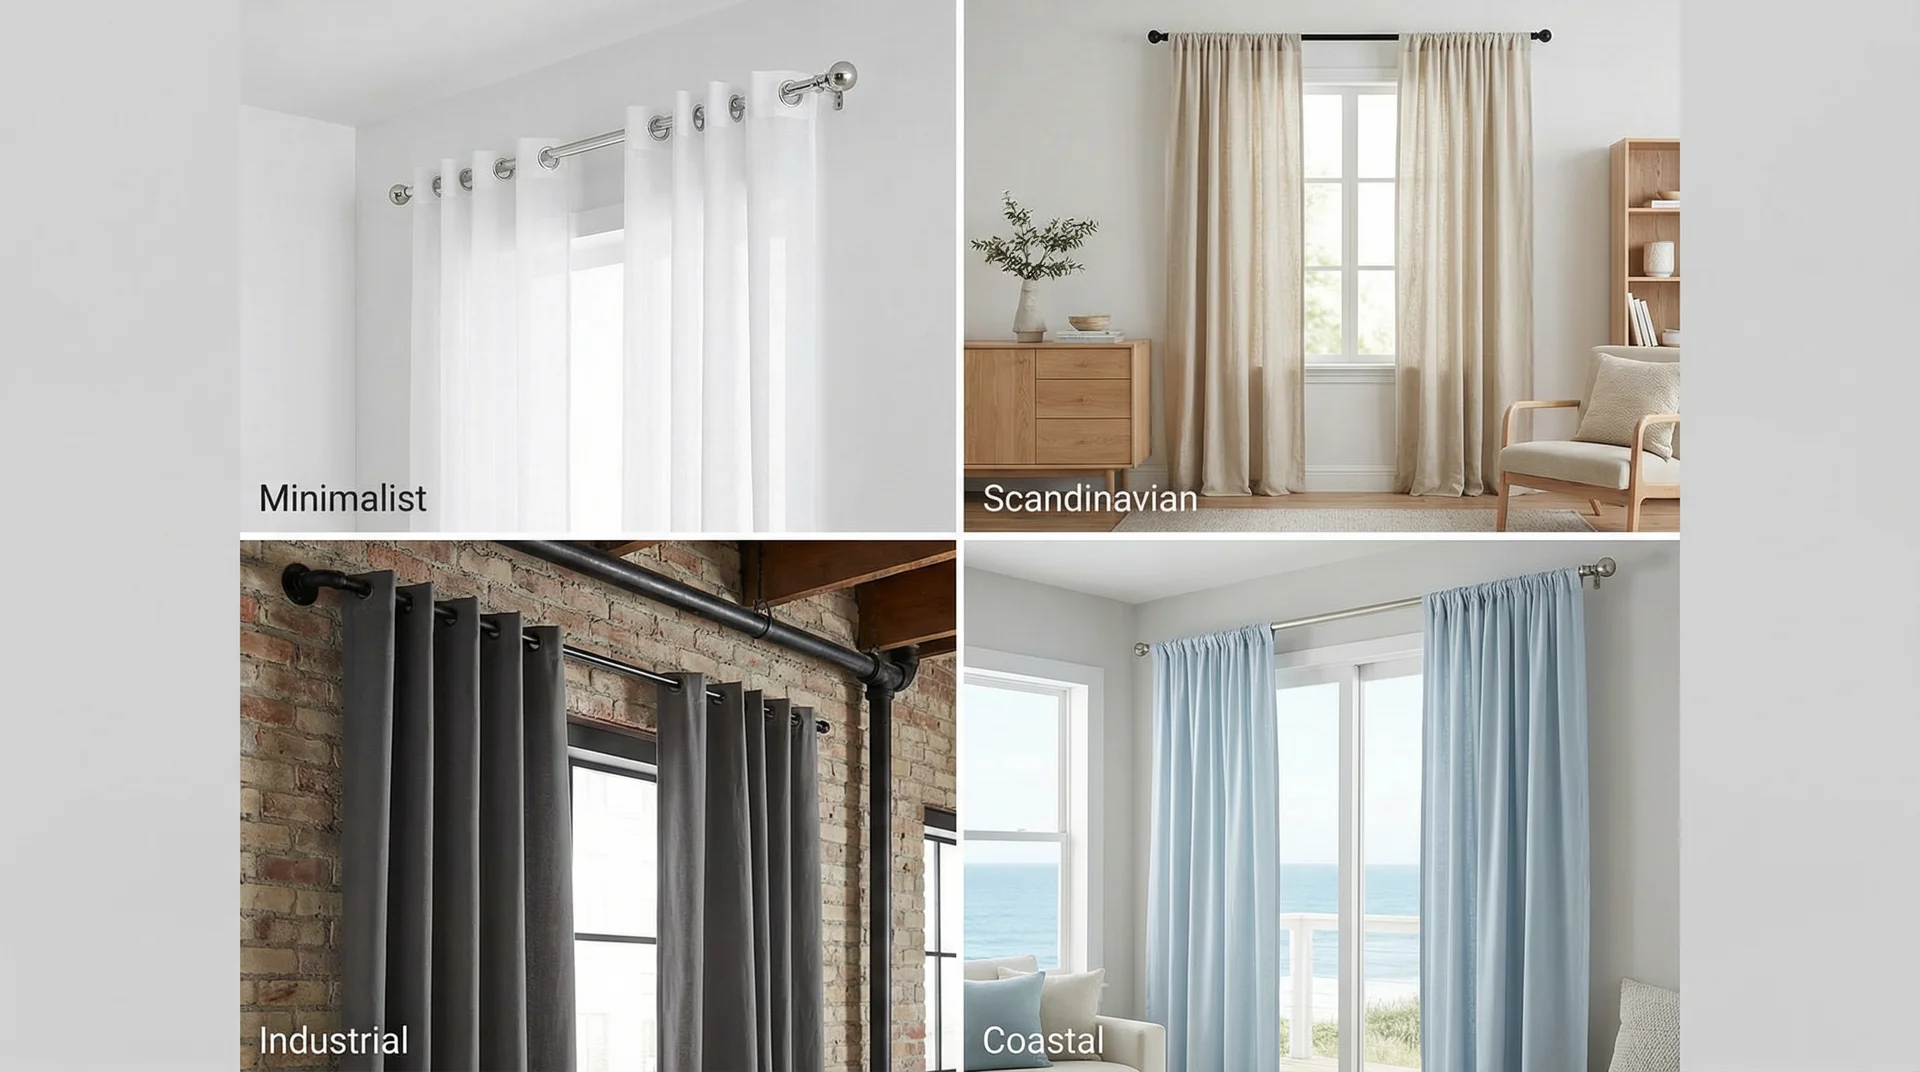
| Modern Minimalist | White or off-white sheer polyester | Brushed nickel or chrome | Floor-length, no layers, simple |
| Scandinavian | Natural undyed linen | Matte black or brushed brass | Slight floor pooling, raw edges add texture |
| Industrial | Heavy cotton canvas, charcoal or navy | Matte black | Exposed metal rod, keep hardware visible |
| Transitional | Linen-cotton blend, warm neutrals | Antique bronze or warm brass | Layer over sheer, simple tiebacks |
| Bohemian | Textured weave, earthy tones | Antique brass | Intentional gathering, textured tiebacks |
| Traditional | Faux silk or velvet, jewel tones | Polished brass | Decorative finials, pair with a pelmet |
| Coastal | Lightweight cotton or linen, whites and blues | Brushed nickel | Breezy, relaxed hems, let fabric move |
Layering for Function and Depth
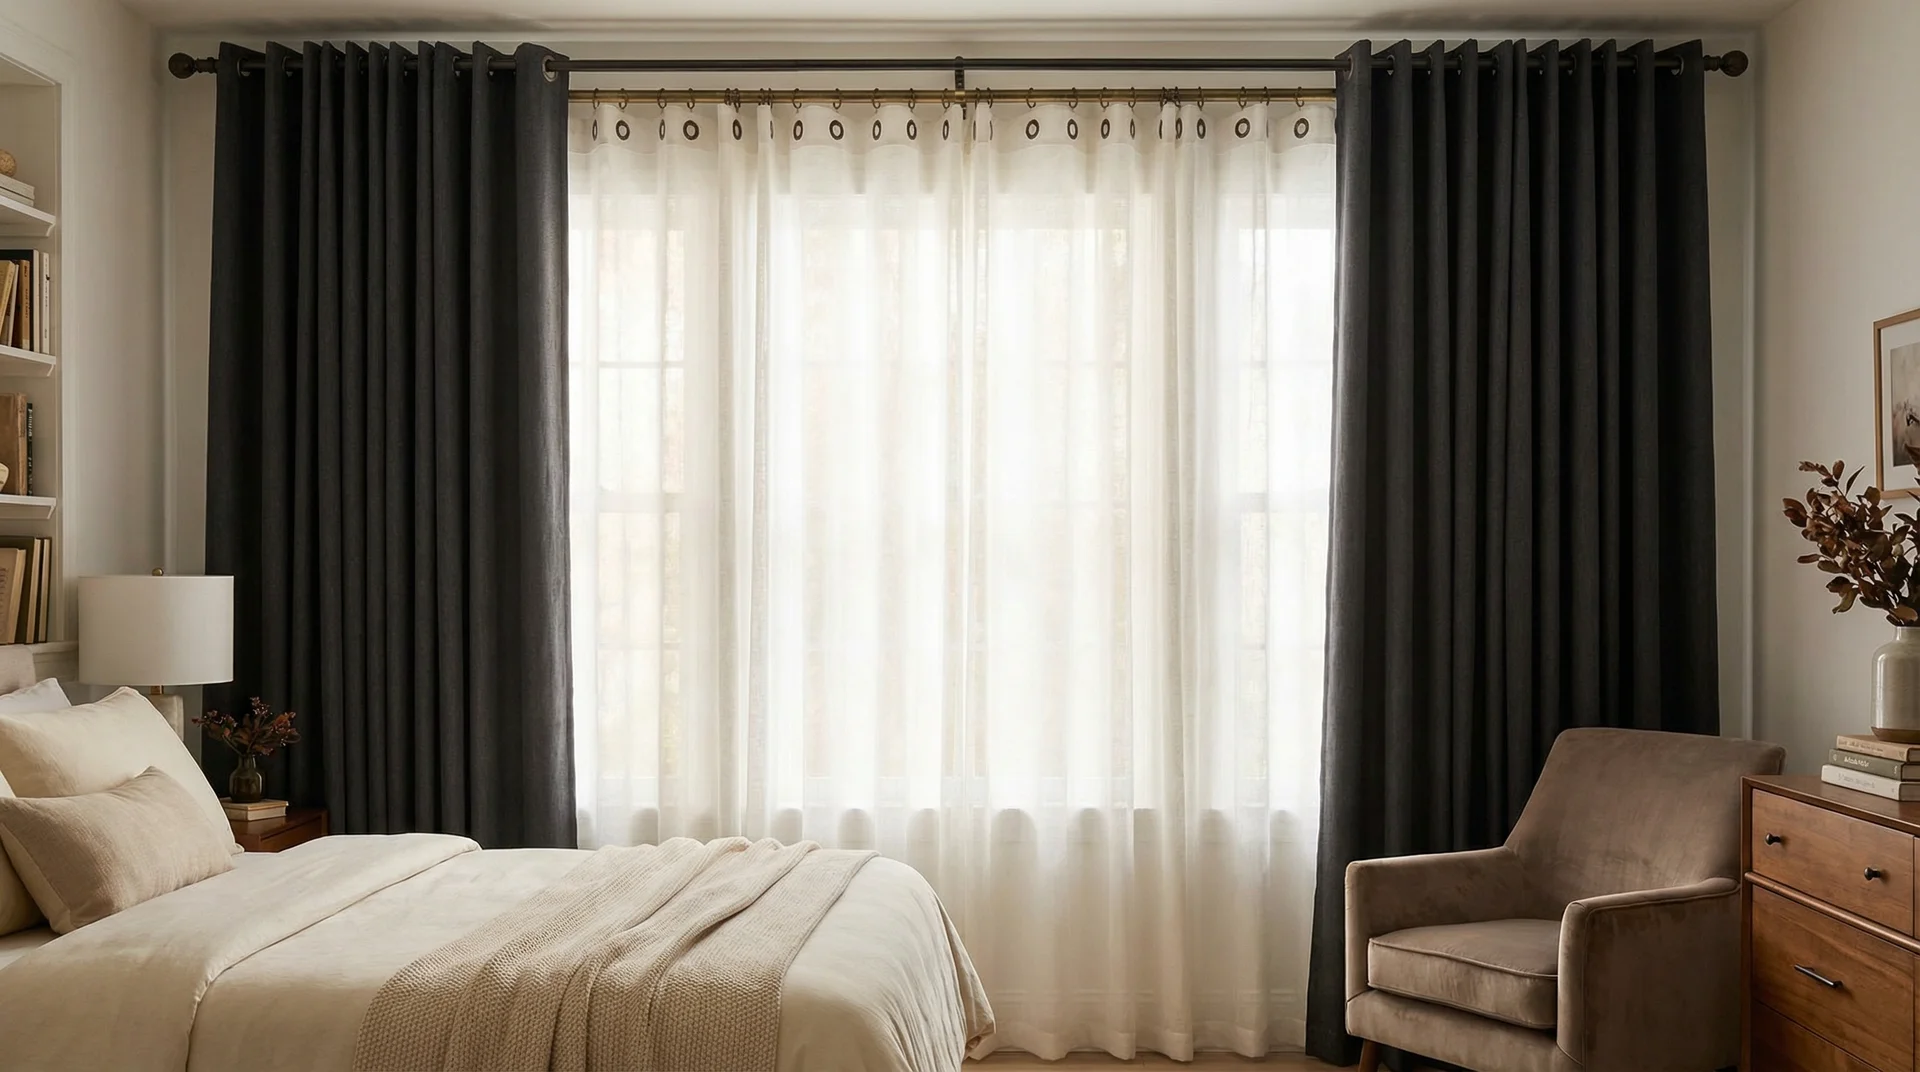
- Sheer roller blind + grommet panel: The blind handles privacy and light through the day; the panel adds colour and warmth at night.
- Linen sheer on a double rod + blackout grommet panel: My go-to for master bedrooms where the client wants true darkness at night but a bright, airy look during the day.
- Grommet panels as a room divider: In open-plan spaces, a ceiling-mounted track with grommet panels creates a soft, flexible partition that looks far more considered than a screen or bookshelf.
Handling Specific Functional Needs
For light control: Blackout fabric works well with grommets, but the gaps between rings and rod do allow a thin line of light along the very top. Installing the rod close to the ceiling minimises this, and adding a pelmet above the rod eliminates it.
For thermal insulation: Interlining, a thick, soft layer sewn between the face fabric and lining, adds significant thermal mass to grommet curtains. I have recommended this for clients in colder climates, and the difference in how warm a room feels with properly interlined curtains is something you notice within the first winter.
For outdoor and covered patio use: Look for UV-resistant and mildew-resistant fabric, and choose stainless steel or marine-grade brass grommets to prevent rust from humidity and rain.
Maintaining Eyelet and Grommet Curtains
Good curtains are an investment, and the way you maintain them determines whether they look beautiful for three years or thirteen.
Cleaning by Fabric Type
Machine washable fabrics (most cotton, polyester, linen blends):
- Wash on a gentle cycle in cool water
- Remove promptly from the machine and hang immediately on the rod to dry, which helps the fabric resume its natural shape
- Avoid the dryer where possible, as heat can shrink fabric and warp plastic grommets
Dry clean only fabrics (velvet, heavy wool, interlining, faux silk):
- Vacuum gently with an upholstery attachment between professional cleans
- Spot-clean small marks with a lightly damp cloth and allow to air dry
Sheer and lightweight fabrics:
- Hand wash in cool water with a small amount of delicate wash
- Press gently between two towels and hang to drip dry
Caring for the Grommets
- Steel grommets: Dry them quickly with a soft cloth after washing. Moisture sitting in the grommet seam can initiate surface rust on lower-grade metals.
- Brass grommets: Brass develops a natural patina over time that many people find attractive. To maintain a bright finish, use a brass-specific cleaner on a soft cloth and avoid abrasives.
- Plastic grommets: Keep them out of prolonged direct sunlight. UV exposure causes discolouration and brittleness in lower-grade plastics over time.
- All types: Check every few months by giving each grommet a gentle tug. A grommet beginning to work loose can be reset before it causes damage to the fabric heading.
When to Refresh or Replace
- The fabric has faded unevenly along the sun-exposed side of the panel
- The heading shows permanent stretching or distortion from years of grommet stress
- Grommets have corroded past the point of simple cleaning
- The fabric has developed a persistent smell that washing does not resolve
In many cases, replacing just the curtain panels while reusing quality metal grommets is perfectly feasible if the grommets were purchased separately and set into the fabric. This is one reason I recommend buying quality individual grommets over cheap pre-set rings in budget curtain panels whenever you have the option.
Frequently Asked Questions
What is the difference between eyelet and grommet curtains?
The terms refer to the same ring-top curtain heading style. “Eyelet” is the standard term in the UK and Australia, while “grommet” is the term used in the United States and Canada. Technically, grommets tend to be larger and more industrial in origin, but for home curtain use, the functional difference is minimal.
What size grommets do I need for curtains?
The inner diameter of your grommets should be at least 3/8 inch larger than the outer diameter of your curtain rod. For a standard 1-inch rod, a 1.5-inch grommet inner diameter is the most common recommendation.
How wide should grommet curtains be?
For a standard, well-filled drape, use curtain panels that are 2 times the width of your window or rod span. For a fuller, more luxurious look, go up to 2.5 times. Anything below 1.5 times the window width will look flat and sparse.
Do grommet curtains let in light at the top?
Yes, there is a small gap between the rings and the rod that can allow a thin line of light through at the very top of the curtain. Hanging the rod close to the ceiling minimises this. Adding a pelmet or valance above the rod eliminates it entirely.
Can you put grommets in any curtain fabric?
Most medium to heavy fabrics work well. Lightweight and loosely woven fabrics benefit from a reinforced heading strip or interfacing before grommets are set. Very delicate fabrics like silk require specialist handling, such as sewing a separate linen heading band onto the panel to carry the stress of the grommets.
How do you keep grommet curtains from sliding to the middle?
This happens when the rod is not level, or the panels are too light for the rod diameter. Ensure your rod is perfectly level before hanging. Some homeowners place small rubber rings or curtain rod end caps to act as subtle stops. If the rod has a slight bow, it may need a centre support bracket.
Are eyelet curtains easy to put up?
Yes, they are among the easiest curtain styles to hang. You simply slide the grommets onto the rod and dress the folds into place. No hooks, no clips, no complicated track systems are required.
Final Takeaways Before You Get Started
After years of working through window treatments with clients across different budgets, room sizes, and design preferences, here is the honest, distilled version of what actually matters.
- Measure your rod before you buy grommets. The single most common sizing mistake in this category is buying grommets without knowing the rod diameter.
- Handle the fabric before you commit. Fabric that feels limp in your hands will create flat, lifeless folds on the rod.
- Buy panels wider than you think you need. Fullness is what creates a beautiful drape. Budget for it.
- Hang the rod high. This applies regardless of everything else. High rod placement transforms curtains from functional to design-intentional.
- Invest in real metal grommets. The cost difference between plastic and quality brass or nickel is small relative to the overall project, and the difference in outcome is not.
The first time I installed grommet curtains in my own living room, I forgot to account for the top gap between the ring and the ceiling. My panels ended up hovering about four inches off the floor instead of skimming it the way I had imagined. I rehung the rod the following weekend, and the room looked completely different.
The learning I carried from that experience into every consultation since is that curtains are one of the most forgiving elements in a room. You can adjust, rehang, reset, and restyle them.
The technical parts of grommet installation look daunting until you do them once, and then they feel entirely manageable. The design decisions look overwhelming until you understand the few principles that govern how curtains look in a space.
You have all of those principles here now.