
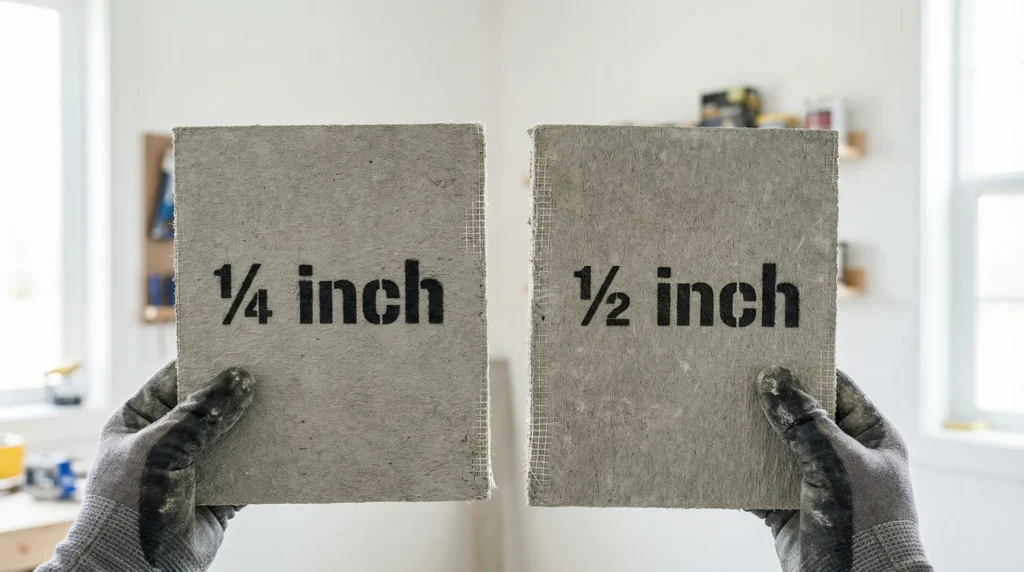
You’re standing in the tile aisle, staring at two stacks of cement board. One says ¼ inch. One says ½ inch. The packaging tells you almost nothing useful. A store associate shrugs and says, “Either one works.”
So you grab the thinner one because it’s cheaper and lighter, haul it home, and spend a weekend installing it.
Three years later, your grout lines crack. A tile pops. You find moisture behind the wall.
I’ve watched this play out on job sites more times than I care to count. And almost every time, it traces back to one decision that felt minor: choosing the wrong cement board thickness.
So here’s what you actually came for, right upfront.
| Application | Recommended Thickness |
|---|---|
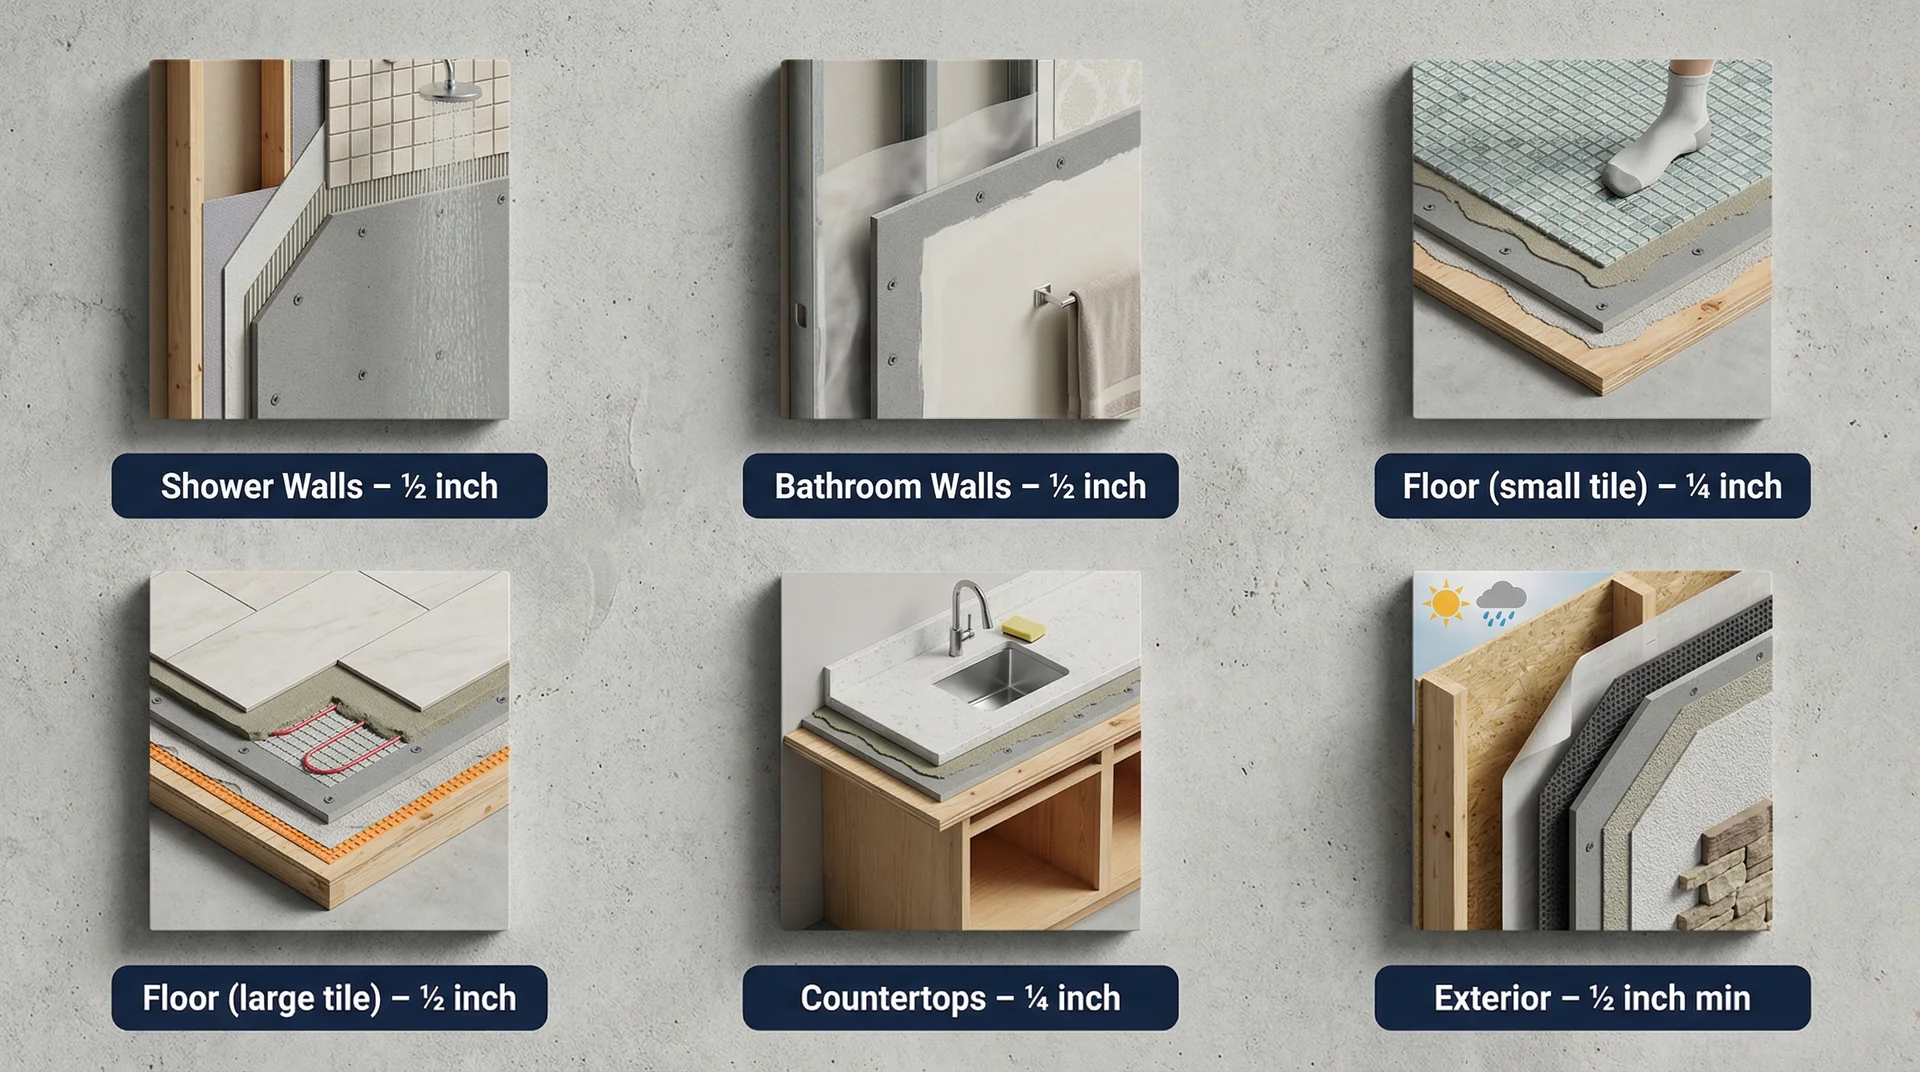
| Shower walls | ½ inch |
| Bathroom walls (non-shower) | ½ inch |
| Floor underlayment, solid subfloor, small tiles | ¼ inch |
| Floor underlayment, large-format tile or upstairs | ½ inch |
| Kitchen backsplash over open studs | ½ inch |
| Countertops | ¼ inch |
| Exterior applications | ½ inch minimum, per code |
If you’re tiling any wet vertical surface, use ½ inch. If you’re doing floor underlayment on a solid, stiff subfloor with standard-sized tile, ¼ inch gets the job done. Everything else lands somewhere between those two, and the rest of this piece will help you find exactly where your project sits.
Why the Board Thickness Alone Does Not Tell the Whole Story
Your cement board does not work in isolation. It works as part of a system, and the thickness you choose means very little unless you understand what’s behind it and beneath it.
About eight years ago, I walked into a bathroom renovation mid-project. The homeowner had done solid research, bought ½ inch HardieBacker, and installed it carefully. But the subfloor was a single layer of ⅝ inch plywood spanning 24-inch joist centers. Every time someone stepped near the tub, the floor gave slightly. Within 18 months, three tiles had cracked, and two grout lines had opened enough to let water through.
The cement board was the right thickness. The system around it was not.
The Subfloor’s Role in Your Thickness Decision
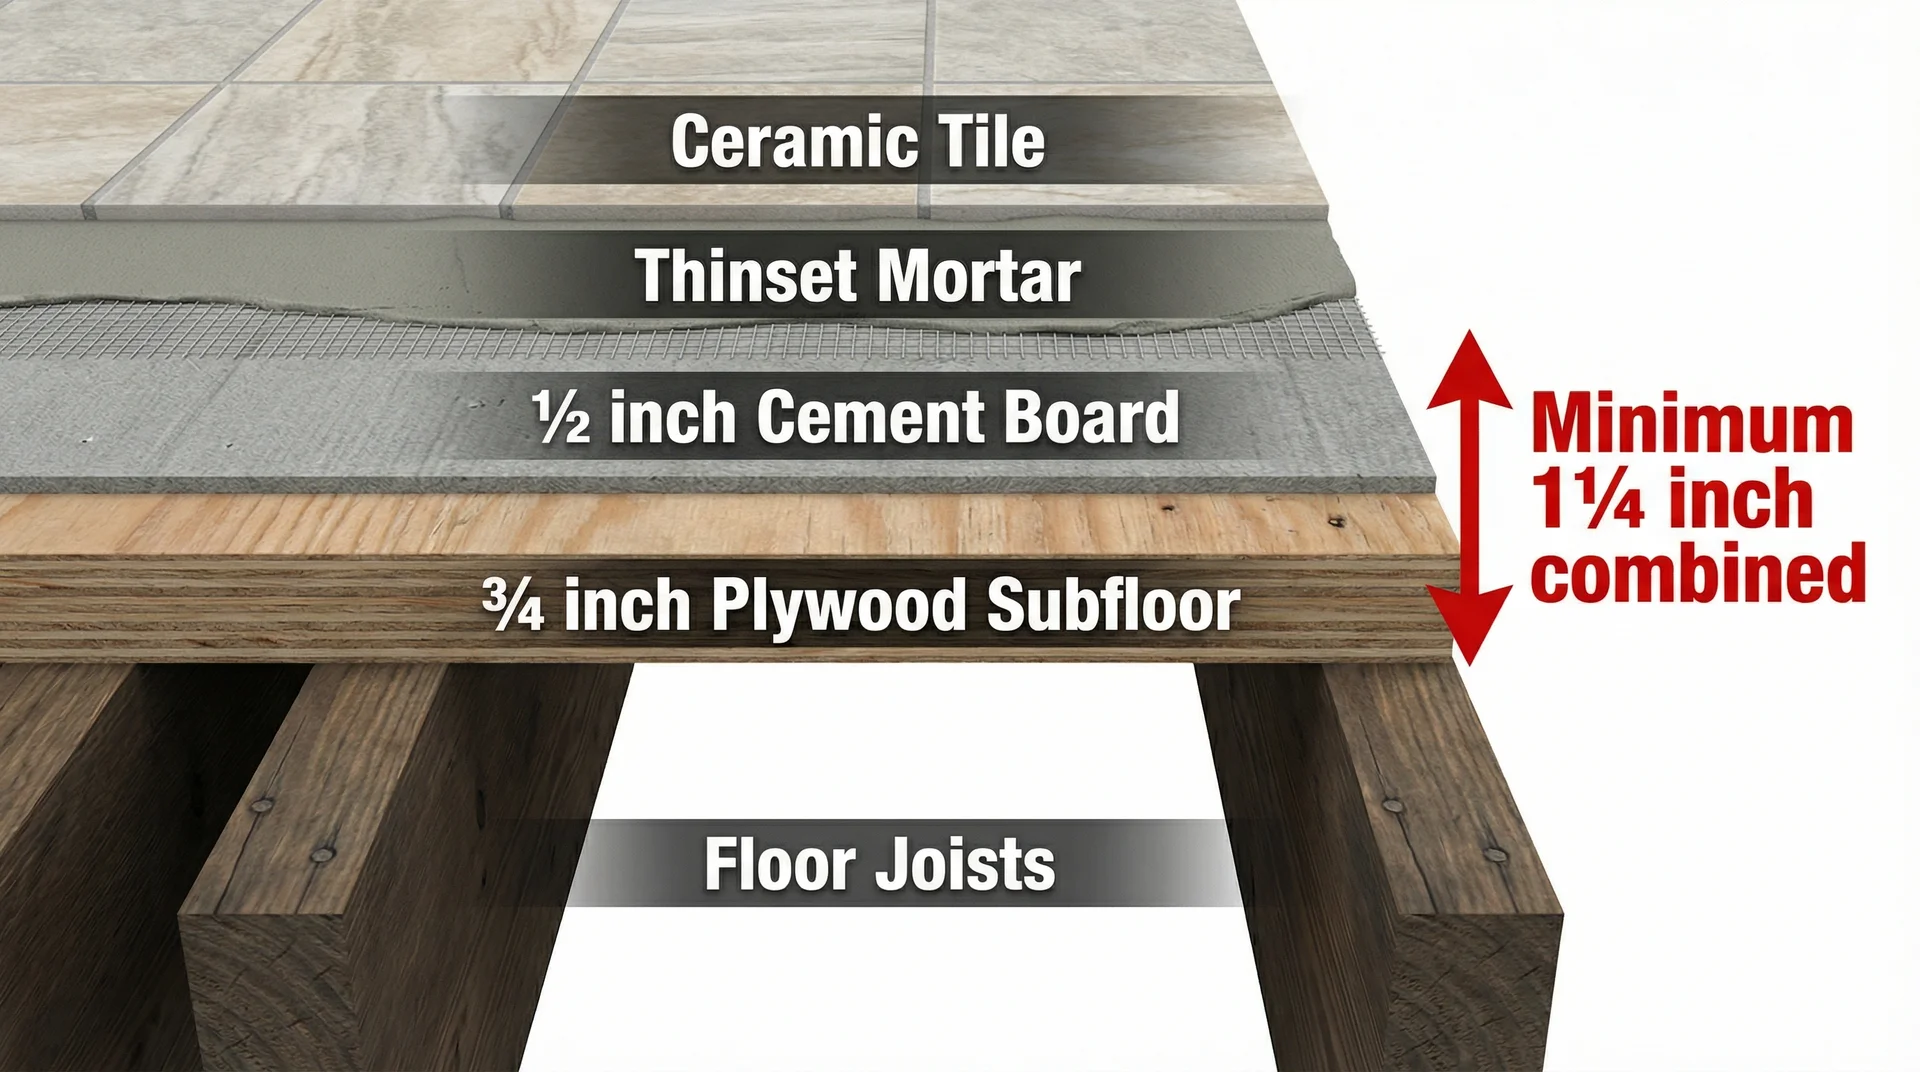
The Tile Council of North America sets the standard: the total substrate thickness must reach a minimum of 1¼ inches before tile goes down on a floor. That total includes your subfloor and your cement board combined.
So if your plywood subfloor runs ¾ inch thick, ¼ inch cement board brings you to just over 1 inch. You fall short. Add ½ inch cement board, and you land at 1¼ inches. If your existing subfloor is thinner or showing flex, no cement board thickness compensates for that. You address the subfloor first, then choose your board.
What Stud Spacing Does to Your Walls
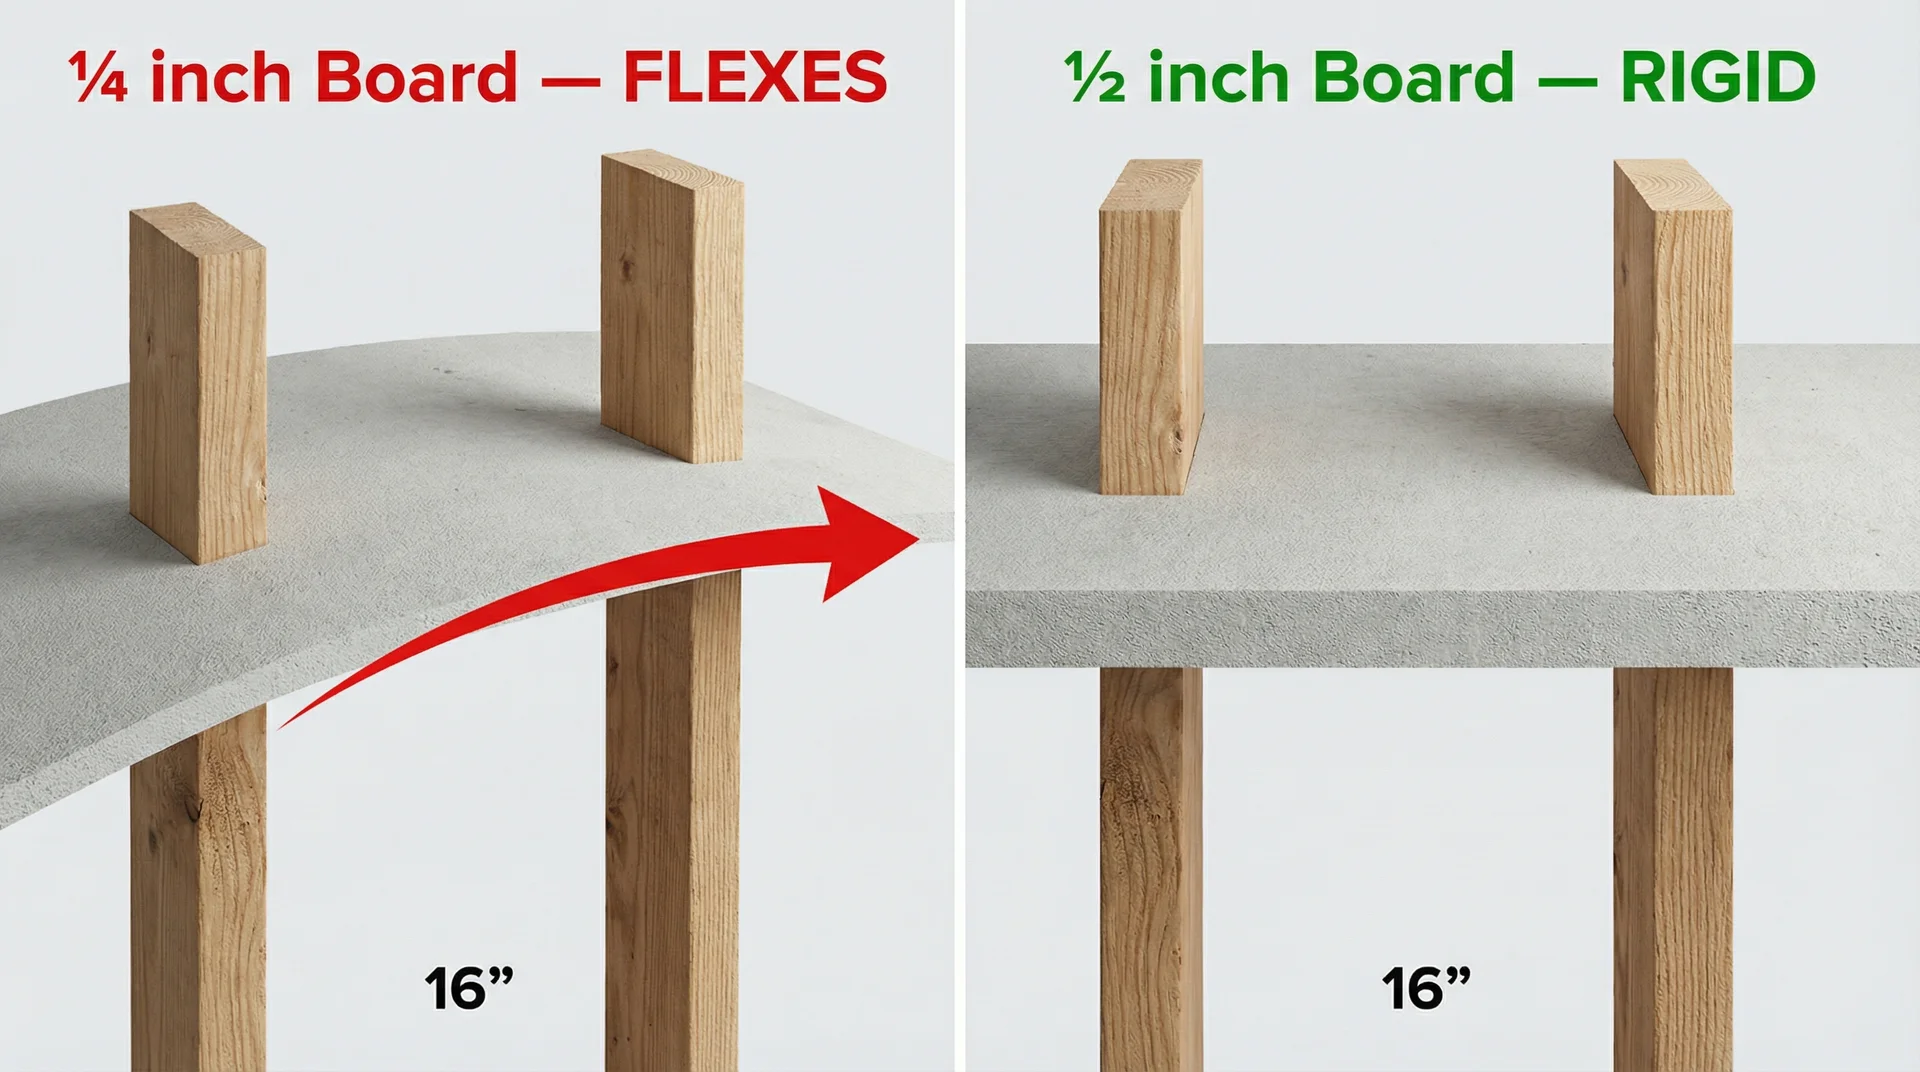
On walls, the math differs but matters equally. Standard residential framing sits at 16 inches on center. Across that 16-inch gap, a ¼ inch cement board flexes. You won’t see it flex with your eyes, but your tile feels it every time the wall takes any impact.
USG addresses this directly in their own construction handbook. Their recommendation for wall applications at standard 16-inch framing is ½ inch, period. They position ¼ inch specifically for floor underlayment. When a manufacturer’s own specification says ½ inch for walls, that recommendation comes from failure data, not caution.
Cement Board Thickness for Shower Walls
Shower walls carry the highest stakes and produce the most costly mistakes I see from well-intentioned DIYers.
Why ½ Inch Is the Professional Standard
The shower environment stacks multiple stressors on your wall assembly simultaneously: continuous moisture, thermal cycling, physical impact from daily use, and the combined weight of tile and thinset bonded to the surface. Your cement board needs to hold rigid across those 16-inch stud spans throughout all of it.
A ½ inch board spans that gap without deflecting. It holds the tile plane flat. It gives your waterproof membrane a stable surface to seal against. And when someone grabs the wall for balance, or a shampoo bottle knocks against the tile, the assembly absorbs that force without transmitting flex into the grout lines.
The tile installations that come back to me for repair are rarely the ones where ½ inch went on the walls. The callbacks come from jobs where someone substituted a ¼ inch to save money or because the supplier ran out.
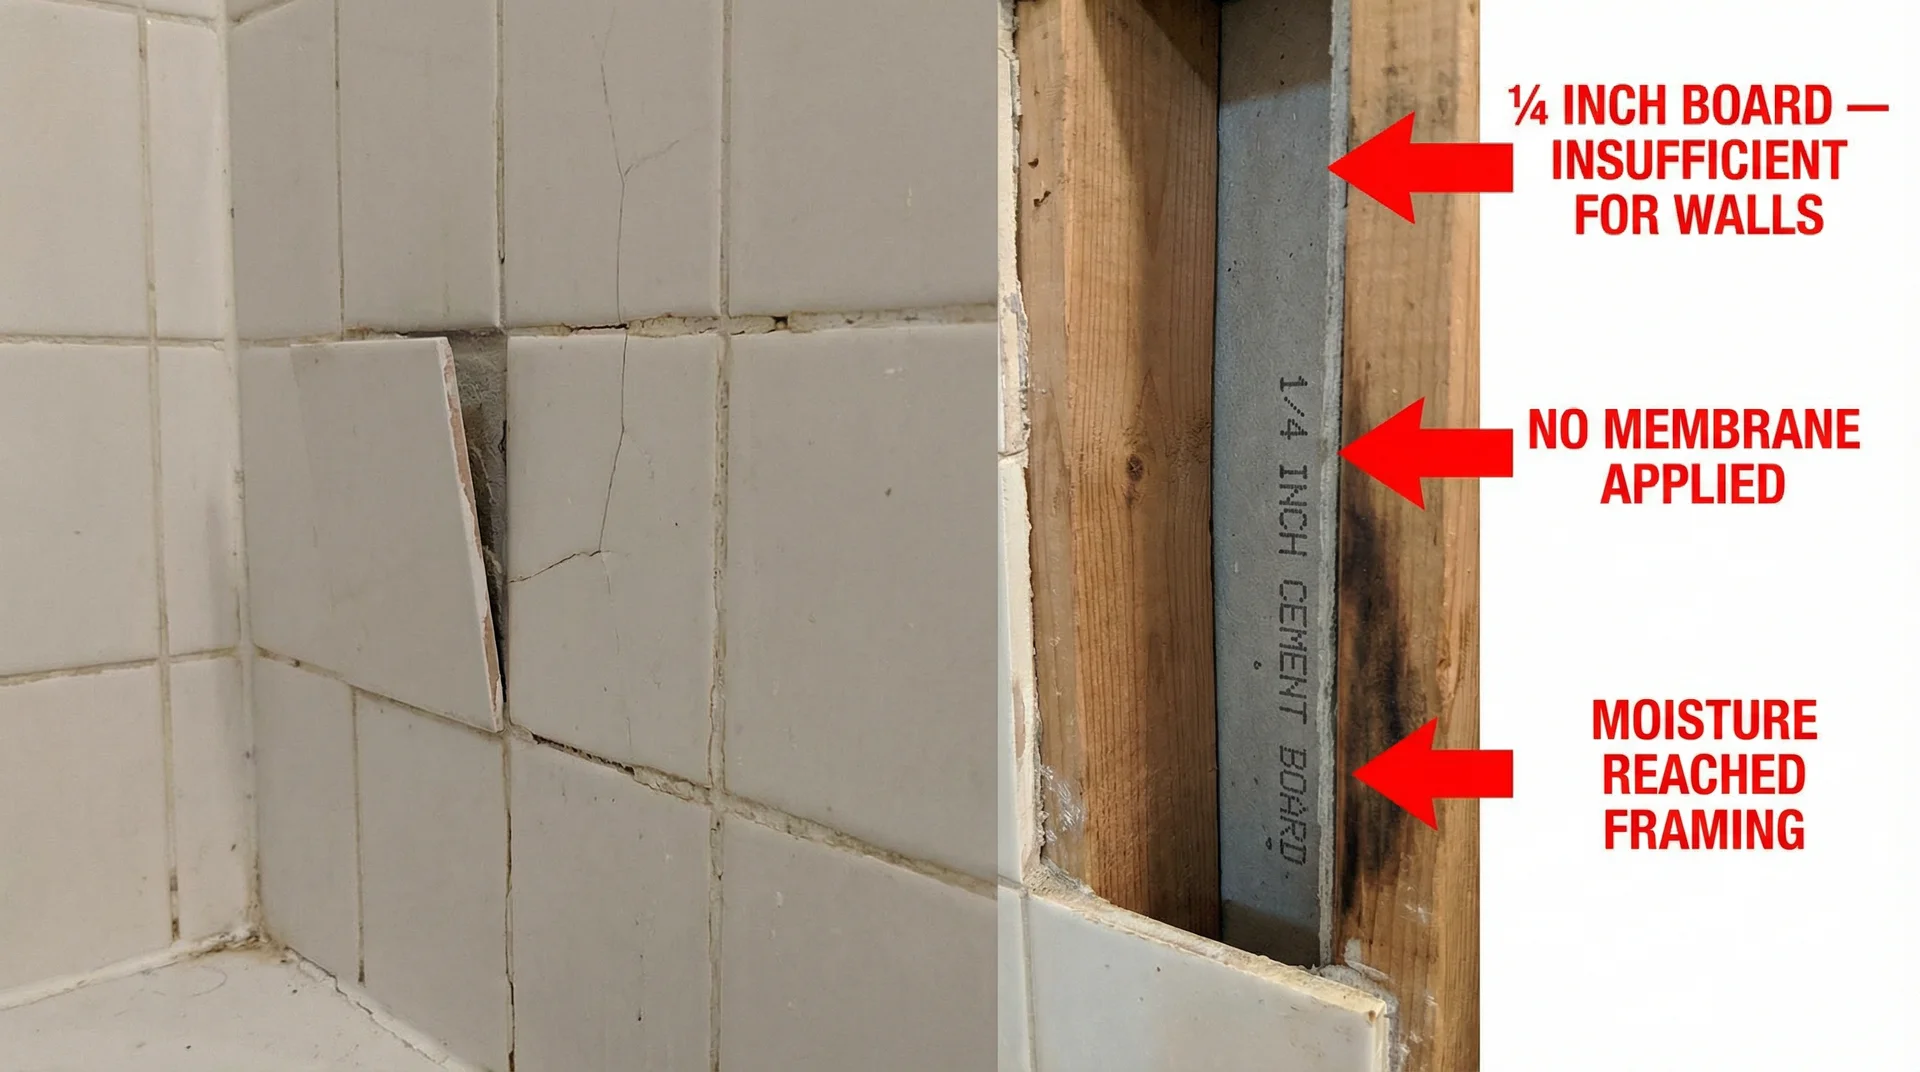
The Waterproofing Misconception That Costs People Real Money
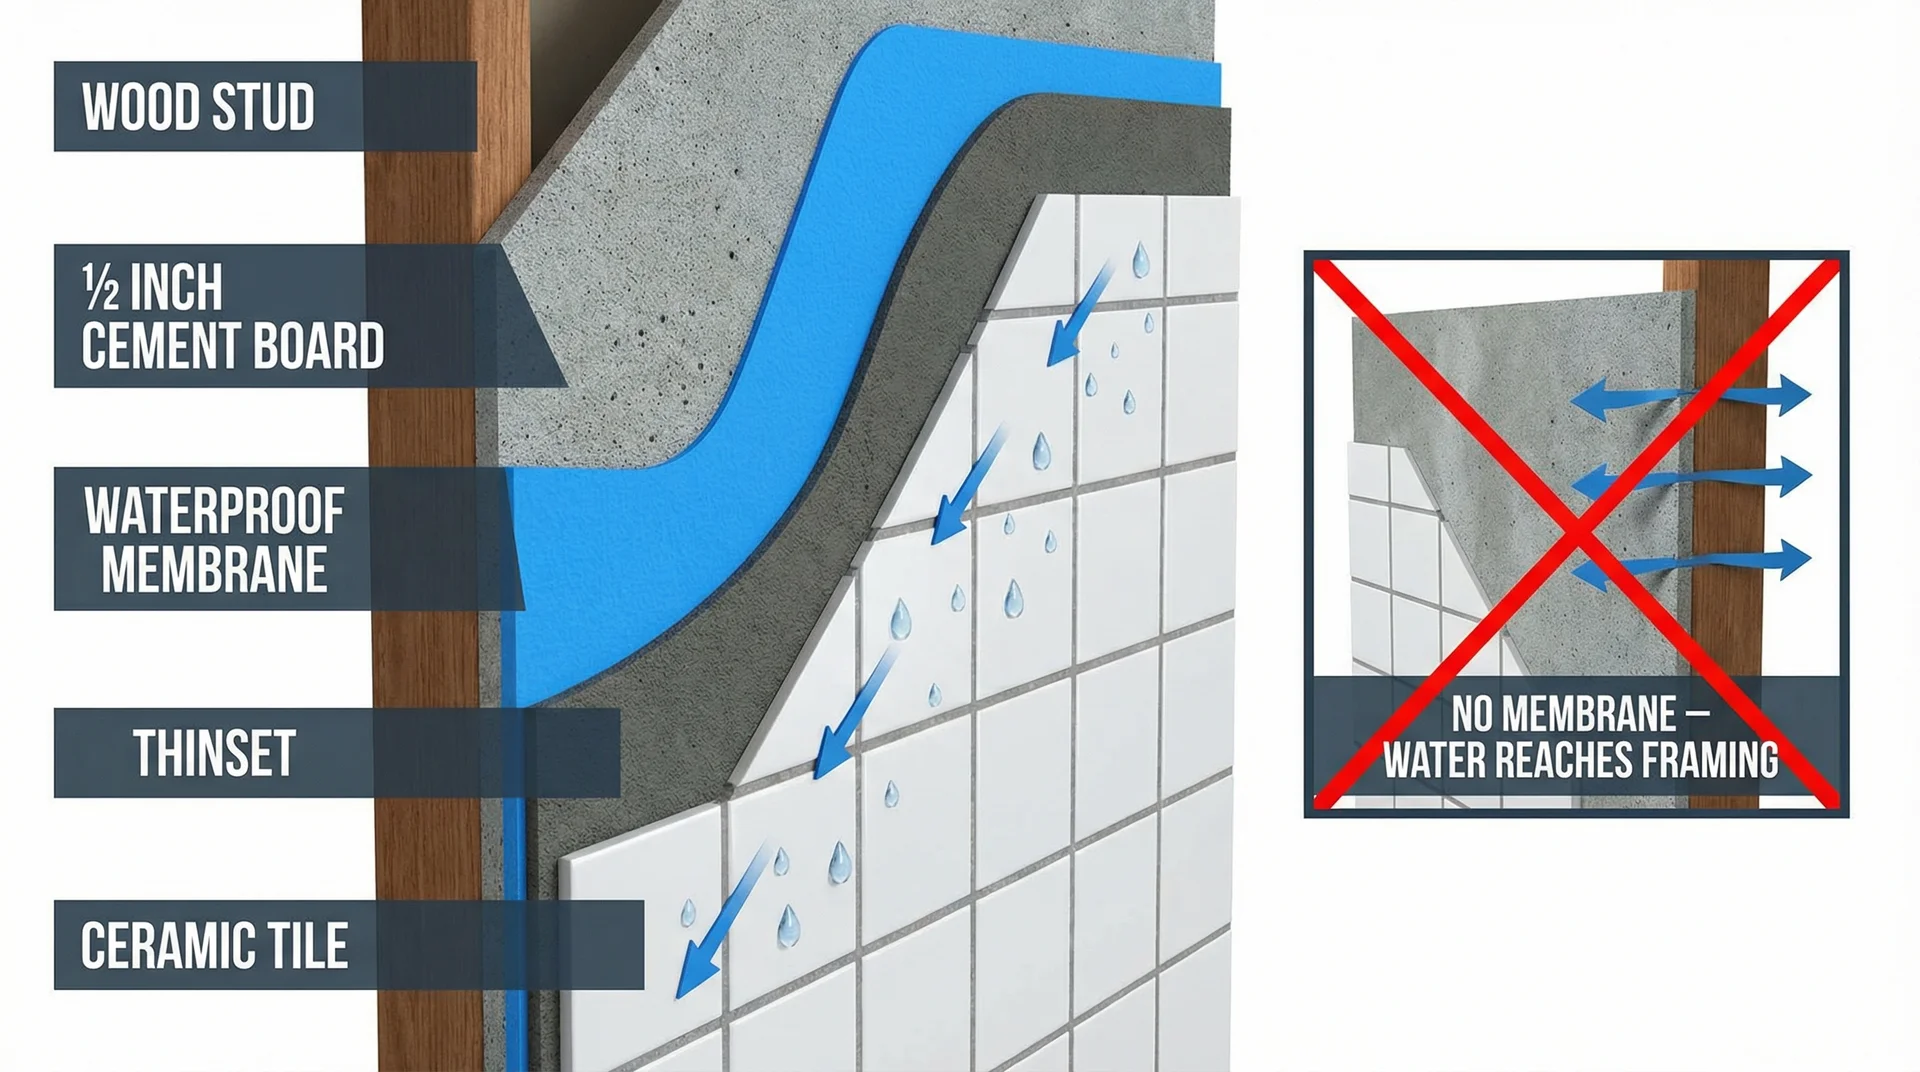
This trips up so many people and deserves its own conversation: cement board is moisture-resistant, not waterproof. These are not the same thing, and treating them as interchangeable is one of the most expensive misunderstandings in residential tile work.
Cement board handles incidental moisture. It won’t dissolve. It won’t swell like drywall. It won’t feed mold the way organic materials do. But water under pressure, water that wicks through grout lines, water that finds its way behind the tile? That moves through the cement board and reaches your framing.
Before any tile goes up in a shower, a waterproof membrane goes on first.
Liquid-applied products like RedGard, sheet membranes like Schluter Kerdi, or integrated waterproof backer systems all address this. The ½ inch board gives the membrane a solid, non-flexing surface to bond to. That relationship between thickness and waterproofing is what most guides miss entirely.
The Honest Answer About ¼ Inch in a Shower
Some older installation guides say ¼ inch is acceptable for shower walls. Technically, it bonds mortar, resists mold, and won’t dissolve from moisture exposure. From a narrow materials standpoint, those guides are not wrong.
Structurally, though, ¼ inch on a wall with 16-inch stud spacing gives your tile installation a fighting chance at best. The board flexes too much. The tile looks fine for a year or two, then the grout softens, and then water finds the gap.
I’ve seen this play out in enough bathrooms to say with confidence: ¼ inch on shower walls pushes a future problem down the road rather than solving it today.
Cement Board Thickness for Floors
Floors give you more flexibility in your thickness decision, but that flexibility comes with conditions worth understanding before you buy.
When ¼ Inch Actually Works on Floors
On a solid, stiff subfloor, ¼ inch cement board performs well as floor underlayment. It creates a stable, moisture-resistant surface for thinset and tile to bond to, and it carries a practical advantage that ½ inch cannot match.
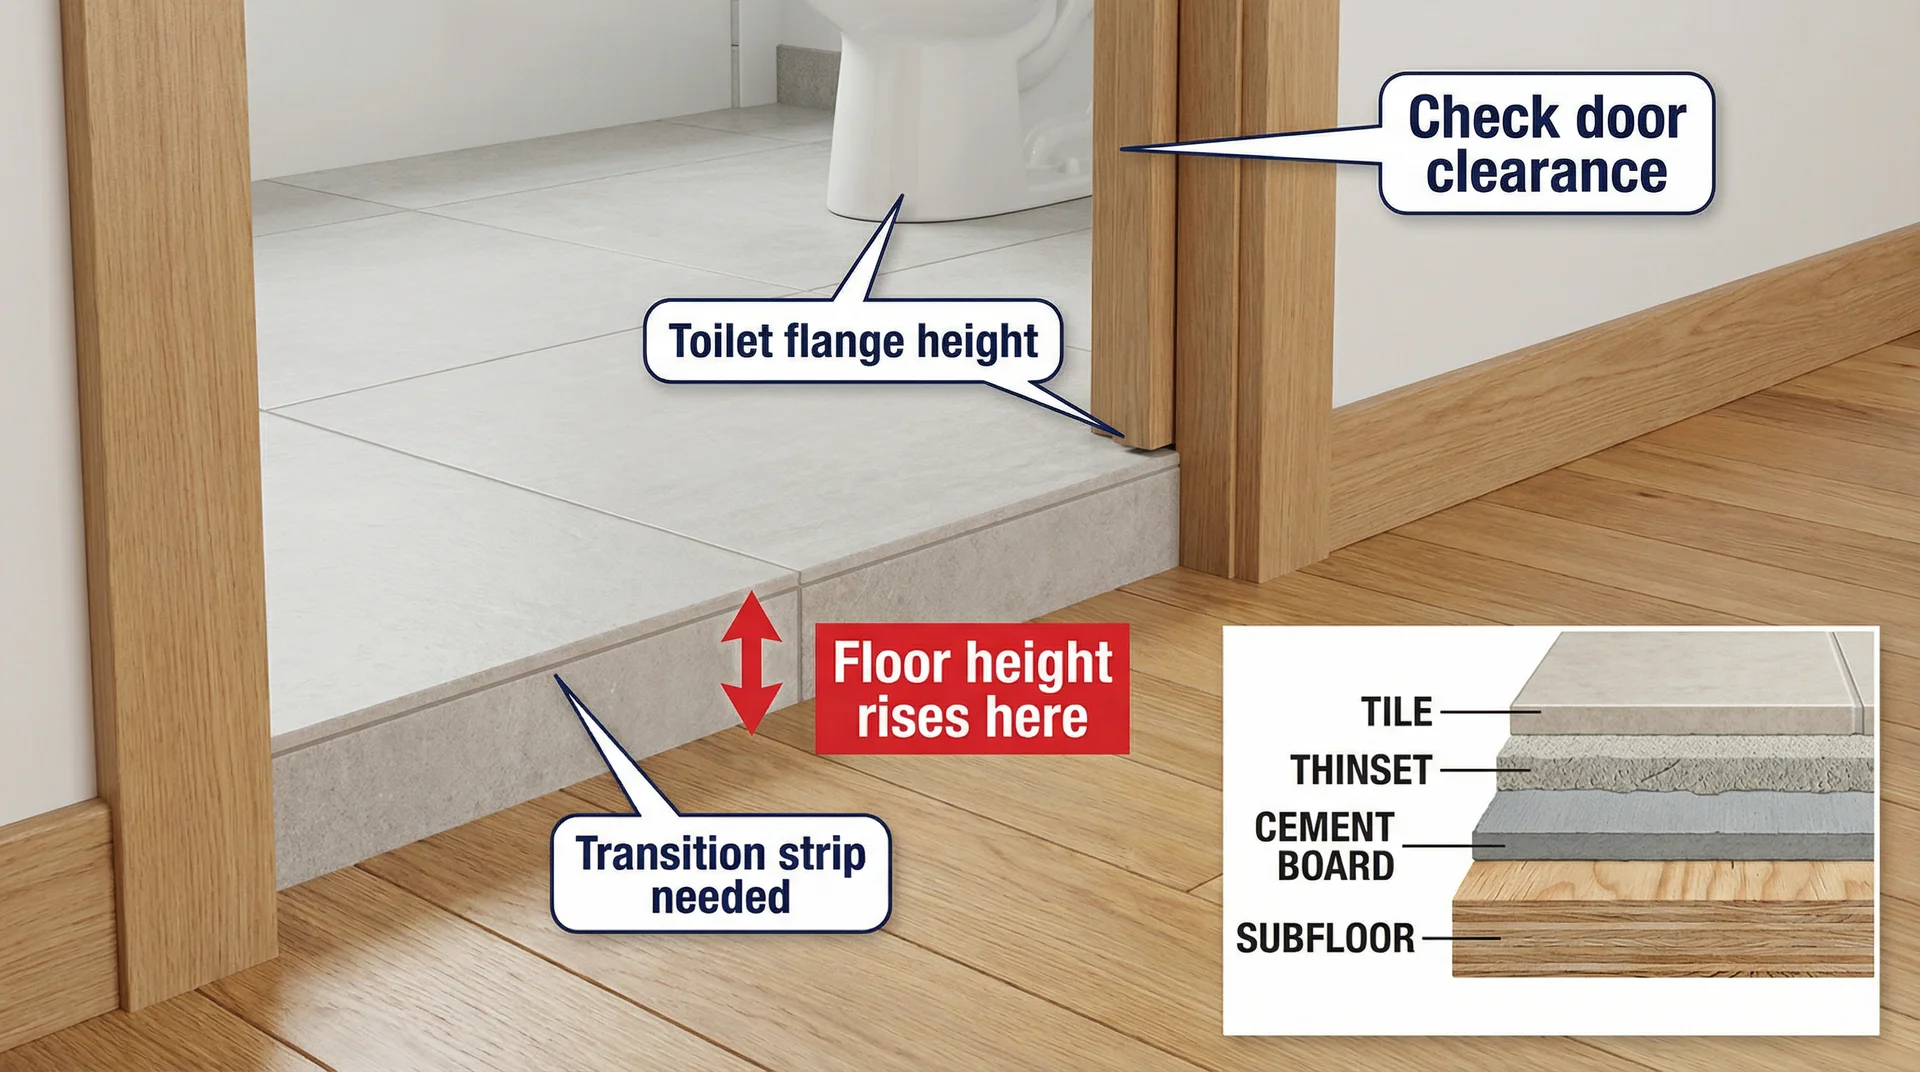
¼ inch raises your floor plane less. On a renovation where you’re tying into existing flooring in adjacent rooms, keeping that floor height change minimal matters. Thresholds, door clearances, toilet flange heights, and transitions to hardwood or LVP all become easier to manage when you add ¼ inch instead of ½ inch.
It’s also lighter and far easier to cut. A standard 3×5 sheet of ½ inch cement board runs 45 to 60 pounds. The ¼ inch version weighs roughly half that. For a solo DIY installation across a 200 square foot bathroom floor, that difference is significant by the end of the day.
Where ¼ inch works well on floors:
- Subfloor is ¾ inch or thicker, in good condition, with minimal flex
- Tiles are 12×12 inches or smaller
- Standard residential foot traffic
- Joist spacing is 16 inches on center or tighter
When You Need ½ Inch on Floors
Large-format tile, 18×18 or 24×24 and above, needs a stiffer substrate. The tile spans more surface area, which amplifies any flex in the assembly underneath. A ½ inch board adds meaningful rigidity that ¼ inch cannot deliver at those tile sizes.
Upstairs bathrooms benefit from ½ inch for a different reason: sound. The added thickness creates a noticeably better sound barrier. Anyone who’s lived beneath a bathroom tile floor knows the difference, and it’s one of those quality-of-life details that shows up years after installation when you realize the floor does not sound hollow underfoot.
If your subfloor shows any softness, bounce, or deflection, ½ inch is the safer call.
The test is simple: walk the area slowly and feel for any give or sound. A properly stiff subfloor for tile should feel completely solid.
The Floor Height Problem Nobody Warns You About
This catches homeowners off guard at exactly the wrong moment, usually after they’ve already bought their materials.
Adding cement board raises your finished floor height. ¼ inch board plus thinset plus tile adds roughly ¾ inch to 1 inch to your floor plane. ½ inch board adds more. That change affects:
- Door clearance: Doors that currently clear the floor may need trimming
- Toilet flanges: If your tile installation raises the floor above the flange, you need a flange extender
- Transitions: Where tile meets hardwood or LVP in an adjacent room, the transition profile must accommodate the height difference
- Shower pan lips: The pan’s side wall height determines how much your floor board can add
Measure this before you buy. Five minutes with a tape measure prevents a frustrating mid-project adjustment.
Cement Board Thickness for Countertops
Countertops get overlooked in most thickness guides, but they come up enough in renovation planning that they’re worth addressing directly.
For tile countertops, ¼ inch cement board over a solid plywood substrate works well. The countertop surface does not experience the same moisture exposure as a shower wall, and the plywood beneath it handles the structural load. The ¼ inch board gives thinset a stable, moisture-resistant bonding surface without adding unnecessary bulk to the countertop assembly.
One consideration: if your countertop has an undermount sink, make sure the cement board edges around the cutout are sealed properly. Water that sits around an unsealed sink cutout will wick into the plywood edge over time, regardless of what’s on top.
Cement Board Thickness for Walls Outside the Shower
Kitchen Backsplash Areas
For a kitchen backsplash installed over existing drywall, ¼ inch cement board is generally acceptable. The drywall behind it adds backing, and moisture exposure in a backsplash is far lower than in a shower wall.
Over open studs, use ½ inch. The same stud-span rigidity concern applies, and a kitchen backsplash area is typically too small to benefit from the thinner board’s handling advantages anyway.
One practical note: when your backsplash transitions to adjacent painted drywall, the cement board thickness affects how your tile sits relative to the surrounding wall surface. ¼ inch keeps the tile plane closer to flush with existing finishes. Account for this in how you plan your trim and caulk lines.
Bathroom Walls Outside the Shower Zone
Many homeowners use moisture-resistant drywall on bathroom walls outside the direct wet zone, which works in a well-ventilated bathroom. If you use cement board in those areas, ½ inch keeps your wall assembly consistent throughout the room, and the uniform stiffness makes tiling easier.
Practically, if your shower walls use ½ inch and your non-shower bathroom walls use ¼ inch, you have a thickness transition somewhere in the room. That transition requires shimming or careful planning so your tile field doesn’t hit a visible lip. Keeping everything at ½ inch eliminates that variable.
Cement Board Thickness for Exterior Applications
This is where my background in residential exterior construction becomes directly relevant. I’ve specified and installed exterior cement board systems on dozens of homes across the Southwest, and the thickness conversation looks meaningfully different outdoors than it does inside a bathroom.
What Exterior Applications Actually Demand
Exterior cement board faces conditions interior applications never see: UV exposure, freeze-thaw cycles, wind-driven rain, humidity swings, and, in coastal areas, salt air. Thicker boards handle these conditions better because they carry more material mass to resist moisture penetration and impact damage over time.
For exterior wall sheathing and siding substrate applications, ½ inch is a baseline. High-wind zones in hurricane-prone coastal areas often require thicker assemblies or specific impact-rated products. Freeze-thaw climates in the Midwest and Northeast put additional stress on exterior assemblies, where thinner boards can develop micro-cracking as moisture that enters the board expands and contracts seasonally.
The critical distinction: interior cement backer board and exterior-rated cement board are different products. Interior backer board handles controlled moisture environments. Exterior-rated products are formulated specifically to handle continuous weathering. Using interior backer board on an exterior application is a code compliance issue in most jurisdictions and a durability problem in all of them.
What I Check Before Specifying Exterior Thickness
On every exterior cement board job, three things determine my specification before I look at any product sheet:
Existing sheathing condition and depth. If there’s existing OSB or plywood sheathing behind the cement board, its thickness and condition factor into the total assembly depth. Compromised sheathing does not get covered up. It gets replaced first.
Local building code requirements. This varies by municipality and climate zone. Some codes specify minimum assembly ratings that determine which products and thicknesses qualify. Always pull local requirements before specifying materials on an exterior job.
Manufacturer installation instructions. Every exterior cement board product comes with specific requirements: fastener type, spacing, joint treatment, and approved thickness ranges. Following these is not optional. Deviating voids the product warranty and can create code compliance issues.
Cement Board vs. Alternatives: A Brief Comparison
You’ll encounter other backer board products on the market, and understanding how they compare helps you make the right call for your specific situation.
| Product | Thickness Available | Best Use | Key Trade-off |
|---|---|---|---|
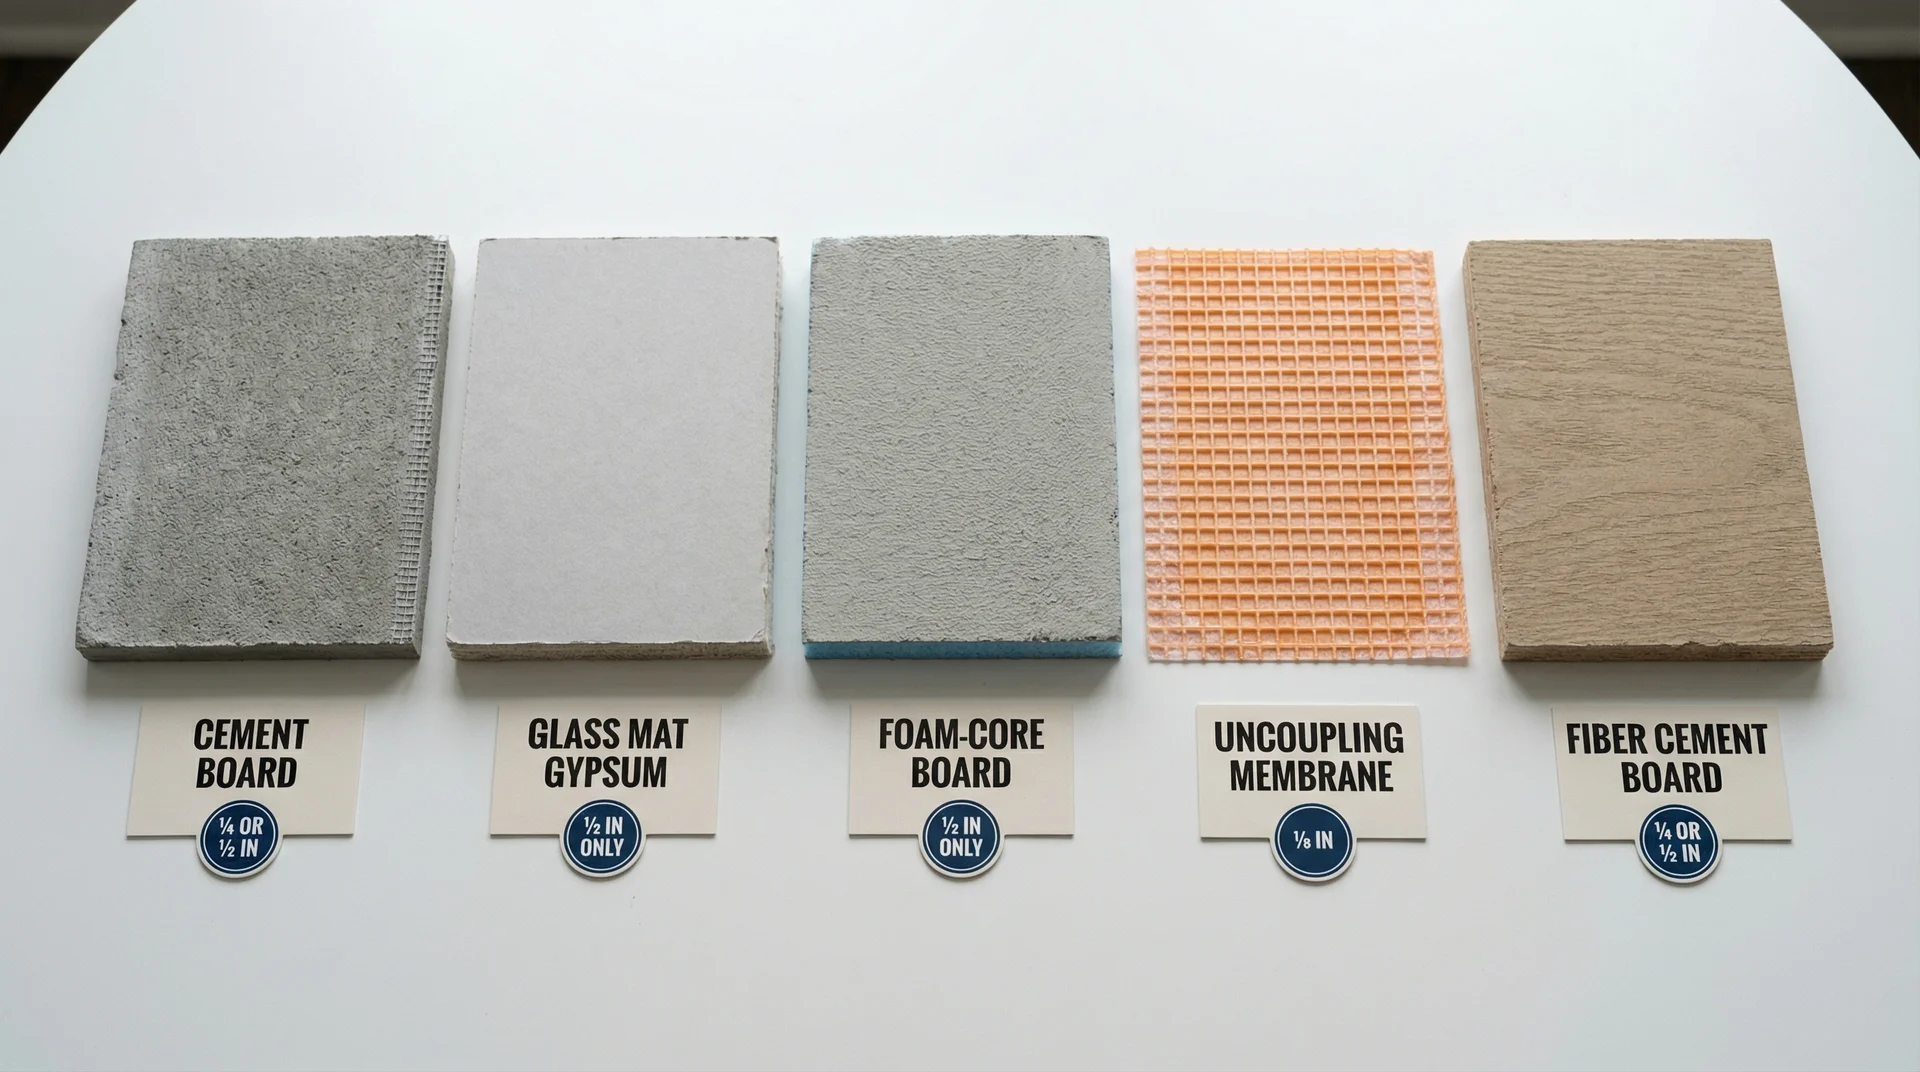
| Cement board (Durock, HardieBacker) | ¼”, ½”, ⅝” | Floors, walls, wet areas | Heavy, harder to cut |
| Glass mat gypsum (DensShield) | ½” only | Walls, moderate wet areas | Easier to cut, built-in moisture barrier, higher cost |
| Foam-core board (GoBoard) | ½” only | Walls, shower surrounds | Lightweight, waterproof core, significantly more expensive |
| Uncoupling membrane (Ditra) | ⅛” | Floor underlayment | Eliminates height buildup, allows floor movement, no wall use |
| Fiber cement board | ¼”, ½” | Floors, countertops, walls | More brittle than cement board, keep screws 1 inch from edges |
Traditional cement board remains the most widely available and cost-effective option for most residential applications. The alternatives earn their premium in specific scenarios: GoBoard makes sense when a lightweight, waterproof wall board justifies the cost difference; Ditra makes sense when minimizing floor height buildup is the priority.
What Cement Board Actually Costs
Pricing is worth knowing before you walk into a hardware store, because the difference between ¼ inch and ½ inch affects both material cost and installation effort.
Material cost per square foot:
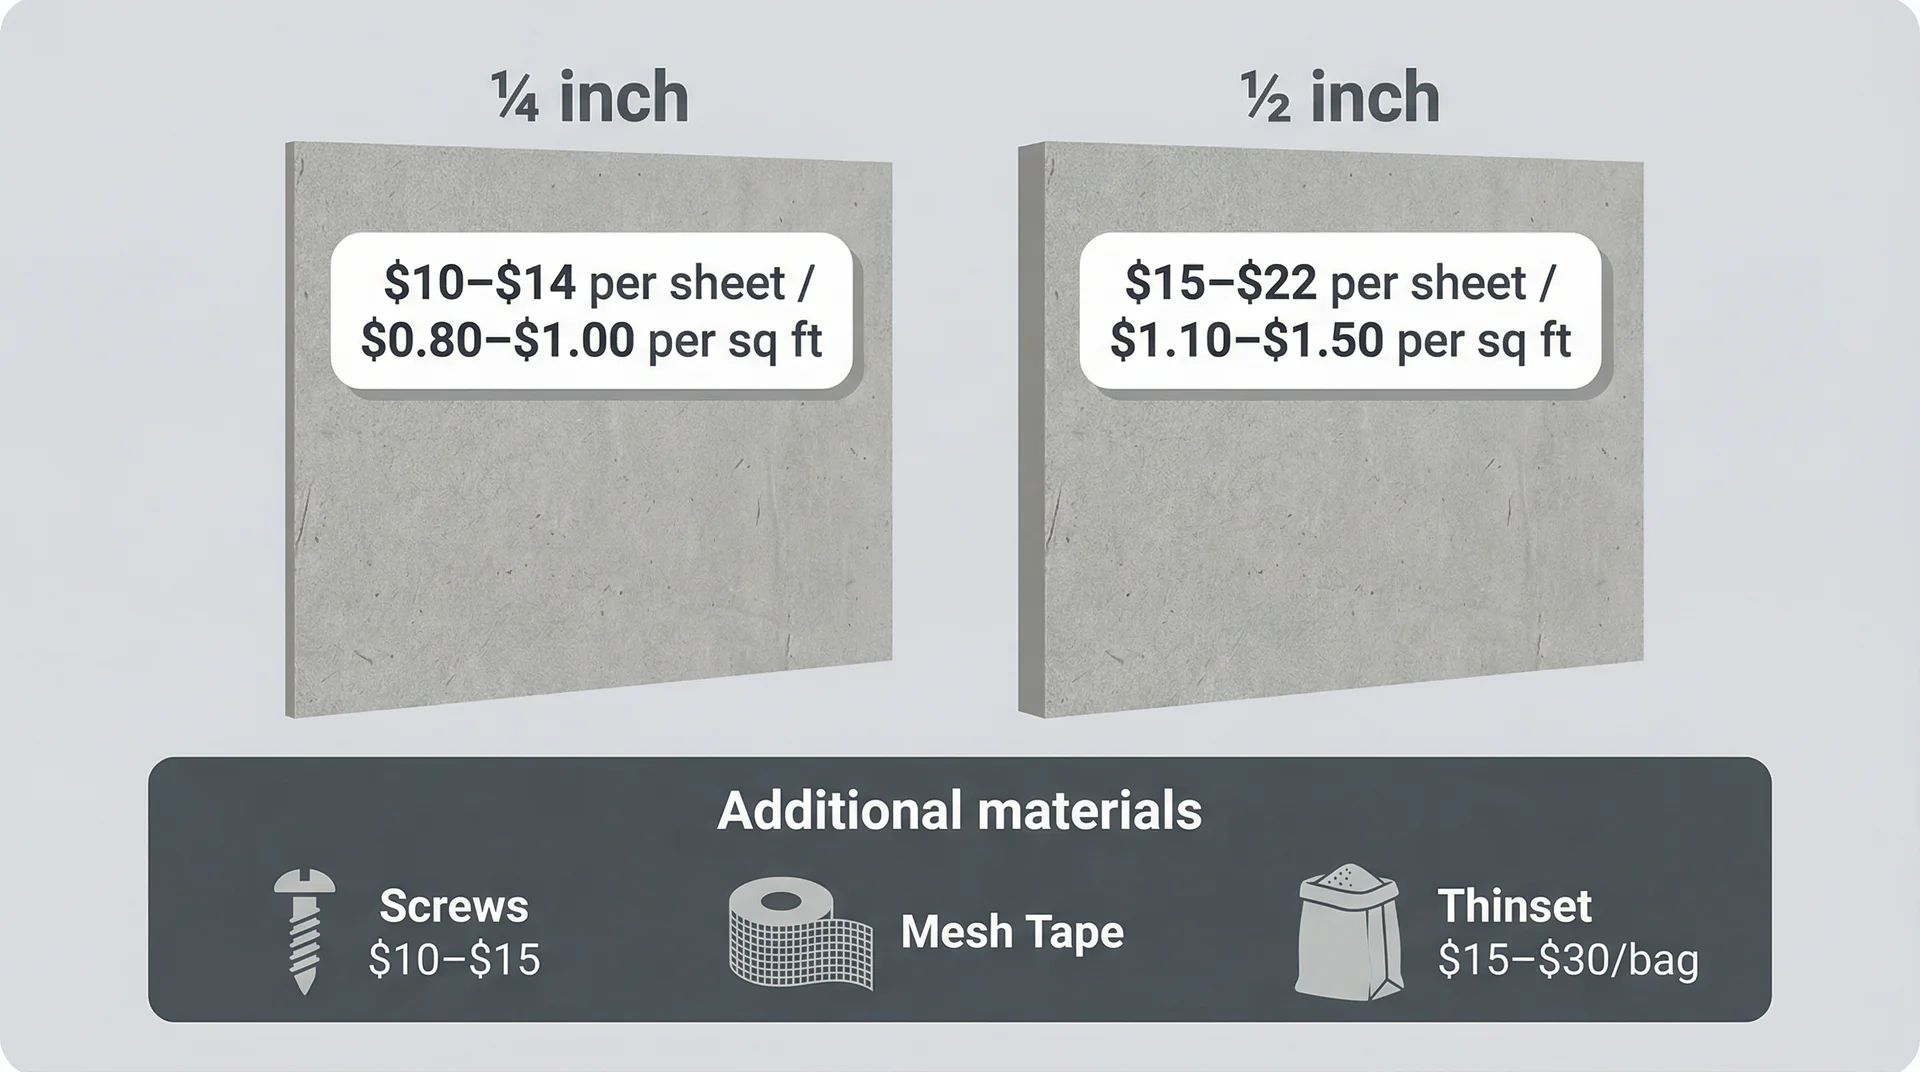
- ¼ inch cement board: roughly $0.80 to $1.00 per square foot
- ½ inch cement board: roughly $1.10 to $1.50 per square foot
- ⅝ inch (specialty): typically special order, priced higher
Sheet pricing (3×5 standard sheet):
- ¼ inch: approximately $10 to $14 per sheet
- ½ inch: approximately $15 to $22 per sheet
Beyond the board itself, budget for corrosion-resistant cement board screws (around $10 to $15 for a box covering 150 to 200 square feet), fiberglass mesh tape for seams, and thinset mortar for floor installations where the board beds into mortar before fastening.
For a mid-range bathroom project – 150 square feet of ½ inch board with modest waterproofing – expect to spend $240 to $330 in materials alone before labor.
Brands and What Thickness Options They Actually Offer
HardieBacker (James Hardie)
HardieBacker comes in ¼ inch and ½ inch. The ¼ inch product is explicitly positioned for floor underlayment. The ½ inch product covers walls, floors, and wet areas. It’s the most widely stocked cement board at most Home Depot and Lowe’s locations in the US, which means ½ inch is genuinely easy to find.
Durock (USG)
Durock offers ¼ inch, ½ inch, and ⅝ inch. The ⅝ inch is a specialty SKU that becomes relevant when you need to match existing drywall thickness in a renovation. You will not find ⅝ inch stocked at most big-box stores. Expect a specialty tile supplier or a special order, and a few extra dollars per sheet.
USG’s own handbook recommends ½ inch for wall applications at standard framing. The existence of the ¼ inch product in their lineup does not change that recommendation.
GoBoard (Johns Manville)
GoBoard only comes in ½ inch. It’s built-in waterproofing changes the installation sequence slightly: you still apply membrane at seams and penetrations, but the board itself is waterproof through and through.
It’s significantly lighter than traditional cement board, which matters on a solo wall installation. The material cost runs considerably higher than traditional cement board, and for most straightforward shower renovations, ½ inch cement board with a quality-applied membrane performs comparably at a lower cost.
The Thickness Mistakes I See Most Often
These are preventable. They show up repeatedly on service calls and renovation jobs.
Using ¼ inch on shower walls because it was available or cheaper. This is the most common and most consequential error. The money saved on the board gets spent three to five times over on tile removal, moisture remediation, and reinstallation.
Not accounting for the floor height change before buying materials. Discovering mid-installation that your toilet flange sits below your new finished floor, or that your door no longer clears the tile, creates a problem requiring either rework or a visible compromise in the finish.
Treating cement board as waterproof. Skipping the waterproof membrane because “cement board handles moisture” misunderstands how the assembly works. The board manages the substrate side. The membrane manages the water.
Placing seams between studs. Regardless of thickness, every cement board edge needs backing behind it. A seam floating between studs creates a flex point that telegraphs into your tile surface over time.
Using standard drywall screws. Cement board requires corrosion-resistant screws rated specifically for the application. Standard drywall screws corrode in wet environments. Fastener failure leads to board movement, which leads to tile and grout failure. Use 1¼ inch cement board screws with the correct corrosion-resistant coating, spaced every 8 inches throughout the panel and every 6 inches around the perimeter.
Skipping the dry fit. Laying out your cement board before committing to final installation lets you identify fit issues, plan seam locations, and confirm that all edges land on joists or studs. It adds 20 minutes and eliminates cutting errors that waste material.
How to Choose the Right Thickness: A Simple Framework
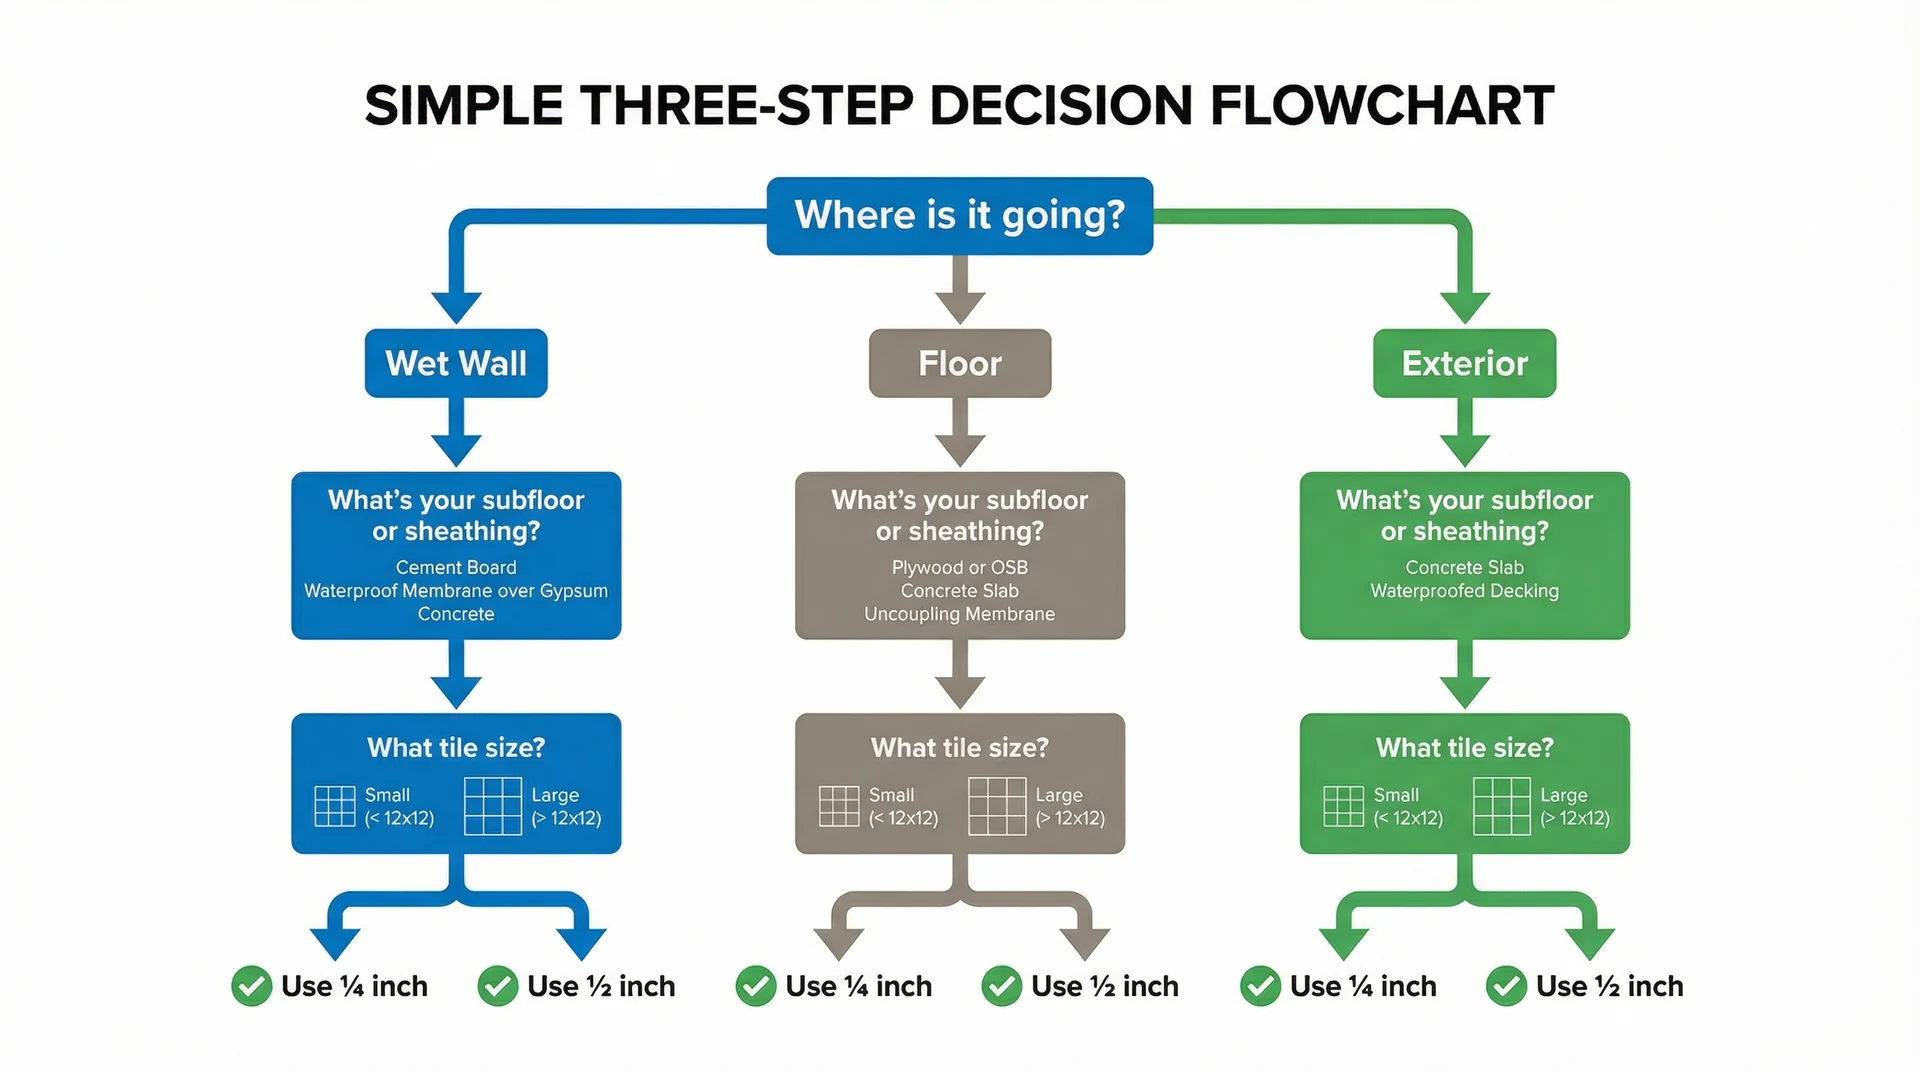
Three Questions to Answer Before You Buy
1. Where is this going?
Wet vertical surface (shower, tub surround): ½ inch, without exception. Dry or semi-wet vertical surface (bathroom wall outside shower, backsplash over drywall): ¼ inch can work over existing backing; ½ inch over open studs. Floor: ¼ inch if conditions are right, ½ inch for large tile or sound control. Countertop: ¼ inch over solid plywood. Exterior: ½ inch minimum, then follow code and manufacturer specifications.
2. What is my existing subfloor or sheathing situation?
Is it stiff, thick, and in good condition? Does your total substrate thickness hit the 1¼ inch minimum for floor tile per TCNA guidelines when you add cement board? If the subfloor flexes noticeably, address that first.
3. What size tile am I installing?
Tiles 12×12 or smaller on a solid floor: ¼ inch works. Tiles larger than 12×12: ½ inch for the added substrate stiffness. Large-format tile on walls makes ½ inch even more important, because larger tiles amplify any flex in the substrate behind them.
The Rule of Thumb I Use in the Field
- Wet plus vertical: ½ inch, always
- Floor on solid subfloor, standard tile: ¼ inch is fine
- Floor with large tile, upstairs bathroom, or any subfloor softness: ½ inch
- Exterior: ½ inch baseline, then follow code and spec
When in doubt, go to ½ inch. The cost difference between ¼ inch and ½ inch is modest on any residential project. The cost difference between a correct first installation and a tile removal and redo is not.
Frequently Asked Questions
What thickness of cement board do I use for shower walls?
Use ½ inch. It provides the structural rigidity needed across standard 16-inch stud spacing, supports tile and thinset under daily use, and gives your waterproof membrane a stable surface to seal against.
Can I use ¼ inch cement board in a shower?
On the shower floor over a solid subfloor, ¼ inch can work. On shower walls, it’s structurally inadequate for standard framing spans. The board flexes, and that flex eventually damages your tile and grout.
What thickness cement board do I use for tile floors?
¼ inch works on a solid ¾ inch subfloor with standard-sized tiles. Use ½ inch for large-format tile, upstairs installations, or any subfloor with noticeable flex.
Is ½ inch or ¼ inch cement board better?
Better depends entirely on your application. ½ inch is better for walls and wet areas. ¼ inch is better where you need minimal floor height addition and your subfloor is solid and stiff.
Does cement board thickness affect tile adhesion?
Indirectly, yes. Thickness affects rigidity. A board that flexes between supports creates movement in the tile plane. That movement breaks grout lines over time and eventually loosens tile. A stiffer board gives thinset and tile a stable surface to bond to for the long term.
What is the standard cement board thickness?
½ inch is the most widely used across residential applications, covering walls, floors, and wet areas.
Can cement board be used on exterior walls?
Yes, with the correct exterior-rated product. Interior backer board is not rated for exterior exposure. Use products formulated specifically for outdoor applications and follow local code requirements for your climate zone.
What happens if I use a cement board that is too thin?
In the short term, usually nothing is visible. Over time, flex in an underspecified board creates micro-movement in your tile installation. Grout lines crack first, then water finds its way behind the tile, and then the tile loosens. The failure timeline ranges from one to five years, depending on use and conditions.
How much does cement board cost per sheet?
A standard 3×5 sheet of ¼ inch runs roughly $10 to $14. A ½ inch sheet of the same size runs $15 to $22. Prices vary by brand and region. Budget additional materials for screws, mesh tape, and thinset mortar on floor installations.
A Final Word
The cement board decision feels minor compared to choosing your tile or planning your layout. It sits early in the project, before anything visible happens, which is exactly why it’s so easy to underestimate.
Getting it right protects everything that comes after it. Use ½ inch on wet vertical surfaces. Hit that 1¼ inch minimum on floors. Apply a waterproof membrane in your shower regardless of which board you use. Account for your floor height change before you buy, not after.
These aren’t complicated standards. They’re just easy to skip when you’re eager to get to the part of the project that actually looks like progress.
Follow the system, choose the right thickness for your specific situation, and your tile installation will outlast almost everything else in the room.