
Cedar board and batten siding gives a house a look that’s genuinely hard to replicate in any other material.
But before you commit to it, you need a clear picture of what it actually costs, how long it realistically lasts, and where it fails when it isn’t installed correctly.
That last part is what most guides skip. I’ve been working residential exteriors for more than 15 years, and cedar board and batten is one of the products that gets oversold on aesthetics and undersold on what it requires.
This guide covers both.
What Is Cedar Board and Batten Siding?
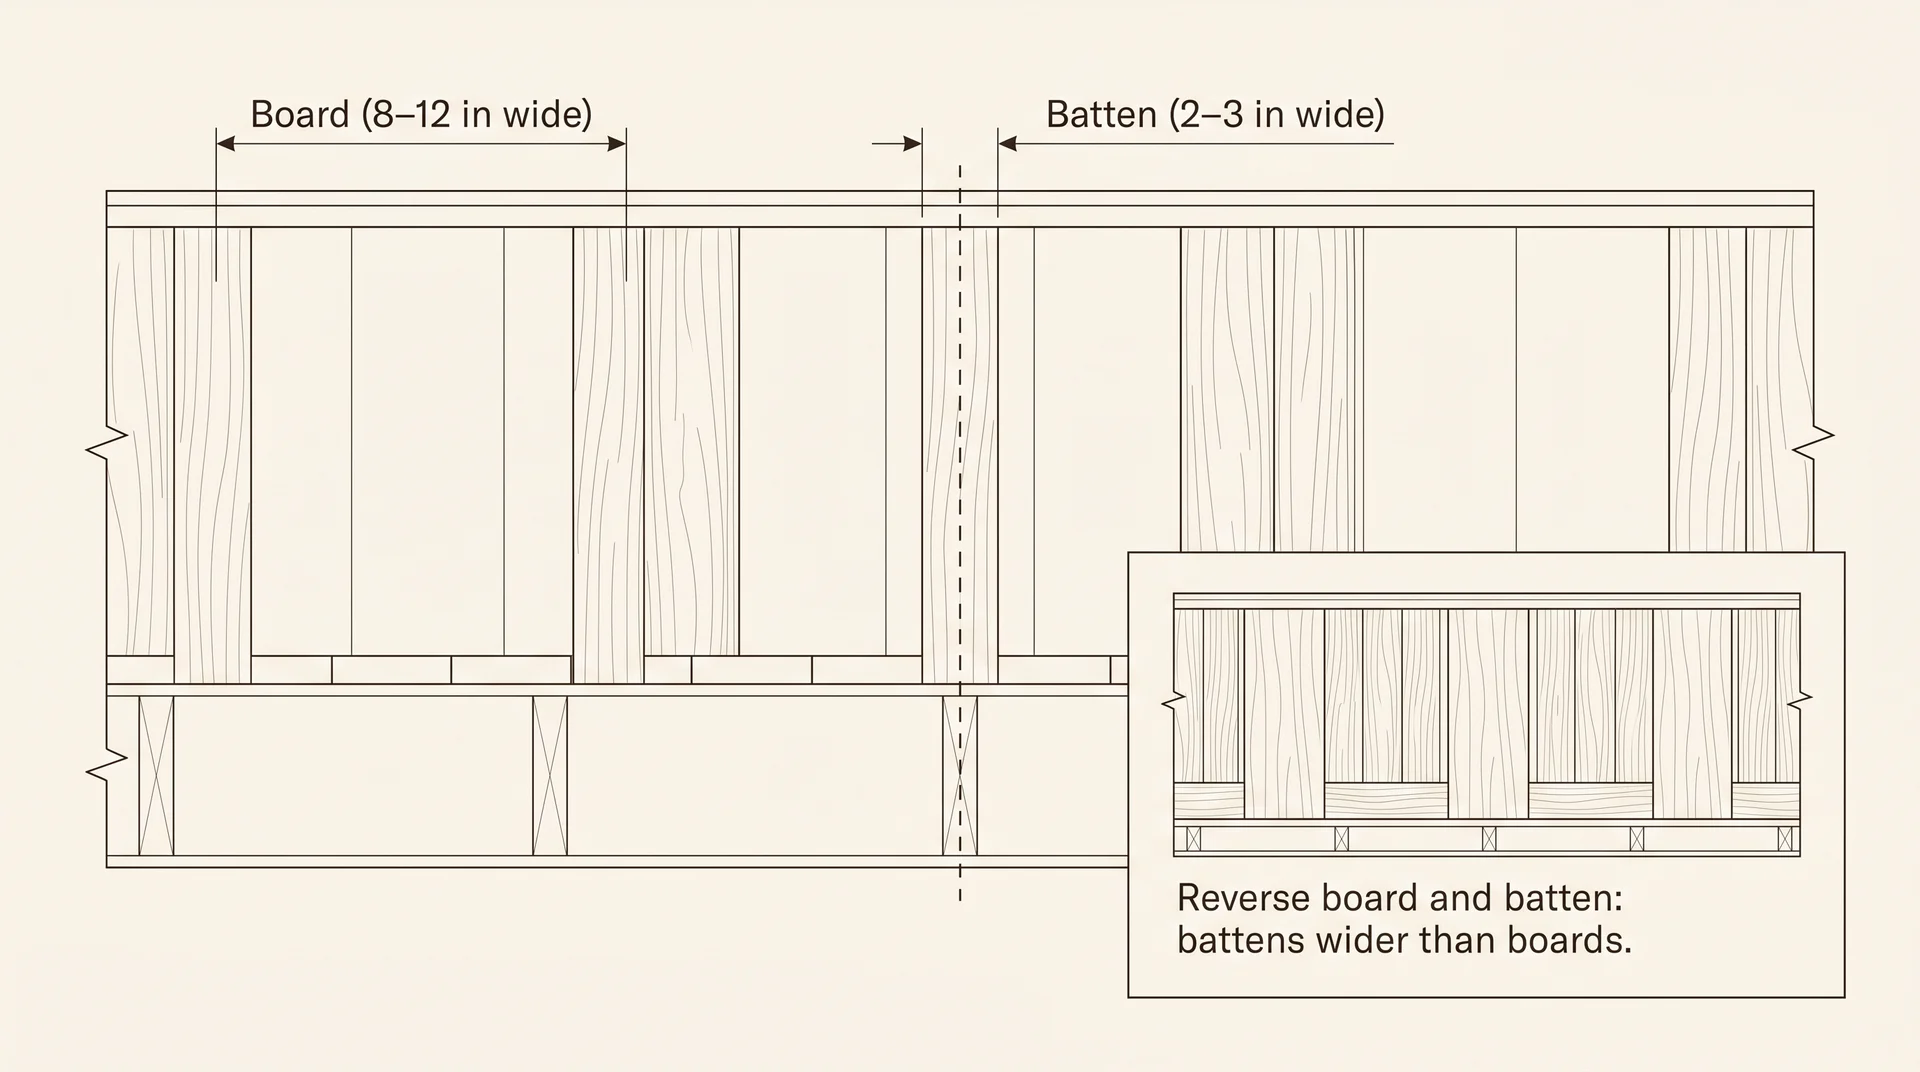
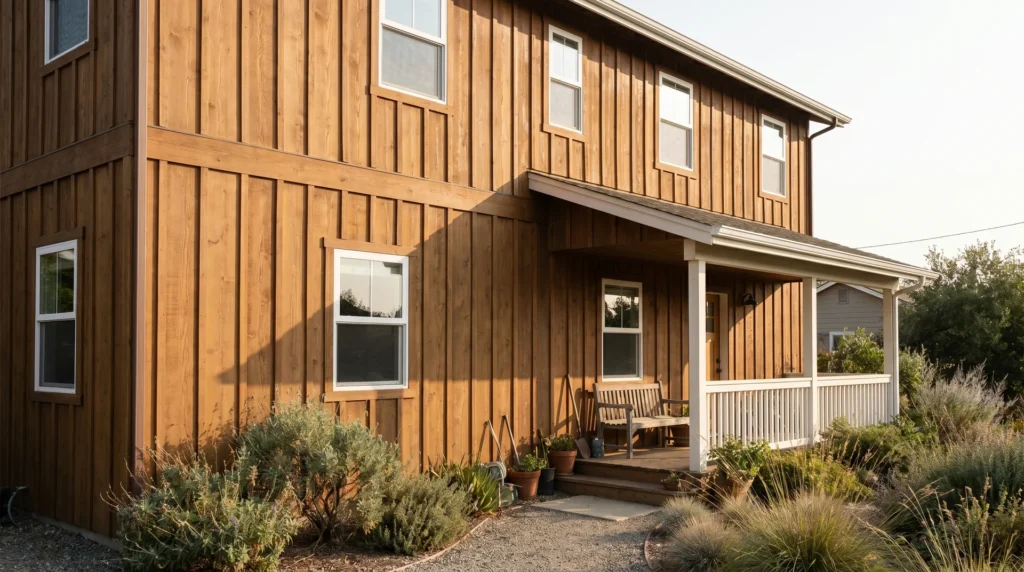
Cedar board and batten siding is a vertical wood siding system made from wide cedar planks, called the boards, with narrower strips called battens nailed over the seams between them.
- The boards are typically 8 to 12 inches wide.
- The battens run 2 to 3 inches wide and sit centered over each joint.
The result is a clean vertical line that works on a modern farmhouse, a cabin, and a craftsman build with equal ease.
It’s one of the oldest exterior siding patterns in American residential construction.
What’s kept it relevant is that the proportions work at almost any scale, and real wood has a texture and warmth that manufactured alternatives don’t quite match.
How Board and Batten Differs from Other Siding Styles
Most common siding profiles run horizontally. Cedar board and batten runs vertically, which changes how the wall reads visually and how water moves across the surface.
- Lap siding (horizontal): Boards overlap from top to bottom and water sheds by gravity along each course. It’s a forgiving profile for installation and tolerates moderate maintenance neglect better than a vertical system does.
- Shiplap: Boards interlock at the edges with a rabbet cut. Tighter than board and batten, but without the same shadow line depth or visual weight.
- Board and batten: Water runs down the face of the boards and must clear the bottom edge cleanly. The battens cover the joints but don’t seal them. Proper installation and finish maintenance matter more here than with most horizontal profiles, a point worth keeping in mind throughout this piece.
- Reverse board and batten: The same system run inverted, with narrow boards over wide batten, creating a recessed groove instead of a raised strip. Less common, but worth knowing if you’ve seen the look on contemporary or shed-style builds and wondered what it was.
- Shingles or shakes: Individual pieces in overlapping rows. More texture, more labor to install, and more pieces to replace when damage occurs.
Western Red Cedar vs. Eastern Red Cedar: Which One Is Used?
For board and batten siding, western red cedar is the standard, and it’s the better choice.
Eastern red cedar, also called aromatic cedar, is denser and harder, but it’s more prone to checking and harder to finish consistently.
It’s also difficult to source in the long, clear lengths that exterior siding requires. Western red cedar, sourced primarily from the Pacific Northwest and British Columbia, is naturally resistant to decay and insects.
The Western Red Cedar Lumber Association grades it for exterior use, and it holds paint and stain well when properly prepared. When you see “cedar board and batten siding” in a supplier’s listing or a contractor’s bid, western red cedar is almost always what they mean.
Why Cedar Board and Batten Is Worth Considering
Western red cedar is one of the few wood species genuinely suited to long-term exterior exposure without chemical treatment. That advantage runs deeper than aesthetics.
- Natural decay resistance: Western red cedar contains natural oils that resist rot and insect damage. The Western Red Cedar Lumber Association classifies it as naturally durable, which means it performs well even when the finish isn’t perfect. That said, natural resistance is not a reason to be careless about maintenance. The oils buy time. They don’t replace a finish schedule, and they don’t protect end grain that was never sealed in the first place.
- Dimensional stability: Cedar moves less with moisture changes than pine or spruce, which matters enormously in a vertical siding system where seasonal movement can open joints and split boards over time. This is one of the reasons cedar became the default for board and batten work historically, and it’s still the most practical argument for it today.
- Finish acceptance: Cedar takes paint and stain exceptionally well, solid-color paint, semi-transparent stains that let the grain show through, or clear sealers for a natural look. The results hold longer on cedar than on most other exterior woods when the surface is properly prepped.
- Repairability: Individual boards or battens can be replaced without touching the rest of the wall. That matters more than people expect.
- Longevity with maintenance: A well-installed, consistently maintained cedar exterior can last 30 to 40 years. The operative word is maintained.
The Real Cost of Cedar Board and Batten Siding
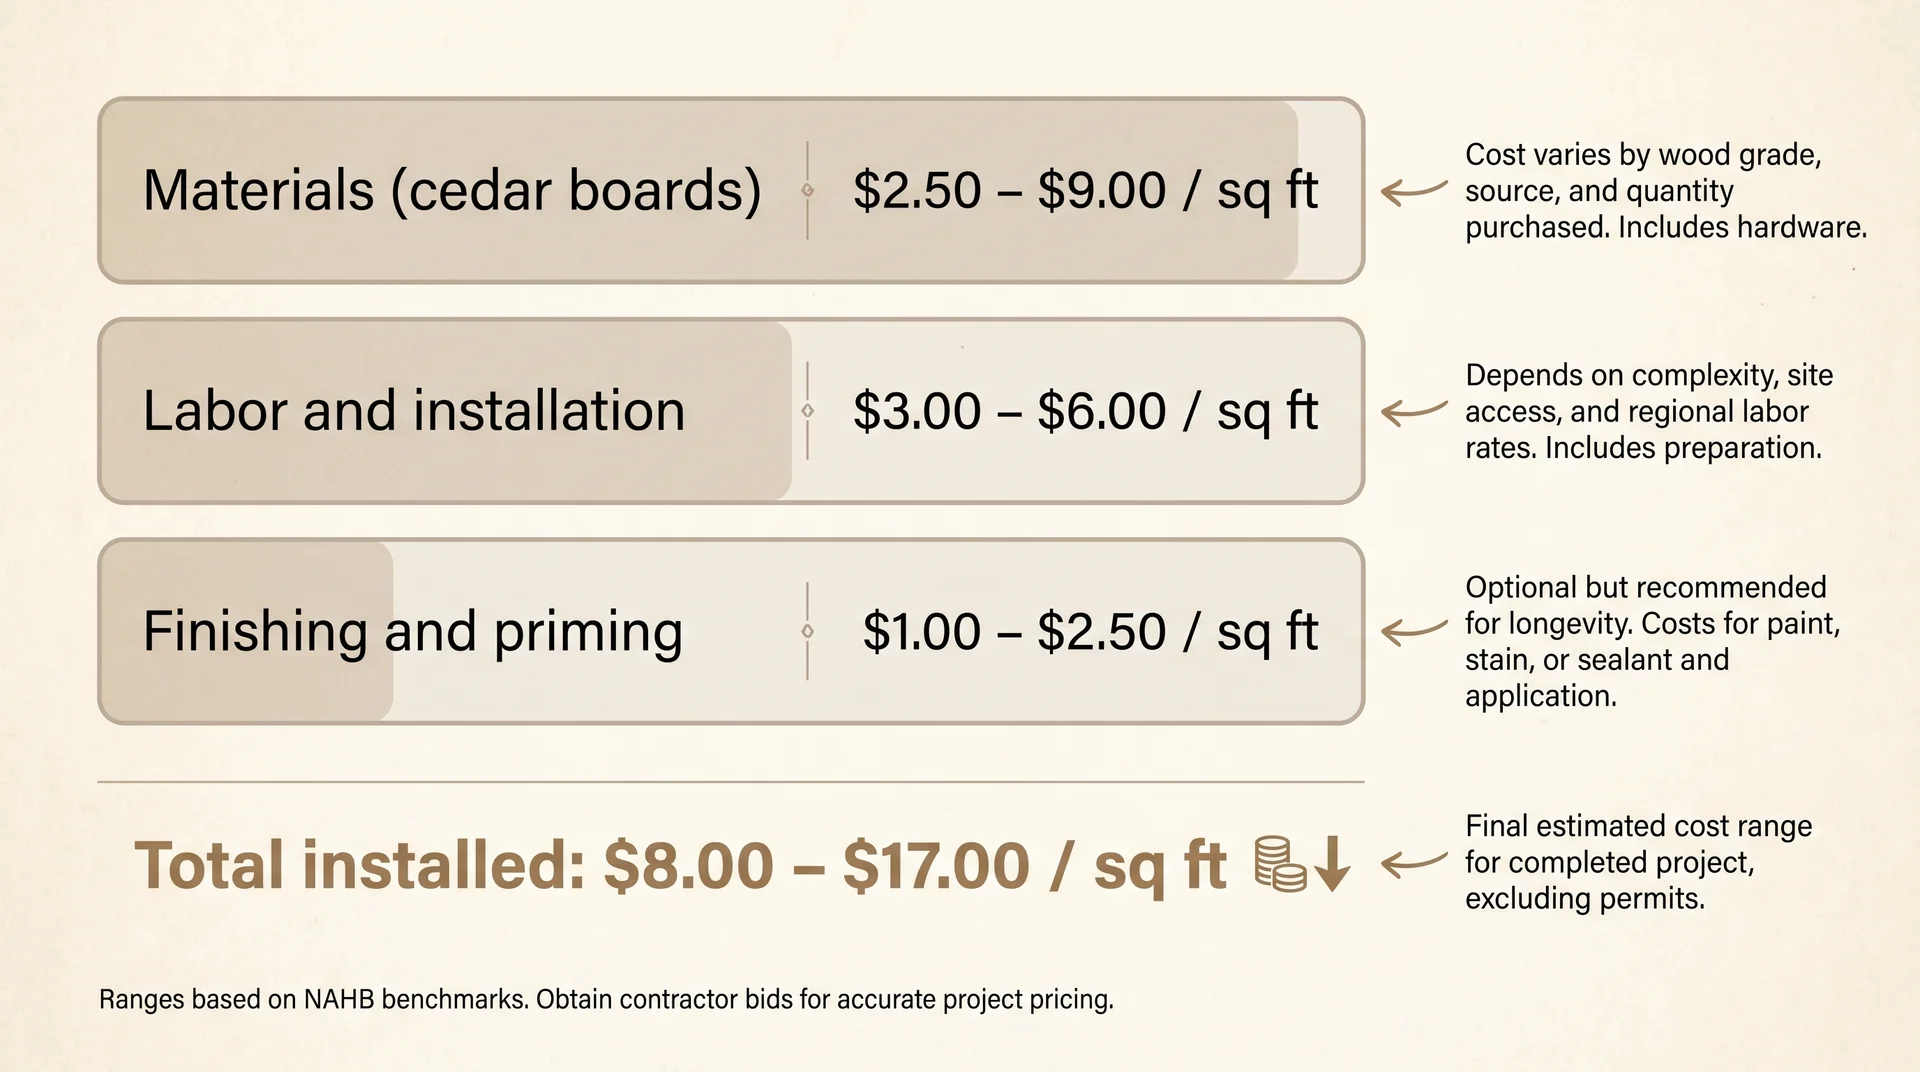
Cedar board and batten siding costs more than most homeowners expect, especially once finishing and labor are factored in separately.
The ranges below reflect typical US market figures consistent with National Association of Home Builders cost benchmarks.
Regional pricing, story height, trim complexity, and whether cedar arrives primed or raw will all affect your actual quote.
Use these as a planning baseline, not a budget ceiling. Always get at least three contractor bids before committing to a project budget.
Material Cost per Square Foot
Cedar pricing varies significantly by grade. STK (Select Tight Knot) is the most commonly specified exterior grade and the most affordable. Clear grades cost more and are typically reserved for high-visibility applications or premium builds.
| Cedar Grade | Typical Material Cost (per sq ft) | Best For |
|---|---|---|
| STK (Select Tight Knot) | $2.50 – $5.00 | Most residential applications |
| Clear (A or B grade) | $5.00 – $9.00 | High-visibility walls, premium builds |
| Prefinished / factory-primed | $6.00 – $11.00 | Faster installation, better end grain coverage |
STK is the right call for most projects. The knots are tight and stable, the grade holds finish well, and the cost difference over clear cedar is meaningful on any job larger than an accent wall.
Labor and Installation Costs
Labor for cedar board and batten runs roughly $3.00 to $6.00 per square foot, depending on your region and the complexity of the job. Multi-story installations cost more. Homes with significant window and door trim cost more.
Factors that push labor toward the high end of that range:
- Second or third-story walls requiring scaffolding
- Complex rooflines or gable ends with numerous angle cuts
- Removal and disposal of existing siding before new installation begins
- Homes with many windows and doors, each requiring precise flashing and trim integration
Finishing and Priming: The Line Item Homeowners Skip
Unfinished cedar board and batten will fail faster than finished cedar, and the cost of correcting that failure is far higher than doing it right from the start.
Primer and finish coats add roughly $1.00 to $2.50 per square foot on top of material and labor.
If your contractor’s quote doesn’t include it, ask specifically where it falls in the budget. Prefinished cedar, where the boards arrive factory-primed on all four sides, including end grain, costs more per board but often reduces total project cost when you account for on-site finishing time.
It also delivers better end-grain sealing than field priming usually does.
Most contractors won’t volunteer that comparison, and I think that’s a real disservice to homeowners trying to make an honest budget decision.
If you’re deciding between raw and prefinished cedar, ask to see the total installed cost for both, not just the material price.
If you’re thinking through exterior color options alongside your siding material decision, guides like this one on exterior paint color for siding can help narrow the finish direction before you commit to a product.
Total installed cost, including materials, labor, and finishing, typically runs $8.00 to $17.00 per square foot. West Coast and Northeast markets tend toward the top of that range. Mid-South and Mountain West markets generally come in lower.
How Long Does Cedar Board and Batten Siding Last?

Properly installed and consistently maintained cedar board and batten siding lasts 30 to 40 years.
Without adequate maintenance, expect significant deterioration by year 15 to 20, and sometimes earlier, depending on climate and installation quality.
I’ll be honest here: predicting exactly how long cedar board and batten will last on any specific house is genuinely difficult.
Climate, installation quality, wood grade, and how faithfully the finish schedule is followed all interact in ways that make precise numbers hard to call. The range above assumes competent installation and a real commitment to maintenance. Those aren’t always givens.
According to the USDA Forest Products Laboratory, the primary drivers of premature wood siding failure are moisture infiltration and finish degradation, not the wood itself.
Cedar’s natural decay resistance buys time when conditions aren’t ideal, but it doesn’t make the siding waterproof or maintenance-free.
Here’s what determines which end of the lifespan range your siding lands on:
- Installation quality at the bottom course and trim transitions. This is where most failures begin. More detail on this below, but it’s the single biggest variable in cedar longevity.
- Climate exposure. High-UV climates degrade the finish faster. High-humidity climates increase moisture pressure on the wood. Coastal salt air accelerates both. If your home faces prevailing weather on a southern or western exposure, plan for shorter refinish cycles.
- Finish maintenance schedule. Paint or stain allowed to crack and open doesn’t just look bad — it invites moisture behind the surface. Once that starts, the wood cycles through seasonal moisture changes with increasing intensity.
- Grade and species. STK western red cedar with tight, stable knots outperforms lower-grade boards with loose or missing knots, which create weak points where moisture concentrates.
What Are the Disadvantages of Cedar Board and Batten Siding?
Cedar board and batten has real drawbacks, and you should know what they are before you sign a contract.
- Maintenance is not optional. This is the one that catches most homeowners off guard. Cedar board and batten needs annual inspection and refinishing on a three-to-five-year cycle, shorter in harsh climates. Letting the finish go isn’t a neutral decision; it’s an accelerant. I’ve seen genuine enthusiasm for cedar turn into real regret when homeowners realize what ten years of deferred maintenance looks like up close. It’s not just cosmetic. By the time you can see the damage clearly, the repair scope has usually doubled.
- Higher upfront cost. Cedar costs more than fiber cement and significantly more than vinyl. The gap is real and meaningful for most residential budgets.
- Moisture vulnerability at the bottom edge. The bottom course of board and batten is the most exposed point on the system. Inadequate ground clearance, missing end grain sealing, and poor flashing at the base will allow water to wick into the wood. Rot follows, usually invisibly, until the damage is extensive.
- Wood movement. Cedar expands and contracts with moisture changes. In climates with wide seasonal swings, boards can cup or split at knots if nailing was too rigid or if the wood wasn’t allowed to acclimate before installation. This shows up looking like a material problem. Usually, it’s an installation error.
- Climate limitations in high-humidity regions. Cedar performs best in dry to moderately humid climates. In consistently high-humidity environments, the maintenance burden increases and the lifespan advantage over fiber cement narrows. It’s not impossible to use in those conditions, but the math changes.
- Pest pressure where moisture damage exists. Western red cedar’s natural oils resist most insects. But once boards have softened from moisture damage, that resistance no longer applies.
Cedar Board and Batten Installation: What Homeowners Need to Know
How cedar board and batten is installed determines more about its lifespan than the grade of wood you buy.
I’m not going to walk through the full installation process here; that’s a job for a licensed contractor and a separate guide that goes considerably deeper than this article is designed to go.
What I will cover is what to look for and what to ask before the job starts. The installation decisions that most affect longevity are ones you can evaluate before a single board goes up.
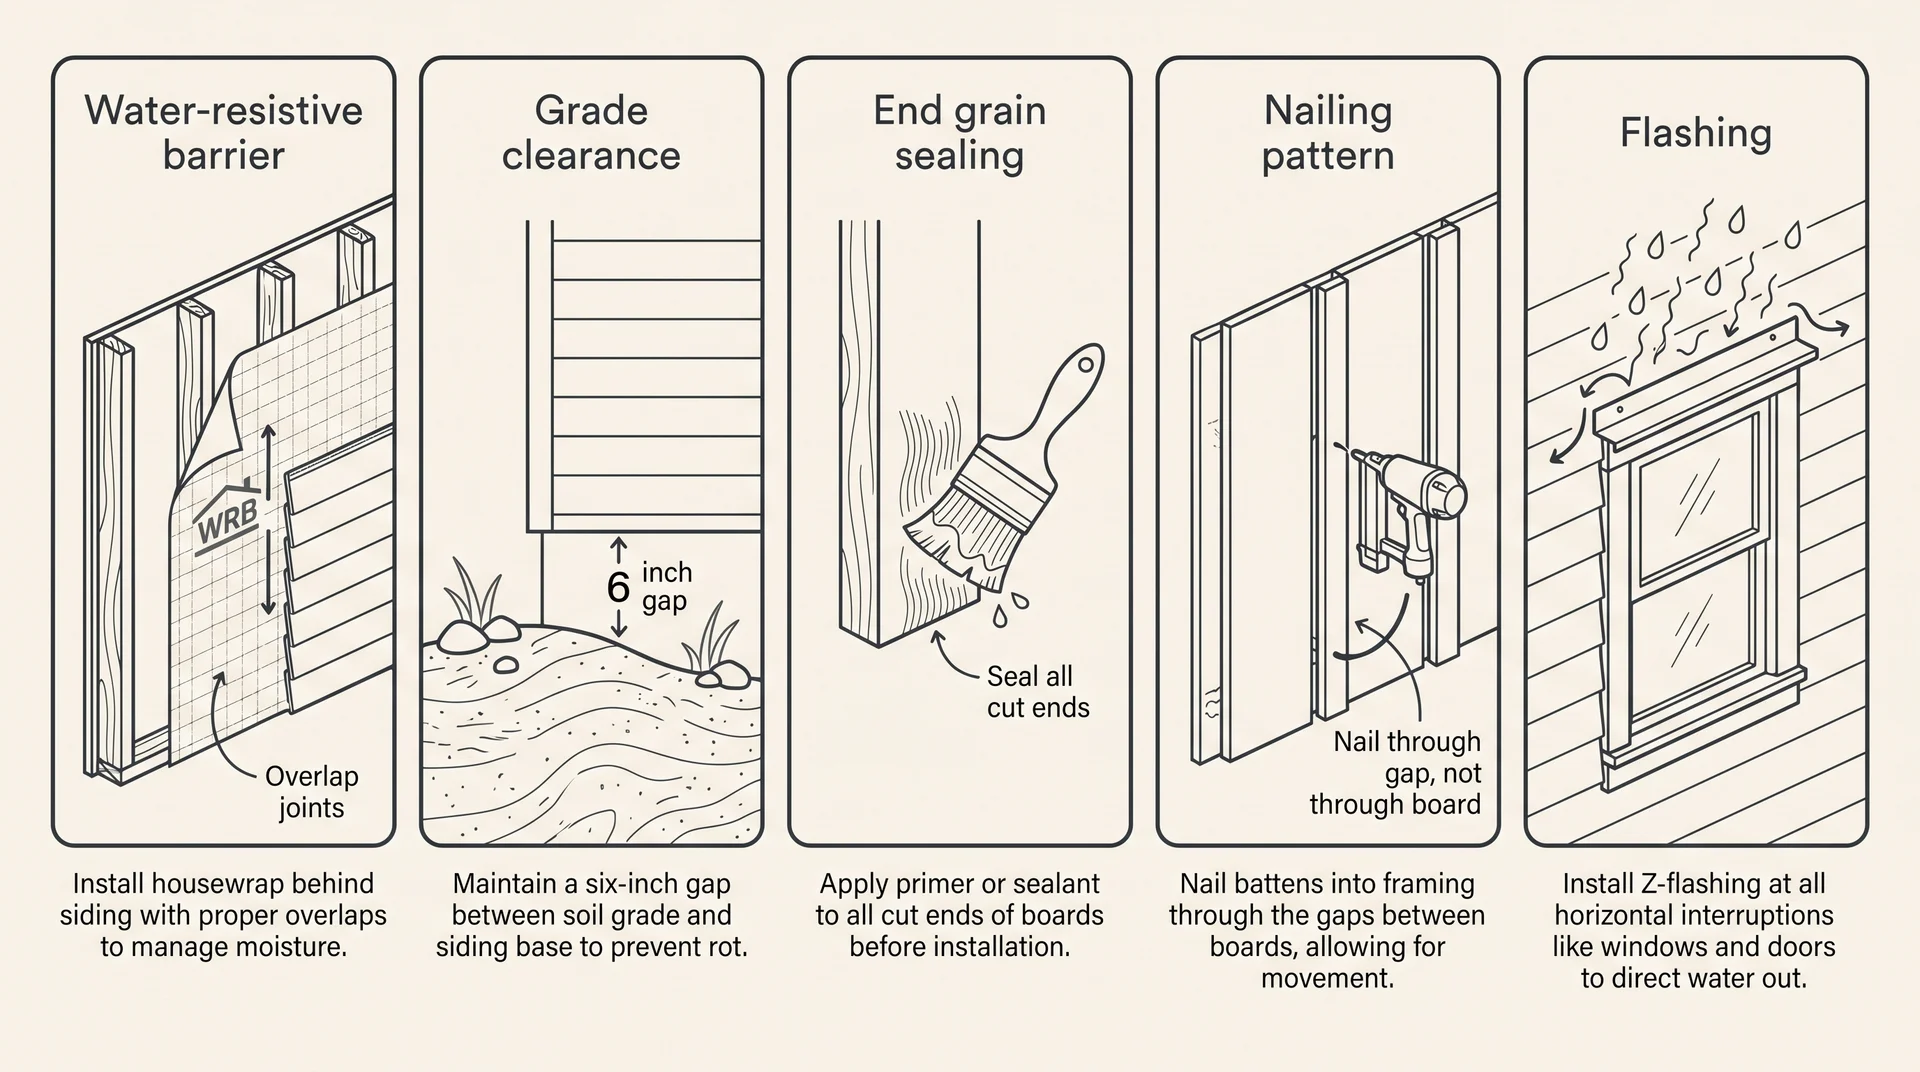
- Housewrap or water-resistive barrier is installed correctly behind the siding. Cedar is the first line of defense, not the only one. Ask your contractor what they’re using and how it’s detailed at windows, doors, and penetrations.
- Minimum six-inch clearance from finished grade to the bottom of the siding. The USDA Forest Products Laboratory recommends at least six inches of clearance from grade for wood siding. Less than that, and you have a slow, invisible moisture problem that compounds over time.
- End grain sealed before installation. The end cuts at the bottom of every board are the most vulnerable surface on the system. Exposed end grain absorbs moisture faster than any face grain and releases it slowly, which accelerates rot from the inside out. End-grain sealing is a simple step that many crews skip because it adds time.
- Correct nailing pattern to allow wood movement. Battens should be nailed through the gap between boards into framing, not through both board and batten simultaneously. Locking both pieces with the same nail prevents the boards from moving naturally with seasonal moisture changes.
- Flashing at all horizontal interruptions. Wherever the siding stops, at window heads, door heads, and horizontal trim bands, there needs to be proper flashing to direct water out and away from the wall assembly. This is the most common infiltration point on otherwise well-built cedar exteriors.
The Bottom Edge Problem Nobody Mentions
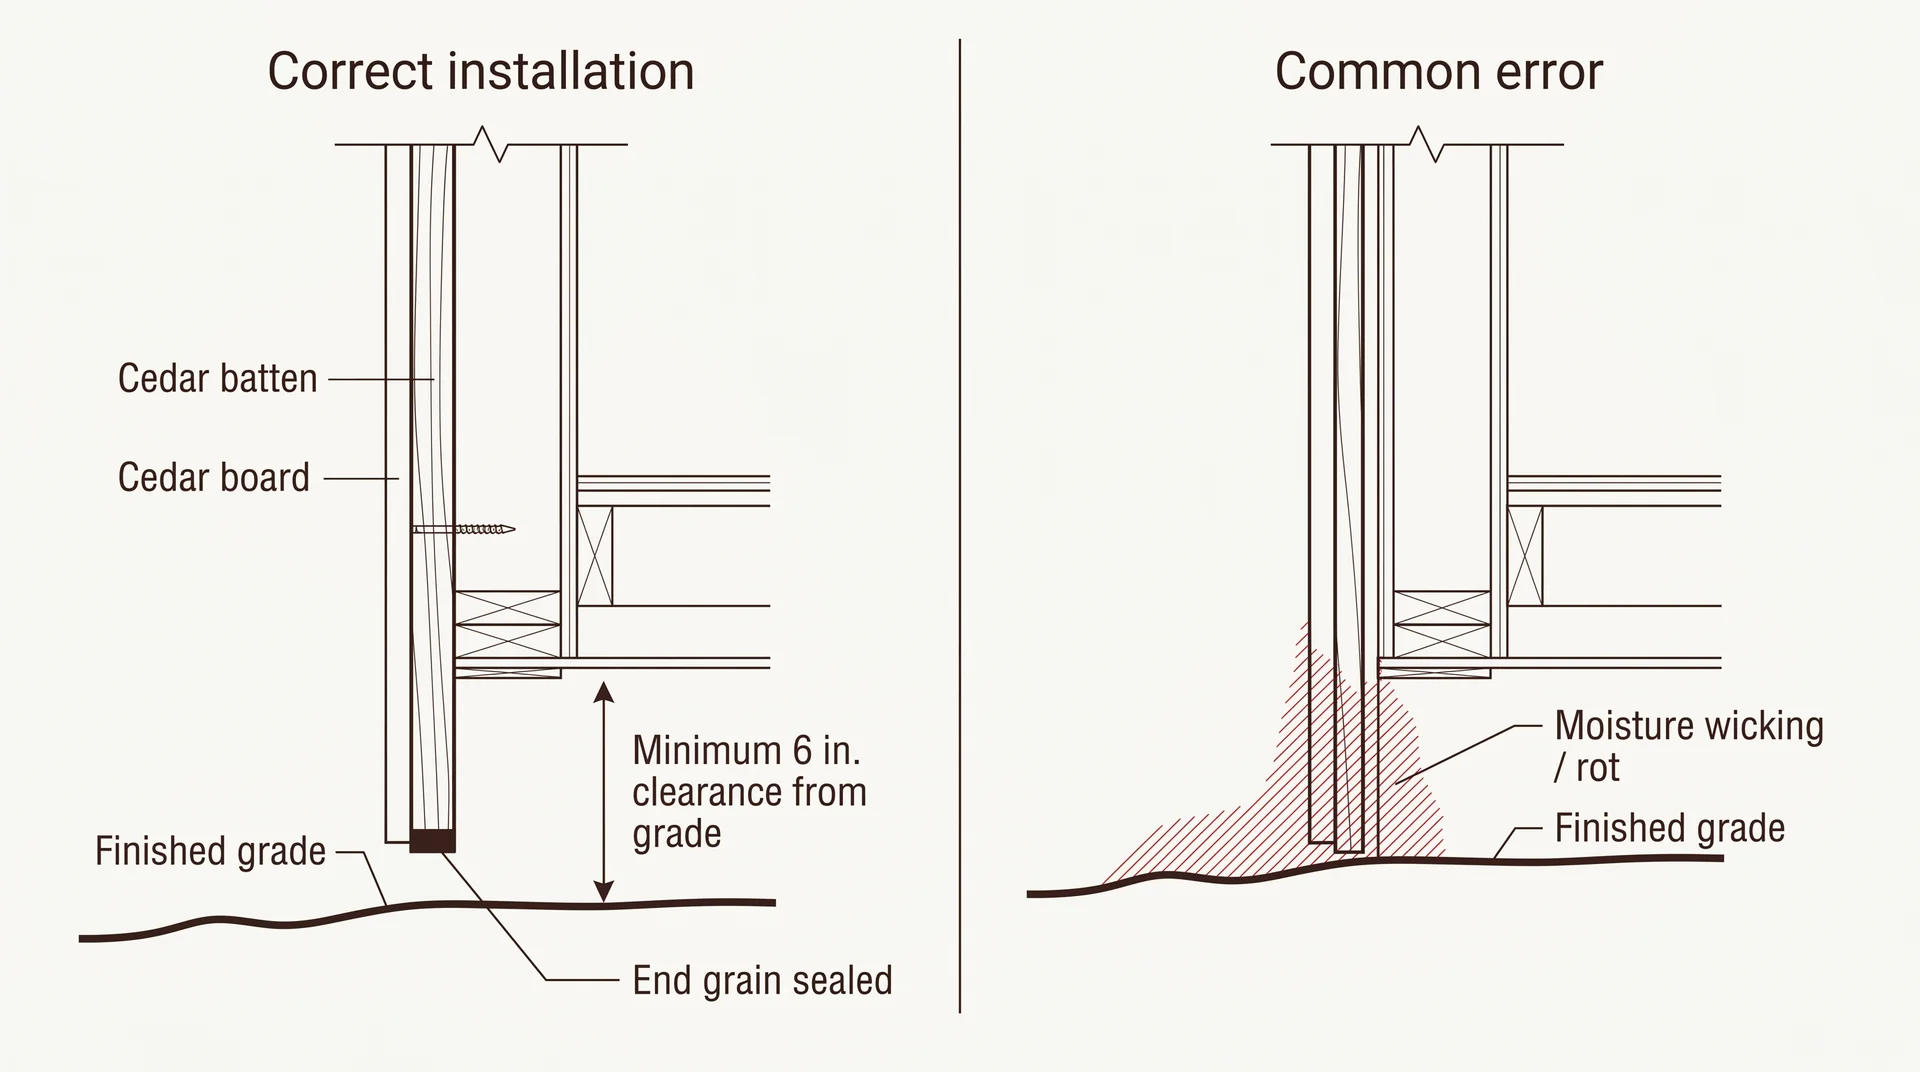
The single most common failure point I’ve seen on cedar board and batten exteriors is the bottom course, specifically where the siding terminates above the foundation or a horizontal trim band.
When the bottom edge sits too close to grade, moisture wicks up from soil and hardscape through the end grain of the boards. The wood absorbs it, the finish softens and opens, and rot sets in from the inside out.
By the time rot is visible at the surface, it has usually traveled further up the board than it appears — sometimes a foot or more.
The fix, once it’s established, is board replacement, not painting over it. That means pulling battens, removing damaged boards, and reintegrating new material with the existing finish.
Spacing, Nailing, and Wood Movement
Cedar needs room to move. Boards installed tightly against each other, or nailed rigidly through both layers, will eventually split or cup as the wood cycles through seasonal moisture changes.
Questions to ask your contractor before the job starts:
- What gap are you leaving between boards before the batten goes on?
- Are the battens nailed through the joint between boards, or through the boards themselves?
- What fasteners are you using, and are they rated for cedar? Some zinc-coated fasteners react with cedar’s tannins and leave dark staining on the face of the boards.
- Did the cedar acclimate on-site long enough before installation?
You don’t need perfect answers. You need to see that your contractor has thought about them.
Maintaining Cedar Board and Batten Siding
Maintenance is the variable that controls almost everything else about cedar’s long-term performance.
That bottom edge discussed in the installation section is where deferred maintenance shows up first. The finish opens at the base, moisture gets in, and the rot that follows is invisible until it’s structural.
A consistent maintenance schedule interrupts that cycle before it starts. Here’s what that schedule actually looks like, not the generic version, but the one that reflects what I’ve seen happen on real houses over real time:
- Annual inspection of the bottom course, window sills, and horizontal trim. Look for paint or stain that’s cracking, peeling, or chalking. Check for any area where a batten has pulled away from the board beneath it. Catching small issues during a walk-around costs nothing.
- Cleaning every one to two years. Mildew and algae grow on north-facing and shaded walls, particularly in humid climates. A low-pressure wash with a mild detergent removes buildup that traps moisture against the finish. High-pressure washing can damage the cedar surface and drive water behind the battens. Keep pressure low and the wand moving continuously.
- Refinishing every three to five years. This is the most important interval in the schedule. Paint or stain allowed to fail doesn’t just look bad; it exposes the wood to moisture infiltration that accelerates degradation far faster than the finish alone degrades. In high-UV or coastal climates, plan for a three-year cycle. In moderate climates, five years is realistic with quality products. If you’re working through exterior color and sheen options for refinishing, exterior paint guides covering color behavior in different light conditions can help narrow the decision before you buy.
- Immediate repair of any cracking, open joints, or pulled battens. Don’t wait for the scheduled cycle if something opens up. An open joint is a moisture pathway.
- Re-seal any cut ends from repair work. If you replace a board or trim a piece on-site, seal the cut end before it goes up. This is the step that gets skipped most often during repairs, and it recreates exactly the vulnerability that causes problems on original installations.
Most advice on cedar longevity treats “properly maintained” as a given. It isn’t. The schedule above is what that phrase actually means in practice. If your household won’t reliably follow it, factor that into the material decision, honestly, before you sign anything.
Cedar vs. Fiber Cement vs. Vinyl Board and Batten: A Quick Comparison
The three most common board and batten materials each suit a different type of homeowner and situation.
I’m not going to do a full profile of fiber cement or vinyl here — each deserves its own honest treatment, and this article is about cedar. But the comparison question is legitimate, and this table should get you to a decision, or at least to a much clearer question.
| Attribute | Cedar Siding | Fiber Cement | Vinyl Siding |
|---|---|---|---|
| Material cost (per sq ft) | $2.50 – $9.00 | $1.50 – $4.00 | $1.00 – $2.50 |
| Installed and finished (per sq ft) | $8.00 – $17.00 | $6.00 – $13.00 | $3.50 – $8.00 |
| Typical lifespan | 30 – 40 years (maintained) | 25 – 40 years | 20 – 30 years |
| Maintenance requirement | High – refinish every 3 – 5 years | Moderate – repaint every 10 – 15 years | Low – periodic cleaning |
| Aesthetic (real wood look) | Authentic grain and texture | Close, particularly when painted | Visibly synthetic at close range |
| Climate suitability | Best in dry to moderate humidity | Works in most climates | Works in most climates |
| Repairability | Individual boards replaceable | Individual planks replaceable | Panels are replaceable; color match fades over time |
If cedar’s cost puts the project outside your comfortable budget, fiber cement is worth a serious look. It delivers most of the visual results for less money upfront, and the maintenance schedule is meaningfully lighter.
Is Cedar Board and Batten Siding Right for Your Home?
Cedar board and batten is the right call for a specific kind of homeowner, and the wrong call for others.
It’s likely a good fit if:
- You live in a dry to moderately humid climate, and your walls will get reasonable sun exposure to dry after rain
- You’re committed to a real maintenance schedule, including refinishing every three to five years as a budget line item, not just an intention
- The authentic look and feel of real wood matters to you, and you’re willing to pay for it over time, not just upfront
- You’re planning to stay in the house long enough to see the material perform. Cedar board and batten rewards owners who stick around and tend to it.
- You’ve found a contractor with specific experience in cedar exterior work, not just siding work generally. Ask for references from Cedar jobs specifically.
It’s probably not the right call if:
- You’re in a consistently high-humidity climate or a coastal zone with significant salt air
- You want a genuinely low-maintenance exterior. Cedar is not that. Vinyl is.
- Your project budget is tight on both the upfront cost and the ongoing maintenance side
I’d take a quality installation of average-grade cedar on a homeowner who’s actually going to maintain it over a premium clear-grade board on a house where the finish schedule will slip.
The material matters less than the commitment to it.
Cedar board and batten siding gives a house a look that’s genuinely hard to replicate in any other material.
But before you commit to it, you need a clear picture of what it actually costs, how long it realistically lasts, and where it fails when it isn’t installed correctly.
That last part is what most guides skip. I’ve been working residential exteriors for more than 15 years, and cedar board and batten is one of the products that gets oversold on aesthetics and undersold on what it requires.
This guide covers both.
What Is Cedar Board and Batten Siding?
Cedar board and batten siding is a vertical wood siding system made from wide cedar planks, called the boards, with narrower strips called battens nailed over the seams between them.
- The boards are typically 8 to 12 inches wide.
- The battens run 2 to 3 inches wide and sit centered over each joint.
The result is a clean vertical line that works on a modern farmhouse, a cabin, and a craftsman build with equal ease.
It’s one of the oldest exterior siding patterns in American residential construction.
What’s kept it relevant is that the proportions work at almost any scale, and real wood has a texture and warmth that manufactured alternatives don’t quite match.
How Board and Batten Differs from Other Siding Styles
Most common siding profiles run horizontally. Cedar board and batten runs vertically, which changes how the wall reads visually and how water moves across the surface.
- Lap siding (horizontal): Boards overlap from top to bottom and water sheds by gravity along each course. It’s a forgiving profile for installation and tolerates moderate maintenance neglect better than a vertical system does.
- Shiplap: Boards interlock at the edges with a rabbet cut. Tighter than board and batten, but without the same shadow line depth or visual weight.
- Board and batten: Water runs down the face of the boards and must clear the bottom edge cleanly. The battens cover the joints but don’t seal them. Proper installation and finish maintenance matter more here than with most horizontal profiles, a point worth keeping in mind throughout this piece.
- Reverse board and batten: The same system run inverted, with narrow boards over wide batten, creating a recessed groove instead of a raised strip. Less common, but worth knowing if you’ve seen the look on contemporary or shed-style builds and wondered what it was.
- Shingles or shakes: Individual pieces in overlapping rows. More texture, more labor to install, and more pieces to replace when damage occurs.
Western Red Cedar vs. Eastern Red Cedar: Which One Is Used?
For board and batten siding, western red cedar is the standard, and it’s the better choice.
Eastern red cedar, also called aromatic cedar, is denser and harder, but it’s more prone to checking and harder to finish consistently.
It’s also difficult to source in the long, clear lengths that exterior siding requires. Western red cedar, sourced primarily from the Pacific Northwest and British Columbia, is naturally resistant to decay and insects.
The Western Red Cedar Lumber Association grades it for exterior use, and it holds paint and stain well when properly prepared. When you see “cedar board and batten siding” in a supplier’s listing or a contractor’s bid, western red cedar is almost always what they mean.
Why Cedar Board and Batten Is Worth Considering
Western red cedar is one of the few wood species genuinely suited to long-term exterior exposure without chemical treatment. That advantage runs deeper than aesthetics.
- Natural decay resistance: Western red cedar contains natural oils that resist rot and insect damage. The Western Red Cedar Lumber Association classifies it as naturally durable, which means it performs well even when the finish isn’t perfect. That said, natural resistance is not a reason to be careless about maintenance. The oils buy time. They don’t replace a finish schedule, and they don’t protect end grain that was never sealed in the first place.
- Dimensional stability: Cedar moves less with moisture changes than pine or spruce, which matters enormously in a vertical siding system where seasonal movement can open joints and split boards over time. This is one of the reasons cedar became the default for board and batten work historically, and it’s still the most practical argument for it today.
- Finish acceptance: Cedar takes paint and stain exceptionally well, solid-color paint, semi-transparent stains that let the grain show through, or clear sealers for a natural look. The results hold longer on cedar than on most other exterior woods when the surface is properly prepped.
- Repairability: Individual boards or battens can be replaced without touching the rest of the wall. That matters more than people expect.
- Longevity with maintenance: A well-installed, consistently maintained cedar exterior can last 30 to 40 years. The operative word is maintained.
The Real Cost of Cedar Board and Batten Siding
Cedar board and batten siding costs more than most homeowners expect, especially once finishing and labor are factored in separately.
The ranges below reflect typical US market figures consistent with National Association of Home Builders cost benchmarks.
Regional pricing, story height, trim complexity, and whether cedar arrives primed or raw will all affect your actual quote.
Use these as a planning baseline, not a budget ceiling. Always get at least three contractor bids before committing to a project budget.
Material Cost per Square Foot
Cedar pricing varies significantly by grade. STK (Select Tight Knot) is the most commonly specified exterior grade and the most affordable. Clear grades cost more and are typically reserved for high-visibility applications or premium builds.
| Cedar Grade | Typical Material Cost (per sq ft) | Best For |
|---|---|---|
| STK (Select Tight Knot) | $2.50 – $5.00 | Most residential applications |
| Clear (A or B grade) | $5.00 – $9.00 | High-visibility walls, premium builds |
| Prefinished / factory-primed | $6.00 – $11.00 | Faster installation, better end grain coverage |
STK is the right call for most projects. The knots are tight and stable, the grade holds finish well, and the cost difference over clear cedar is meaningful on any job larger than an accent wall.
Labor and Installation Costs
Labor for cedar board and batten runs roughly $3.00 to $6.00 per square foot, depending on your region and the complexity of the job. Multi-story installations cost more. Homes with significant window and door trim cost more.
Factors that push labor toward the high end of that range:
- Second or third-story walls requiring scaffolding
- Complex rooflines or gable ends with numerous angle cuts
- Removal and disposal of existing siding before new installation begins
- Homes with many windows and doors, each requiring precise flashing and trim integration
Finishing and Priming: The Line Item Homeowners Skip
Unfinished cedar board and batten will fail faster than finished cedar, and the cost of correcting that failure is far higher than doing it right from the start.
Primer and finish coats add roughly $1.00 to $2.50 per square foot on top of material and labor.
If your contractor’s quote doesn’t include it, ask specifically where it falls in the budget. Prefinished cedar, where the boards arrive factory-primed on all four sides, including end grain, costs more per board but often reduces total project cost when you account for on-site finishing time.
It also delivers better end-grain sealing than field priming usually does.
Most contractors won’t volunteer that comparison, and I think that’s a real disservice to homeowners trying to make an honest budget decision.
If you’re deciding between raw and prefinished cedar, ask to see the total installed cost for both, not just the material price.
If you’re thinking through exterior color options alongside your siding material decision, guides like this one on exterior paint color for siding can help narrow the finish direction before you commit to a product.
Total installed cost, including materials, labor, and finishing, typically runs $8.00 to $17.00 per square foot. West Coast and Northeast markets tend toward the top of that range. Mid-South and Mountain West markets generally come in lower.
How Long Does Cedar Board and Batten Siding Last?
Properly installed and consistently maintained cedar board and batten siding lasts 30 to 40 years.
Without adequate maintenance, expect significant deterioration by year 15 to 20, and sometimes earlier, depending on climate and installation quality.
I’ll be honest here: predicting exactly how long cedar board and batten will last on any specific house is genuinely difficult.
Climate, installation quality, wood grade, and how faithfully the finish schedule is followed all interact in ways that make precise numbers hard to call. The range above assumes competent installation and a real commitment to maintenance. Those aren’t always givens.
According to the USDA Forest Products Laboratory, the primary drivers of premature wood siding failure are moisture infiltration and finish degradation, not the wood itself.
Cedar’s natural decay resistance buys time when conditions aren’t ideal, but it doesn’t make the siding waterproof or maintenance-free.
Here’s what determines which end of the lifespan range your siding lands on:
- Installation quality at the bottom course and trim transitions. This is where most failures begin. More detail on this below, but it’s the single biggest variable in cedar longevity.
- Climate exposure. High-UV climates degrade the finish faster. High-humidity climates increase moisture pressure on the wood. Coastal salt air accelerates both. If your home faces prevailing weather on a southern or western exposure, plan for shorter refinish cycles.
- Finish maintenance schedule. Paint or stain allowed to crack and open doesn’t just look bad — it invites moisture behind the surface. Once that starts, the wood cycles through seasonal moisture changes with increasing intensity.
- Grade and species. STK western red cedar with tight, stable knots outperforms lower-grade boards with loose or missing knots, which create weak points where moisture concentrates.
What Are the Disadvantages of Cedar Board and Batten Siding?
Cedar board and batten has real drawbacks, and you should know what they are before you sign a contract.
- Maintenance is not optional. This is the one that catches most homeowners off guard. Cedar board and batten needs annual inspection and refinishing on a three-to-five-year cycle, shorter in harsh climates. Letting the finish go isn’t a neutral decision; it’s an accelerant. I’ve seen genuine enthusiasm for cedar turn into real regret when homeowners realize what ten years of deferred maintenance looks like up close. It’s not just cosmetic. By the time you can see the damage clearly, the repair scope has usually doubled.
- Higher upfront cost. Cedar costs more than fiber cement and significantly more than vinyl. The gap is real and meaningful for most residential budgets.
- Moisture vulnerability at the bottom edge. The bottom course of board and batten is the most exposed point on the system. Inadequate ground clearance, missing end grain sealing, and poor flashing at the base will allow water to wick into the wood. Rot follows, usually invisibly, until the damage is extensive.
- Wood movement. Cedar expands and contracts with moisture changes. In climates with wide seasonal swings, boards can cup or split at knots if nailing was too rigid or if the wood wasn’t allowed to acclimate before installation. This shows up looking like a material problem. Usually, it’s an installation error.
- Climate limitations in high-humidity regions. Cedar performs best in dry to moderately humid climates. In consistently high-humidity environments, the maintenance burden increases and the lifespan advantage over fiber cement narrows. It’s not impossible to use in those conditions, but the math changes.
- Pest pressure where moisture damage exists. Western red cedar’s natural oils resist most insects. But once boards have softened from moisture damage, that resistance no longer applies.
Cedar Board and Batten Installation: What Homeowners Need to Know
How cedar board and batten is installed determines more about its lifespan than the grade of wood you buy.
I’m not going to walk through the full installation process here; that’s a job for a licensed contractor and a separate guide that goes considerably deeper than this article is designed to go.
What I will cover is what to look for and what to ask before the job starts. The installation decisions that most affect longevity are ones you can evaluate before a single board goes up.
- Housewrap or water-resistive barrier is installed correctly behind the siding. Cedar is the first line of defense, not the only one. Ask your contractor what they’re using and how it’s detailed at windows, doors, and penetrations.
- Minimum six-inch clearance from finished grade to the bottom of the siding. The USDA Forest Products Laboratory recommends at least six inches of clearance from grade for wood siding. Less than that, and you have a slow, invisible moisture problem that compounds over time.
- End grain sealed before installation. The end cuts at the bottom of every board are the most vulnerable surface on the system. Exposed end grain absorbs moisture faster than any face grain and releases it slowly, which accelerates rot from the inside out. End-grain sealing is a simple step that many crews skip because it adds time.
- Correct nailing pattern to allow wood movement. Battens should be nailed through the gap between boards into framing, not through both board and batten simultaneously. Locking both pieces with the same nail prevents the boards from moving naturally with seasonal moisture changes.
- Flashing at all horizontal interruptions. Wherever the siding stops, at window heads, door heads, and horizontal trim bands, there needs to be proper flashing to direct water out and away from the wall assembly. This is the most common infiltration point on otherwise well-built cedar exteriors.
The Bottom Edge Problem Nobody Mentions
The single most common failure point I’ve seen on cedar board and batten exteriors is the bottom course, specifically where the siding terminates above the foundation or a horizontal trim band.
When the bottom edge sits too close to grade, moisture wicks up from soil and hardscape through the end grain of the boards. The wood absorbs it, the finish softens and opens, and rot sets in from the inside out.
By the time rot is visible at the surface, it has usually traveled further up the board than it appears — sometimes a foot or more.
The fix, once it’s established, is board replacement, not painting over it. That means pulling battens, removing damaged boards, and reintegrating new material with the existing finish.
Spacing, Nailing, and Wood Movement
Cedar needs room to move. Boards installed tightly against each other, or nailed rigidly through both layers, will eventually split or cup as the wood cycles through seasonal moisture changes.
Questions to ask your contractor before the job starts:
- What gap are you leaving between boards before the batten goes on?
- Are the battens nailed through the joint between boards, or through the boards themselves?
- What fasteners are you using, and are they rated for cedar? Some zinc-coated fasteners react with cedar’s tannins and leave dark staining on the face of the boards.
- Did the cedar acclimate on-site long enough before installation?
You don’t need perfect answers. You need to see that your contractor has thought about them.
Maintaining Cedar Board and Batten Siding
Maintenance is the variable that controls almost everything else about cedar’s long-term performance.
That bottom edge discussed in the installation section is where deferred maintenance shows up first. The finish opens at the base, moisture gets in, and the rot that follows is invisible until it’s structural.
A consistent maintenance schedule interrupts that cycle before it starts. Here’s what that schedule actually looks like, not the generic version, but the one that reflects what I’ve seen happen on real houses over real time:
- Annual inspection of the bottom course, window sills, and horizontal trim. Look for paint or stain that’s cracking, peeling, or chalking. Check for any area where a batten has pulled away from the board beneath it. Catching small issues during a walk-around costs nothing.
- Cleaning every one to two years. Mildew and algae grow on north-facing and shaded walls, particularly in humid climates. A low-pressure wash with a mild detergent removes buildup that traps moisture against the finish. High-pressure washing can damage the cedar surface and drive water behind the battens. Keep pressure low and the wand moving continuously.
- Refinishing every three to five years. This is the most important interval in the schedule. Paint or stain allowed to fail doesn’t just look bad; it exposes the wood to moisture infiltration that accelerates degradation far faster than the finish alone degrades. In high-UV or coastal climates, plan for a three-year cycle. In moderate climates, five years is realistic with quality products. If you’re working through exterior color and sheen options for refinishing, exterior paint guides covering color behavior in different light conditions can help narrow the decision before you buy.
- Immediate repair of any cracking, open joints, or pulled battens. Don’t wait for the scheduled cycle if something opens up. An open joint is a moisture pathway.
- Re-seal any cut ends from repair work. If you replace a board or trim a piece on-site, seal the cut end before it goes up. This is the step that gets skipped most often during repairs, and it recreates exactly the vulnerability that causes problems on original installations.
Most advice on cedar longevity treats “properly maintained” as a given. It isn’t. The schedule above is what that phrase actually means in practice. If your household won’t reliably follow it, factor that into the material decision, honestly, before you sign anything.
Cedar vs. Fiber Cement vs. Vinyl Board and Batten: A Quick Comparison
The three most common board and batten materials each suit a different type of homeowner and situation.
I’m not going to do a full profile of fiber cement or vinyl here — each deserves its own honest treatment, and this article is about cedar. But the comparison question is legitimate, and this table should get you to a decision, or at least to a much clearer question.
| Attribute | Cedar Siding | Fiber Cement | Vinyl Siding |
|---|---|---|---|
| Material cost (per sq ft) | $2.50 – $9.00 | $1.50 – $4.00 | $1.00 – $2.50 |
| Installed and finished (per sq ft) | $8.00 – $17.00 | $6.00 – $13.00 | $3.50 – $8.00 |
| Typical lifespan | 30 – 40 years (maintained) | 25 – 40 years | 20 – 30 years |
| Maintenance requirement | High – refinish every 3 – 5 years | Moderate – repaint every 10 – 15 years | Low – periodic cleaning |
| Aesthetic (real wood look) | Authentic grain and texture | Close, particularly when painted | Visibly synthetic at close range |
| Climate suitability | Best in dry to moderate humidity | Works in most climates | Works in most climates |
| Repairability | Individual boards replaceable | Individual planks replaceable | Panels are replaceable; color match fades over time |
If cedar’s cost puts the project outside your comfortable budget, fiber cement is worth a serious look. It delivers most of the visual results for less money upfront, and the maintenance schedule is meaningfully lighter.
Is Cedar Board and Batten Siding Right for Your Home?
Cedar board and batten is the right call for a specific kind of homeowner, and the wrong call for others.
It’s likely a good fit if:
- You live in a dry to moderately humid climate, and your walls will get reasonable sun exposure to dry after rain
- You’re committed to a real maintenance schedule, including refinishing every three to five years as a budget line item, not just an intention
- The authentic look and feel of real wood matters to you, and you’re willing to pay for it over time, not just upfront
- You’re planning to stay in the house long enough to see the material perform. Cedar board and batten rewards owners who stick around and tend to it.
- You’ve found a contractor with specific experience in cedar exterior work, not just siding work generally. Ask for references from Cedar jobs specifically.
It’s probably not the right call if:
- You’re in a consistently high-humidity climate or a coastal zone with significant salt air
- You want a genuinely low-maintenance exterior. Cedar is not that. Vinyl is.
- Your project budget is tight on both the upfront cost and the ongoing maintenance side
I’d take a quality installation of average-grade cedar on a homeowner who’s actually going to maintain it over a premium clear-grade board on a house where the finish schedule will slip.
The material matters less than the commitment to it.